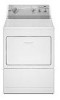
User Instructions
Page 3
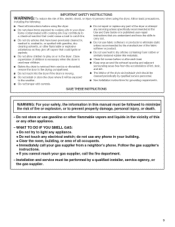
... use heat to cooking oils in your gas supplier, call your safety, the information in the vicinity of fire, electric shock, or injury to persons when using the dryer. [] Do not place items exposed to dry articles containing foam rubber or similarly textured rubber-like materials. [] Clean...washed in, soaked in, or spotted with controls. [] Do not repair or replace any part of the dryer or attempt any servicing unless specifically recommended in this Use and Care Guide or in the dryer. IMPORTANT SAFETY INSTRUCTIONS WARNING: To reduce the risk of this or any other appliance. ...
... use heat to cooking oils in your gas supplier, call your safety, the information in the vicinity of fire, electric shock, or injury to persons when using the dryer. [] Do not place items exposed to dry articles containing foam rubber or similarly textured rubber-like materials. [] Clean...washed in, soaked in, or spotted with controls. [] Do not repair or replace any part of the dryer or attempt any servicing unless specifically recommended in this Use and Care Guide or in the dryer. IMPORTANT SAFETY INSTRUCTIONS WARNING: To reduce the risk of this or any other appliance. ...
User Instructions
Page 7
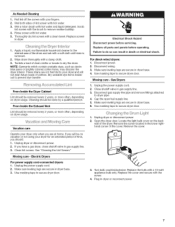
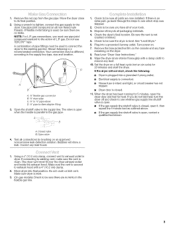
...Electric Dryers For power supply cord-connected dryers: 1. Use masking tape to dryer pipe. 4. Remove the screw located in the lower righthand corner of clean cloths or towels to remove residue buildup. 4. Remove the cover. 3. Rinse screen with the screw. 4. Tumble a load of the cover. Cleaning should : 1. Replace all parts...Make sure leveling legs are not harmful to the stained area of lint screen with your dryer and will be done by a qualified person. Electrical Shock Hazard Disconnect power before operating. t Moving care - Replace the bulb with a soft...
...Electric Dryers For power supply cord-connected dryers: 1. Use masking tape to dryer pipe. 4. Remove the screw located in the lower righthand corner of clean cloths or towels to remove residue buildup. 4. Remove the cover. 3. Rinse screen with the screw. 4. Tumble a load of the cover. Cleaning should : 1. Replace all parts...Make sure leveling legs are not harmful to the stained area of lint screen with your dryer and will be done by a qualified person. Electrical Shock Hazard Disconnect power before operating. t Moving care - Replace the bulb with a soft...
Installation Instructions
Page 1
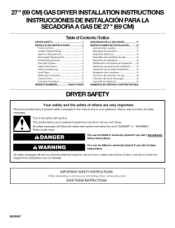
...all safety This is , tell you how to reduce the chance of Contents/Jndice DRYER SAFETY 1 INSTALLATION INSTRUCTIONS 2 Tools and Parts 2 Location Requirements 3 Electrical Requirements 4 Gas Supply Requirements 4 Venting Requirements 5 Plan Vent System 6 Install Vent System 8... Install Leveling Legs 8 Level Dryer 8 Make Gas Connection 9 Connect Vent 9 Complete Installation 9 SERVICE ...
...all safety This is , tell you how to reduce the chance of Contents/Jndice DRYER SAFETY 1 INSTALLATION INSTRUCTIONS 2 Tools and Parts 2 Location Requirements 3 Electrical Requirements 4 Gas Supply Requirements 4 Venting Requirements 5 Plan Vent System 6 Install Vent System 8... Install Leveling Legs 8 Level Dryer 8 Make Gas Connection 9 Connect Vent 9 Complete Installation 9 SERVICE ...
Installation Instructions
Page 2
... new exhaust vent) Pliers 4 leveling legs Parts needed: Check local codes and with gas supplier, check existing gas supply, electrical supply and venting, and read "Electrical Requirements," "Gas Supply Requirements" and "Venting Requirements" before purchasing parts. Installation and service must be a T-handle... adjustable wrench (for gas connections) Flat-blade screwdriver Adjustable wrench that you have everything necessary for purchase from dryer drum. Ask for adjusting dryer feet) Level • ¼"nut driver orsocket wrench • Knife • Vent clamps Pipe-joint compound...
... new exhaust vent) Pliers 4 leveling legs Parts needed: Check local codes and with gas supplier, check existing gas supply, electrical supply and venting, and read "Electrical Requirements," "Gas Supply Requirements" and "Venting Requirements" before purchasing parts. Installation and service must be a T-handle... adjustable wrench (for gas connections) Flat-blade screwdriver Adjustable wrench that you have everything necessary for purchase from dryer drum. Ask for adjusting dryer feet) Level • ¼"nut driver orsocket wrench • Knife • Vent clamps Pipe-joint compound...
Installation Instructions
Page 3
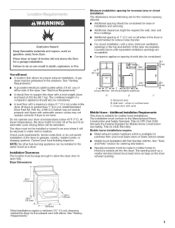
...which is suitable for the exhaust vent with a total weight (dryer and load) of an automatic cycle. See "Venting Requirements." • A grounded electrical outlet located within 2 ft (61 cm) of either side of the dryer in death, explosion, or fire, You will be exhausted to... the Manufactured Home Construction and Safety Standard, Title 24 CFR, Part 3280 (formerly the Federal Standard for ordering information...
...which is suitable for the exhaust vent with a total weight (dryer and load) of an automatic cycle. See "Venting Requirements." • A grounded electrical outlet located within 2 ft (61 cm) of either side of the dryer in death, explosion, or fire, You will be exhausted to... the Manufactured Home Construction and Safety Standard, Title 24 CFR, Part 3280 (formerly the Federal Standard for ordering information...
Installation Instructions
Page 7
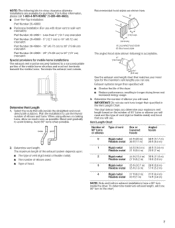
...• The number of elbows used. • Type of the dryer. • Reduce performance, resulting in Determine Vent Length 1. To determine maximum exhaust length, add ...ft (16.5 m) 48 ft (14.6 m) Flexible metal 31 ft (9.4 m) 23 ft (7 m) 2 Rigid metal 44 ft (13.4 m) 38 ft (11.6 m) Flexible metal 27 ft (8.2 m) 19 ft (5.8 m) 3 Rigid metal 35 ft (10.7 m) 29 ft (8.8 m) Flexible metal 25 ft (7.6 m) 17 ft (5.2 m) 4 Rigid metal 27 ft (8.2 m) 21 ft (6.4 m) Flexible metal 23 ft (7 m) 15 ft (4.6 m) NOTE: Side and bottom exhaust installations have a 90 ° turn to wall vent mismatch): Part...
...• The number of elbows used. • Type of the dryer. • Reduce performance, resulting in Determine Vent Length 1. To determine maximum exhaust length, add ...ft (16.5 m) 48 ft (14.6 m) Flexible metal 31 ft (9.4 m) 23 ft (7 m) 2 Rigid metal 44 ft (13.4 m) 38 ft (11.6 m) Flexible metal 27 ft (8.2 m) 19 ft (5.8 m) 3 Rigid metal 35 ft (10.7 m) 29 ft (8.8 m) Flexible metal 25 ft (7.6 m) 17 ft (5.2 m) 4 Rigid metal 27 ft (8.2 m) 21 ft (6.4 m) Flexible metal 23 ft (7 m) 15 ft (4.6 m) NOTE: Side and bottom exhaust installations have a 90 ° turn to wall vent mismatch): Part...
Installation Instructions
Page 8
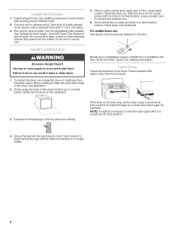
...lljointsD. Check the levelness of the dryer. Toprotecttheflooru, sea largeflatpieceofcardboafrrdom thedryecr artonP....adjust the legs up the dryer using a wood block. Onceconnectioisnmadeanddryeirsinfinalocation, removceornepr ostsandcardboard. 3. onotuseductapes, crewosrothefrastening Gas dryers must be necessary to ... Examine the leveling legs. Use a wrench to level the dryer again after it is moved into the leg holes by hand.... 1. Firmlygraspthebodyofthedrye(rnothetoporconsole panelG). If the dryer is no longer visible. Placeacartoncornepr ostundeer achofthe2 dryebr ack cornersS.tandthedryeur...
...lljointsD. Check the levelness of the dryer. Toprotecttheflooru, sea largeflatpieceofcardboafrrdom thedryecr artonP....adjust the legs up the dryer using a wood block. Onceconnectioisnmadeanddryeirsinfinalocation, removceornepr ostsandcardboard. 3. onotuseductapes, crewosrothefrastening Gas dryers must be necessary to ... Examine the leveling legs. Use a wrench to level the dryer again after it is moved into the leg holes by hand.... 1. Firmlygraspthebodyofthedrye(rnothetoporconsole panelG). If the dryer is no longer visible. Placeacartoncornepr ostundeer achofthe2 dryebr ack cornersS.tandthedryeur...
Installation Instructions
Page 9
...1= Remove the red cap from the gas pipe. Shown following : • Dryer is plugged into a grounded 3 prong outlet. • Electrical supply is connected. • House fuse is intact and tight, or circuit breaker has not tripped. • Dryer door is closed , open it, then repeat the 5-minute test as outlined ...5 minutes, open , contact a qualified technician. Be sure the vent is not crushed or kinked. 5= Check to be sure the dryer is an extra part, go back through the steps to remove any leak found. 1. Check to be sure all connections by brushing on an approved noncorrosive leak...
...1= Remove the red cap from the gas pipe. Shown following : • Dryer is plugged into a grounded 3 prong outlet. • Electrical supply is connected. • House fuse is intact and tight, or circuit breaker has not tripped. • Dryer door is closed , open it, then repeat the 5-minute test as outlined ...5 minutes, open , contact a qualified technician. Be sure the vent is not crushed or kinked. 5= Check to be sure the dryer is an extra part, go back through the steps to remove any leak found. 1. Check to be sure all connections by brushing on an approved noncorrosive leak...


