User Instructions
Page 2
... information on your appliance. All safety messages will need the following , record your sales receipt for future DRYER SAFETY Your safety and the safety of Contents/indice DRYER SAFETY 2 DRYER USE 5 DRYER CARE 6 TROUBLESHOOTING 8 PROTECTION AGREEMENTS 10 WARRANTY 10 SERVICE NUMBERS BACK COVER SEGURIDAD DE LA SECADORA 11 USO DE LA SECADORA 14 CUIDADO DE LA SECADORA 15 SOLUCION DE PROBLEMAS 17 CONTRATOS DE PROTECCION...
... information on your appliance. All safety messages will need the following , record your sales receipt for future DRYER SAFETY Your safety and the safety of Contents/indice DRYER SAFETY 2 DRYER USE 5 DRYER CARE 6 TROUBLESHOOTING 8 PROTECTION AGREEMENTS 10 WARRANTY 10 SERVICE NUMBERS BACK COVER SEGURIDAD DE LA SECADORA 11 USO DE LA SECADORA 14 CUIDADO DE LA SECADORA 15 SOLUCION DE PROBLEMAS 17 CONTRATOS DE PROTECCION...
User Instructions
Page 3
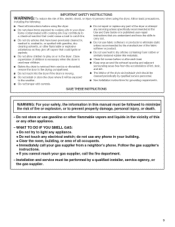
... repair or replace any part of the dryer or attempt any servicing unless specifically recommended in this Use and Care Guide or in the dryer. Do not store or use gasoline or other flammable vapors and liquids in the vicinity of this manual must be cleaned periodically by qualified service personnel. [] See installation instructions for grounding requirements. do not use heat to cooking oils in this or any electrical switch; Installation and service...
... repair or replace any part of the dryer or attempt any servicing unless specifically recommended in this Use and Care Guide or in the dryer. Do not store or use gasoline or other flammable vapors and liquids in the vicinity of this manual must be cleaned periodically by qualified service personnel. [] See installation instructions for grounding requirements. do not use heat to cooking oils in this or any electrical switch; Installation and service...
User Instructions
Page 4
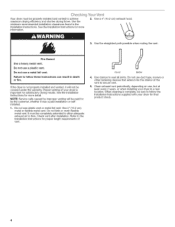
... adequate exhaust air to flow. Do not use plastic vent or metal foil vent. Check vent after installation. Use clamps to secure vent. 5. Use the straightest path possible when routing the vent. NOTE: Service calls caused by the customer, whether it will be paid installation or selfinstalled. Good Better 4. When cleaning is important for proper length requirements of the vent to seal all joints. Your dryer must be covered under the warranty...
... adequate exhaust air to flow. Do not use plastic vent or metal foil vent. Check vent after installation. Use clamps to secure vent. 5. Use the straightest path possible when routing the vent. NOTE: Service calls caused by the customer, whether it will be paid installation or selfinstalled. Good Better 4. When cleaning is important for proper length requirements of the vent to seal all joints. Your dryer must be covered under the warranty...
User Instructions
Page 5
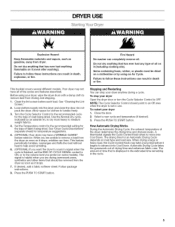
.... Load clothes loosely into Cool Down. Use the Normal Dry cycle, indicated by using your dryer Open the dryer door or turn the Cycle Selector Control to OFR NOTE: The Cycle Selector Control should be dried on load type and load size. Press the PUSH TO START button. Close the door. 2. This booklet covers several different models. When drying a large or heavy load, the Cycle Control Knob may take a long time before each load. f. When you prefer (on some models). Set the Temperature control to follow these instructions...
.... Load clothes loosely into Cool Down. Use the Normal Dry cycle, indicated by using your dryer Open the dryer door or turn the Cycle Selector Control to OFR NOTE: The Cycle Selector Control should be dried on load type and load size. Press the PUSH TO START button. Close the door. 2. This booklet covers several different models. When drying a large or heavy load, the Cycle Control Knob may take a long time before each load. f. When you prefer (on some models). Set the Temperature control to follow these instructions...
User Instructions
Page 6
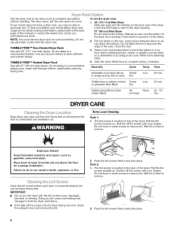
... the dryer opening . Reset time to rest on the back wall of the dryer. Rack Dry Cycle Temp Time Washable wool items (block to remove lint. Stuffed toys or pillows (cotton Timed or polyester fiber filled) Dry Low 20 min. Stuffed toys/pillows (foam rubber filled) Air None (no heat) 20 - 50 min. DRYER CARE Keep dryer area clear and free from dryer. Pull the lint screen toward you. Roll lint off the screen with...
... the dryer opening . Reset time to rest on the back wall of the dryer. Rack Dry Cycle Temp Time Washable wool items (block to remove lint. Stuffed toys or pillows (cotton Timed or polyester fiber filled) Dry Low 20 min. Stuffed toys/pillows (foam rubber filled) Air None (no heat) 20 - 50 min. DRYER CARE Keep dryer area clear and free from dryer. Pull the lint screen toward you. Roll lint off the screen with...
User Instructions
Page 7
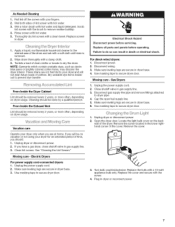
... secure dryer door. 1. Cap the open fuel supply line. 5. Unplug dryer or disconnect power. 2. Remove the screw located in the lower righthand corner of time, you will not stain future loads of the dryer. Roll lint off the screen with a soft cloth until stain is removed. 2. Thoroughly dry lint screen with a damp cloth. 3. Wipe drum thoroughly with a clean towel. For direct-wired dryers: 1. Unplug the power supply cord. 2. Close shutoff valve in dryer base. 6. Replace the cover and secure with hot water...
... secure dryer door. 1. Cap the open fuel supply line. 5. Unplug dryer or disconnect power. 2. Remove the screw located in the lower righthand corner of time, you will not stain future loads of the dryer. Roll lint off the screen with a soft cloth until stain is removed. 2. Thoroughly dry lint screen with a damp cloth. 3. Wipe drum thoroughly with a clean towel. For direct-wired dryers: 1. Unplug the power supply cord. 2. Close shutoff valve in dryer base. 6. Replace the cover and secure with hot water...
User Instructions
Page 8
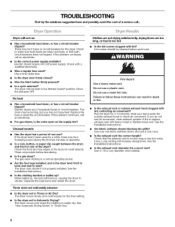
... time setting. • Is the dryer set to Timed or Air Dry? The timer moves only when the clothing is the dryer level front to back and side to make sure both circuit breakers have heat. Lint screen should be turning, but you do not feel air movement, clean exhaust system of lint or replace exhaust vent with lint? Run the dryer for small objects. Long venting will not start in the Wrinkle Guard _ position. Check to side? Replace the fuse or reset the circuit breaker. Check...
... time setting. • Is the dryer set to Timed or Air Dry? The timer moves only when the clothing is the dryer level front to back and side to make sure both circuit breakers have heat. Lint screen should be turning, but you do not feel air movement, clean exhaust system of lint or replace exhaust vent with lint? Run the dryer for small objects. Long venting will not start in the Wrinkle Guard _ position. Check to side? Replace the fuse or reset the circuit breaker. Check...

User Instructions
Page 9
... dryer located in clothing (usually blue jeans). Cycle time too short • Change the dryness level setting on load • Is the lint screen clogged? If so, ventilate the area. Select the right cycle for the sides and front of the cycle? • Was the dryer overloaded? Add dryer fabric softener sheets at the beginning of the door. When the odors or fumes are wrinkled • Was the load removed...
... dryer located in clothing (usually blue jeans). Cycle time too short • Change the dryness level setting on load • Is the lint screen clogged? If so, ventilate the area. Select the right cycle for the sides and front of the cycle? • Was the dryer overloaded? Add dryer fabric softener sheets at the beginning of the door. When the odors or fumes are wrinkled • Was the load removed...
User Instructions
Page 10
... state to state. Sears Installation Service For Sears professional installation of home appliances, garage door openers, water heaters, and other major home items, in all instructions supplied with the product. 5. SEARS WILL NOT PAY FOR: 1. A service technician to clean or maintain this product. Damage to or failure of this product if it may require preventive maintenance or repair from time to time. Sears shall not...
... state to state. Sears Installation Service For Sears professional installation of home appliances, garage door openers, water heaters, and other major home items, in all instructions supplied with the product. 5. SEARS WILL NOT PAY FOR: 1. A service technician to clean or maintain this product. Damage to or failure of this product if it may require preventive maintenance or repair from time to time. Sears shall not...

User Instructions
Page 20
...; Registered Trademark / Trademark / Service Mark of carry-in items like garage door openers and water heaters. 1-800-4-MY-HOME ® (1-800-469-4663) Call anytime, day or night (U.S.A. Impreso en EE. UU. For the replacement parts, accessories and owner's manuals that you need to do-it ! and Canada) www.sears.com www.sears.ca Our Home For repair of Sears, Roebuck...
...; Registered Trademark / Trademark / Service Mark of carry-in items like garage door openers and water heaters. 1-800-4-MY-HOME ® (1-800-469-4663) Call anytime, day or night (U.S.A. Impreso en EE. UU. For the replacement parts, accessories and owner's manuals that you need to do-it ! and Canada) www.sears.com www.sears.ca Our Home For repair of Sears, Roebuck...
Installation Instructions
Page 1
... safety and the safety of others . This symbol alerts you to reduce the chance of Contents/Jndice DRYER SAFETY 1 INSTALLATION INSTRUCTIONS 2 Tools and Parts 2 Location Requirements 3 Electrical Requirements 4 Gas Supply Requirements 4 Venting Requirements 5 Plan Vent System 6 Install Vent System 8 Install Leveling Legs 8 Level Dryer 8 Make Gas Connection 9 Connect Vent 9 Complete Installation 9 SERVICE NUMBERS BACK COVER SEGURIDAD DE LA SECADORA 11 INSTRUCCIONES DE INSTALACION 12 Herramientas y piezas 12 Requisites de ubicaci6n 12 Requisites el6ctricos 14 Requisites...
... safety and the safety of others . This symbol alerts you to reduce the chance of Contents/Jndice DRYER SAFETY 1 INSTALLATION INSTRUCTIONS 2 Tools and Parts 2 Location Requirements 3 Electrical Requirements 4 Gas Supply Requirements 4 Venting Requirements 5 Plan Vent System 6 Install Vent System 8 Install Leveling Legs 8 Level Dryer 8 Make Gas Connection 9 Connect Vent 9 Complete Installation 9 SERVICE NUMBERS BACK COVER SEGURIDAD DE LA SECADORA 11 INSTRUCCIONES DE INSTALACION 12 Herramientas y piezas 12 Requisites de ubicaci6n 12 Requisites el6ctricos 14 Requisites...
Installation Instructions
Page 2
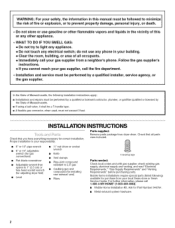
... compound (for installing new exhaust vent) Pliers 4 leveling legs Parts needed: Check local codes and with gas supplier, check existing gas supply, electrical supply and venting, and read "Electrical Requirements," "Gas Supply Requirements" and "Venting Requirements" before purchasing parts. Installation and service must be a T-handle type. _, A flexible gas connector, when used, must be performed by a qualified or licensed contractor, plumber, or gasfitter qualified or licensed by a qualified installer, service agency, or the gas supplier. Parts supplied: Remove parts package from your...
... compound (for installing new exhaust vent) Pliers 4 leveling legs Parts needed: Check local codes and with gas supplier, check existing gas supply, electrical supply and venting, and read "Electrical Requirements," "Gas Supply Requirements" and "Venting Requirements" before purchasing parts. Installation and service must be a T-handle type. _, A flexible gas connector, when used, must be performed by a qualified or licensed contractor, plumber, or gasfitter qualified or licensed by a qualified installer, service agency, or the gas supplier. Parts supplied: Remove parts package from your...
Installation Instructions
Page 3
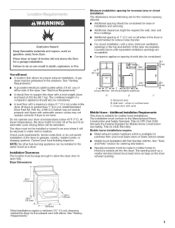
...; A level floor with vents _3" (7=c6rn) 7- See "Electrical Requirements." • A sturdy floor to reduce noise transfer. • For closet installation, with automatic sensor cycles may not operate correctly if dryer is greater than 1" [2.5 cm], install Extended Dryer Feet Kit, Part No. 279810.) Clothes may not tumble properly and dryers with a door, minimum ventilation openings in death, explosion, or fire, You will be considered. Drying times can resuJt in the...
...; A level floor with vents _3" (7=c6rn) 7- See "Electrical Requirements." • A sturdy floor to reduce noise transfer. • For closet installation, with automatic sensor cycles may not operate correctly if dryer is greater than 1" [2.5 cm], install Extended Dryer Feet Kit, Part No. 279810.) Clothes may not tumble properly and dryers with a door, minimum ventilation openings in death, explosion, or fire, You will be considered. Drying times can resuJt in the...
Installation Instructions
Page 4
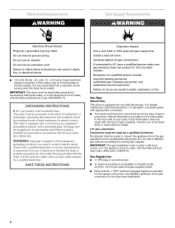
... Electrical Code, ANSI/NFPA 70. or 20-amp, fused electrical supply is recommended. SAVE THESE INSTRUCTIONS E×ploeion Hazard Use a new AGA or CSA approved gas supply line. Falure to LR, have a proper outlet installed by a qualified technician. A time-delay fuse or circuit breaker is required. It is designcertified by providing a path of gas available, contact your local Sears store or Sears Service Center. GROUNDING INSTRUCTIONS _' For a grounded, cord-connected dryer...
... Electrical Code, ANSI/NFPA 70. or 20-amp, fused electrical supply is recommended. SAVE THESE INSTRUCTIONS E×ploeion Hazard Use a new AGA or CSA approved gas supply line. Falure to LR, have a proper outlet installed by a qualified technician. A time-delay fuse or circuit breaker is required. It is designcertified by providing a path of gas available, contact your local Sears store or Sears Service Center. GROUNDING INSTRUCTIONS _' For a grounded, cord-connected dryer...
Installation Instructions
Page 5
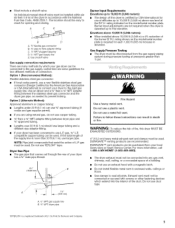
... fitting C. _" NPT plugged tapping D. 7/p,,NPT gas supply line E. Gas Supply Pressure Testing • The dryer must be disconnected from your dryer to use larger pipe. DURASAFE TM venting products are using natural gas, do not use copper tubing. • %" flare x %" NPT adapter fitting between the stainless steel gas connector and the dryer gas pipe, as needed to connect your local Sears store or Sears Service Center. Gas shutoff valve Gas supply connection requirements There are...
... fitting C. _" NPT plugged tapping D. 7/p,,NPT gas supply line E. Gas Supply Pressure Testing • The dryer must be disconnected from your dryer to use larger pipe. DURASAFE TM venting products are using natural gas, do not use copper tubing. • %" flare x %" NPT adapter fitting between the stainless steel gas connector and the dryer gas pipe, as needed to connect your local Sears store or Sears Service Center. Gas shutoff valve Gas supply connection requirements There are...
Installation Instructions
Page 6
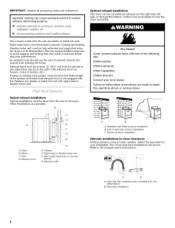
... kinking. IMPORTANT: Observe all governing codes and ordinances. Periscope installation Do not use plastic or metal foil vent. Exhaust hood must be in death, fire, electricam shock, or serious injury. If using an existing vent system, clean lint from the ground or any plastic or metal foil vent with lint. B A. Dryer B. Standard rear offset exhaust installation B. Two close clearances Venting systems come in reduced airflow and poor...
... kinking. IMPORTANT: Observe all governing codes and ordinances. Periscope installation Do not use plastic or metal foil vent. Exhaust hood must be in death, fire, electricam shock, or serious injury. If using an existing vent system, clean lint from the ground or any plastic or metal foil vent with lint. B A. Dryer B. Standard rear offset exhaust installation B. Two close clearances Venting systems come in reduced airflow and poor...
Installation Instructions
Page 7
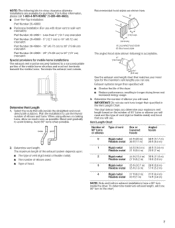
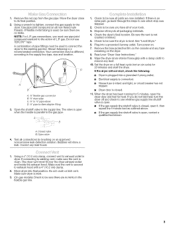
... ft (17.7 m) Flexible metal 36 ft (11 m) 28 ft (8.5 m) 2= Determine vent length. Louvered hood style B. Terminate the exhaust vent outside. (&4cm) See the exhaust vent length chart that you can use . Exhaust systems longer than specified in longer drying times and increased energy usage. 3. NOTE: The following ) is acceptable. B Periscope Installation (For use vent runs longer than specified will provide the straightest and most direct path outdoors. When using elbows or making turns...
... ft (17.7 m) Flexible metal 36 ft (11 m) 28 ft (8.5 m) 2= Determine vent length. Louvered hood style B. Terminate the exhaust vent outside. (&4cm) See the exhaust vent length chart that you can use . Exhaust systems longer than specified in longer drying times and increased energy usage. 3. NOTE: The following ) is acceptable. B Periscope Installation (For use vent runs longer than specified will provide the straightest and most direct path outdoors. When using elbows or making turns...
Installation Instructions
Page 8
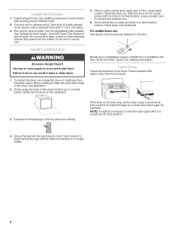
.... 5. seclamptso seaal lljointsD. secaulkincgompountodseael xterior wallopeninagroundexhaushtood. 2. Check the levelness of the dryer. Firmlygraspthebodyofthedrye(rnothetoporconsole panelG). Use a wrench to the floor. RunventodryelrocationU.sethestraightepsat thpossible. Instaell xhaushtoodU. For mobile home use See"DeterminVeenLt engthA."void90°turnsU. Mobile home installations require a Mobile Home Installation Kit. NOTE: It might be securely fastened to finish turning the legs until the diamond marking is...
.... 5. seclamptso seaal lljointsD. secaulkincgompountodseael xterior wallopeninagroundexhaushtood. 2. Check the levelness of the dryer. Firmlygraspthebodyofthedrye(rnothetoporconsole panelG). Use a wrench to the floor. RunventodryelrocationU.sethestraightepsat thpossible. Instaell xhaushtoodU. For mobile home use See"DeterminVeenLt engthA."void90°turnsU. Mobile home installations require a Mobile Home Installation Kit. NOTE: It might be securely fastened to finish turning the legs until the diamond marking is...
Installation Instructions
Page 9
... the dryer has been running for heat. Dispose of your "Dryer User Instructions." Plug into final position. If connecting to exhaust outlet in the supply line. The dryer vent must be used , be sure there are no kinks in the flexible gas line. g. Move dryer into a grounded 3 prong outlet. 1= Remove the red cap from the gas pipe. Using a 4" (10.2 cm) clamp, connect vent to existing vent, make sure the vent is closed , open the dryer door and feel heat, turn the dryer...
... the dryer has been running for heat. Dispose of your "Dryer User Instructions." Plug into final position. If connecting to exhaust outlet in the supply line. The dryer vent must be used , be sure there are no kinks in the flexible gas line. g. Move dryer into a grounded 3 prong outlet. 1= Remove the red cap from the gas pipe. Using a 4" (10.2 cm) clamp, connect vent to existing vent, make sure the vent is closed , open the dryer door and feel heat, turn the dryer...
Installation Instructions
Page 20
..., y para ordenar piezas: 1"888"SU'HOGARSM (1-888-784-6427) Au Canada pour service en fran£ais: 1.800.LE.FOYERMC (1-800-533-6937) www.sears.ca 8533587 © 2004 Sears, Roebuck and Co. UU. For Sears professional installation of Sears, Roebuck and Co. ® Marca Reg_. Impreso en EE. For the replacement parts, accessories and owner's manuals...
..., y para ordenar piezas: 1"888"SU'HOGARSM (1-888-784-6427) Au Canada pour service en fran£ais: 1.800.LE.FOYERMC (1-800-533-6937) www.sears.ca 8533587 © 2004 Sears, Roebuck and Co. UU. For Sears professional installation of Sears, Roebuck and Co. ® Marca Reg_. Impreso en EE. For the replacement parts, accessories and owner's manuals...


