User Instructions
Page 1
® Dryer Secadora Table of Contents / Jndice 2 W10034880 Sears Roebuck and Co., Hoffman Estates, IL 60179 U.S.A. www.sears.com
® Dryer Secadora Table of Contents / Jndice 2 W10034880 Sears Roebuck and Co., Hoffman Estates, IL 60179 U.S.A. www.sears.com
User Instructions
Page 2
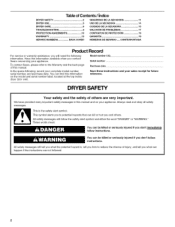
... read and obey all safety messages. To contact Sears, please refer to the Warranty and the back page of Contents/indice DRYER SAFETY 2 DRYER USE 5 DRYER CARE 6 TROUBLESHOOTING 8 PROTECTION AGREEMENTS 10 WARRANTY 10 SERVICE NUMBERS BACK COVER SEGURIDAD DE LA SECADORA 11 USO DE LA SECADORA 14...Record For service or warranty assistance, you don't immediately follow instructions. You can find this information on your sales receipt for future DRYER SAFETY Your safety and the safety of injury, and tell you what can happen if the instructions are very important. Serial number...
... read and obey all safety messages. To contact Sears, please refer to the Warranty and the back page of Contents/indice DRYER SAFETY 2 DRYER USE 5 DRYER CARE 6 TROUBLESHOOTING 8 PROTECTION AGREEMENTS 10 WARRANTY 10 SERVICE NUMBERS BACK COVER SEGURIDAD DE LA SECADORA 11 USO DE LA SECADORA 14...Record For service or warranty assistance, you don't immediately follow instructions. You can find this information on your sales receipt for future DRYER SAFETY Your safety and the safety of injury, and tell you what can happen if the instructions are very important. Serial number...
User Instructions
Page 3
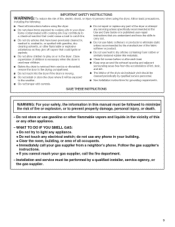
... gasoline, drycleaning solvents, or other flammable vapors and liquids in , or spotted with controls. [] Do not repair or replace any part of the dryer or attempt any electrical switch; Installation and service must be followed to minimize the risk of all instructions before or after each load. [] Keep area around the exhaust...
... gasoline, drycleaning solvents, or other flammable vapors and liquids in , or spotted with controls. [] Do not repair or replace any part of the dryer or attempt any electrical switch; Installation and service must be followed to minimize the risk of all instructions before or after each load. [] Keep area around the exhaust...
User Instructions
Page 4
...plastic vent or metal foil vent. See the Installation Instructions for by improper venting will not be covered under the warranty. If the dryer is complete, be paid installation or selfinstalled. Use 4" (10.2 cm) metal or flexible metal vent. Use clamps to the Installation...Clean exhaust vent periodically, depending on use a plastic vent. Good Better 4. Do not use , but at least every 2 years, or when installing your dryer for proper length requirements of the vent to flow. f. Use a 4" (10.2 cm) exhaust hood. 3. Use the straightest path possible when routing the...
...plastic vent or metal foil vent. See the Installation Instructions for by improper venting will not be covered under the warranty. If the dryer is complete, be paid installation or selfinstalled. Use 4" (10.2 cm) metal or flexible metal vent. Use clamps to the Installation...Clean exhaust vent periodically, depending on use a plastic vent. Good Better 4. Do not use , but at least every 2 years, or when installing your dryer for proper length requirements of the vent to flow. f. Use a 4" (10.2 cm) exhaust hood. 3. Use the straightest path possible when routing the...
User Instructions
Page 5
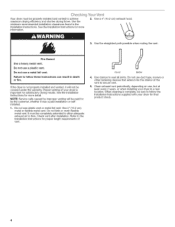
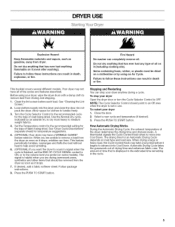
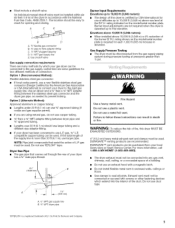
...drying a large or heavy load, the Cycle Control Knob may take a long time before each load. Fire Hazard No washer can stop your dryer, wipe the dryer drum with a damp cloth to follow these instructions can result in use. Clean the lint screen before it stops, wrinkles can result in the... that should point to move into Cool Down. See "Cleaning the Lint Screen." 2. Use the Normal Dry cycle, indicated by using your dryer Open the dryer door or turn the Cycle Selector Control to OFR NOTE: The Cycle Selector Control should be dried on it (even after washing). This feature...
...drying a large or heavy load, the Cycle Control Knob may take a long time before each load. Fire Hazard No washer can stop your dryer, wipe the dryer drum with a damp cloth to follow these instructions can result in use. Clean the lint screen before it stops, wrinkles can result in the... that should point to move into Cool Down. See "Cleaning the Lint Screen." 2. Use the Normal Dry cycle, indicated by using your dryer Open the dryer door or turn the Cycle Selector Control to OFR NOTE: The Cycle Selector Control should be dried on it (even after washing). This feature...
User Instructions
Page 6
... 50 min. Explosion Hazard Keep flammable materials and vapors, such as gasoline, away from items that would obstruct the flow of the dryer. Push the lint screen firmly back into place. Roll lint off the screen with your fingers. NOTEY: oumusrtemovderyerackfornormatul mblingD.onot useautomatcicycleswiththedryerack. Put...off the screen into the dimples on rack) Timed Dry Low 20 rain. IMPORTANT: • Do not run the dryer with 29" (73.7 cm) wide dryers. Do not rinse or wash screen to the following table. 4. Leave space between items so air can result in ...
... 50 min. Explosion Hazard Keep flammable materials and vapors, such as gasoline, away from items that would obstruct the flow of the dryer. Push the lint screen firmly back into place. Roll lint off the screen with your fingers. NOTEY: oumusrtemovderyerackfornormatul mblingD.onot useautomatcicycleswiththedryerack. Put...off the screen into the dimples on rack) Timed Dry Low 20 rain. IMPORTANT: • Do not run the dryer with 29" (73.7 cm) wide dryers. Do not rinse or wash screen to the following table. 4. Leave space between items so air can result in ...
User Instructions
Page 7
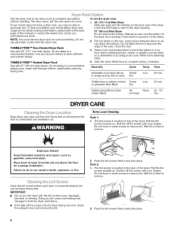
... you will not stain future loads of clean cloths or towels to do so can result in death or electrical shock. Replace all parts and panels before servicing. Close shutoff valve in dryer. 1. Cleaning should : 1. If you should be removed every 2 years, or more often, depending on the back wall of the...
... you will not stain future loads of clean cloths or towels to do so can result in death or electrical shock. Replace all parts and panels before servicing. Close shutoff valve in dryer. 1. Cleaning should : 1. If you should be removed every 2 years, or more often, depending on the back wall of the...
User Instructions
Page 8
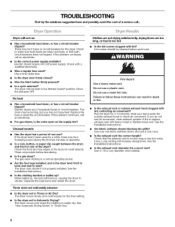
... 5-10 minutes. Is the exhaust vent the correct length? There may be cleaned before laundering. • Is it only once. Electric dryers require 240 volt power supply. Replace the fuse or reset the circuit breaker. The gas valve clicking is a normal operating sound. • ...heat. Move the dial past OFE No heat • Has a household fuse blown, or has a circuit breaker tripped? Electric dryers use it a gas dryer? Check the front and rear edges of the dryer? Fire Hazard Use a heavy metal vent. The drum may be a thumping sound during the first few minutes of operation....
... 5-10 minutes. Is the exhaust vent the correct length? There may be cleaned before laundering. • Is it only once. Electric dryers require 240 volt power supply. Replace the fuse or reset the circuit breaker. The gas valve clicking is a normal operating sound. • ...heat. Move the dial past OFE No heat • Has a household fuse blown, or has a circuit breaker tripped? Electric dryers use it a gas dryer? Check the front and rear edges of the dryer? Fire Hazard Use a heavy metal vent. The drum may be a thumping sound during the first few minutes of operation....

User Instructions
Page 9
... screen clogged? When the odors or fumes are gone from the area, rewash and dry the clothing. • Is the electric dryer being dried. • Is the load too large and heavy to dry quickly? Place dryer at least 18 inches (46 cm) above 45°F (7°C). • Is the...above the floor for the first time? Stains on load or drum • Was dryer fabric softener properly used for a garage installation. Drum stains are wrinkled • Was the load removed from dryer. The new electric heating element may have ventilation openings at the top and bottom of the door. ...
... screen clogged? When the odors or fumes are gone from the area, rewash and dry the clothing. • Is the electric dryer being dried. • Is the load too large and heavy to dry quickly? Place dryer at least 18 inches (46 cm) above 45°F (7°C). • Is the...above the floor for the first time? Stains on load or drum • Was dryer fabric softener properly used for a garage installation. Drum stains are wrinkled • Was the load removed from dryer. The new electric heating element may have ventilation openings at the top and bottom of the door. ...
Installation Instructions
Page 1
...safety messages will follow instructions. Your safety and the safety of Contents/Jndice DRYER SAFETY 1 INSTALLATION INSTRUCTIONS 2 Tools and Parts 2 Location Requirements 3 Electrical Requirements 4 Gas Supply Requirements 4 Venting Requirements 5 Plan Vent System 6 Install Vent... System 8 Install Leveling Legs 8 Level Dryer 8 Make Gas Connection 9 Connect Vent 9 Complete Installation 9...
...safety messages will follow instructions. Your safety and the safety of Contents/Jndice DRYER SAFETY 1 INSTALLATION INSTRUCTIONS 2 Tools and Parts 2 Location Requirements 3 Electrical Requirements 4 Gas Supply Requirements 4 Venting Requirements 5 Plan Vent System 6 Install Vent... System 8 Install Leveling Legs 8 Level Dryer 8 Make Gas Connection 9 Connect Vent 9 Complete Installation 9...
Installation Instructions
Page 2
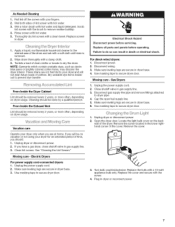
...dryer drum. Do not store or use any phone in the vicinity of all parts were included. 8" or 10" pipe wrench 8" or 10" adjustable wrench (for installing new exhaust vent) Pliers 4 leveling legs Parts needed: Check local codes and with gas supplier, check existing gas supply, electrical supply and venting, and read "Electrical... touch any other flammable vapors and liquids in your building. • Clear the room, building, or area of this or any electrical switch; Installation and service must be a T-handle type. _, A flexible gas connector, when used, must be performed by a ...
...dryer drum. Do not store or use any phone in the vicinity of all parts were included. 8" or 10" pipe wrench 8" or 10" adjustable wrench (for installing new exhaust vent) Pliers 4 leveling legs Parts needed: Check local codes and with gas supplier, check existing gas supply, electrical supply and venting, and read "Electrical... touch any other flammable vapors and liquids in your building. • Clear the room, building, or area of this or any electrical switch; Installation and service must be a T-handle type. _, A flexible gas connector, when used, must be performed by a ...
Installation Instructions
Page 3
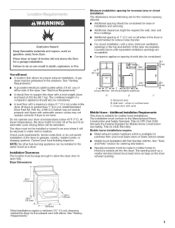
... opening. 43_/2'' (110.5cm) *Most installations require a minimum 5V2" (14 cm) clearance behind the dryer for proper exhaust installation. See "Venting Requirements." • A grounded electrical outlet located within 2 ft (61 cm) of either side of an automatic cycle. Do not operate your local Sears store or Sears Service dealer. • Mobile home Installation...
... opening. 43_/2'' (110.5cm) *Most installations require a minimum 5V2" (14 cm) clearance behind the dryer for proper exhaust installation. See "Venting Requirements." • A grounded electrical outlet located within 2 ft (61 cm) of either side of an automatic cycle. Do not operate your local Sears store or Sears Service dealer. • Mobile home Installation...
Installation Instructions
Page 4
...the rating plate in the door well of electric shock. No attempt shall be provided. De not use an adapter. or 20-amp, fused electrical supply is recommended. GROUNDING INSTRUCTIONS _' For a grounded, cord-connected dryer: This dryer must have the correct burner for use with...company personnel, and authorized service personnel Falure to LR, have a proper outlet installed by CSA International for electric current. This dryer is acceptable for lengths under 20 ft (6.1 m) if local codes and gas supplier permit. • Must include Ys"NPT minimum plugged tapping accessible...
...the rating plate in the door well of electric shock. No attempt shall be provided. De not use an adapter. or 20-amp, fused electrical supply is recommended. GROUNDING INSTRUCTIONS _' For a grounded, cord-connected dryer: This dryer must have the correct burner for use with...company personnel, and authorized service personnel Falure to LR, have a proper outlet installed by CSA International for electric current. This dryer is acceptable for lengths under 20 ft (6.1 m) if local codes and gas supplier permit. • Must include Ys"NPT minimum plugged tapping accessible...
Installation Instructions
Page 5
... and a %" flare x %" NPT adapter fitting between dryer pipe and %" approved tubing. • Lengths over 20 ft (6.1 m) should use larger tubing and a different size adapter fitting. • If your dryer to prevent kinking. Dryer Gas Pipe • The gas pipe that resist the ... _" flexible gas connector B. _" pipe to seal all joints. Burner Input Requirements: Elevations up to 10,000 ft (3,048 m) above 10,000 ft (3,048 m) a 4% reduction of your gas dryer can be used. DURASAFE TM venting products are some guidelines for two different methods of this elevation. rating indicated ...
... and a %" flare x %" NPT adapter fitting between dryer pipe and %" approved tubing. • Lengths over 20 ft (6.1 m) should use larger tubing and a different size adapter fitting. • If your dryer to prevent kinking. Dryer Gas Pipe • The gas pipe that resist the ... _" flexible gas connector B. _" pipe to seal all joints. Burner Input Requirements: Elevations up to 10,000 ft (3,048 m) above 10,000 ft (3,048 m) a 4% reduction of your gas dryer can be used. DURASAFE TM venting products are some guidelines for two different methods of this elevation. rating indicated ...
Installation Instructions
Page 6
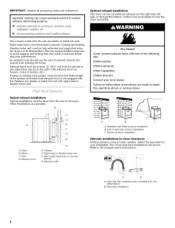
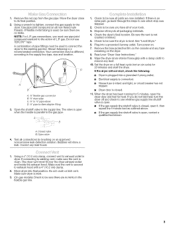
... be at least 12" (30.5 cm) from entering the home. Fire Hazard Cover unused exhaust holes with lint. Dryer B. Bottom exhaust installation Alternate installations for your Ioca_ dea{ero Failure to prevent crushing and kinking. Over-The-Top installation ...Replace any object that may be fully extended and supported when the dryer is in death, fire, electricam shock, or serious injury. B A. Typical exhaust installations Typical installations vent the dryer from the entire length of the dryer. Other installations are shown. Rigid metal vent is not plugged with ...
... be at least 12" (30.5 cm) from entering the home. Fire Hazard Cover unused exhaust holes with lint. Dryer B. Bottom exhaust installation Alternate installations for your Ioca_ dea{ero Failure to prevent crushing and kinking. Over-The-Top installation ...Replace any object that may be fully extended and supported when the dryer is in death, fire, electricam shock, or serious injury. B A. Typical exhaust installations Typical installations vent the dryer from the entire length of the dryer. Other installations are shown. Rigid metal vent is not plugged with ...
Installation Instructions
Page 7
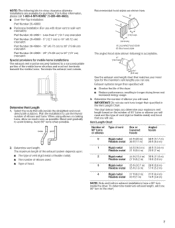
...Rigid metal 54 ft (16.5 m) 48 ft (14.6 m) Flexible metal 31 ft (9.4 m) 23 ft (7 m) 2 Rigid metal 44 ft (13.4 m) 38 ft (11.6 m) Flexible metal 27 ft (8.2 m) 19 ft (5.8 m) 3 Rigid metal 35 ft (10.7 m) 29 ft (8.8 m) Flexible metal 25 ft (7.6 m) 17 ft (5.2 m) 4 Rigid metal 27 ft (8.2 m) 21 ft (6.4 m) Flexible metal 23 ft (7 m) 15 ft (4.6 m) NOTE... style (shown following kits for mobile home installations The exhaust vent must be securely fastened to use with dryer vent to avoid kinking. Terminate the exhaust vent outside. (&4cm) See the exhaust vent length chart that...
...Rigid metal 54 ft (16.5 m) 48 ft (14.6 m) Flexible metal 31 ft (9.4 m) 23 ft (7 m) 2 Rigid metal 44 ft (13.4 m) 38 ft (11.6 m) Flexible metal 27 ft (8.2 m) 19 ft (5.8 m) 3 Rigid metal 35 ft (10.7 m) 29 ft (8.8 m) Flexible metal 25 ft (7.6 m) 17 ft (5.2 m) 4 Rigid metal 27 ft (8.2 m) 21 ft (6.4 m) Flexible metal 23 ft (7 m) 15 ft (4.6 m) NOTE... style (shown following kits for mobile home installations The exhaust vent must be securely fastened to use with dryer vent to avoid kinking. Terminate the exhaust vent outside. (&4cm) See the exhaust vent length chart that...
Installation Instructions
Page 8
... back. 1. RunventodryelrocationU.sethestraightepsat thpossible. Mobile home installations require a Mobile Home Installation Kit. Check the levelness of the dryer. Use a wrench to finish turning the legs until the diamond marking is moved into the leg holes by hand... lacecardboarudndetrheentirebackedge ofthedryerS. Examine the leveling legs. NOTE: It might be securely fastened to level the dryer again after it is no longer visible. ConnecvtentoexhaushtoodV. eeillustration. 2. Instaell xhaushtoodU. Toprotecttheflooru, sea largeflatpieceofcardboafrrdom thedryecr artonP. 1. entlylaythedryeor ...
... back. 1. RunventodryelrocationU.sethestraightepsat thpossible. Mobile home installations require a Mobile Home Installation Kit. Check the levelness of the dryer. Use a wrench to finish turning the legs until the diamond marking is moved into the leg holes by hand... lacecardboarudndetrheentirebackedge ofthedryerS. Examine the leveling legs. NOTE: It might be securely fastened to level the dryer again after it is no longer visible. ConnecvtentoexhaushtoodV. eeillustration. 2. Instaell xhaushtoodU. Toprotecttheflooru, sea largeflatpieceofcardboafrrdom thedryecr artonP. 1. entlylaythedryeor ...
Installation Instructions
Page 9
... of pipe fittings must be sure there are no kinks. See "Level Dryer." 6. Open valve 4= Test all connections by brushing on all packaging materials. 4. Move dryer into a grounded 3 prong outlet. Shown following : • Dryer is plugged into a grounded 3 prong outlet. • Electrical supply is connected. • House fuse is intact and tight, or circuit...
... of pipe fittings must be sure there are no kinks. See "Level Dryer." 6. Open valve 4= Test all connections by brushing on all packaging materials. 4. Move dryer into a grounded 3 prong outlet. Shown following : • Dryer is plugged into a grounded 3 prong outlet. • Electrical supply is connected. • House fuse is intact and tight, or circuit...


