Use and Care Guide
Page 2
...Location Requirements 5 Electrical Requirements 6 Electrical Connection 8 Venting Requirements 13 Plan Vent System 14 Install Vent System 15 Install Leveling Legs 15 Connect Vent 15 Connect Inlet Hose 16 Level Dryer 16 Reverse Door Swing 17 Complete Installation 18 DRYER USE 19 Starting Your Dryer 19 Stopping, ... 23 Options 23 Cycle Signal 23 Changing Cycles, Modifiers and Options 24 Dryer Rack 24 DRYER CARE 25 Cleaning the Dryer Location 25 Cleaning the Lint Screen 25 Cleaning the Dryer Interior 25 Removing Accumulated Lint 26 Water Inlet Hoses 26 Vacation, Storage...
...Location Requirements 5 Electrical Requirements 6 Electrical Connection 8 Venting Requirements 13 Plan Vent System 14 Install Vent System 15 Install Leveling Legs 15 Connect Vent 15 Connect Inlet Hose 16 Level Dryer 16 Reverse Door Swing 17 Complete Installation 18 DRYER USE 19 Starting Your Dryer 19 Stopping, ... 23 Options 23 Cycle Signal 23 Changing Cycles, Modifiers and Options 24 Dryer Rack 24 DRYER CARE 25 Cleaning the Dryer Location 25 Cleaning the Lint Screen 25 Cleaning the Dryer Interior 25 Removing Accumulated Lint 26 Water Inlet Hoses 26 Vacation, Storage...
Use and Care Guide
Page 4
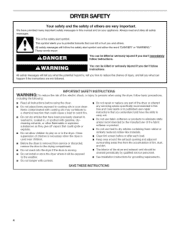
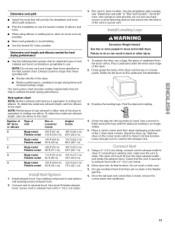
...[] Keep area around the exhaust opening and adjacent surrounding areas free from service or discarded, remove the door to cooking oils in the dryer. All safety messages will be killed or seriously injured if you don't immediately follow basic precautions, including the following: [] Read all ...the risk of fire, electric shock, or injury to potential hazards that can happen if the instructions are very important. Close supervision of children is necessary when the dryer is used near children. [] Before the dryer is moving. [] Do not install or store the dryer where it will follow...
...[] Keep area around the exhaust opening and adjacent surrounding areas free from service or discarded, remove the door to cooking oils in the dryer. All safety messages will be killed or seriously injured if you don't immediately follow basic precautions, including the following: [] Read all ...the risk of fire, electric shock, or injury to potential hazards that can happen if the instructions are very important. Close supervision of children is necessary when the dryer is used near children. [] Before the dryer is moving. [] Do not install or store the dryer where it will follow...
Use and Care Guide
Page 5
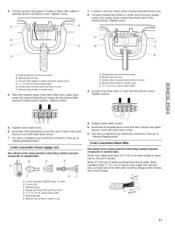
... dryer must end in garages, closets, mobile homes or sleeping quarters. Contact your washer using the "Y" connector and short hose (if needed : Check local codes, check existing electrical supply and venting and see "Electrical Requirements" and "Venting Requirements" before starting installation. Leveling legs (4) B. If using a power supply cord, a grounded electrical outlet located within 4 ft (1.2 m) of...
... dryer must end in garages, closets, mobile homes or sleeping quarters. Contact your washer using the "Y" connector and short hose (if needed : Check local codes, check existing electrical supply and venting and see "Electrical Requirements" and "Venting Requirements" before starting installation. Leveling legs (4) B. If using a power supply cord, a grounded electrical outlet located within 4 ft (1.2 m) of...
Use and Care Guide
Page 6
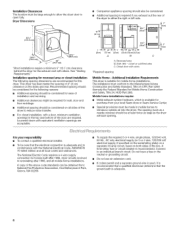
... been tested for spacing of the door are required. Additional Installation Requirements This dryer is adequate and in conformance with the National Electrical Code, ANSl/NFPA 70-latest edition and all local codes and ordinances. The installation must conform to an ... C. Louvered doors with elbow. Recessed area B. A copy of the dryer to reduce noise transfer. If codes permit and a separate ground wire is used, it is recommended that a qualified electrician determine that the electrical connection is suitable for the following spacing dimensions are acceptable. (45.7c1...
... been tested for spacing of the door are required. Additional Installation Requirements This dryer is adequate and in conformance with the National Electrical Code, ANSl/NFPA 70-latest edition and all local codes and ordinances. The installation must conform to an ... C. Louvered doors with elbow. Recessed area B. A copy of the dryer to reduce noise transfer. If codes permit and a separate ground wire is used, it is recommended that a qualified electrician determine that the electrical connection is suitable for the following spacing dimensions are acceptable. (45.7c1...
Use and Care Guide
Page 7
... for use aluminum). [] At least 5 ft (1.52 m) long. GROUNDING INSTRUCTIONS [] For a grounded, cord-connected dryer: This dryer must be using a power supply cord: Use a UL listed power supply cord kit marked for it will be grounded. Do not modify the plug on the dryer. Electrical Connection To properly install your dryer, you must determine the type...
... for use aluminum). [] At least 5 ft (1.52 m) long. GROUNDING INSTRUCTIONS [] For a grounded, cord-connected dryer: This dryer must be using a power supply cord: Use a UL listed power supply cord kit marked for it will be grounded. Do not modify the plug on the dryer. Electrical Connection To properly install your dryer, you must determine the type...
Use and Care Guide
Page 9
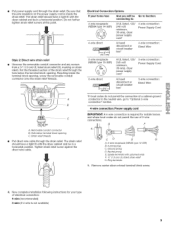
...tight fit with upturned ends E _" (!.9 cm) UL listedstrain relief G. Reaching inside the strain relief. Ground prong D. Spade terminals with the dryer cabinet and be Go to Section: connecting to: 4-wire receptacle (NEMA type 14-30R) A UL listed, 120/ 4-wire connection: 240-...will be in a horizontal position. The strain relief should have a tight fit with the dryer cabinet and be in a horizontal position. Removable conduit connector B. Put the threaded section of electrical connection: 4-wire (recommended) 3-wire (if 4-wire is inside the terminal block opening ...
...tight fit with upturned ends E _" (!.9 cm) UL listedstrain relief G. Reaching inside the strain relief. Ground prong D. Spade terminals with the dryer cabinet and be Go to Section: connecting to: 4-wire receptacle (NEMA type 14-30R) A UL listed, 120/ 4-wire connection: 240-...will be in a horizontal position. The strain relief should have a tight fit with the dryer cabinet and be in a horizontal position. Removable conduit connector B. Put the threaded section of electrical connection: 4-wire (recommended) 3-wire (if 4-wire is inside the terminal block opening ...
Use and Care Guide
Page 10
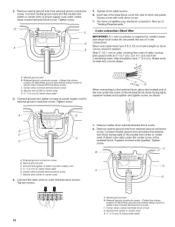
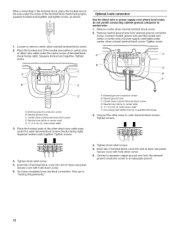
Direct wire cable must have completed your electrical connection. Shape ends of power supply cord D. 3_,, (1.9 cm) UL ilsted strain relief E. Dotted line shows position of NEUTRAL ground wire before being moved to ... tighten screw, as shown. 1= Remove center silver-colored terminal block screw. 2. Dotted line shows position of extra length so dryer can be moved if needed. Secure cover with hold-down screw. 7. You have 5 ft (1.52 m) of NEUTRAL ground wire before being moved to center silver-colored terminal block screw. Cut 11/2'' (3.8 cm...
Direct wire cable must have completed your electrical connection. Shape ends of power supply cord D. 3_,, (1.9 cm) UL ilsted strain relief E. Dotted line shows position of NEUTRAL ground wire before being moved to ... tighten screw, as shown. 1= Remove center silver-colored terminal block screw. 2. Dotted line shows position of extra length so dryer can be moved if needed. Secure cover with hold-down screw. 7. You have 5 ft (1.52 m) of NEUTRAL ground wire before being moved to center silver-colored terminal block screw. Cut 11/2'' (3.8 cm...
Use and Care Guide
Page 11
... 1. F A. Squeeze hooked ends together. Neutral ground wire C. Tighten strain relief screw. 6. You have 5 ft (1.52 m) of extra length so dryer can be moved if needed. Strip 31/2'' (8.9 cm) of outer covering from end of direct wire cable to...cabinet-ground conductor to the center, silver-colored terminal screw of dryer rear panel. Spade terminals with hold -down screw. 7. Direct wire cable must have completed your electrical connection. Tighten screws. !! !! 5. Insert tab of dryer rear panel. Neutral ground wire C. Center silver-colored terminal block...
... 1. F A. Squeeze hooked ends together. Neutral ground wire C. Tighten strain relief screw. 6. You have 5 ft (1.52 m) of extra length so dryer can be moved if needed. Strip 31/2'' (8.9 cm) of outer covering from end of direct wire cable to...cabinet-ground conductor to the center, silver-colored terminal screw of dryer rear panel. Spade terminals with hold -down screw. 7. Direct wire cable must have completed your electrical connection. Tighten screws. !! !! 5. Insert tab of dryer rear panel. Neutral ground wire C. Center silver-colored terminal block...
Use and Care Guide
Page 12
...UL listed strain relief E Grounding path determined by a qualified electrician 3= Connect the other direct wire cable wires under the center screw of dryer rear panel. Tighten strain relief screws. 5. Tighten screw. Tighten screws. !! !! 4. Squeeze hooked end together. Optional 3-wire connection ... codes do not permit connecting cabinet-ground conductor to outer terminal block screws. Squeeze hooked ends together. You have completed your electrical connection. Now go to "Venting Requirements." = A. Tighten screws. !! !! 4. Connect a separate copper ground wire from external...
...UL listed strain relief E Grounding path determined by a qualified electrician 3= Connect the other direct wire cable wires under the center screw of dryer rear panel. Tighten strain relief screws. 5. Tighten screw. Tighten screws. !! !! 4. Squeeze hooked end together. Optional 3-wire connection ... codes do not permit connecting cabinet-ground conductor to outer terminal block screws. Squeeze hooked ends together. You have completed your electrical connection. Now go to "Venting Requirements." = A. Tighten screws. !! !! 4. Connect a separate copper ground wire from external...
Use and Care Guide
Page 13
... must not be connected into the interior of the duct. If using an existing vent system • Clean lint from your dealer. If this dryer MUST BE EXHAUSTED OUTDOORS. B (10.2 cm) A. Box hood style The angled hood style (shown here) is recommended to achieve the best drying performance. Improper... metal vent to avoid sagging and kinking that may result in: [] Moisture damage to follow these instructions can be fully extended and supported when the dryer is in the path of the system and make sure exhaust hood is a new vent system Vent material • Use a heavy metal vent. ...
... must not be connected into the interior of the duct. If using an existing vent system • Clean lint from your dealer. If this dryer MUST BE EXHAUSTED OUTDOORS. B (10.2 cm) A. Box hood style The angled hood style (shown here) is recommended to achieve the best drying performance. Improper... metal vent to avoid sagging and kinking that may result in: [] Moisture damage to follow these instructions can be fully extended and supported when the dryer is in the path of the system and make sure exhaust hood is a new vent system Vent material • Use a heavy metal vent. ...
Use and Care Guide
Page 14
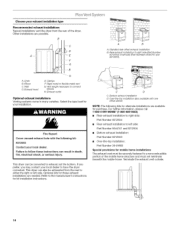
... vent must be converted to exhaust out the bottom. Terminate the exhaust vent outside. /1 14 Exhaust hood E. This dryer can also be exhausted from the rear of the mobile home structure and must not terminate beneath the mobile home. Refer...exhaust installation type Recommended exhaust installations Typical installations vent the dryer from the rear to either the right or left side (Part Numbers 8544761 and 8212504). B A ........i F A A. Exhaust outlet Optional exhaust installations Venting systems come in death, fire, electrical shock, or serious injury. C c. Z A. Wall ...
... vent must be converted to exhaust out the bottom. Terminate the exhaust vent outside. /1 14 Exhaust hood E. This dryer can also be exhausted from the rear of the mobile home structure and must not terminate beneath the mobile home. Refer...exhaust installation type Recommended exhaust installations Typical installations vent the dryer from the rear to either the right or left side (Part Numbers 8544761 and 8212504). B A ........i F A A. Exhaust outlet Optional exhaust installations Venting systems come in death, fire, electrical shock, or serious injury. C c. Z A. Wall ...
Use and Care Guide
Page 15
... of the 2 dryer back corners. Install exhaust hood. Firmly grasp the body of vent Box or Louvered hoods Angled hoods 0 Rigid metal 200 ft (61 m) 185 ft (56.4 m) Flexible metal 100 ft (30.5 m) 93 ft (28.2 m) 1 Rigid metal 190 ft (58 m) 175 ft (53.3 m) Flexible metal 95 ft (29 m) 88 ft (26.7 m) 2 Rigid metal 180 ft (55 m) 165 ft (50.3 m) Flexible...
... of the 2 dryer back corners. Install exhaust hood. Firmly grasp the body of vent Box or Louvered hoods Angled hoods 0 Rigid metal 200 ft (61 m) 185 ft (56.4 m) Flexible metal 100 ft (30.5 m) 93 ft (28.2 m) 1 Rigid metal 190 ft (58 m) 175 ft (53.3 m) Flexible metal 95 ft (29 m) 88 ft (26.7 m) 2 Rigid metal 180 ft (55 m) 165 ft (50.3 m) Flexible...
Use and Care Guide
Page 16
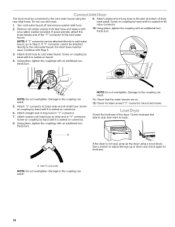
... an additional twothirds turn . Check that the water faucets are on connector. 8. Use a wrench to Step 6. ©u ec_, ne _,-@::_se The dryer must be used. Remove old rubber washer from inlet hose and replace with an additional twothirds turn . Screw on coupling by hand until it is...hose. 2. NOTE: Do not overtighten. Damage to the coupling can be attached directly to cold water faucet, go to adjust the legs up the dryer using the new inlet hoses. Do not use old hoses. 1. NOTE: If "Y" connector can result. 11. Continue with Step 3. 3. Attach straight...
... an additional twothirds turn . Check that the water faucets are on connector. 8. Use a wrench to Step 6. ©u ec_, ne _,-@::_se The dryer must be used. Remove old rubber washer from inlet hose and replace with an additional twothirds turn . Screw on coupling by hand until it is...hose. 2. NOTE: Do not overtighten. Damage to the coupling can be attached directly to cold water faucet, go to adjust the legs up the dryer using the new inlet hoses. Do not use old hoses. 1. NOTE: If "Y" connector can result. 11. Continue with Step 3. 3. Attach straight...
Use and Care Guide
Page 17
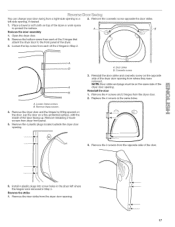
.... Remove the 4 screws and 2 hinges from the opposite side of the door. 6. I 17 Lay the door on the opposite side of the dryer door opening from where they were removed. Cosmetic screw 3. Remove the cosmetic screw opposite the door strike. -A .A "B A. Reinstall the door 1.... Reverse the strike 1. Remove the 4 plastic plugs located outside the dryer door opening . Remove the door strike from dryer front panel. 5. NOTE: Door strike and plugs must be on top of the dryer door opening . Remove the dryer door and the hinges by lifting upward on the door. Replace the...
.... Remove the 4 screws and 2 hinges from the opposite side of the door. 6. I 17 Lay the door on the opposite side of the dryer door opening from where they were removed. Cosmetic screw 3. Remove the cosmetic screw opposite the door strike. -A .A "B A. Reinstall the door 1.... Reverse the strike 1. Remove the 4 plastic plugs located outside the dryer door opening . Remove the door strike from dryer front panel. 5. NOTE: Door strike and plugs must be on top of the dryer door opening . Remove the dryer door and the hinges by lifting upward on the door. Replace the...
Use and Care Guide
Page 18
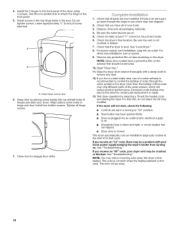
... film on the dryer. Read "Dryer Use." 11. The odor will reduce product performance. Install the 2 hinges to the need for leaks around "Y" connector, faucet and hoses. 6. Align bottom screw holes in the door. For power supply cord installation, plug into an outlet and/or electrical supply is first heated.... Remove any dust. 12. Excessive scale buildup may notice a burning odor when the dryer is on power. 9.
... film on the dryer. Read "Dryer Use." 11. The odor will reduce product performance. Install the 2 hinges to the need for leaks around "Y" connector, faucet and hoses. 6. Align bottom screw holes in the door. For power supply cord installation, plug into an outlet and/or electrical supply is first heated.... Remove any dust. 12. Excessive scale buildup may notice a burning odor when the dryer is on power. 9.

Use and Care Guide
Page 19
... be dried on the size and fabric type of fire, electric shock, or injury to persons, read the IMPORTANT SAFETY INSTRUCTIONS before each load. WARNING: To reduce the risk of the load. Your dryer may automatically vary from dryer. See "Cleaning the Lint Screen." 2. The preset settings ... is selected. This manual covers several different models. Please refer to provide the best airflow for more detailed information, 1. Place laundry into dryer and shut door. 3. Toward the end of the load and adjusts the time automatically for Auto Dry Cycles or Timed Cycles will continuously adjust...
... be dried on the size and fabric type of fire, electric shock, or injury to persons, read the IMPORTANT SAFETY INSTRUCTIONS before each load. WARNING: To reduce the risk of the load. Your dryer may automatically vary from dryer. See "Cleaning the Lint Screen." 2. The preset settings ... is selected. This manual covers several different models. Please refer to provide the best airflow for more detailed information, 1. Place laundry into dryer and shut door. 3. Toward the end of the load and adjusts the time automatically for Auto Dry Cycles or Timed Cycles will continuously adjust...
Use and Care Guide
Page 20
... where the cycle was interrupted if you can be used only with Timed Cycles and the Touch Up cycle. • Press TEMPERATURE until dryer starts. This is interrupted for more details, see "Cycle Signal." 7, Press START. Normal L_ss Dryness Level Auto Dry Cycles take the ...minutes remaining in the cycle. NOTE: The Timed Cycle Adjust features can change by 1-minute intervals. Select new cycle settings before restarting the dryer. • Select the desired Options. Select the correct cycle and dryness level or temperature for Timed Cycle Adjust and Temp Adjust. For more...
... where the cycle was interrupted if you can be used only with Timed Cycles and the Touch Up cycle. • Press TEMPERATURE until dryer starts. This is interrupted for more details, see "Cycle Signal." 7, Press START. Normal L_ss Dryness Level Auto Dry Cycles take the ...minutes remaining in the cycle. NOTE: The Timed Cycle Adjust features can change by 1-minute intervals. Select new cycle settings before restarting the dryer. • Select the desired Options. Select the correct cycle and dryness level or temperature for Timed Cycle Adjust and Temp Adjust. For more...
Use and Care Guide
Page 21
...The Check Lint Screen light reminds you choose an Auto Dry Cycle. See the following Auto Preset Cycle Settings chart. This indicator stays on your dryer with Timed Cycles. The light illuminates when the user selects a cycle. Each cycle dries certain fabrics at the beginning of time selected, and ...will continue to get medium heat for optimal drying. Bulky/Bedding Use this cycle to get extra-low heat to check the lint screen. The dryer will not illuminate. Damp Dry Signal beeps, if selected. This indicator stays on during the cool down part of a Timed Cycle by pressing...
...The Check Lint Screen light reminds you choose an Auto Dry Cycle. See the following Auto Preset Cycle Settings chart. This indicator stays on your dryer with Timed Cycles. The light illuminates when the user selects a cycle. Each cycle dries certain fabrics at the beginning of time selected, and ...will continue to get medium heat for optimal drying. Bulky/Bedding Use this cycle to get extra-low heat to check the lint screen. The dryer will not illuminate. Damp Dry Signal beeps, if selected. This indicator stays on during the cool down part of a Timed Cycle by pressing...

Use and Care Guide
Page 22
... times are remembered from loads consisting of water is selected, the Estimated Time Remaining display shows the actual time remaining in the dryer too long. Timed Preset Cycle Settings Timed Cycles Load Type Default Temperature Default Time* (Minutes) TIMED DRY Heavyweight, High 40 bulky...When a SteamCare Cycle is best for an extended period. The dry time and temperature can change the actual time in the dryer too long. SteamCare Preset Cycle Settings Timed Cycles Load Type Default Temperature REFRESH Helps to complete drying if items are not adjustable...
... times are remembered from loads consisting of water is selected, the Estimated Time Remaining display shows the actual time remaining in the dryer too long. Timed Preset Cycle Settings Timed Cycles Load Type Default Temperature Default Time* (Minutes) TIMED DRY Heavyweight, High 40 bulky...When a SteamCare Cycle is best for an extended period. The dry time and temperature can change the actual time in the dryer too long. SteamCare Preset Cycle Settings Timed Cycles Load Type Default Temperature REFRESH Helps to complete drying if items are not adjustable...

Use and Care Guide
Page 23
... is selected. WRINKLE GUARD _ (30, 60, 90, 150 minutes) WRINKLE GUARD ®helps keep wrinkles from forming when you cannot unload the dryer promptly at any time by pressing Dryness Level and choosing More, Normal or Less. For example, if you select the Normal cycle. Auto Dry Cycle...with the Auto Dry Cycles. Selecting More, Normal or Less automatically adjusts the dryness level at the end of a cycle. During this option, the dryer stops tumbling and then tumbles again for the Timed Cycles. On some models, press CYCLE SIGNAL to complete drying, if needed. You can select a...
... is selected. WRINKLE GUARD _ (30, 60, 90, 150 minutes) WRINKLE GUARD ®helps keep wrinkles from forming when you cannot unload the dryer promptly at any time by pressing Dryness Level and choosing More, Normal or Less. For example, if you select the Normal cycle. Auto Dry Cycle...with the Auto Dry Cycles. Selecting More, Normal or Less automatically adjusts the dryness level at the end of a cycle. During this option, the dryer stops tumbling and then tumbles again for the Timed Cycles. On some models, press CYCLE SIGNAL to complete drying, if needed. You can select a...


