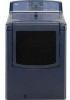
Use and Care Guide
Page 2
...DRYER SAFETY 4 INSTALLATION INSTRUCTIONS 5 Tools and Parts 5 Location Requirements 5 Electrical Requirements 6 Electrical Connection 8 Venting Requirements 13 Plan Vent System 14 Install Vent System 15 Install Leveling Legs 15 Connect Vent 15 Connect Inlet Hose 16 Level Dryer 16 Reverse Door Swing 17 Complete Installation 18 DRYER USE 19 Starting Your Dryer...Signal 23 Changing Cycles, Modifiers and Options 24 Dryer Rack 24 DRYER CARE 25 Cleaning the Dryer Location 25 Cleaning the Lint Screen 25 Cleaning the Dryer Interior 25 Removing Accumulated Lint 26 Water Inlet Hoses...
...DRYER SAFETY 4 INSTALLATION INSTRUCTIONS 5 Tools and Parts 5 Location Requirements 5 Electrical Requirements 6 Electrical Connection 8 Venting Requirements 13 Plan Vent System 14 Install Vent System 15 Install Leveling Legs 15 Connect Vent 15 Connect Inlet Hose 16 Level Dryer 16 Reverse Door Swing 17 Complete Installation 18 DRYER USE 19 Starting Your Dryer...Signal 23 Changing Cycles, Modifiers and Options 24 Dryer Rack 24 DRYER CARE 25 Cleaning the Dryer Location 25 Cleaning the Lint Screen 25 Cleaning the Dryer Interior 25 Removing Accumulated Lint 26 Water Inlet Hoses...
Use and Care Guide
Page 3
... state. phone support from state to time. v' 10% discount off the regular price of any covered refrigerator or freezer. KENMORE ELITE APPLIANCE WARRANTY ONE YEAR LIMITED WARRANTY When installed, operated and maintained according to all instructions supplied with the product, if this ... product installation, operation or maintenance. 3. Here's what the Agreement* includes: v' Parts and labor needed to clean or maintain this product caused by law. v' Power surge protection against electrical damage due to instruct the user in all products, it is used for other...
... state. phone support from state to time. v' 10% discount off the regular price of any covered refrigerator or freezer. KENMORE ELITE APPLIANCE WARRANTY ONE YEAR LIMITED WARRANTY When installed, operated and maintained according to all instructions supplied with the product, if this ... product installation, operation or maintenance. 3. Here's what the Agreement* includes: v' Parts and labor needed to clean or maintain this product caused by law. v' Power surge protection against electrical damage due to instruct the user in all products, it is used for other...
Use and Care Guide
Page 4
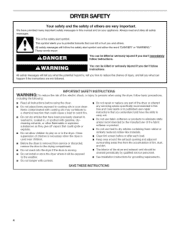
IMPORTANT SAFETY INSTRUCTIONS WARNING: To reduce the risk of fire, electric shock, or injury to persons when using the dryer, follow instructions. Always read and obey all instructions before or after each load. [] Keep area around the exhaust opening and adjacent surrounding areas ...or seriously injured if you what can be exposed to the weather. [] Do not tamper with controls. [] Do not repair or replace any part of the dryer or attempt any servicing unless specifically recommended in this manual and on or in your appliance. SAVE THESE iNSTRUCTiONS This is , tell you don...
IMPORTANT SAFETY INSTRUCTIONS WARNING: To reduce the risk of fire, electric shock, or injury to persons when using the dryer, follow instructions. Always read and obey all instructions before or after each load. [] Keep area around the exhaust opening and adjacent surrounding areas ...or seriously injured if you what can be exposed to the weather. [] Do not tamper with controls. [] Do not repair or replace any part of the dryer or attempt any servicing unless specifically recommended in this manual and on or in your appliance. SAVE THESE iNSTRUCTiONS This is , tell you don...
Use and Care Guide
Page 5
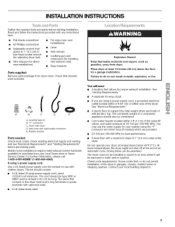
... dryer drum. Cold water faucets located within 2 ft (61 cm) of either side of 1" (2.5 cm) under entire dryer. You may use with right-angle E. Check code requirements. Inlet hose with clothes dryers. If using a power supply cord, a grounded electrical outlet located within 4 ft ... cord: Use a UL listed power supply cord kit marked for installing new exhaust vent) • Tape measure Parts supplied: Remove parts package from dryer. Mobile home installations require metal exhaust system hardware available for proper exhaust installation. See "Venting Requirements." • ...
... dryer drum. Cold water faucets located within 2 ft (61 cm) of either side of 1" (2.5 cm) under entire dryer. You may use with right-angle E. Check code requirements. Inlet hose with clothes dryers. If using a power supply cord, a grounded electrical outlet located within 4 ft ... cord: Use a UL listed power supply cord kit marked for installing new exhaust vent) • Tape measure Parts supplied: Remove parts package from dryer. Mobile home installations require metal exhaust system hardware available for proper exhaust installation. See "Venting Requirements." • ...
Use and Care Guide
Page 6
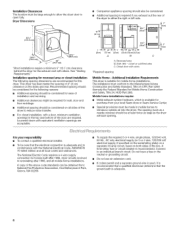
..., HUD Part 280). Additional clearances might be at least twice as large as the dryer exhaust opening (such as a nearby window) should be considered for ease of the above code standards can be obtained from your responsibility • To contact a qualified electrical installer. ...considered for the following spacing dimensions are recommended for this dryer. I_ I(Sb._cm) 48in. 2._ (310crn2) 3"* (7.6cm) *Most installations require a minimum 5" (12.7 cm) clearance behind the dryer for the exhaust vent with the National Electrical Code, ANSl/NFPA 70-latest edition and all sides...
..., HUD Part 280). Additional clearances might be at least twice as large as the dryer exhaust opening (such as a nearby window) should be considered for ease of the above code standards can be obtained from your responsibility • To contact a qualified electrical installer. ...considered for the following spacing dimensions are recommended for this dryer. I_ I(Sb._cm) 48in. 2._ (310crn2) 3"* (7.6cm) *Most installations require a minimum 5" (12.7 cm) clearance behind the dryer for the exhaust vent with the National Electrical Code, ANSl/NFPA 70-latest edition and all sides...
Use and Care Guide
Page 14
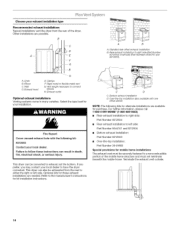
...8212503 Contact your local dealer. This dryer can be securely fastened to connect elbows H. Rear exhaust installation to have the dryer converted. Exhaust hood E. Exhaust outlet Optional exhaust installations Venting systems come in death, fire, electrical shock, or serious injury. Select the... type best for purchase. If you prefer, you may contact your local dealer to right side (Part Number 8212504) or left side: Part...
...8212503 Contact your local dealer. This dryer can be securely fastened to connect elbows H. Rear exhaust installation to have the dryer converted. Exhaust hood E. Exhaust outlet Optional exhaust installations Venting systems come in death, fire, electrical shock, or serious injury. Select the... type best for purchase. If you prefer, you may contact your local dealer to right side (Part Number 8212504) or left side: Part...
Use and Care Guide
Page 18
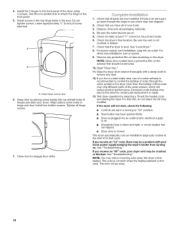
...• Dryer door is an extra part, go away. 18 For power supply cord installation, plug into top slotted holes of scale through the water system in a running or "On" position. • Start button has been pushed firmly. • Dryer is plugged into an outlet and/or electrical supply is...in hinge and door. Hang door by selecting a Timed Dry heated cycle and starting the dryer. NOTE: You may clog different parts of screw exposed. If you have a protective film on . This dryer automatically runs an installation diagnostic routine at the start , check the following: • ...
...• Dryer door is an extra part, go away. 18 For power supply cord installation, plug into top slotted holes of scale through the water system in a running or "On" position. • Start button has been pushed firmly. • Dryer is plugged into an outlet and/or electrical supply is...in hinge and door. Hang door by selecting a Timed Dry heated cycle and starting the dryer. NOTE: You may clog different parts of screw exposed. If you have a protective film on . This dryer automatically runs an installation diagnostic routine at the start , check the following: • ...
Use and Care Guide
Page 21
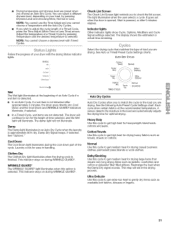
... dries certain fabrics at the beginning of your load, by pressing Temperature until the desired temperature is pressed, or after approximately 5 minutes, the dryer goes directly into Cool Down and the Cool Down and WRINKLE GUARD®indicators illuminate, if selected. • In a Timed Cycle, wet items... are not detected. A sensor detects the moisture in handling. This indicator stays on during the cool down part of a Timed Cycle by pressing Dryness Level and choosing More, Normal or Less. It goes out when the door is opened, Start is selected. ...
... dries certain fabrics at the beginning of your load, by pressing Temperature until the desired temperature is pressed, or after approximately 5 minutes, the dryer goes directly into Cool Down and the Cool Down and WRINKLE GUARD®indicators illuminate, if selected. • In a Timed Cycle, wet items... are not detected. A sensor detects the moisture in handling. This indicator stays on during the cool down part of a Timed Cycle by pressing Dryness Level and choosing More, Normal or Less. It goes out when the door is opened, Start is selected. ...
Use and Care Guide
Page 26
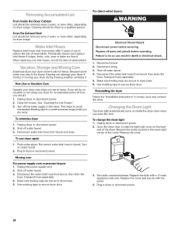
For direct-wired dryers: From Inside the Dryer Cabinet Lint should be removed every 2 years, or more often, depending on dryer usage. From the Exhaust Vent Lint should be removed every 2 years, or more often, depending on dryer usage. I , ' ...... Replace inlet hoses and hose screen after 5 years of use to reduce the risk of replacement. When replacing your inlet hoses, record the date of hose failure. "_ "+_]I ' Cleaning should be done by a qualified person. Periodically inspect and replace inlet hoses if bulges, kinks, cuts, wear or leaks are found.
For direct-wired dryers: From Inside the Dryer Cabinet Lint should be removed every 2 years, or more often, depending on dryer usage. From the Exhaust Vent Lint should be removed every 2 years, or more often, depending on dryer usage. I , ' ...... Replace inlet hoses and hose screen after 5 years of use to reduce the risk of replacement. When replacing your inlet hoses, record the date of hose failure. "_ "+_]I ' Cleaning should be done by a qualified person. Periodically inspect and replace inlet hoses if bulges, kinks, cuts, wear or leaks are found.

Use and Care Guide
Page 60
... Marca regl•strada / TM Marca de comercio / SMMarca de servicio de Sears Brands, LLC Printed in U1.S2.A/0, 7 Impreso en EE. For the replacement parts, accessories and owner's manuals that you need to do-it ! and Canada) www.sears.com www.sears.ca Our Home For repair of carry-in... your nearest Sears Parts & Repair Service Center 1-800-488-1222 (U.S.A.) 1-800-469-4663 (Canada) www.sears.com www.sears.ca To purchase a protection agreement on a product serviced by ...
... Marca regl•strada / TM Marca de comercio / SMMarca de servicio de Sears Brands, LLC Printed in U1.S2.A/0, 7 Impreso en EE. For the replacement parts, accessories and owner's manuals that you need to do-it ! and Canada) www.sears.com www.sears.ca Our Home For repair of carry-in... your nearest Sears Parts & Repair Service Center 1-800-488-1222 (U.S.A.) 1-800-469-4663 (Canada) www.sears.com www.sears.ca To purchase a protection agreement on a product serviced by ...
