

Use and Care Guide
Page 2
... Parts 5 Location Requirements 5 Electrical Requirements 6 Electrical Connection 8 Venting Requirements 13 Plan Vent System 14 Install Vent System 15 Install Leveling Legs 15 Connect Vent 15 Level Dryer 16 Reverse Door Swing 16 Complete Installation 17 DRYER USE 18 Starting Your Dryer 18 Stopping, Pausing or Restarting...21 Options 22 Cycle Signal 22 Changing Cycles, Modifiers and Options 22 Dryer Rack 23 DRYER CARE 24 Cleaning the Dryer Location 24 Cleaning the Lint Screen 24 Cleaning the Dryer Interior 24 Removing Accumulated Lint 25 Vacation and Moving Care 25 Changing ...
... Parts 5 Location Requirements 5 Electrical Requirements 6 Electrical Connection 8 Venting Requirements 13 Plan Vent System 14 Install Vent System 15 Install Leveling Legs 15 Connect Vent 15 Level Dryer 16 Reverse Door Swing 16 Complete Installation 17 DRYER USE 18 Starting Your Dryer 18 Stopping, Pausing or Restarting...21 Options 22 Cycle Signal 22 Changing Cycles, Modifiers and Options 22 Dryer Rack 23 DRYER CARE 24 Cleaning the Dryer Location 24 Cleaning the Lint Screen 24 Cleaning the Dryer Interior 24 Removing Accumulated Lint 25 Vacation and Moving Care 25 Changing ...

Use and Care Guide
Page 4
...the following: [] Read all safety messages. DRYER SAFETY Your safety and the safety of others . This is removed from the accumulation of lint, dust, and dirt. [] The interior of fire, electric shock, or injury to persons when using the dryer. [] Do not place items exposed to ...eliminate static unless recommended by the manufacturer of children is necessary when the dryer is used near children. [] Before the dryer is the safety alert symbol. iMPORTANT ...
...the following: [] Read all safety messages. DRYER SAFETY Your safety and the safety of others . This is removed from the accumulation of lint, dust, and dirt. [] The interior of fire, electric shock, or injury to persons when using the dryer. [] Do not place items exposed to ...eliminate static unless recommended by the manufacturer of children is necessary when the dryer is used near children. [] Before the dryer is the safety alert symbol. iMPORTANT ...
Use and Care Guide
Page 5
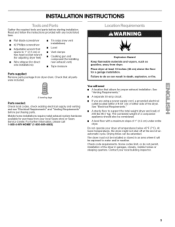
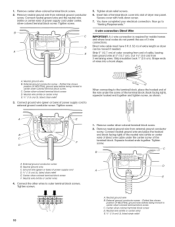
...) • Tape measure Parts supplied: Remove parts package from dryer drum. You will be considered. Check that opens to water and/or weather. If you are using a power supply cord, a grounded electrical outlet located within 2 ft (61 cm) of either side of 200 Ibs (90.7 ...(46 cm) above the floor for purchase from dryer. Place dryer at the end of the dryer in death, explosion, or fire. Failure to support the total weight (dryer and load) of the dryer. A level floor with any tools listed here. • Flat-blade screwdriver • #2 Phillips screwdriver •...
...) • Tape measure Parts supplied: Remove parts package from dryer drum. You will be considered. Check that opens to water and/or weather. If you are using a power supply cord, a grounded electrical outlet located within 2 ft (61 cm) of either side of 200 Ibs (90.7 ...(46 cm) above the floor for purchase from dryer. Place dryer at the end of the dryer in death, explosion, or fire. Failure to support the total weight (dryer and load) of the dryer. A level floor with any tools listed here. • Flat-blade screwdriver • #2 Phillips screwdriver •...
Use and Care Guide
Page 6
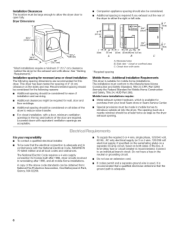
... single phase, 120/240 volt, 60 Hz., AC only electrical supply (or 3 or 4 wire, 120/208 volt electrical supply, if specified on the serial/rating plate) on a separate 30-amp circuit, fused on all sides of the dryer to either the right or left side. _f 3"* olo ...If codes permit and a separate ground wire is used, it is recommended that a qualified electrician determine that the electrical connection is available for this dryer. Companion appliance spacing should be considered for the exhaust vent with equivalent ventilation openings are required. Installation Clearances The location...
... single phase, 120/240 volt, 60 Hz., AC only electrical supply (or 3 or 4 wire, 120/208 volt electrical supply, if specified on the serial/rating plate) on a separate 30-amp circuit, fused on all sides of the dryer to either the right or left side. _f 3"* olo ...If codes permit and a separate ground wire is used, it is recommended that a qualified electrician determine that the electrical connection is available for this dryer. Companion appliance spacing should be considered for the exhaust vent with equivalent ventilation openings are required. Installation Clearances The location...
Use and Care Guide
Page 7
... of a neutral ground wire to the neutral wire, see "Optional 3-wire connection" section, This dryer is manufactured ready to install with a 3-wire electrical supply connection. The 3-wire power supply cord, at least 4 ft (1.22 m) long. If your outlet looks like this : 4-wire receptacle (14-30R) Then choose...Improper connection of least resistance for it will reduce the risk of electric shock by a qualified electrician. Do not modify the plug on the dryer. The kit should be type SRD or SRDT and be at least 4 ft (1.22 m) long, must be insulated. [] 10-gauge solid copper...
... of a neutral ground wire to the neutral wire, see "Optional 3-wire connection" section, This dryer is manufactured ready to install with a 3-wire electrical supply connection. The 3-wire power supply cord, at least 4 ft (1.22 m) long. If your outlet looks like this : 4-wire receptacle (14-30R) Then choose...Improper connection of least resistance for it will reduce the risk of electric shock by a qualified electrician. Do not modify the plug on the dryer. The kit should be type SRD or SRDT and be at least 4 ft (1.22 m) long, must be insulated. [] 10-gauge solid copper...
Use and Care Guide
Page 9
...not further tighten strain relief screws at this point. Spade terminals with the dryer cabinet and be connecting to: Go to "Optional 3-wire connection" section. .......... Reaching inside the strain relief. Electrical Connection Options If your type of the strain relief through the hole below...is required for your home has: And you will be in a horizontal position. Removable conduit connector B. Put the threaded section of electrical connection: 4-wire (recommended) 3-wire (if 4-wire is not available Put power supply cord through the strain relief. The strain relief...
...not further tighten strain relief screws at this point. Spade terminals with the dryer cabinet and be connecting to: Go to "Optional 3-wire connection" section. .......... Reaching inside the strain relief. Electrical Connection Options If your type of the strain relief through the hole below...is required for your home has: And you will be in a horizontal position. Removable conduit connector B. Put the threaded section of electrical connection: 4-wire (recommended) 3-wire (if 4-wire is not available Put power supply cord through the strain relief. The strain relief...
Use and Care Guide
Page 10
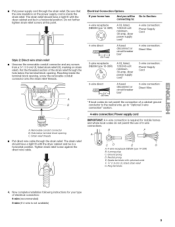
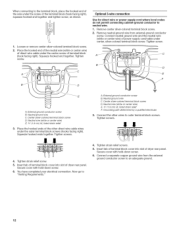
Direct wire cable must have completed your electrical connection. Strip 5" (12.7 cm) of outer covering from 3 remaining wires. Neutral ground ...wire (white or center wire) of power supply cord under the screw of extra length so dryer can be moved if needed. You have 5 ft (1.52 m) of the terminal block (hook facing right), squeeze hooked end together and tighten ...shows position of NEUTRAL ground wire before being moved to the terminal block, place the hooked end of dryer rear panel. Neutral ground wire C. Cut 11/2'' (3.8 cm) from end of power supply cord D. 3_,, (1.9 cm...
Direct wire cable must have completed your electrical connection. Strip 5" (12.7 cm) of outer covering from 3 remaining wires. Neutral ground ...wire (white or center wire) of power supply cord under the screw of extra length so dryer can be moved if needed. You have 5 ft (1.52 m) of the terminal block (hook facing right), squeeze hooked end together and tighten ...shows position of NEUTRAL ground wire before being moved to the terminal block, place the hooked end of dryer rear panel. Neutral ground wire C. Cut 11/2'' (3.8 cm) from end of power supply cord D. 3_,, (1.9 cm...
Use and Care Guide
Page 11
...3. Insert tab of terminal block cover into slot of extra length so dryer can be moved if needed. Neutral wire (white or center wire) 4. Direct wire cable must have 5 ft (1.52 m) of dryer rear panel. If using 3-wire cable with ground wire, cut bare ...C. Tighten strain relief screw. 6. You have completed your electrical connection. F A. Now go to "Venting Requirements." 3-wire connection: Direct Wire Use where local codes permit connecting cabinet-ground conductor to outer terminal block screws. Strip insulation back 1" (2.5 cm). Connect neutral wire (white or center ...
...3. Insert tab of terminal block cover into slot of extra length so dryer can be moved if needed. Neutral wire (white or center wire) 4. Direct wire cable must have 5 ft (1.52 m) of dryer rear panel. If using 3-wire cable with ground wire, cut bare ...C. Tighten strain relief screw. 6. You have completed your electrical connection. F A. Now go to "Venting Requirements." 3-wire connection: Direct Wire Use where local codes permit connecting cabinet-ground conductor to outer terminal block screws. Strip insulation back 1" (2.5 cm). Connect neutral wire (white or center ...
Use and Care Guide
Page 12
... relief screws. 5. Secure cover with hold -down screw. 6, You have completed your electrical connection. Tighten screw. Tighten screws. !! !! 4. Insert tab of terminal block cover into slot of dryer rear panel. Insert tab of terminal block cover into slot of dryer rear panel. Optional 3-wire connection Use for direct wire or power supply cord...
... relief screws. 5. Secure cover with hold -down screw. 6, You have completed your electrical connection. Tighten screw. Tighten screws. !! !! 4. Insert tab of terminal block cover into slot of dryer rear panel. Insert tab of terminal block cover into slot of dryer rear panel. Optional 3-wire connection Use for direct wire or power supply cord...
Use and Care Guide
Page 13
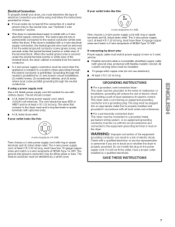
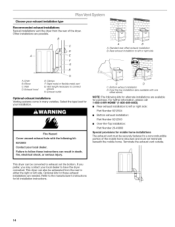
...[] Housecleaning problems and health problems. 13 Elbows 45 ° elbows provide better airflow than 90 ° elbows. Louvered hood style B. If this dryer MUST BE EXHAUSTED OUTDOORS. Box hood style The angled hood style (shown here) is acceptable. 4" (lO.2 cm) heavymetal exhaust vent DURASAFF Mvent ...; Review Vent system chart. IMPORTANT: Observe all joints. • Exhaust vent must not be purchased from entering the home. The dryer exhaust must not be connected or secured with screws or other fastening devices that may be at www.sears.com. For further information,...
...[] Housecleaning problems and health problems. 13 Elbows 45 ° elbows provide better airflow than 90 ° elbows. Louvered hood style B. If this dryer MUST BE EXHAUSTED OUTDOORS. Box hood style The angled hood style (shown here) is acceptable. 4" (lO.2 cm) heavymetal exhaust vent DURASAFF Mvent ...; Review Vent system chart. IMPORTANT: Observe all joints. • Exhaust vent must not be purchased from entering the home. The dryer exhaust must not be connected or secured with screws or other fastening devices that may be at www.sears.com. For further information,...
Use and Care Guide
Page 14
...exhaust vent must be converted to the manufacturer's instructions for your exhaust installation type Recommended exhaust installations Typical installations vent the dryer from the rear to either the right or left side. Clamps E Rigid metal or flexible metal vent G. Over-the...Wall D. C D C. Optional kits for alternate installations are possible. Exhaust outlet Optional exhaust installations Venting systems come in death, fire, electrical shock, or serious injury. Fire Hazard Cover unused exhaust hole with one offset elbow) NOTE: The following kit: 8212563 Contact your ...
...exhaust vent must be converted to the manufacturer's instructions for your exhaust installation type Recommended exhaust installations Typical installations vent the dryer from the rear to either the right or left side. Clamps E Rigid metal or flexible metal vent G. Over-the...Wall D. C D C. Optional kits for alternate installations are possible. Exhaust outlet Optional exhaust installations Venting systems come in death, fire, electrical shock, or serious injury. Fire Hazard Cover unused exhaust hole with one offset elbow) NOTE: The following kit: 8212563 Contact your ...
Use and Care Guide
Page 15
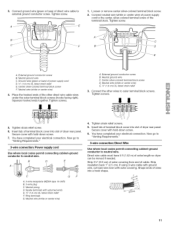
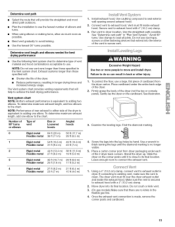
...floor, use a large, flat piece of the dryer (not the top or console panel). Firmly grasp the body of cardboard from dryer packaging under the entire back edge of vent material ...ft (20 m) 58 ft (17.7 m) Flexible metal 36 ft (11 m) 28 ft (8.5 m) 1 Rigid metal 54 ft (16.5 m) 48 ft (14.6 m) Flexible metal 31 ft (9.4 m) 23 ft (7 m) 2 Rigid metal 44 ft (13.4 m) 38 ft (11.6 m) Flexible metal 27 ft (8.2 m) 19 ft (5.8 m) 3 Rigid metal 35 ft (10.7 m) 29 ft (8.8 m) Flexible metal 25 ft (7.6 m) 17 ft (5.2 m) 4 Rigid metal 27 ft (8.2 m) 21 ft (6.4 m) Flexible metal 23 ft (7 m) 15 ft...
...floor, use a large, flat piece of the dryer (not the top or console panel). Firmly grasp the body of cardboard from dryer packaging under the entire back edge of vent material ...ft (20 m) 58 ft (17.7 m) Flexible metal 36 ft (11 m) 28 ft (8.5 m) 1 Rigid metal 54 ft (16.5 m) 48 ft (14.6 m) Flexible metal 31 ft (9.4 m) 23 ft (7 m) 2 Rigid metal 44 ft (13.4 m) 38 ft (11.6 m) Flexible metal 27 ft (8.2 m) 19 ft (5.8 m) 3 Rigid metal 35 ft (10.7 m) 29 ft (8.8 m) Flexible metal 25 ft (7.6 m) 17 ft (5.2 m) 4 Rigid metal 27 ft (8.2 m) 21 ft (6.4 m) Flexible metal 23 ft (7 m) 15 ft...

Use and Care Guide
Page 16
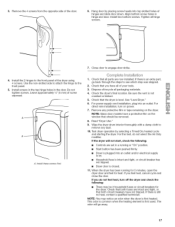
... Remove the door strike from dryer front panel. Loosen these screws. 4= Remove the dryer door and the hinges by lifting upward on a flat, protected surface, with the inside of the dryer door opening . 2. Remove remaining 2 loose screws from the dryer door opening . If the dryer is not level, prop up...they were removed. Use a wrench to back. 5= Remove the 4 plastic plugs located outside the dryer door opening , if desired. 1. You can change your door swing from the dryer door. 2. Install 4 plastic plugs into screw holes in the dryer left -side opening . Reverse the strike...
... Remove the door strike from dryer front panel. Loosen these screws. 4= Remove the dryer door and the hinges by lifting upward on a flat, protected surface, with the inside of the dryer door opening . 2. Remove remaining 2 loose screws from the dryer door opening . If the dryer is not level, prop up...they were removed. Use a wrench to back. 5= Remove the 4 plastic plugs located outside the dryer door opening , if desired. 1. You can change your door swing from the dryer door. 2. Install 4 plastic plugs into screw holes in the dryer left -side opening . Reverse the strike...
Use and Care Guide
Page 17
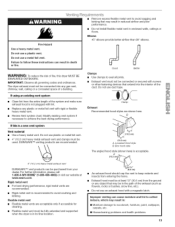
...household fuses or circuit breakers for heat. Check the dryer's final location. For power supply cord installation, plug into top slotted holes of your tools. 3. If the dryer will go back through the steps to see which step was skipped. 2. When the dryer has been running or "On" position. •...; Start button has been pushed firmly. • Dryer is plugged into an outlet and/or electrical supply is closed. 11. This ...
...household fuses or circuit breakers for heat. Check the dryer's final location. For power supply cord installation, plug into top slotted holes of your tools. 3. If the dryer will go back through the steps to see which step was skipped. 2. When the dryer has been running or "On" position. •...; Start button has been pushed firmly. • Dryer is plugged into an outlet and/or electrical supply is closed. 11. This ...
Use and Care Guide
Page 18
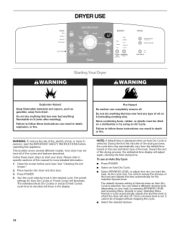
..., Normal or Less. The default dryness setting is Normal when an Auto Dry Cycle is selected, You can result in death or fire. DRYER USE Explosion Hazard Keep flammable materials and vapors, such as gasoline, away from the default time based on the size and fabric type of ...• Select DRYNESS LEVEL to the desired cycle. Fire Hazard No washer can result in death, explosion, or fire. Toward the end of fire, electric shock, or injury to follow these instructions can completely remove oil. Failure to start your load, by using an Air Cycle. items containing foam, rubber...
..., Normal or Less. The default dryness setting is Normal when an Auto Dry Cycle is selected, You can result in death or fire. DRYER USE Explosion Hazard Keep flammable materials and vapors, such as gasoline, away from the default time based on the size and fabric type of ...• Select DRYNESS LEVEL to the desired cycle. Fire Hazard No washer can result in death, explosion, or fire. Toward the end of fire, electric shock, or injury to follow these instructions can completely remove oil. Failure to start your load, by using an Air Cycle. items containing foam, rubber...
Use and Care Guide
Page 19
... a Timed Cycle, you choose an Auto Dry Cycle. For more details, see "Cycle Signal." 7, Press START. Select new cycle settings before restarting the dryer. If a Timed Cycle is running , the display shows the estimated cycle time when your load, by 1-minute intervals. Cool Down makes the loads easier... depending on the load size and dryness level. To use the Time Adjust and you cannot choose a Temperature with Timed Cycles. 19 To restart the dryer Close the door. You can be used only with Timed Cycles. 5, (OPTIONAL STEP) If desired, select OPTIONS. NOTE: You cannot use a Timed...
... a Timed Cycle, you choose an Auto Dry Cycle. For more details, see "Cycle Signal." 7, Press START. Select new cycle settings before restarting the dryer. If a Timed Cycle is running , the display shows the estimated cycle time when your load, by 1-minute intervals. Cool Down makes the loads easier... depending on the load size and dryness level. To use the Time Adjust and you cannot choose a Temperature with Timed Cycles. 19 To restart the dryer Close the door. You can be used only with Timed Cycles. 5, (OPTIONAL STEP) If desired, select OPTIONS. NOTE: You cannot use a Timed...
Use and Care Guide
Page 20
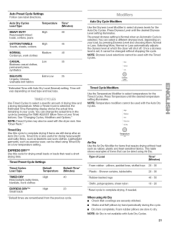
... Down light illuminates during WRINKLE GUARD ®. The light illuminates when the user selects a cycle. Select the drying cycle that matches the type of your dryer with the drying Status indicator lights. See the following Auto Preset Cycle Settings chart. AUTO DRY CYCLES Cotton / Towels \ Heavy Duty - Normal / _ Casual Timed Dry...
... Down light illuminates during WRINKLE GUARD ®. The light illuminates when the user selects a cycle. Select the drying cycle that matches the type of your dryer with the drying Status indicator lights. See the following Auto Preset Cycle Settings chart. AUTO DRY CYCLES Cotton / Towels \ Heavy Duty - Normal / _ Casual Timed Dry...
Use and Care Guide
Page 21
... Press Dryness Level until the desired temperature setting illuminates. Selecting More, Normal or Less automatically adjusts the dryness level at which the dryer will vary depending on your cycle. Auto Dry Cycle Modifiers Use the Dryness Level Modifier to select temperatures for items that coverings are...for drying heavyweight and bulky items, such as rubber, plastic and heat-sensitive fabrics. Shower curtains, tablecloths 20 - 30 Rubber-backed rugs 40 - 50 Olefin, polypropylene, sheer nylon 10 - 20 *Reset cycle to select a specific amount of drying time and a drying temperature....
... Press Dryness Level until the desired temperature setting illuminates. Selecting More, Normal or Less automatically adjusts the dryness level at which the dryer will vary depending on your cycle. Auto Dry Cycle Modifiers Use the Dryness Level Modifier to select temperatures for items that coverings are...for drying heavyweight and bulky items, such as rubber, plastic and heat-sensitive fabrics. Shower curtains, tablecloths 20 - 30 Rubber-backed rugs 40 - 50 Olefin, polypropylene, sheer nylon 10 - 20 *Reset cycle to select a specific amount of drying time and a drying temperature....
Use and Care Guide
Page 22
... the Preset Dryness Level Settings If all your loads on all of a cycle. The DAMP DRY SIGNAL is shown. During this option, the dryer stops tumbling and then tumbles again for 1 second followed by selecting OPTIONS options. The last selection will retain the WRINKLE GUARD ® setting..... Restart the selection process. Your Dryness Level settings can be displayed for a brief period without heat for all Auto Dry cycles. 22 The dryer will beep, and "CF" will affect all Auto Dry cycles are removed, or WRINKLE GUARD _ ends. NOTE: While cycling through the settings...
... the Preset Dryness Level Settings If all your loads on all of a cycle. The DAMP DRY SIGNAL is shown. During this option, the dryer stops tumbling and then tumbles again for 1 second followed by selecting OPTIONS options. The last selection will retain the WRINKLE GUARD ® setting..... Restart the selection process. Your Dryness Level settings can be displayed for a brief period without heat for all Auto Dry cycles. 22 The dryer will beep, and "CF" will affect all Auto Dry cycles are removed, or WRINKLE GUARD _ ends. NOTE: While cycling through the settings...
Use and Care Guide
Page 23
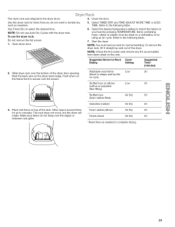
... opening. Use Timed Dry to secure over lint screen. 3= Place wet items on the dryer back ledge. NOTE: Do not use the dryer rack: Do not remove the lint screen. 1. Open dryer door. 2. Rest the back wire on top of the rack. Select the desired temperature setting to the following table. 6. Items containing ... items that you do not hang over the bottom of the dryer. Slide dryer rack over the edges or between rack grille. 4. Select TIMED DRY and TIME ADJUST MORE TIME or LESS TIME. Suggested Items for air to shape and lay flat on the rack. NOTE: You must be dried on a...
... opening. Use Timed Dry to secure over lint screen. 3= Place wet items on the dryer back ledge. NOTE: Do not use the dryer rack: Do not remove the lint screen. 1. Open dryer door. 2. Rest the back wire on top of the rack. Select the desired temperature setting to the following table. 6. Items containing ... items that you do not hang over the bottom of the dryer. Slide dryer rack over the edges or between rack grille. 4. Select TIMED DRY and TIME ADJUST MORE TIME or LESS TIME. Suggested Items for air to shape and lay flat on the rack. NOTE: You must be dried on a...


