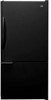

Use and Care Guide
Page 2
... instructions Warranty and Protection Agreements Installation Location Measuring the Opening Transporting Your Refrigerator Leveling Door Removal Reinstallation of the Doors Door Reversal Handles Connecting the Water Supply Temperature Controls Touch Temperature Controls Fresh Food Features Shelves Door Storage Storage Drawers Freezer Features Shelves and Baskets Accessories Ice Automatic Ice Maker Food Storage...
... instructions Warranty and Protection Agreements Installation Location Measuring the Opening Transporting Your Refrigerator Leveling Door Removal Reinstallation of the Doors Door Reversal Handles Connecting the Water Supply Temperature Controls Touch Temperature Controls Fresh Food Features Shelves Door Storage Storage Drawers Freezer Features Shelves and Baskets Accessories Ice Automatic Ice Maker Food Storage...
Use and Care Guide
Page 3
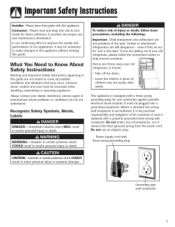
... appliance. Do not under any circumstances, cut or remove the third (ground) prong from the power cord. Always contact your old refrigerator or freezer: • Take off the doors. • Leave the shelves in this guide are not problems of our appliances, it provides the...which [ COULD resu t in minor personal injury or property damage. Power supply cord with a three-prong grounding plug for your old refrigerator, please follow basic precautions, including the following: important: Child entrapment and suffocation are not meant to the appliance without revising this guide. ...
... appliance. Do not under any circumstances, cut or remove the third (ground) prong from the power cord. Always contact your old refrigerator or freezer: • Take off the doors. • Leave the shelves in this guide are not problems of our appliances, it provides the...which [ COULD resu t in minor personal injury or property damage. Power supply cord with a three-prong grounding plug for your old refrigerator, please follow basic precautions, including the following: important: Child entrapment and suffocation are not meant to the appliance without revising this guide. ...
Use and Care Guide
Page 4
... instructions. 4. Be sure to Installation Instructions. Check with local codes and be operated in the presence of refrigerator unless specifically recommended in refrigerator. 18. Do not remove warning tag from electrical supply before using your refrigerator in good condition. Do not tamper with water installation. Do not service or replace any part of explosive...
... instructions. 4. Be sure to Installation Instructions. Check with local codes and be operated in the presence of refrigerator unless specifically recommended in refrigerator. 18. Do not remove warning tag from electrical supply before using your refrigerator in good condition. Do not tamper with water installation. Do not service or replace any part of explosive...
Use and Care Guide
Page 5
...with the product. 7. Damage to or failure of detergents, cleaners, chemicals or utensils other than private family purposed, this booklet and your refrigerator. This warranty gives you specific legal rights, and you . Product Record In the space below record the model and serial numbers and ...workmanship within one year or the shortest period allowed by the warranty. Sears will find the model and serial number sticker inside the refrigerator section on the duration of your Sears sales receipt in the United States and Canada. limitation of this appliance is used in ...
...with the product. 7. Damage to or failure of detergents, cleaners, chemicals or utensils other than private family purposed, this booklet and your refrigerator. This warranty gives you specific legal rights, and you . Product Record In the space below record the model and serial numbers and ...workmanship within one year or the shortest period allowed by the warranty. Sears will find the model and serial number sticker inside the refrigerator section on the duration of your Sears sales receipt in the United States and Canada. limitation of this appliance is used in ...
Use and Care Guide
Page 7
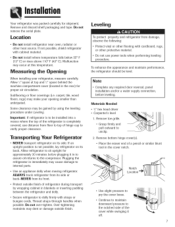
... where the top of hinge cap to dolly firmly with straps or bungee cords. Leveling To protect property and refrigerator from its side. Remove bottom hinge cover(s). • Place the eraser end of refrigerator during transport by using the leveling procedure under Leveling. Some clearance may dent or damage outside finish of a pencil...
... where the top of hinge cap to dolly firmly with straps or bungee cords. Leveling To protect property and refrigerator from its side. Remove bottom hinge cover(s). • Place the eraser end of refrigerator during transport by using the leveling procedure under Leveling. Some clearance may dent or damage outside finish of a pencil...

Use and Care Guide
Page 8
... removing doors. Using hex head driver, turn the front adjustment screws (A) on the interior of the refrigerator. Hold freezer door while removing hinge pin with cardboard, rugs or other flooring with a -%?'hex head drivel. Remove bottom hinge or stabilizing bracket with the lower cabinet slots. • Push the toe grille firmly until firmly...
... removing doors. Using hex head driver, turn the front adjustment screws (A) on the interior of the refrigerator. Hold freezer door while removing hinge pin with cardboard, rugs or other flooring with a -%?'hex head drivel. Remove bottom hinge or stabilizing bracket with the lower cabinet slots. • Push the toe grille firmly until firmly...

Use and Care Guide
Page 9
...with %" hex head so rews. • Install center hinge with Phillips so rews. • Install bottom hinge with 5A?'hex head driver and replace hinge cover. While holding refrigerator door upright, tighten down top hinge with 3/8"hex head screws. 2. Remove door(s} (see page 10}.... 8}. 2. Reinstallation of cabinet, and insert bottom hinge pin. Insert bottom hinge pin. * Locate bottom hinge hole closest to opposite side of cabinet. • Remove cabinet plugs with flat blade of freezer door on bottom hinge pin and hold freezer door upright while installing center hinge pin with...
...with %" hex head so rews. • Install center hinge with Phillips so rews. • Install bottom hinge with 5A?'hex head driver and replace hinge cover. While holding refrigerator door upright, tighten down top hinge with 3/8"hex head screws. 2. Remove door(s} (see page 10}.... 8}. 2. Reinstallation of cabinet, and insert bottom hinge pin. Insert bottom hinge pin. * Locate bottom hinge hole closest to opposite side of cabinet. • Remove cabinet plugs with flat blade of freezer door on bottom hinge pin and hold freezer door upright while installing center hinge pin with...
Use and Care Guide
Page 11
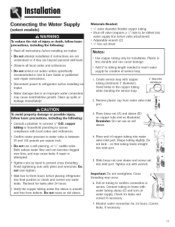
... port. important: Do not overtighten. Cross threading may cause mold/mildew growth. Monitor water connection for leaks and correct if necessary. 7. Disconnect power to refrigerator before placing refrigerator into final position to check and correct any water leaks. Water damage due to an improper water connection may occur. 6. copper tubing to household...
... port. important: Do not overtighten. Cross threading may cause mold/mildew growth. Monitor water connection for leaks and correct if necessary. 7. Disconnect power to refrigerator before placing refrigerator into final position to check and correct any water leaks. Water damage due to an improper water connection may occur. 6. copper tubing to household...
Use and Care Guide
Page 12
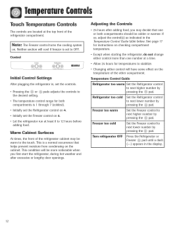
... Nono.teN: eithTehr e sFercetieozner wcilol nctroool l tiuf rfnreseztheer cisooselint gto sOysFtFe.m Control Freezer %,,_J/ Refrigerator |nitial Control Settings After plugging the refrigerator in, set the Freezer control on the temperature of the other compartment. Adjusting the Controls 2/4 hours after adding ...food, you first start the refrigerator, during hot weather and after excessive or lengthy door openings. Turn refrigerator OFF Press the Refrigerator or Freezer @ pad until a dash (--) appears in the Temperature Control Guide table...
... Nono.teN: eithTehr e sFercetieozner wcilol nctroool l tiuf rfnreseztheer cisooselint gto sOysFtFe.m Control Freezer %,,_J/ Refrigerator |nitial Control Settings After plugging the refrigerator in, set the Freezer control on the temperature of the other compartment. Adjusting the Controls 2/4 hours after adding ...food, you first start the refrigerator, during hot weather and after excessive or lengthy door openings. Turn refrigerator OFF Press the Refrigerator or Freezer @ pad until a dash (--) appears in the Temperature Control Guide table...
Use and Care Guide
Page 13
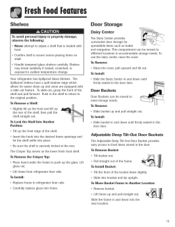
... rear of the bucket down into bracket and tip upright. Shelves may break suddenly if nicked, scratched, or exposed to sudden temperature change. Your refrigerator has Spillproof Glass Shelves. To use the dairy center, raise the cover. To Remove: • Slide bucket up the glass. Push in the... door. Door Buckets Door Buckets can be moved to meet storage needs. Slide the frame in refrigerator liner rails. • Carefully replace glass into place. • Be sure the shelf is securely locked at the rear. To slide out, grasp...
... rear of the bucket down into bracket and tip upright. Shelves may break suddenly if nicked, scratched, or exposed to sudden temperature change. Your refrigerator has Spillproof Glass Shelves. To use the dairy center, raise the cover. To Remove: • Slide bucket up the glass. Push in the... door. Door Buckets Door Buckets can be moved to meet storage needs. Slide the frame in refrigerator liner rails. • Carefully replace glass into place. • Be sure the shelf is securely locked at the rear. To slide out, grasp...

Use and Care Guide
Page 16
... ice storage bin periodically and wash it is normal for quick chilling. This will continue to make ice until arm is pushed down . • After freezer section reaches between 0° to 2° F (-17 ° to -16 ° C), ice maker fills with water and begins operating. Water damage... injury or property damage, observe the following: • Do not place fingers or hands on the automatic ice making mechanism while the refrigerator is plugged in lukewarm water. Continued consumption of such discolored ice cubes may be broken apart. Beverages and foods should not be placed in...
... ice storage bin periodically and wash it is normal for quick chilling. This will continue to make ice until arm is pushed down . • After freezer section reaches between 0° to 2° F (-17 ° to -16 ° C), ice maker fills with water and begins operating. Water damage... injury or property damage, observe the following: • Do not place fingers or hands on the automatic ice making mechanism while the refrigerator is plugged in lukewarm water. Continued consumption of such discolored ice cubes may be broken apart. Beverages and foods should not be placed in...

Use and Care Guide
Page 17
... with an optimum temperature of 37° F (3° C}. Store these foods in the original carton and refrigerate immediately after purchasing and after 24 hours. This overloads the freezer, slows the rate of freezing and can circulate freely, allowing food to freeze as quickly as possible. This... as described on pages 18 and 19 for longer time periods (see page 14}. * Sort fruits and vegetables before use aluminum foil, freezer wrap, freezer bags or airtight containers. StoragTeips Fresh Food Storage * The fresh food compartment of a refrigerator should be wrapped securely...
... with an optimum temperature of 37° F (3° C}. Store these foods in the original carton and refrigerate immediately after purchasing and after 24 hours. This overloads the freezer, slows the rate of freezing and can circulate freely, allowing food to freeze as quickly as possible. This... as described on pages 18 and 19 for longer time periods (see page 14}. * Sort fruits and vegetables before use aluminum foil, freezer wrap, freezer bags or airtight containers. StoragTeips Fresh Food Storage * The fresh food compartment of a refrigerator should be wrapped securely...

Use and Care Guide
Page 18
...hard apples at room temperature before refrigerating. May also store at room temperature before refrigerating. Use quickly. Wrap tightly. Ripen at room temperature before refrigerating. Check carton date. Do not return unused portions to 12 months Refrigerate small ends down. Check carton..., avocados 3 to 4 days Berries, cherries, apricots Grapes Citrus fruits 2 to 3 days 3 to 5 days 1 to 2 weeks Pineapples, cut 18 2 to 3 days 6 to 6 months May become crumbly Store in original carton. StoragTeips Food Storage Chart Storage times are approximate and may vary depending...
...hard apples at room temperature before refrigerating. May also store at room temperature before refrigerating. Use quickly. Wrap tightly. Ripen at room temperature before refrigerating. Check carton date. Do not return unused portions to 12 months Refrigerate small ends down. Check carton..., avocados 3 to 4 days Berries, cherries, apricots Grapes Citrus fruits 2 to 3 days 3 to 5 days 1 to 2 weeks Pineapples, cut 18 2 to 3 days 6 to 6 months May become crumbly Store in original carton. StoragTeips Food Storage Chart Storage times are approximate and may vary depending...
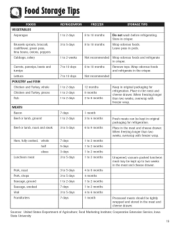
Use and Care Guide
Page 19
...to 6 months Keep in original packaging for refrigeration. When freezing longer than two weeks, overwrap with freezer wrap. Unopened, vacuum-packed luncheon meat may be kept up to 10 months Not recommended Wrap odorous foods and refrigerate in the meat and cheese drawer. Sources...longer than two weeks, overwrap with freezer wrap. 1 month 3 to 4 months 6 to 9 months 1 to 2 months 1 to 2 months 1 to 2 months 1 to 2 months 4 to 6 months 4 months 1 to 2 months 1 to 2 months 4 to 10 months Do not wash before refrigerating. StoragTeips VEGETABLES Asparagus Brussels sprouts, ...
...to 6 months Keep in original packaging for refrigeration. When freezing longer than two weeks, overwrap with freezer wrap. Unopened, vacuum-packed luncheon meat may be kept up to 10 months Not recommended Wrap odorous foods and refrigerate in the meat and cheese drawer. Sources...longer than two weeks, overwrap with freezer wrap. 1 month 3 to 4 months 6 to 9 months 1 to 2 months 1 to 2 months 1 to 2 months 1 to 2 months 4 to 6 months 4 months 1 to 2 months 1 to 2 months 4 to 10 months Do not wash before refrigerating. StoragTeips VEGETABLES Asparagus Brussels sprouts, ...
Use and Care Guide
Page 20
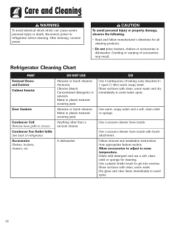
... surfaces with clean, warm water. Use a vacuum cleaner hose nozzle. Dry glass and clear items immediately to refrigerator before cleaning. Refrigerator Cleaning Chart To avoid personal injury or property damage, observe the following: Read and follow manufacturer's directions for ... instructions from appropriate feature section. Use a plastic bristle brush to room temperature. Condenser Fan Outlet Grille See back of refrigerator Accessories Shelves, buckets, drawers, etc. Textured Doors and Exterior Cabinet interior Door Gaskets Condenser Coil Remove base grille to avoid...
... surfaces with clean, warm water. Use a vacuum cleaner hose nozzle. Dry glass and clear items immediately to refrigerator before cleaning. Refrigerator Cleaning Chart To avoid personal injury or property damage, observe the following: Read and follow manufacturer's directions for ... instructions from appropriate feature section. Use a plastic bristle brush to room temperature. Condenser Fan Outlet Grille See back of refrigerator Accessories Shelves, buckets, drawers, etc. Textured Doors and Exterior Cabinet interior Door Gaskets Condenser Coil Remove base grille to avoid...
Use and Care Guide
Page 21
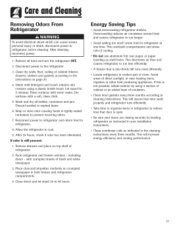
..., shelves and gaskets according to reduce time that is open. • Be sure your doors are closing securely by leveling refrigerator as instructed in both freezer and refrigerator compartments. 4. Let stand for 5 minutes. Locate refrigerator in coolest part of black and white newspaper. 3. This will increase energy efficiency and cooling performance. 21 Wrap or...
..., shelves and gaskets according to reduce time that is open. • Be sure your doors are closing securely by leveling refrigerator as instructed in both freezer and refrigerator compartments. 4. Let stand for 5 minutes. Locate refrigerator in coolest part of black and white newspaper. 3. This will increase energy efficiency and cooling performance. 21 Wrap or...
Use and Care Guide
Page 22
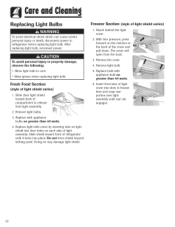
...the light .... With firm pressure, press forward on each side of refrigerator until rear tab engages. 22 The cover will open from light assembly. 2. Insert front tabs of light shield varies) 1. Remove light bulbs. 3. Freezer Section (style of light cover into liner holes on the notches at ...Replace bulb with appliance bulbs no greater than 40 watts. 4_ Replace light bulb cover by inserting tabs on light shield into slots in freezer liner and snap rear portion over light assembly until it locks into place. l::leanln Replacing Light Bulbs To avoid electrical shock which can ...
...the light .... With firm pressure, press forward on each side of refrigerator until rear tab engages. 22 The cover will open from light assembly. 2. Insert front tabs of light shield varies) 1. Remove light bulbs. 3. Freezer Section (style of light cover into liner holes on the notches at ...Replace bulb with appliance bulbs no greater than 40 watts. 4_ Replace light bulb cover by inserting tabs on light shield into slots in freezer liner and snap rear portion over light assembly until it locks into place. l::leanln Replacing Light Bulbs To avoid electrical shock which can ...
Use and Care Guide
Page 23
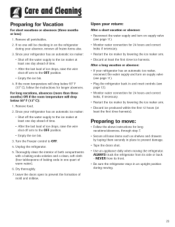
Turn the Freezer control to prevent damage. * Tape the doors shut. * Use an appliance dolly when moving . 23 Dry thoroughly. 7. Be sure the refrigerator stays in an upright position during your refrigerator has an automatic ice maker: * Shut off the water supply to the ice maker at least ...load of mold and mildew. If no one day ahead of time. * After the last load of warm water). 6. Remove food. 2. Unplug the refrigerator. 5. Since your absence, remove all perishables. 2. If the room temperature will drop 1. For long vacations, absences [more months) OR if the room...
Turn the Freezer control to prevent damage. * Tape the doors shut. * Use an appliance dolly when moving . 23 Dry thoroughly. 7. Be sure the refrigerator stays in an upright position during your refrigerator has an automatic ice maker: * Shut off the water supply to the ice maker at least ...load of mold and mildew. If no one day ahead of time. * After the last load of warm water). 6. Remove food. 2. Unplug the refrigerator. 5. Since your absence, remove all perishables. 2. If the room temperature will drop 1. For long vacations, absences [more months) OR if the room...

Use and Care Guide
Page 24
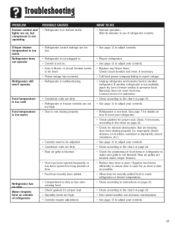
... device (B) sounds like an electric clock and snaps in and out. • Freezer fan (C) and condenser fan (D) make this noise while operating. • Evaporator (E) and heat exchanger (F) refrigerant makes this noise when flowing. • Ice cubes from ice maker (select models...Normal operation • Normal operation • Normal operation • Normal operation • Compressor (H) makes a pulsating sound while running. • Refrigerator is not level. • Ice maker water valve (I) hookup (select models) buzzes when ice maker fills with water. • Normal operation *...
... device (B) sounds like an electric clock and snaps in and out. • Freezer fan (C) and condenser fan (D) make this noise while operating. • Evaporator (E) and heat exchanger (F) refrigerant makes this noise when flowing. • Ice cubes from ice maker (select models...Normal operation • Normal operation • Normal operation • Normal operation • Compressor (H) makes a pulsating sound while running. • Refrigerator is not level. • Ice maker water valve (I) hookup (select models) buzzes when ice maker fills with water. • Normal operation *...
Use and Care Guide
Page 25
...to instructions on page 20. • Clean according to the chart on , but compressor is not operating • Refrigerator is in freezer section to see if refrigerator restarts. Warranty does not cover food loss. Organize food items efficiently to level your controls. ° Replace any ... drawers, ice buckets, oversized or improperly stored containers, etc.] ° See page 12 to adjust your controls. • Refrigerator is not level. Troubleshoofln9 Freezer control and lights are located under crisper drawers. • Reduce time door is open for as short a time as possible....
...to instructions on page 20. • Clean according to the chart on , but compressor is not operating • Refrigerator is in freezer section to see if refrigerator restarts. Warranty does not cover food loss. Organize food items efficiently to level your controls. ° Replace any ... drawers, ice buckets, oversized or improperly stored containers, etc.] ° See page 12 to adjust your controls. • Refrigerator is not level. Troubleshoofln9 Freezer control and lights are located under crisper drawers. • Reduce time door is open for as short a time as possible....


