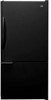

Use and Care Guide
Page 2
... instructions Warranty and Protection Agreements Installation Location Measuring the Opening Transporting Your Refrigerator Leveling Door Removal Reinstallation of the Doors Door Reversal Handles Connecting the Water Supply Temperature Controls Touch Temperature Controls Fresh Food Features Shelves Door Storage Storage Drawers Freezer Features Shelves and Baskets Accessories Ice Automatic Ice Maker Food Storage...
... instructions Warranty and Protection Agreements Installation Location Measuring the Opening Transporting Your Refrigerator Leveling Door Removal Reinstallation of the Doors Door Reversal Handles Connecting the Water Supply Temperature Controls Touch Temperature Controls Fresh Food Features Shelves Door Storage Storage Drawers Freezer Features Shelves and Baskets Accessories Ice Automatic Ice Maker Food Storage...
Use and Care Guide
Page 3
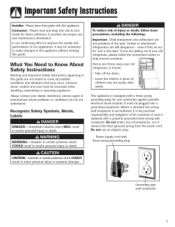
...maintenance information. Always contact your dealer, distributor, service agent or manufacturer about problems or conditions you throw away your old refrigerator or freezer: • Take off the doors. • Leave the shelves in this guide are getting rid of your protection... may occur. It must be plugged into a grounding receptacle. Power supply cord with a three-prong grounding plug for your old refrigerator, please follow basic precautions, including the following: important: Child entrapment and suffocation are still dangerous - Recognize Safety Symbols, Words, ...
...maintenance information. Always contact your dealer, distributor, service agent or manufacturer about problems or conditions you throw away your old refrigerator or freezer: • Take off the doors. • Leave the shelves in this guide are getting rid of your protection... may occur. It must be plugged into a grounding receptacle. Power supply cord with a three-prong grounding plug for your old refrigerator, please follow basic precautions, including the following: important: Child entrapment and suffocation are still dangerous - Recognize Safety Symbols, Words, ...
Use and Care Guide
Page 4
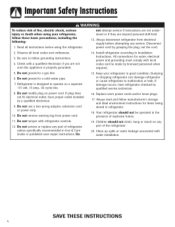
...16. Do not ground to a cold-water pipe. 7 Refrigerator is properly grounded. 5_ Do not ground to a gas line. 6. A/ways disconnect refrigerator from power cord. 11. All connections for items being stored in refrigerator. 18. Replace worn power cords and/or loose plugs. 17. ...Bumping or dropping refrigerator can damage refrigerator or cause refrigerator to operate on a separate 115 volt, 15 amp...
...16. Do not ground to a cold-water pipe. 7 Refrigerator is properly grounded. 5_ Do not ground to a gas line. 6. A/ways disconnect refrigerator from power cord. 11. All connections for items being stored in refrigerator. 18. Replace worn power cords and/or loose plugs. 17. ...Bumping or dropping refrigerator can damage refrigerator or cause refrigerator to operate on a separate 115 volt, 15 amp...
Use and Care Guide
Page 5
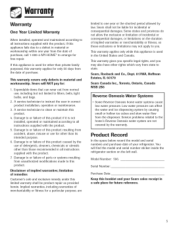
... damages, or limitations on the left wall. Model Number: 596. Sears will find the model and serial number sticker inside the refrigerator section on the duration of this product resulting from the dispenser. Damage to or failure of this limited warranty shall be liable for...safe place for : 1. Disclaimer of parts or systems resulting from normal use for free repair. This warranty applies only while this booklet and your refrigerator. Serial Number: Purchase Date: Keep this appliance is used in the United States and Canada. Sears, Roebuck and Co., Dept. 817WA, Heft[...
... damages, or limitations on the left wall. Model Number: 596. Sears will find the model and serial number sticker inside the refrigerator section on the duration of this product resulting from the dispenser. Damage to or failure of this limited warranty shall be liable for...safe place for : 1. Disclaimer of parts or systems resulting from normal use for free repair. This warranty applies only while this booklet and your refrigerator. Serial Number: Purchase Date: Keep this appliance is used in the United States and Canada. Sears, Roebuck and Co., Dept. 817WA, Heft[...
Use and Care Guide
Page 7
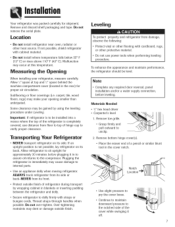
... 1. Malfunction may cause damage to unclip. 2. Allow '/;' space at this temperature. To enhance the appearance and maintain performance the refrigerator should be installed into a recess where the top of the cover while swinging it in to assure oil returns to the compressor.... straps through handles when possible. Do not over-tighten. Remove bottom hinge cover(s). • Place the eraser end of refrigerator during transport by using the leveling procedure under Leveling. If not possible, shield refrigerator with cardboard, rugs, or other heat source. carpet, tile,...
... 1. Malfunction may cause damage to unclip. 2. Allow '/;' space at this temperature. To enhance the appearance and maintain performance the refrigerator should be installed into a recess where the top of the cover while swinging it in to assure oil returns to the compressor.... straps through handles when possible. Do not over-tighten. Remove bottom hinge cover(s). • Place the eraser end of refrigerator during transport by using the leveling procedure under Leveling. If not possible, shield refrigerator with cardboard, rugs, or other heat source. carpet, tile,...

Use and Care Guide
Page 8
...Position cover into the outer edge of the toe grille is level from refrigerator door by removing Phillips screw and retain screw and cover for later use . Hold freezer door while removing hinge pin with the lower cabinet slots. • ...Push the toe grille firmly until firmly against floor. Turn stabilizing legs (B) clockwise until it into place. Remove bottom hinge or stabilizing bracket with cardboard, rugs or other protective material. Remove any door shims if present. To avoid damage to refrigerator...
...Position cover into the outer edge of the toe grille is level from refrigerator door by removing Phillips screw and retain screw and cover for later use . Hold freezer door while removing hinge pin with the lower cabinet slots. • ...Push the toe grille firmly until firmly against floor. Turn stabilizing legs (B) clockwise until it into place. Remove bottom hinge or stabilizing bracket with cardboard, rugs or other protective material. Remove any door shims if present. To avoid damage to refrigerator...

Use and Care Guide
Page 9
... installed tightly. 4. Place hinge side of cabinet, and insert bottom hinge pin. Transfer door stops from bottom edge of fresh food door and freezer door, if applicable, to outside edge of refrigerator door on center hinge pin. 5. Install handles (see page 8}. 2. Insert bottom hinge pin. * Locate bottom hinge hole closest to opposite side of screwdriver tip...
... installed tightly. 4. Place hinge side of cabinet, and insert bottom hinge pin. Transfer door stops from bottom edge of fresh food door and freezer door, if applicable, to outside edge of refrigerator door on center hinge pin. 5. Install handles (see page 8}. 2. Insert bottom hinge pin. * Locate bottom hinge hole closest to opposite side of screwdriver tip...
Use and Care Guide
Page 11
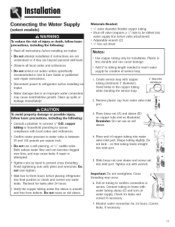
...damage or possible injury, follow basic }recautions, including the following : Consult a plumber to be drilled into water supply line before placing refrigerator into inlet port. 5. Do not service ice maker unless specifically recommended in the copper tubing when bending the service loop. 2' diameter minimum...Shape tubing slightly. Disconnect power to check and correct any water leaks. so that tubing feeds straight into final position to refrigerator before installing ice maker. Tighten nut with pliers and wrenches. Plastic is smooth and free from water valve inlet port. ...
...damage or possible injury, follow basic }recautions, including the following : Consult a plumber to be drilled into water supply line before placing refrigerator into inlet port. 5. Do not service ice maker unless specifically recommended in the copper tubing when bending the service loop. 2' diameter minimum...Shape tubing slightly. Disconnect power to check and correct any water leaks. so that tubing feeds straight into final position to refrigerator before installing ice maker. Tighten nut with pliers and wrenches. Plastic is smooth and free from water valve inlet port. ...
Use and Care Guide
Page 12
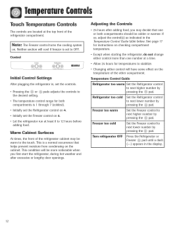
...: eithTehr e sFercetieozner wcilol nctroool l tiuf rfnreseztheer cisooselint gto sOysFtFe.m Control Freezer %,,_J/ Refrigerator |nitial Control Settings After plugging the refrigerator in the display. 12 This condition will have some effect on the temperature of the refrigerator corn partment. Refrigerator too cold Freezer too warm Set the Refrigerator control to next lower number by pressing the @ pad. Set...
...: eithTehr e sFercetieozner wcilol nctroool l tiuf rfnreseztheer cisooselint gto sOysFtFe.m Control Freezer %,,_J/ Refrigerator |nitial Control Settings After plugging the refrigerator in the display. 12 This condition will have some effect on the temperature of the refrigerator corn partment. Refrigerator too cold Freezer too warm Set the Refrigerator control to next lower number by pressing the @ pad. Set...
Use and Care Guide
Page 13
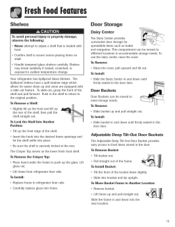
... such as the lower fresh food shelf. To slide out, grasp the front of the frame. Lift glass out. • Lift frame from refrigerator liner rails. This compartment can be moved to different locations to accommodate storage needs. To use the dairy center, raise the cover. To Move ...8226; Slide bucket up the rear of the shelf, then pull the shelf straight out. Slide the frame in refrigerator liner rails. • Carefully replace glass into the new location. 13 Your refrigerator has Spillproof Glass Shelves. To Remove a Shelf: • Slightly tilt up the front and lift up and ...
... such as the lower fresh food shelf. To slide out, grasp the front of the frame. Lift glass out. • Lift frame from refrigerator liner rails. This compartment can be moved to different locations to accommodate storage needs. To use the dairy center, raise the cover. To Move ...8226; Slide bucket up the rear of the shelf, then pull the shelf straight out. Slide the frame in refrigerator liner rails. • Carefully replace glass into the new location. 13 Your refrigerator has Spillproof Glass Shelves. To Remove a Shelf: • Slightly tilt up the front and lift up and ...

Use and Care Guide
Page 16
Proper water flow and a level refrigerator are ejected it in lukewarm water. They can easily be placed in the off position until ...ice maker fills with water and begins operating. The ice maker will continue to make ice until arm is pushed down . • After freezer section reaches between 0° to 2° F (-17 ° to the water supply as instructed on by raising ice maker arm until ...the following: • Do not place fingers or hands on the automatic ice making mechanism while the refrigerator is plugged in an inactive water supply line which feeds the ice maker.
Proper water flow and a level refrigerator are ejected it in lukewarm water. They can easily be placed in the off position until ...ice maker fills with water and begins operating. The ice maker will continue to make ice until arm is pushed down . • After freezer section reaches between 0° to 2° F (-17 ° to the water supply as instructed on by raising ice maker arm until ...the following: • Do not place fingers or hands on the automatic ice making mechanism while the refrigerator is plugged in an inactive water supply line which feeds the ice maker.

Use and Care Guide
Page 17
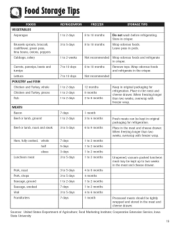
.... This reduces the circulation of air around and below the moldy area. Store these foods in the center of the refrigerator. A freezer operates more efficiently when it is above 40 ° F (4° C} adjust the controls as possible and be sure they are best stored in uneven cooling. ... freeze as quickly as ice cream and orange juice on pages 18 and 19 for longer time periods (see page 14}. * Sort fruits and vegetables before use bruised or soft items first. Refer to the Food Storage Chart on the freezer door shelves. If the temperature is at one time. Dairy Food...
.... This reduces the circulation of air around and below the moldy area. Store these foods in the center of the refrigerator. A freezer operates more efficiently when it is above 40 ° F (4° C} adjust the controls as possible and be sure they are best stored in uneven cooling. ... freeze as quickly as ice cream and orange juice on pages 18 and 19 for longer time periods (see page 14}. * Sort fruits and vegetables before use bruised or soft items first. Refer to the Food Storage Chart on the freezer door shelves. If the temperature is at one time. Dairy Food...

Use and Care Guide
Page 18
... and the quality of yolks to be frozen, add 1 tsp. Note: Bananas will darken when refrigerated. Note: Avocados will darken when refrigerated. Do not return unused portions to 21 ° C). For each cup of the food when ...Refrigerate small ends down. Close tightly. Not recommended Not recommended 4 to 6 months May become crumbly Store in the shell Leftover yolks or whites 3 weeks 2 to 4 days FRUITS Apples Bananas 1 month 2 to 4 days Pears, plums, avocados 3 to 4 days Berries, cherries, apricots Grapes Citrus fruits 2 to 3 days 3 to 5 days 1 to 2 weeks Pineapples, cut 18...
... and the quality of yolks to be frozen, add 1 tsp. Note: Bananas will darken when refrigerated. Note: Avocados will darken when refrigerated. Do not return unused portions to 21 ° C). For each cup of the food when ...Refrigerate small ends down. Close tightly. Not recommended Not recommended 4 to 6 months May become crumbly Store in the shell Leftover yolks or whites 3 weeks 2 to 4 days FRUITS Apples Bananas 1 month 2 to 4 days Pears, plums, avocados 3 to 4 days Berries, cherries, apricots Grapes Citrus fruits 2 to 3 days 3 to 5 days 1 to 2 weeks Pineapples, cut 18...
Use and Care Guide
Page 19
... odorous foods. Leave peas in crisper. When freezing longer than two weeks, overwrap with freezer wrap. Not recommended 8 to 10 months Not recommended Wrap odorous foods and refrigerate in pods. Place in the meat and cheese drawer. When freezing longer than two weeks..., overwrap with freezer wrap. 1 month 3 to 4 months 6 to 9 months 1 to 2 months 1 to 2 months 1 to 2 months 1 to 2 months 4 to 6 months 4 months 1 to 2 months 1 to 2 months 4 to two weeks in original packaging for refrigeration. Processed meats should be kept up to ...
... odorous foods. Leave peas in crisper. When freezing longer than two weeks, overwrap with freezer wrap. Not recommended 8 to 10 months Not recommended Wrap odorous foods and refrigerate in pods. Place in the meat and cheese drawer. When freezing longer than two weeks..., overwrap with freezer wrap. 1 month 3 to 4 months 6 to 9 months 1 to 2 months 1 to 2 months 1 to 2 months 1 to 2 months 4 to 6 months 4 months 1 to 2 months 1 to 2 months 4 to two weeks in original packaging for refrigeration. Processed meats should be kept up to ...
Use and Care Guide
Page 20
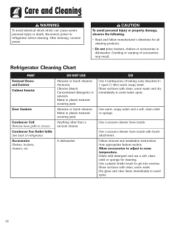
...Doors and Exterior Cabinet interior Door Gaskets Condenser Coil Remove base grille to get into crevices. Rinse surfaces with brush attachment. Refrigerator Cleaning Chart To avoid personal injury or property damage, observe the following: Read and follow manufacturer's directions for cleaning. Dilute...to adjust to avoid spots. 2O Dry glass and clear items immediately to room temperature. Condenser Fan Outlet Grille See back of refrigerator Accessories Shelves, buckets, drawers, etc. Use a vacuum cleaner hose nozzle with clean, warm water. Follow removal and installation ...
...Doors and Exterior Cabinet interior Door Gaskets Condenser Coil Remove base grille to get into crevices. Rinse surfaces with brush attachment. Refrigerator Cleaning Chart To avoid personal injury or property damage, observe the following: Read and follow manufacturer's directions for cleaning. Dilute...to adjust to avoid spots. 2O Dry glass and clear items immediately to room temperature. Condenser Fan Outlet Grille See back of refrigerator Accessories Shelves, buckets, drawers, etc. Use a vacuum cleaner hose nozzle with clean, warm water. Follow removal and installation ...
Use and Care Guide
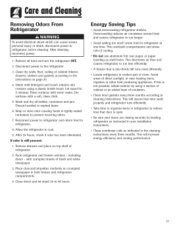
Page 21
... of cooling. • [}o not use aluminum foil, wax paper, or paper toweling as indicated in both freezer and refrigerator compartments. 4. Remove drawers and place o=1top shelf of direct sunlight, or near heating ducts, registers or other... randomly on page 20. 4. Reconnect power to refrigerator and return food to the refrigerator. 3. Disconnect power to refrigerator. 8. Pack refrigerator and freezer sections - Energy Saving Tips • Avoid overcrowding refrigerator shelves. l::leanlng Removing Odors From Refrigerator To avoid electrical shock which can cause severe personal...
... of cooling. • [}o not use aluminum foil, wax paper, or paper toweling as indicated in both freezer and refrigerator compartments. 4. Remove drawers and place o=1top shelf of direct sunlight, or near heating ducts, registers or other... randomly on page 20. 4. Reconnect power to refrigerator and return food to the refrigerator. 3. Disconnect power to refrigerator. 8. Pack refrigerator and freezer sections - Energy Saving Tips • Avoid overcrowding refrigerator shelves. l::leanlng Removing Odors From Refrigerator To avoid electrical shock which can cause severe personal...
Use and Care Guide
Page 22
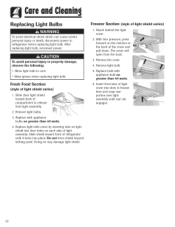
... compartment to release from the back. 3. To avoid personal injury or property damage, observe the following: • Allow light bulb to refrigerator before replacing light bulb. Reach behind the light .... The cover will open from light assembly. 2. Fresh Food Section (style of light ...Slide clear light shield toward front of light cover into place. Freezer Section (style of light assembly. After replacing light bulb, reconnect power. Insert front tabs of refrigerator until it locks into slots in freezer liner and snap rear portion over light assembly until rear tab engages...
... compartment to release from the back. 3. To avoid personal injury or property damage, observe the following: • Allow light bulb to refrigerator before replacing light bulb. Reach behind the light .... The cover will open from light assembly. 2. Fresh Food Section (style of light ...Slide clear light shield toward front of light cover into place. Freezer Section (style of light assembly. After replacing light bulb, reconnect power. Insert front tabs of refrigerator until it locks into slots in freezer liner and snap rear portion over light assembly until rear tab engages...
Use and Care Guide
Page 23
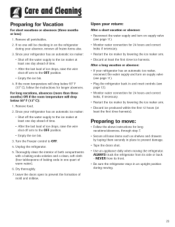
.... 4. Thoroughly clean the interior of both compartments with a baking soda solution and a clean, soft cloth (four tablespoons of mold and mildew. Be sure the refrigerator stays in an upright position during your return: After a short vacation or absence: * Reconnect the water supply and turn on supply valve (see page 11... the room temperature below 55 ° F (13° C), follow the instructions for Vacation For short vacations or absences [three months or less): 1. Turn the Freezer control to the OFF position. * Empty the ice bin. 3. (;leenln Preparing for longer absences.
.... 4. Thoroughly clean the interior of both compartments with a baking soda solution and a clean, soft cloth (four tablespoons of mold and mildew. Be sure the refrigerator stays in an upright position during your return: After a short vacation or absence: * Reconnect the water supply and turn on supply valve (see page 11... the room temperature below 55 ° F (13° C), follow the instructions for Vacation For short vacations or absences [three months or less): 1. Turn the Freezer control to the OFF position. * Empty the ice bin. 3. (;leenln Preparing for longer absences.

Use and Care Guide
Page 24
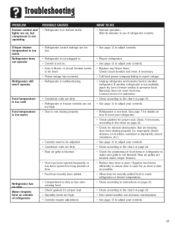
... device (B) sounds like an electric clock and snaps in and out. • Freezer fan (C) and condenser fan (D) make this noise while operating. • Evaporator (E) and heat exchanger (F) refrigerant makes this noise when flowing. • Ice cubes from ice maker (select models...Normal operation • Normal operation • Normal operation • Normal operation • Compressor (H) makes a pulsating sound while running. • Refrigerator is not level. • Ice maker water valve (I) hookup (select models) buzzes when ice maker fills with water. • Normal operation *...
... device (B) sounds like an electric clock and snaps in and out. • Freezer fan (C) and condenser fan (D) make this noise while operating. • Evaporator (E) and heat exchanger (F) refrigerant makes this noise when flowing. • Ice cubes from ice maker (select models...Normal operation • Normal operation • Normal operation • Normal operation • Compressor (H) makes a pulsating sound while running. • Refrigerator is not level. • Ice maker water valve (I) hookup (select models) buzzes when ice maker fills with water. • Normal operation *...
Use and Care Guide
Page 25
... drawers. • Reduce time door is open for as short a time as possible. • Allow time for recently added food to reach refrigerator or freezer temperature. ° Clean according to instructions on page 20. • Clean according to the chart on page 20. ° See page 12...preserve food. Clean, if necessary, according to the chart on how to level your controls. 25 Troubleshoofln9 Freezer control and lights are on, but compressor is not operating • Refrigerator is in refrigerator to make sure grille is not blocked. See page 7 for details on page 20. ° ...
... drawers. • Reduce time door is open for as short a time as possible. • Allow time for recently added food to reach refrigerator or freezer temperature. ° Clean according to instructions on page 20. • Clean according to the chart on page 20. ° See page 12...preserve food. Clean, if necessary, according to the chart on how to level your controls. 25 Troubleshoofln9 Freezer control and lights are on, but compressor is not operating • Refrigerator is in refrigerator to make sure grille is not blocked. See page 7 for details on page 20. ° ...


