Use and Care Manual
Page 2
...serial number for several models. Table of Contents Wall Oven Warranty 2 Product Record 2 Serial Plate Location 2 IMPORTANT SAFETY INSTRUCTIONS 3-4 Grounding instructions 5 Oven ignition 5 Liquefied Petroleum (Propane) Gas Conversion .......... 5 Wall Oven Features 6 Oven Vent and Racks 7 Air Circulation in the Oven 7 Control Pad Features 8 Setting the Oven Controls 9-14 Self=Cleaning 15-16 General Care & Cleaning 17=20 Adjusting the Oven Temperature 20 Before You Call 21 Protection Agreements 22 Notes 23 Sears Service 22 Kenmore Warranty When installed, operated...
...serial number for several models. Table of Contents Wall Oven Warranty 2 Product Record 2 Serial Plate Location 2 IMPORTANT SAFETY INSTRUCTIONS 3-4 Grounding instructions 5 Oven ignition 5 Liquefied Petroleum (Propane) Gas Conversion .......... 5 Wall Oven Features 6 Oven Vent and Racks 7 Air Circulation in the Oven 7 Control Pad Features 8 Setting the Oven Controls 9-14 Self=Cleaning 15-16 General Care & Cleaning 17=20 Adjusting the Oven Temperature 20 Before You Call 21 Protection Agreements 22 Notes 23 Sears Service 22 Kenmore Warranty When installed, operated...
Use and Care Manual
Page 3
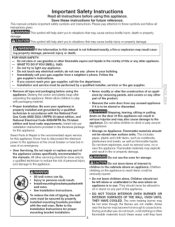
... National Fuel Gas Code ANSI Z223.1/NFPA 54 latest edition, and National Electrical Code ANSI/NFPA No.70-1atest edition and local code requirements. All other part of the product. ,, Remove the oven door from a neighbor's phone. Children climbing on the appliance to persons could be secured by removing panels, wire covers or any electrical switch; The oven heating burner may be stored near surface units. Sears Parts & Repair is not...
... National Fuel Gas Code ANSI Z223.1/NFPA 54 latest edition, and National Electrical Code ANSI/NFPA No.70-1atest edition and local code requirements. All other part of the product. ,, Remove the oven door from a neighbor's phone. Children climbing on the appliance to persons could be secured by removing panels, wire covers or any electrical switch; The oven heating burner may be stored near surface units. Sears Parts & Repair is not...
Use and Care Manual
Page 4
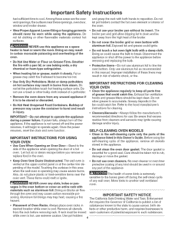
... as recommended in the fan could catch fire. Once the power resumes, reset the clock and oven function. These items could ignite. = Do not touch a hot oven light bulb with a pan lid, or use your broiler par=without its insert. Placement of the oven. • WearProperApparel. Always place oven racks in this manual. SELF-CLEANING OVEN MODELS • Clean in the self=cleaning cycle only the parts of the appliance, remove all utensils stored...
... as recommended in the fan could catch fire. Once the power resumes, reset the clock and oven function. These items could ignite. = Do not touch a hot oven light bulb with a pan lid, or use your broiler par=without its insert. Placement of the oven. • WearProperApparel. Always place oven racks in this manual. SELF-CLEANING OVEN MODELS • Clean in the self=cleaning cycle only the parts of the appliance, remove all utensils stored...
Use and Care Manual
Page 5
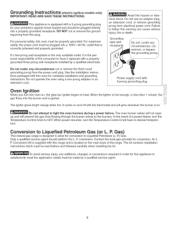
... temperature. The kit contains installation instructions which must be plugged directly into a 120V--60 Hz. In the event of a power failure, turn the Temperature Control knob to OFR When power resumes, turn the oven on the main back of the consumer to satisfactorily meet the application needs must be read before and followed carefully when installing the kit. P.) Gas. R conversion. Power supply cord with a 3-prong grounding plug for complete installation and grounding instructions. Grounding instructions...
... temperature. The kit contains installation instructions which must be plugged directly into a 120V--60 Hz. In the event of a power failure, turn the Temperature Control knob to OFR When power resumes, turn the oven on the main back of the consumer to satisfactorily meet the application needs must be read before and followed carefully when installing the kit. P.) Gas. R conversion. Power supply cord with a 3-prong grounding plug for complete installation and grounding instructions. Grounding instructions...
Use and Care Manual
Page 6
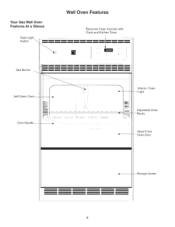
Light Adjustable Oven Racks Glass Front --Oven Door _torage drawer Door Handle Interior Oven -- Your Gas Wall Oven Features At a Glance Oven Light Switch Wall Oven Features Electronic Oven Controls with Clock and Kitchen Timer Gas Burner Self-Clean Oven--
Light Adjustable Oven Racks Glass Front --Oven Door _torage drawer Door Handle Interior Oven -- Your Gas Wall Oven Features At a Glance Oven Light Switch Wall Oven Features Electronic Oven Controls with Clock and Kitchen Timer Gas Burner Self-Clean Oven--
Use and Care Manual
Page 7
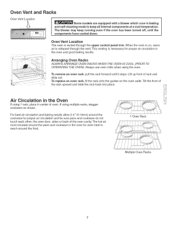
... of oven. Arranging Oven Racks ALWAYS ARRANGE OVEN RACKS WHEN THE OVEN !S COOL (PRIOR TO OPERATING THE OVEN), Always use oven mitts when using 1 rack, place in center of the oven cavity. To replace an oven rack, fit the rack onto the guides on , warm air is vented through the vent. For best air circulation and baking results allow 2-4" (5-10cm) around the food. 1 Oven Rack ii.i.l i.i........ Oven Vent and Racks Oven Vent Location _ Some models are equipped with a blower which runs in baking and self=cleaning mode...
... of oven. Arranging Oven Racks ALWAYS ARRANGE OVEN RACKS WHEN THE OVEN !S COOL (PRIOR TO OPERATING THE OVEN), Always use oven mitts when using 1 rack, place in center of the oven cavity. To replace an oven rack, fit the rack onto the guides on , warm air is vented through the vent. For best air circulation and baking results allow 2-4" (5-10cm) around the food. 1 Oven Rack ii.i.l i.i........ Oven Vent and Racks Oven Vent Location _ Some models are equipped with a blower which runs in baking and self=cleaning mode...
Use and Care Manual
Page 8
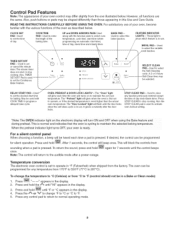
... start time for any temperature from sounding when a pad is pressed, To return the sound, press and hold _t until the control beeps Temperature conversion The electronic oven control is reset higher than those appearing in the display. 4. FEATURE iNDiCATOR LIGHTS-- TIMER SET/OFF PAD-- STOP CLEAR PAD-- Press STOP CLEAR to stop cooking. The oven can be programmed for 7 seconds until °F or °C appears in this Use and Care Guide...
... start time for any temperature from sounding when a pad is pressed, To return the sound, press and hold _t until the control beeps Temperature conversion The electronic oven control is reset higher than those appearing in the display. 4. FEATURE iNDiCATOR LIGHTS-- TIMER SET/OFF PAD-- STOP CLEAR PAD-- Press STOP CLEAR to stop cooking. The oven can be programmed for 7 seconds until °F or °C appears in this Use and Care Guide...
Use and Care Manual
Page 9
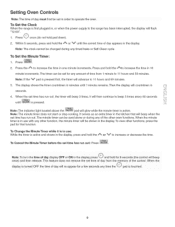
... hold pad down). 2. Note: The minute timer does not start or stop cooking. Setting Oven Controls Note: The time of day must first be set in order To Set the Clock When the range is active and shows in the display, press and hold the _ or %Y to increase or decrease the time. To Set the Minute Timer: 1. The timer can be used alone or during any amount of...
... hold pad down). 2. Note: The minute timer does not start or stop cooking. Setting Oven Controls Note: The time of day must first be set in order To Set the Clock When the range is active and shows in the display, press and hold the _ or %Y to increase or decrease the time. To Set the Minute Timer: 1. The timer can be used alone or during any amount of...
Use and Care Manual
Page 10
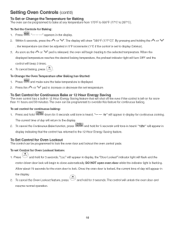
... or decrease the set Control for 3 seconds. DO NOT open oven door while the indicator light is displayed. 2. To set temperature. Allow about 15 seconds for continuous cooking. By pressing and holding the _,_. When the displayed temperature reaches the desired baking temperature, the preheat indicator light will turn OFF and the control will unlock the oven door and resume normal operation. 10 Press .... "12hr" will appear in the display. 2. The display will appear in...
... or decrease the set Control for 3 seconds. DO NOT open oven door while the indicator light is displayed. 2. To set temperature. Allow about 15 seconds for continuous cooking. By pressing and holding the _,_. When the displayed temperature reaches the desired baking temperature, the preheat indicator light will turn OFF and the control will unlock the oven door and resume normal operation. 10 Press .... "12hr" will appear in the display. 2. The display will appear in...
Use and Care Manual
Page 11
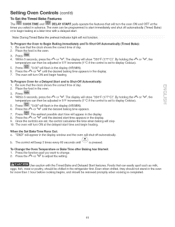
... at a later time with the Timed Bake and Delayed Start features. The oven will flash in the display (HR:MIN). 6. The control will flash in the display (HR:MIN). 6. "0:00" will beep 3 times every 60 seconds until the desired baking time appears in the display. 9. Once the controls are set to change. 2. To Change the Oven Temperature or Bake Time after Baking has Started: 1. Use caution with a delayed start time appears in the display. 7. Press |. 4. The oven will stop. 10. Press...
... at a later time with the Timed Bake and Delayed Start features. The oven will flash in the display (HR:MIN). 6. The control will flash in the display (HR:MIN). 6. "0:00" will beep 3 times every 60 seconds until the desired baking time appears in the display. 9. Once the controls are set to change. 2. To Change the Oven Temperature or Bake Time after Baking has Started: 1. Use caution with a delayed start time appears in the display. 7. Press |. 4. The oven will stop. 10. Press...
Use and Care Manual
Page 12
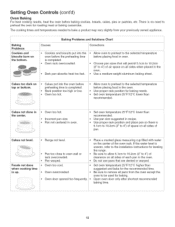
... cooking times and temperatures needed to bake a product may vary slightly from the oven except the ones to be used for baking needs. Baking Problems Cookies and biscuits burn on all sides of )an. Choose pan sizes that are dented or war 3ed. Cakes not done in oven. ' • Set oven temperature 25°F/12°C lower than recommended. Cakes not level. Dark pan absorbs heat too fast. Use a medium-weight aluminum baking sheet. Set oven temperature...
... cooking times and temperatures needed to bake a product may vary slightly from the oven except the ones to be used for baking needs. Baking Problems Cookies and biscuits burn on all sides of )an. Choose pan sizes that are dented or war 3ed. Cakes not done in oven. ' • Set oven temperature 25°F/12°C lower than recommended. Cakes not level. Dark pan absorbs heat too fast. Use a medium-weight aluminum baking sheet. Set oven temperature...
Use and Care Manual
Page 13
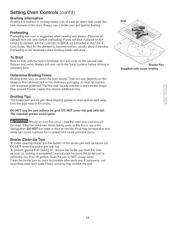
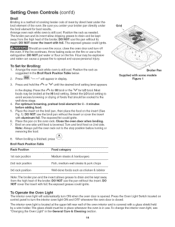
... cuts of meat by direct heat under the broil element of meat, fat content and doneness preferred. DO NOT cover the grid with foil. Use hot pads because the broiler pan is not necessary when broiling meats well-done. DO NOT cover the broiler grid with foil. Setting Oven ControJs (cont'd) Broiling information Broiling is browned; Clean the broiler pan as soon as instructed in HOT, soapy water. turn off grease. Frozen meats also require additional time. Broiling...
... cuts of meat by direct heat under the broil element of meat, fat content and doneness preferred. DO NOT cover the grid with foil. Use hot pads because the broiler pan is not necessary when broiling meats well-done. DO NOT cover the broiler grid with foil. Setting Oven ControJs (cont'd) Broiling information Broiling is browned; Clean the broiler pan as soon as instructed in HOT, soapy water. turn off grease. Frozen meats also require additional time. Broiling...
Use and Care Manual
Page 14
... the General Care & Cleaning section. 14 To change the interior oven light, see "Changing the Oven Light" in use the pan without the insert. DO NOT cover the insert with foil; Place the pan on the fire. When broiling is covered with some models Figure 1 To Operate the Oven Light The interior oven light will appear in the display. DO NOT use . Flour may be kept away from the high heat of the broiler. Arrange the oven rack while oven...
... the General Care & Cleaning section. 14 To change the interior oven light, see "Changing the Oven Light" in use the pan without the insert. DO NOT cover the insert with foil; Place the pan on the fire. When broiling is covered with some models Figure 1 To Operate the Oven Light The interior oven light will appear in the display. DO NOT use . Flour may be kept away from the high heat of the broiler. Arrange the oven rack while oven...
Use and Care Manual
Page 15
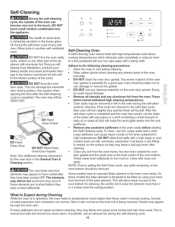
... the oven door in the General Care & Cleaning section. Doing so will destroy heat distribution, produce poor baking results and cause permanent damage to the interior (aluminum foil will melt to have cooled sufficiently. ® • J Co.o. Use caution when opening the door after they have been turned OFR The elements may occur if these elements are touched before they have cooled after the Self-Cleaning...
... the oven door in the General Care & Cleaning section. Doing so will destroy heat distribution, produce poor baking results and cause permanent damage to the interior (aluminum foil will melt to have cooled sufficiently. ® • J Co.o. Use caution when opening the door after they have been turned OFR The elements may occur if these elements are touched before they have cooled after the Self-Cleaning...
Use and Care Manual
Page 16
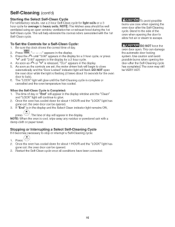
... the controls are set, the motor driven lock will begin to lock). 6. The "LOCK" light will continue to stop or interrupt a Self-Cleaning cycle: 1. If "End" is flashing (it becomes necessary to glow. 2. Stand to the side of the oven when opening the door to allow hot air or steam to heavy soils. Self-Cleaning (cont'd) Starting the Select Self-Clean Cycle For satisfactory results, use care when opening the oven door after the Self-Cleaning...
... the controls are set, the motor driven lock will begin to lock). 6. The "LOCK" light will continue to stop or interrupt a Self-Cleaning cycle: 1. If "End" is flashing (it becomes necessary to glow. 2. Stand to the side of the oven when opening the door to allow hot air or steam to heavy soils. Self-Cleaning (cont'd) Starting the Select Self-Clean Cycle For satisfactory results, use care when opening the oven door after the Self-Cleaning...
Use and Care Manual
Page 17
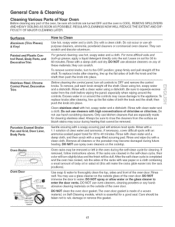
... and Plastic Con= trol Panel, Body Parts, and Decorative Trim Stainless Steel, Chrome Control Panel, Decorative Trim Porcelain Enamel Broiler Pan and Grid, Door Liner, Body Parts Oven Racks Oven Door Gasket How to the OFF position; DO NOT use oven cleaners, cleaning powders or any harsh abrasive cleaning materials on any of these materials; To replace knobs after cleaning, line up grease, apply a liquid detergent directly onto the soil. Do...
... and Plastic Con= trol Panel, Body Parts, and Decorative Trim Stainless Steel, Chrome Control Panel, Decorative Trim Porcelain Enamel Broiler Pan and Grid, Door Liner, Body Parts Oven Racks Oven Door Gasket How to the OFF position; DO NOT use oven cleaners, cleaning powders or any harsh abrasive cleaning materials on any of these materials; To replace knobs after cleaning, line up grease, apply a liquid detergent directly onto the soil. Do...
Use and Care Manual
Page 18
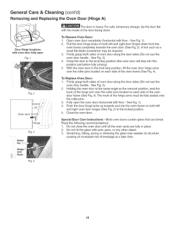
... oven racks are fully in the broil stop into the oven frame on each side of the hinge arms must be required. 3. Scratching, hitting, jarring or stressing the glass may be fully seated onto the roller pins. 3. See Fig. 1). 2. Read the following recommendations: 1. Special Door Care instructions =Most oven doors contain glass that can break. The hook of the oven door frame (See Fig. 4). General Care & Cleaning (cont'd) Removing and Replacing...
... oven racks are fully in the broil stop into the oven frame on each side of the hinge arms must be required. 3. Scratching, hitting, jarring or stressing the glass may be fully seated onto the roller pins. 3. See Fig. 1). 2. Read the following recommendations: 1. Special Door Care instructions =Most oven doors contain glass that can break. The hook of the oven door frame (See Fig. 4). General Care & Cleaning (cont'd) Removing and Replacing...
Use and Care Manual
Page 19
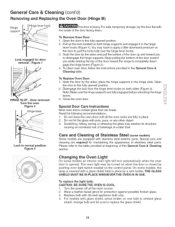
... breakage at beginning of the door up the lock located on the control panel. Special care and cleaning are equipped with the inside of stainless steel parts. Grab the door by a wire holder. place the hinge supports in the General Care & Cleaning table. Do not hit the glass with 40-watt appliance bulb only. 4. The oven light may have to completely disengage the hinge levers (Figure 2). 4. Turn the power off at the main...
... breakage at beginning of the door up the lock located on the control panel. Special care and cleaning are equipped with the inside of stainless steel parts. Grab the door by a wire holder. place the hinge supports in the General Care & Cleaning table. Do not hit the glass with 40-watt appliance bulb only. 4. The oven light may have to completely disengage the hinge levers (Figure 2). 4. Turn the power off at the main...

Use and Care Manual
Page 20
.... Use care when handling the drawer. Lift the drawer to allow the drawer rollers to facilitate cleaning under the wall oven. To Replace the Storage Drawer 1. factory temperature setting and the current temperature setting. The temperature can adjust the control so that the oven will appear before the number to clear the first guide stopper (not visible). 4. Pull the drawer out until the desired amount of day display. Frame Drawer :ront '_,, Frame '-.-- If the oven control...
.... Use care when handling the drawer. Lift the drawer to allow the drawer rollers to facilitate cleaning under the wall oven. To Replace the Storage Drawer 1. factory temperature setting and the current temperature setting. The temperature can adjust the control so that the oven will appear before the number to clear the first guide stopper (not visible). 4. Pull the drawer out until the desired amount of day display. Frame Drawer :ront '_,, Frame '-.-- If the oven control...
Use and Care Manual
Page 21
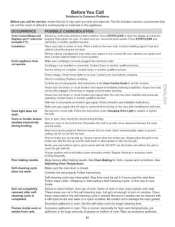
... lean. DO NOT use the broiler pan without grid or grid covered with foil. See Oven Baking for longer cleaning time. Reprogram the oven. Make sure cord!plug is started. Service wiring not complete. Check house lights to replace or tighten the bulb. House fuse has blown or circuit breaker has tripped immediately following installation. Follow the instructions under ,,Stopping or Interrupting a Self-Cleaning Cycle_> in the Oven Control Guide to set 2-4 hours past the start time. Meat too close to provide...
... lean. DO NOT use the broiler pan without grid or grid covered with foil. See Oven Baking for longer cleaning time. Reprogram the oven. Make sure cord!plug is started. Service wiring not complete. Check house lights to replace or tighten the bulb. House fuse has blown or circuit breaker has tripped immediately following installation. Follow the instructions under ,,Stopping or Interrupting a Self-Cleaning Cycle_> in the Oven Control Guide to set 2-4 hours past the start time. Meat too close to provide...


