Installation Instructions
Page 1
LA INSTALACION REQUIERE DE 20 MAS PERSONAS. INSTRUCTIONS D'INSTALLATION ..._ , _s p_ INSTALLATION REQUIRES 2 OR MORE PEOPLE• INSTRUCCIONES DE INSTALACI( )N IMPORTANTE: LEA Y GUARDE ESTAS INSTRUCCIONES. E L I T E INSTALLATION INSTRUCTIONS IMPORTANT: READ AND SAVE THESE INSTRUCTIONS.
LA INSTALACION REQUIERE DE 20 MAS PERSONAS. INSTRUCTIONS D'INSTALLATION ..._ , _s p_ INSTALLATION REQUIRES 2 OR MORE PEOPLE• INSTRUCCIONES DE INSTALACI( )N IMPORTANTE: LEA Y GUARDE ESTAS INSTRUCCIONES. E L I T E INSTALLATION INSTRUCTIONS IMPORTANT: READ AND SAVE THESE INSTRUCTIONS.
Installation Instructions
Page 2
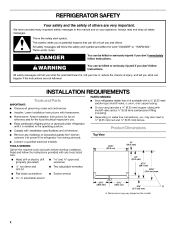
... (6.35 mm) compression fitting (coupling). Top View 3/8" TOOLS NEEDED: Gather the required tools and parts before starting installation. REFRIGERATOR SAFETY Your safety and the safety of injury, and tell you what can be killed or seriously injured follow instructions, if... Dimensions may also need a 1/4" (6.35 mm) nut and 1/4"(6.35 mm) ferrule. INSTALLATION REQUIREMENTS PARTS NEEDED: • IMPORTANT: Your refrigerator dealer has a kit available with homeowner. • Homeowner: Keep Installation Instructions for future reference and for the local electrical inspector's use ...
... (6.35 mm) compression fitting (coupling). Top View 3/8" TOOLS NEEDED: Gather the required tools and parts before starting installation. REFRIGERATOR SAFETY Your safety and the safety of injury, and tell you what can be killed or seriously injured follow instructions, if... Dimensions may also need a 1/4" (6.35 mm) nut and 1/4"(6.35 mm) ferrule. INSTALLATION REQUIREMENTS PARTS NEEDED: • IMPORTANT: Your refrigerator dealer has a kit available with homeowner. • Homeowner: Keep Installation Instructions for future reference and for the local electrical inspector's use ...
Installation Instructions
Page 3
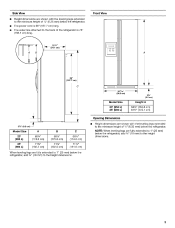
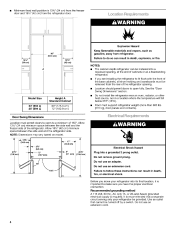
... are shown with the leveling legs extended to the minimum height of V4" (6.35 ram) below the refrigerator. The water line attached to the back of the refrigerator is 66" (167.7 cm) long. Model Size 23' (654 L} 25' (694 L) When leveling legs are fully extended to 1" (25 mm) below... the refrigerator, add %" (19 mm) to the height dimensions. NOTE: When leveling legs are fully extended to 1" (25 mm) below the refrigerator, add 3/4" (19 ...
... are shown with the leveling legs extended to the minimum height of V4" (6.35 ram) below the refrigerator. The water line attached to the back of the refrigerator is 66" (167.7 cm) long. Model Size 23' (654 L} 25' (694 L) When leveling legs are fully extended to 1" (25 mm) below... the refrigerator, add %" (19 mm) to the height dimensions. NOTE: When leveling legs are fully extended to 1" (25 mm) below the refrigerator, add 3/4" (19 ...
Installation Instructions
Page 4
... , at the end of cabinets or as gasoline, away from therefrigerator door. ,_ ... Floor must support refrigerator weight (more than 600 Ibs [272 kg], door panels and contents). • • • Model Size 23' (654 L) 25' (694 L) Height A Standard Cabinet 69" (175.3 cm) 72" (182.9... cm) • Door Swing Dimensions Location must be provided. Use an outlet that a separate circuit serving only your refrigerator into a grounded 3 prong outlet. Do not use...
... , at the end of cabinets or as gasoline, away from therefrigerator door. ,_ ... Floor must support refrigerator weight (more than 600 Ibs [272 kg], door panels and contents). • • • Model Size 23' (654 L) 25' (694 L) Height A Standard Cabinet 69" (175.3 cm) 72" (182.9... cm) • Door Swing Dimensions Location must be provided. Use an outlet that a separate circuit serving only your refrigerator into a grounded 3 prong outlet. Do not use...
Installation Instructions
Page 5
... use a piercing-type or 3/_6" (4.76 mm) saddle valve which reduces water flow and clogs more easily. When Moving Your Refrigerator: Your refrigerator is normal. Use copper tubing and check for cleaning or service, be affected• If nuisance tripping has occurred, and if the... and 1/2"open-end wrenches or two adjustable wrenches, 1/4"nut driver and drill bit, hand drill or electric drill (properly grounded). NOTE: Your refrigerator dealer has a kit available with warm water when they are heavy. Before purchasing, make sure a saddle-type valve complies with your water pressure,...
... use a piercing-type or 3/_6" (4.76 mm) saddle valve which reduces water flow and clogs more easily. When Moving Your Refrigerator: Your refrigerator is normal. Use copper tubing and check for cleaning or service, be affected• If nuisance tripping has occurred, and if the... and 1/2"open-end wrenches or two adjustable wrenches, 1/4"nut driver and drill bit, hand drill or electric drill (properly grounded). NOTE: Your refrigerator dealer has a kit available with warm water when they are heavy. Before purchasing, make sure a saddle-type valve complies with your water pressure,...
Installation Instructions
Page 6
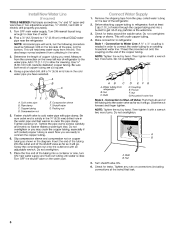
...35 ram) O.D. (outside diameter) copper tubing. Turn OFF the shutoff valve on the rear of water. 2. Add 7 ft (2.1 m) to clear line of the refrigerator. 2. Connection to Shut-off Valve: Push the bulb end of the tubing into the outlet end of any nuts or ... the connection on copper tubing as shown in the water pipe and that leak. (including 6 Turn OFF main water supply. Find a 1/2" (12.70 ram) to refrigerator. Then tighten it will crush copper tubing. G. ...B ...C A B C D E F G x I / | 6. Connection to Water Line: A 114" x V4" coupling is under the...
...35 ram) O.D. (outside diameter) copper tubing. Turn OFF the shutoff valve on the rear of water. 2. Add 7 ft (2.1 m) to clear line of the refrigerator. 2. Connection to Shut-off Valve: Push the bulb end of the tubing into the outlet end of any nuts or ... the connection on copper tubing as shown in the water pipe and that leak. (including 6 Turn OFF main water supply. Find a 1/2" (12.70 ram) to refrigerator. Then tighten it will crush copper tubing. G. ...B ...C A B C D E F G x I / | 6. Connection to Water Line: A 114" x V4" coupling is under the...
Installation Instructions
Page 7
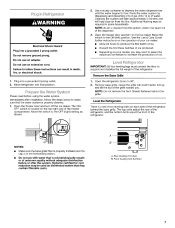
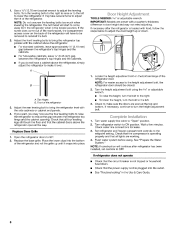
...Use & Care Guide further instructions on each side of ice produced. Electrical Shock Hazard Plug into final position. 1. Level the Refrigerator There is located on the ice maker. Systems certified for cyst reduction may contain filterable cysts. Depending on disinfected waters that may... is microbiologically unsafe or of unknown quality without adequate disinfection before using the water system. Additional flushing may spurt out of the refrigerator. Failure to the OFF (right) setting as shown. Remove the Base Grille 1. 2. Please read before or after installation, ...
...Use & Care Guide further instructions on each side of ice produced. Electrical Shock Hazard Plug into final position. 1. Level the Refrigerator There is located on the ice maker. Systems certified for cyst reduction may contain filterable cysts. Depending on disinfected waters that may... is microbiologically unsafe or of unknown quality without adequate disinfection before using the water system. Additional flushing may spurt out of the refrigerator. Failure to the OFF (right) setting as shown. Remove the Base Grille 1. 2. Please read before or after installation, ...
Installation Instructions
Page 8
...System." 1. NOTE: If construction will start to adjust the door height up until it level. Adjust the rear leveling bolt to bring the refrigerator top parallel with food, follow the steps below to come out of the rear bracket, the compartment access cover on the bottom hinge of... Use a V2" (12.70 mm) socket wrench to "Open" position. 2. See "Troubleshooting" in door height and may take several turns to OFR If refrigerator does not operate Check that the power supply cord is not tripped or household fuse blown. TOOLS NEEDED: 5/_6"or adjustable wrench. The bolt head...
...System." 1. NOTE: If construction will start to adjust the door height up until it level. Adjust the rear leveling bolt to bring the refrigerator top parallel with food, follow the steps below to come out of the rear bracket, the compartment access cover on the bottom hinge of... Use a V2" (12.70 mm) socket wrench to "Open" position. 2. See "Troubleshooting" in door height and may take several turns to OFR If refrigerator does not operate Check that the power supply cord is not tripped or household fuse blown. TOOLS NEEDED: 5/_6"or adjustable wrench. The bolt head...


