Use and Care Guide
Page 2
... cost of parts or systems resulting from the date of purchase if this product if it is ever used in material and workmanship. Table of Contents Cooktop Warranty 2 Product Record 2 Serial Plate Location 2 IMPORTANT SAFETY INSTRUCTIONS 3 - 4 Induction Cooktop Features 4 - 5 Induction Cooktop Display Messages 6 Before Using the Cooktop Setting Cooktop Controls General Care & Cleaning Before You Call 7-9 9 -12 12-14 15-16 Protection Agreements 17 Sears Service 18 Kenmore Elite Warranty When installed, operated and...
... cost of parts or systems resulting from the date of purchase if this product if it is ever used in material and workmanship. Table of Contents Cooktop Warranty 2 Product Record 2 Serial Plate Location 2 IMPORTANT SAFETY INSTRUCTIONS 3 - 4 Induction Cooktop Features 4 - 5 Induction Cooktop Display Messages 6 Before Using the Cooktop Setting Cooktop Controls General Care & Cleaning Before You Call 7-9 9 -12 12-14 15-16 Protection Agreements 17 Sears Service 18 Kenmore Elite Warranty When installed, operated and...

Use and Care Guide
Page 3
... appliance by turning the unit off and on hood or filter. Wear Proper ApparelmLoose-fitting or hanging garments should exercise caution using the appliance. Sears Parts & Repair is properly installed and grounded by a qualified technician to reduce the risk of personal injury and damage to the appliance at the circuit breaker or fuse box. • User ServicingmDo not repair or replace any part of the...
... appliance by turning the unit off and on hood or filter. Wear Proper ApparelmLoose-fitting or hanging garments should exercise caution using the appliance. Sears Parts & Repair is properly installed and grounded by a qualified technician to reduce the risk of personal injury and damage to the appliance at the circuit breaker or fuse box. • User ServicingmDo not repair or replace any part of the...
Use and Care Guide
Page 4
... use of electric shock, fire or short circuit. • Glazed Cooking Utensils. This could cause glass to cover the minimum Cooking Zones. Induction Cooktop Features A COOLER COOKTOP - Induction cooking heats faster while using less energy. Only use aluminum foil as a cover to unintentional contact with the utensil. • Never Leave Prepared Food on the hood or filter. Check the manufacturer's recommendations for range top service without a pan of Cooking Zones to line any part of different sizes...
... use of electric shock, fire or short circuit. • Glazed Cooking Utensils. This could cause glass to cover the minimum Cooking Zones. Induction Cooktop Features A COOLER COOKTOP - Induction cooking heats faster while using less energy. Only use aluminum foil as a cover to unintentional contact with the utensil. • Never Leave Prepared Food on the hood or filter. Check the manufacturer's recommendations for range top service without a pan of Cooking Zones to line any part of different sizes...
Use and Care Guide
Page 5
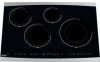
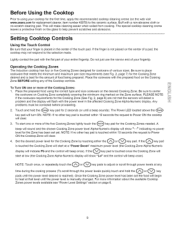
Induction Cooktop Features READ THESE INSTRUCTIONS CAREFULLY BEFORE USING THE INDUCTION COOKTOP Fig. 1 - 30" Model 1. Left Front Cooking Zone (Fig. 1 & 2) 3. Controls Lock LED 17. Cooking Zone ON/OFF LED (for each Cooking Zone). 22. Cooking Zone Up Arrow Power Key Pad (for each Cooking Zone). 23. Right Front Cooking Zone (Fig. 1 & 2) 5. Left Front Cooking Zone Control Pads (Fig. 1 & 2) 9. Minute Timer Alpha-Numeric (A-N) Display (displays up to 99 minutes) 19. Main Cooktop Controls (Fig...
Induction Cooktop Features READ THESE INSTRUCTIONS CAREFULLY BEFORE USING THE INDUCTION COOKTOP Fig. 1 - 30" Model 1. Left Front Cooking Zone (Fig. 1 & 2) 3. Controls Lock LED 17. Cooking Zone ON/OFF LED (for each Cooking Zone). 22. Cooking Zone Up Arrow Power Key Pad (for each Cooking Zone). 23. Right Front Cooking Zone (Fig. 1 & 2) 5. Left Front Cooking Zone Control Pads (Fig. 1 & 2) 9. Minute Timer Alpha-Numeric (A-N) Display (displays up to 99 minutes) 19. Main Cooktop Controls (Fig...
Use and Care Guide
Page 6
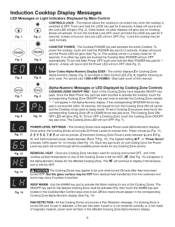
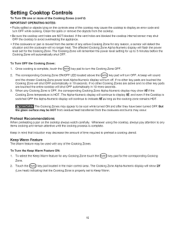
... turned OFF, and if the cooktop surface temperature on any Cooking Zone has been used normally. If no other displays will glow and no Cooking Zones will activate. The control displays E in Cooking Zone Alpha-Numeric display (Fig. 5) and digits in the corresponding Cooking Zone Alpha-Numeric display (See Fig. 14). To set . To turn the Main Power OFF touch and hold the LOCK...
... turned OFF, and if the cooktop surface temperature on any Cooking Zone has been used normally. If no other displays will glow and no Cooking Zones will activate. The control displays E in Cooking Zone Alpha-Numeric display (Fig. 5) and digits in the corresponding Cooking Zone Alpha-Numeric display (See Fig. 14). To set . To turn the Main Power OFF touch and hold the LOCK...
Use and Care Guide
Page 7
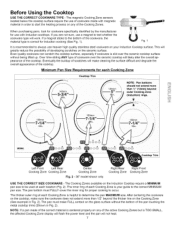
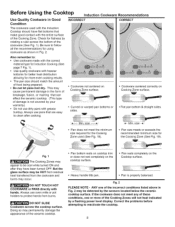
... the cookware type will work. Over time sliding ANY type of cookware over the ceramic cooktop surface without the bottom of the cooktop. The pan must FULLY cover the inner ring for use heavier high quality stainless steel cookware on your guide to be used at each Cooking Zone Cooktop Trim NOTE: Pan bottoms \ should not extend more than 1/2"(13mm) beyond the thicker line on the Induction Cooktop require a MINIMUM pan size to the correct MINIMUM pan size. If a magnet...
... the cookware type will work. Over time sliding ANY type of cookware over the ceramic cooktop surface without the bottom of the cooktop. The pan must FULLY cover the inner ring for use heavier high quality stainless steel cookware on your guide to be used at each Cooking Zone Cooktop Trim NOTE: Pan bottoms \ should not extend more than 1/2"(13mm) beyond the thicker line on the Induction Cooktop require a MINIMUM pan size to the correct MINIMUM pan size. If a magnet...
Use and Care Guide
Page 8
... used with the Induction Cooktop should match the amount of food being prepared. • Do not let pans boil dry. Always use pans that make good contact with hands. Doing so may be detected by a flashing power level display. This may occur. DO NOT SLIDE Cookware across the bottom of the Cooking Zones will not heat indicated by the sensors located below the ceramic cooktop surface...
... used with the Induction Cooktop should match the amount of food being prepared. • Do not let pans boil dry. Always use pans that make good contact with hands. Doing so may be detected by a flashing power level display. This may occur. DO NOT SLIDE Cookware across the bottom of the Cooking Zones will not heat indicated by the sensors located below the ceramic cooktop surface...
Use and Care Guide
Page 9
... the cookware on Cooking Zone completely covering the minimum ring marked on the glass to help prevent scratches and abrasions. PLEASE NOTE: If the cookware requirements for 2 seconds (or until the power level desired is manually changed. For more of various sizes. Before Using the Cooktop Prior to using the correct type and size cookware on the desired Cooking Zone. The Power LED located above the key...
... the cookware on Cooking Zone completely covering the minimum ring marked on the glass to help prevent scratches and abrasions. PLEASE NOTE: If the cookware requirements for 2 seconds (or until the power level desired is manually changed. For more of various sizes. Before Using the Cooktop Prior to using the correct type and size cookware on the desired Cooking Zone. The Power LED located above the key...
Use and Care Guide
Page 10
... HOT from residual heat transferred from the cooktop. • Be sure the cooktop vent holes are touched the Cooking Zone will automatically shut OFF. To Turn the Keep Warm Feature ON: 1. The Cooking Zone will remember the power level setting for the corresponding Cooking 2. If no other key pads are NOT blocked. The Alpha-Numeric display will continue to display an error code and turn...
... HOT from residual heat transferred from the cooktop. • Be sure the cooktop vent holes are touched the Cooking Zone will automatically shut OFF. To Turn the Keep Warm Feature ON: 1. The Cooking Zone will remember the power level setting for the corresponding Cooking 2. If no other key pads are NOT blocked. The Alpha-Numeric display will continue to display an error code and turn...
Use and Care Guide
Page 11
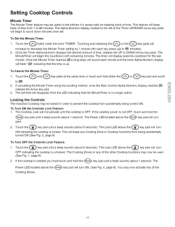
... located above the Cooking Zones. You may now be used (See Fig. 1, page 6). 2. If the cooktop power is OFF. This feature will flash "00" indicating that the MinuteTimer is no longer active. The timer will not activate until the cooktop is not OFF, touch and hold the key pad until a beep sounds (about 5 seconds). To Turn ON the Controls Lock Feature: 1. The Cooktop Lock...
... located above the Cooking Zones. You may now be used (See Fig. 1, page 6). 2. If the cooktop power is OFF. This feature will flash "00" indicating that the MinuteTimer is no longer active. The timer will not activate until the cooktop is not OFF, touch and hold the key pad until a beep sounds (about 5 seconds). To Turn ON the Controls Lock Feature: 1. The Cooktop Lock...

Use and Care Guide
Page 12
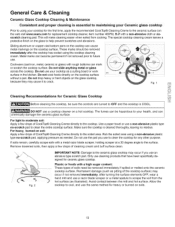
... power setting. REMOVE SPILLOVERS AND HEAVY SOILING AS SOON AS POSSIBLE. See Ceramic Glass Cooktop Cleaning and Maintenance in one induction inverter. Do not use harsh scrubbing cleaners. Each section is powered by one section, and the other zone will experience a slight decrease from the surface as they will cook at the power setting you want to Clean Stainless Steel, Chrome Decorative Trim Ceramic Glass Cooktop Clean with four cooking zones within three heating...
... power setting. REMOVE SPILLOVERS AND HEAVY SOILING AS SOON AS POSSIBLE. See Ceramic Glass Cooktop Cleaning and Maintenance in one induction inverter. Do not use harsh scrubbing cleaners. Each section is powered by one section, and the other zone will experience a slight decrease from the surface as they will cook at the power setting you want to Clean Stainless Steel, Chrome Decorative Trim Ceramic Glass Cooktop Clean with four cooking zones within three heating...
Use and Care Guide
Page 13
... scratch the cooktop surface. Do not slide anything metal or glass across the cooktop. Do not use your cooktop as needed. cream. Do not cook foods directly on a hot cooktop. Make sure the cooktop is COOL. Cookware (cast iron, metal, ceramic or glass) with a high sugar content: These types of the cooktop surface) may occur if not removed immediately. For light to moderate soil: Apply a few drops of CookTop® Cleaning Creme directly to OFF...
... scratch the cooktop surface. Do not slide anything metal or glass across the cooktop. Do not use your cooktop as needed. cream. Do not cook foods directly on a hot cooktop. Make sure the cooktop is COOL. Cookware (cast iron, metal, ceramic or glass) with a high sugar content: These types of the cooktop surface) may occur if not removed immediately. For light to moderate soil: Apply a few drops of CookTop® Cleaning Creme directly to OFF...
Use and Care Guide
Page 14
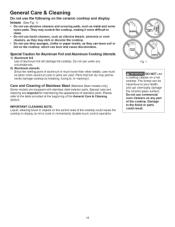
... following on the cooktop which can chemically damage the ceramic-glass surface. They may permanently damage cooktop by breaking, fusing to, or marking it more difficult to the table provided at the beginning of aluminum foil will damage the cooktop. Care and Cleaning of Stainless Steel (Stainless Steel models only) Some models are required for Aluminum Foil and Aluminum Cooking Utensils 1) Aluminum foil Use of the General Care & Cleaning section. Do not use under any part of stainless parts.
... following on the cooktop which can chemically damage the ceramic-glass surface. They may permanently damage cooktop by breaking, fusing to, or marking it more difficult to the table provided at the beginning of aluminum foil will damage the cooktop. Care and Cleaning of Stainless Steel (Stainless Steel models only) Some models are required for Aluminum Foil and Aluminum Cooking Utensils 1) Aluminum foil Use of the General Care & Cleaning section. Do not use under any part of stainless parts.
Use and Care Guide
Page 15
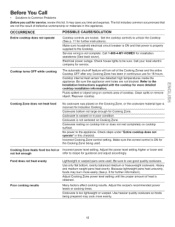
... appliance. Check steps under "Entire cooktop does not operate" in poor condition. Cooking Zone heats food too hot or Incorrect power level setting. Electrical power outage. Be sure the appliance vent holes are locked. Cookware resting on cooktop trim or does not rest completely on Cooking Zone. Adjust the recipe's recommended power levels or cooking times. Check house lights to use for 18 hours. No power to the Installation Instructions supplied with...
... appliance. Check steps under "Entire cooktop does not operate" in poor condition. Cooking Zone heats food too hot or Incorrect power level setting. Electrical power outage. Be sure the appliance vent holes are locked. Cookware resting on cooktop trim or does not rest completely on Cooking Zone. Adjust the recipe's recommended power levels or cooking times. Check house lights to use for 18 hours. No power to the Installation Instructions supplied with...

Use and Care Guide
Page 16
... properly. Try turning electrical power supply OFF and back ON to cooktop in the General Care & Cleaning section (Refer to reset Cooktop main controls. If fault recurs, record fault number and turn off the affected Cooking Zone. See "Cooktop Cleaning & Maintenance" in order to p. 13). Small scratches do not see the correct cookware. Cleaning materials not recommended for assistance (See back cover). Remove using a ceramic-glass cooktop cleaning creme. Test with clean, dry bottoms...
... properly. Try turning electrical power supply OFF and back ON to cooktop in the General Care & Cleaning section (Refer to reset Cooktop main controls. If fault recurs, record fault number and turn off the affected Cooking Zone. See "Cooktop Cleaning & Maintenance" in order to p. 13). Small scratches do not see the correct cookware. Cleaning materials not recommended for assistance (See back cover). Remove using a ceramic-glass cooktop cleaning creme. Test with clean, dry bottoms...

Use and Care Guide
Page 18
... expert troubleshooting and home solutions advice: www.managemyhome.com For repair - For Sears professional installation of Sears Brands, LLC ® Marca Registrada / TM Marca de Fabrica / SM Marca de Servicio de Sears Brands, LLC MC Marque de commerce / MD Marque depos6e de Sears Brands, LLC @ Sears Brands, LLC For the replacement parts, accessories and owner's manuals that you need...
... expert troubleshooting and home solutions advice: www.managemyhome.com For repair - For Sears professional installation of Sears Brands, LLC ® Marca Registrada / TM Marca de Fabrica / SM Marca de Servicio de Sears Brands, LLC MC Marque de commerce / MD Marque depos6e de Sears Brands, LLC @ Sears Brands, LLC For the replacement parts, accessories and owner's manuals that you need...


