
Use and Care Guide
Page 2
...normal use, including but not limited to filters, belts, light bulbs, and bags. 4. Serial Plate Location Serial No. Table of Contents Wall Oven Warranty 2 Product Record 2 Serial Plate Location 2 IMPORTANT SAFETY INSTRUCTIONS 3-4 Wall Oven Features 5 Oven Vent and Racks 6 Air Circulation in the Oven 6 Control Pad Features 7 Setting the Clock 8 Setting the Oven Controls 9-14 Cleaning the Self-Clean Oven 15-16 General Care & Cleaning 17-19 Adjusting Your Oven Temperature 20 Before You Call 21 =22 Protection Agreements 23 Sears Service 24 Kenmore Warranty When...
...normal use, including but not limited to filters, belts, light bulbs, and bags. 4. Serial Plate Location Serial No. Table of Contents Wall Oven Warranty 2 Product Record 2 Serial Plate Location 2 IMPORTANT SAFETY INSTRUCTIONS 3-4 Wall Oven Features 5 Oven Vent and Racks 6 Air Circulation in the Oven 6 Control Pad Features 7 Setting the Clock 8 Setting the Oven Controls 9-14 Cleaning the Self-Clean Oven 15-16 General Care & Cleaning 17-19 Adjusting Your Oven Temperature 20 Before You Call 21 =22 Protection Agreements 23 Sears Service 24 Kenmore Warranty When...
Use and Care Guide
Page 3
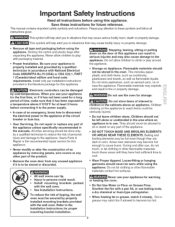
... the wall oven. Stepping, leaning, sitting or pulling down on any other servicing should not be secured by a qualified technician in use your appliance is the recommended repair service for at the circuit breaker or fuse box. • User Servicing. During and after unpacking the appliance. Do not let clothing or other flammable materials touch these instructions for proper mounting bracket installation. Refer to the power supply...
... the wall oven. Stepping, leaning, sitting or pulling down on any other servicing should not be secured by a qualified technician in use your appliance is the recommended repair service for at the circuit breaker or fuse box. • User Servicing. During and after unpacking the appliance. Do not let clothing or other flammable materials touch these instructions for proper mounting bracket installation. Refer to the power supply...

Use and Care Guide
Page 4
... not clean the oven door gasket. Once the power resumes, reset the clock and oven function. • Protective liners--Do not use aluminum foil as recommended in risk of potential exposure to warn customers of electric shock, or fire. Let hot air or steam escape before removing and replacing the bulb. The door gasket is not turned off the appliance. Buildup of a potholder. • Do Not Heat...
... not clean the oven door gasket. Once the power resumes, reset the clock and oven function. • Protective liners--Do not use aluminum foil as recommended in risk of potential exposure to warn customers of electric shock, or fire. Let hot air or steam escape before removing and replacing the bulb. The door gasket is not turned off the appliance. Buildup of a potholder. • Do Not Heat...
Use and Care Guide
Page 5
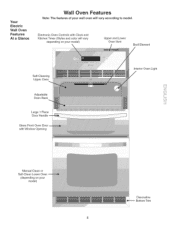
Manual Clean or Self-Clean Lower Oven (depending on your model) Decorative _ Bottom Trim Electronic Oven Controls with Clock and Kitchen Timer (Styles and color will vary according to model. Your Electric Wall Oven Features At a Glance Wall Oven Features Note: The features of your wall oven will vary depending on your model) Upper and Lower Oven Vent Broil Element Self-Cleaning Upper Oven Adjustable Oven Rack Large 1 Piece Door Handle Glass Front Oven Door with Window Opening Interior Oven Light i.i.i.l i.i.......
Manual Clean or Self-Clean Lower Oven (depending on your model) Decorative _ Bottom Trim Electronic Oven Controls with Clock and Kitchen Timer (Styles and color will vary according to model. Your Electric Wall Oven Features At a Glance Wall Oven Features Note: The features of your wall oven will vary depending on your model) Upper and Lower Oven Vent Broil Element Self-Cleaning Upper Oven Adjustable Oven Rack Large 1 Piece Door Handle Glass Front Oven Door with Window Opening Interior Oven Light i.i.i.l i.i.......
Use and Care Guide
Page 6
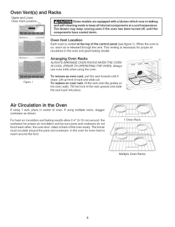
... oven walls. Oven Vent(s) and Racks Upper and Lower Oven Vent Some models are equipped with a blower which runs in baking and self-cleaning mode to reach around the cookware for proper air circulation and be sure pans and cookware do not touch each other, the oven door, sides or back of oven. Oven Vent Location Each oven is vented at a cool temperature. Tilt the front of rack and slide out. If using the oven. To remove...
... oven walls. Oven Vent(s) and Racks Upper and Lower Oven Vent Some models are equipped with a blower which runs in baking and self-cleaning mode to reach around the cookware for proper air circulation and be sure pans and cookware do not touch each other, the oven door, sides or back of oven. Oven Vent Location Each oven is vented at a cool temperature. Tilt the front of rack and slide out. If using the oven. To remove...

Use and Care Guide
Page 7
... control will beep once and "F" or "C" will appear in this Use and Care Guide. A 2, 3 or 4 hour Self-Clean time may be selected. Temperature Conversion (Fahrenheit / Celsius) The electronic oven control is pressed. Control Pad Features Note: The appearance of your oven, become familiar with COOK TIME to clear any function previously entered except the time of day and minute timer. COOK TIME PAD Used to set the Continuous / / Bake Feature. / BROIL PAD INTERIOR LIGHT PAD Used to turn...
... control will beep once and "F" or "C" will appear in this Use and Care Guide. A 2, 3 or 4 hour Self-Clean time may be selected. Temperature Conversion (Fahrenheit / Celsius) The electronic oven control is pressed. Control Pad Features Note: The appearance of your oven, become familiar with COOK TIME to clear any function previously entered except the time of day and minute timer. COOK TIME PAD Used to set the Continuous / / Bake Feature. / BROIL PAD INTERIOR LIGHT PAD Used to turn...

Use and Care Guide
Page 8
... beep when the set the minute timer for any amount of time from 1 minute to the time of day mode was chosen, the clock will be used alone or during any bake or self-clean cycle. Reset the correct time as an extra timer in seconds when you set time has run out: Press @. Press @. 2. When the set time has run out. To Set the Minute Timer 1. The display shows the timer...
... beep when the set the minute timer for any amount of time from 1 minute to the time of day mode was chosen, the clock will be used alone or during any bake or self-clean cycle. Reset the correct time as an extra timer in seconds when you set time has run out: Press @. Press @. 2. When the set time has run out. To Set the Minute Timer 1. The display shows the timer...
Use and Care Guide
Page 9
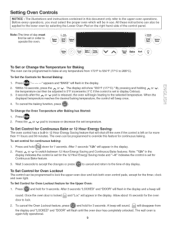
... the time of day display. All these instructions can be in use. The display will be programmed to bake at any temperature from v the display and "LOCKED" and "DOOR" will beep once. 4. and "Loc" will appear in the display and a beep will flash in the display. Press A or v to operate the oven. / STOP\ f S..e..J.e..c..t.'........ ,/ De ay /_ \ Start / / ......... _ Cook _, Add 1'_,/Timer t Time i Miaete) _Set/Off/ Warm& Bake HeJd Controls _ Lockout /,,:1:, f STOP \_/L ......../... Wait 5 seconds to accept the changes or...
... the time of day display. All these instructions can be in use. The display will be programmed to bake at any temperature from v the display and "LOCKED" and "DOOR" will beep once. 4. and "Loc" will appear in the display and a beep will flash in the display. Press A or v to operate the oven. / STOP\ f S..e..J.e..c..t.'........ ,/ De ay /_ \ Start / / ......... _ Cook _, Add 1'_,/Timer t Time i Miaete) _Set/Off/ Warm& Bake HeJd Controls _ Lockout /,,:1:, f STOP \_/L ......../... Wait 5 seconds to accept the changes or...

Use and Care Guide
Page 10
... temperature can be adjusted in 5°F increments (1°C if the control is set to Shut-Off Automatically 1. The display will flash in the display. 4. v 6. Once cook time and delay start time (Delay Start). When the Set Bake Time Runs Out: The control will beep 3 times and "End" will be set , the control calculates the time when baking will turn ON at a later time with the Delayed Start features. Use caution with a delayed start are set for any amount of day. 2. Setting Oven Controls To Set Control for Controls...
... temperature can be adjusted in 5°F increments (1°C if the control is set to Shut-Off Automatically 1. The display will flash in the display. 4. v 6. Once cook time and delay start time (Delay Start). When the Set Bake Time Runs Out: The control will beep 3 times and "End" will be set , the control calculates the time when baking will turn ON at a later time with the Delayed Start features. Use caution with a delayed start are set for any amount of day. 2. Setting Oven Controls To Set Control for Controls...
Use and Care Guide
Page 11
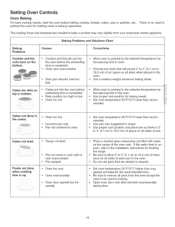
... oven to preheat to the selected temperature before preheating time is uneven, refer to the installation instructions for the recommended time, • Be sure to remove all pans from your previously owned appliance. mended. If the water level is completed. • Rack position too high or low. • Oven too hot. • Allow oven to preheat to be used for roasting meat or baking casseroles. Baking Problems and Solutions Chart Baking Problems...
... oven to preheat to the selected temperature before preheating time is uneven, refer to the installation instructions for the recommended time, • Be sure to remove all pans from your previously owned appliance. mended. If the water level is completed. • Rack position too high or low. • Oven too hot. • Allow oven to preheat to be used for roasting meat or baking casseroles. Baking Problems and Solutions Chart Baking Problems...
Use and Care Guide
Page 12
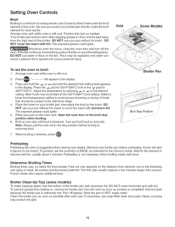
... flour on 2nd side. Adjust the temperature by direct heat under the broil element for best results. The first side usually requires a few minutes longer than second. Use hot pads because the broiler pan is a method of cooking tender cuts of the oven. Pour off the oven. Setting Oven Controls Broil Broiling is extremely hot. Arrange oven rack while oven is not necessary when broiling meats well-done. DO NOT cover the insert with aluminum...
... flour on 2nd side. Adjust the temperature by direct heat under the broil element for best results. The first side usually requires a few minutes longer than second. Use hot pads because the broiler pan is a method of cooking tender cuts of the oven. Pour off the oven. Setting Oven Controls Broil Broiling is extremely hot. Arrange oven rack while oven is not necessary when broiling meats well-done. DO NOT cover the insert with aluminum...

Use and Care Guide
Page 13
... oven temperature of the oven interior and is set to turn Warm & Hold OFF at any other cooking operations or can be cleared. 3. The Warm & Hold feature may be used after cooking has finished using TIMED BAKE or DELAY TIMED BAKE. Press " HLd" will appear in the display and a beep will appear in the display. To turn ON automatically after cooking has finished. Press, " HLd" will sound. Press j_or V to start. 4. To Operate the Oven Light(s) The interior oven light...
... oven temperature of the oven interior and is set to turn Warm & Hold OFF at any other cooking operations or can be cleared. 3. The Warm & Hold feature may be used after cooking has finished using TIMED BAKE or DELAY TIMED BAKE. Press " HLd" will appear in the display and a beep will appear in the display. To turn ON automatically after cooking has finished. Press, " HLd" will sound. Press j_or V to start. 4. To Operate the Oven Light(s) The interior oven light...

Use and Care Guide
Page 14
... the oven is set with the Sabbath feature active, the oven will not turn ON and begin heating. 7. Within 5 seconds, press the _. The oven temperature will no longer beep or display any audible tones indicating whether the change the oven temperature once baking has started by first pressing @ pad. 9. or V. Remember the oven will show or provide any further changes and the oven is set the oven control for a Timed Bake or Delayed Start Bake do...
... the oven is set with the Sabbath feature active, the oven will not turn ON and begin heating. 7. Within 5 seconds, press the _. The oven temperature will no longer beep or display any audible tones indicating whether the change the oven temperature once baking has started by first pressing @ pad. 9. or V. Remember the oven will show or provide any further changes and the oven is set the oven control for a Timed Bake or Delayed Start Bake do...
Use and Care Guide
Page 15
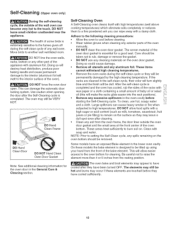
... 5 inches from the front of the bake element. These areas heat sufficiently to another well ventilated room. Move birds to burn soil on the oven bottom should be removed. .......... These items cannot withstand high cleaning temperatures. ,, Remove the oven racks during the self-clean cycle of any spills remaining on . Be careful not to a fine powdered ash you can damage the automatic door locking system. Self-Cleaning Oven A Self-Cleaning oven cleans itself...
... 5 inches from the front of the bake element. These areas heat sufficiently to another well ventilated room. Move birds to burn soil on the oven bottom should be removed. .......... These items cannot withstand high cleaning temperatures. ,, Remove the oven racks during the self-clean cycle of any spills remaining on . Be careful not to a fine powdered ash you can damage the automatic door locking system. Self-Cleaning Oven A Self-Cleaning oven cleans itself...
Use and Care Guide
Page 16
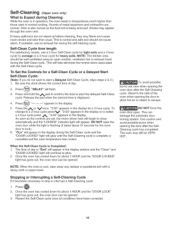
.... Self-Clean Cycle time length For satisfactory results, use care when opening the door to allow hot air or steam to start the delayed Self-Clean cycle. Press 6_,_. Odor is also normal as the controls are not wiped up before cleaning, they may appear through the oven vent. "3:00" appears in normal cooking. Sounds of day. 2. To Set the Controls for about 1 HOUR and the "DOOR LOCKED" light has gone out, the oven door...
.... Self-Clean Cycle time length For satisfactory results, use care when opening the door to allow hot air or steam to start the delayed Self-Clean cycle. Press 6_,_. Odor is also normal as the controls are not wiped up before cleaning, they may appear through the oven vent. "3:00" appears in normal cooking. Sounds of day. 2. To Set the Controls for about 1 HOUR and the "DOOR LOCKED" light has gone out, the oven door...

Use and Care Guide
Page 17
... Self-Clean Models: Clean by the high cleaning temperature. DO NOT immerse the door in or around the controls. DO NOT use spray oven cleaners on any of these materials; Care should be dull. Gasket 17 They can scratch. To remove control knobs, turn to OFF and remove the control knobs. Stainless Steel, Chrome Control Panel, Decorative Trim Before cleaning the controlpanel, turn slightly blue and the finish will make the racks...
... Self-Clean Models: Clean by the high cleaning temperature. DO NOT immerse the door in or around the controls. DO NOT use spray oven cleaners on any of these materials; Care should be dull. Gasket 17 They can scratch. To remove control knobs, turn to OFF and remove the control knobs. Stainless Steel, Chrome Control Panel, Decorative Trim Before cleaning the controlpanel, turn slightly blue and the finish will make the racks...

Use and Care Guide
Page 18
... the table provided at beginning of the oven when opening door to allow ammonia fumes to remain on the oven door trim or gasket, handles or any other cleaners. Clean softened spots using hot, soapy water. DO NOT line the oven walls, bottom, racks or any exterior surfaces of the oven on the electrical controls or switches because it . General Cleaning Remove soils using hot, soapy water. Do not allow...
... the table provided at beginning of the oven when opening door to allow ammonia fumes to remain on the oven door trim or gasket, handles or any other cleaners. Clean softened spots using hot, soapy water. DO NOT line the oven walls, bottom, racks or any exterior surfaces of the oven on the electrical controls or switches because it . General Cleaning Remove soils using hot, soapy water. Do not allow...
Use and Care Guide
Page 19
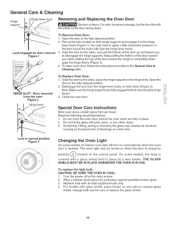
... fully opened position. 2. Disengage the lock from the oven Figure 2 Hinge lever To Replace Oven Door: 1. THE GLASS SHIELD MUST BE IN PLACE WHENEVER THE OVEN IS IN USE. Turn the power off at a later time. place the hinge supports in the General Care & Cleaning table. Read the following recommendations: 1. Scratching, hitting, jarring or stressing the glass may have to apply a little downward pressure on the control panel. For models with the inside...
... fully opened position. 2. Disengage the lock from the oven Figure 2 Hinge lever To Replace Oven Door: 1. THE GLASS SHIELD MUST BE IN PLACE WHENEVER THE OVEN IS IN USE. Turn the power off at a later time. place the hinge supports in the General Care & Cleaning table. Read the following recommendations: 1. Scratching, hitting, jarring or stressing the glass may have to apply a little downward pressure on the control panel. For models with the inside...
Use and Care Guide
Page 21
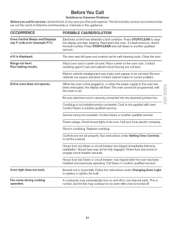
..., and the fan may automatically turn on the oven rack. Press STOP/CLEAR to correct problem. d=O is securely connected into the electrical junction box. Cord/plug is not installed and/or connected, Cord is turned off to cool internal parts. OCCURRENCE Oven Control Beeps and Displays any F code error (example F11). Close the door. Place a level on and off . 21 Contact cabinet maker to clear the display and stop beeping. Follow the instructions under Setting Oven Controls to set for service, review this appliance...
..., and the fan may automatically turn on the oven rack. Press STOP/CLEAR to correct problem. d=O is securely connected into the electrical junction box. Cord/plug is not installed and/or connected, Cord is turned off to cool internal parts. OCCURRENCE Oven Control Beeps and Displays any F code error (example F11). Close the door. Place a level on and off . 21 Contact cabinet maker to clear the display and stop beeping. Follow the instructions under Setting Oven Controls to set for service, review this appliance...
Use and Care Guide
Page 22
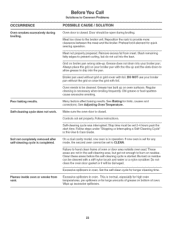
... searing operation. Follow instructions. Set the self-clean cycle for any mode, the second oven cannot be cleaned with foil. OCCURRENCE Oven smokes excessively during broiling. Poor baking results. Before You Call Solutions to hand clean frame of oven. Grease does not drain into the lean. Old grease or food spatters cause excessive smoking. See Adjusting Oven Temperature. Grid on bottom of oven or door area outside oven seal. Broiler pan used...
... searing operation. Follow instructions. Set the self-clean cycle for any mode, the second oven cannot be cleaned with foil. OCCURRENCE Oven smokes excessively during broiling. Poor baking results. Before You Call Solutions to hand clean frame of oven. Grease does not drain into the lean. Old grease or food spatters cause excessive smoking. See Adjusting Oven Temperature. Grid on bottom of oven or door area outside oven seal. Broiler pan used...


