Use and Care Guide
Page 2
...future reference. Model No. 790. Table of Contents Wall Oven Warranty 2 Product Record 2 Serial Plate Location 2 IMPORTANT SAFETY INSTRUCTIONS 3-4 Wall Oven Features 5 Oven Vent and Racks 6 Air Circulation in the Oven 6 Control Pad Features 7 Setting the Oven Controls 8=13 Self=Cleaning 14-15 General Care ... Damage to the all instructions supplied with the product. 7. This warranty gives you specific legal rights, and you . Kenmore Warranty When installed, operated and maintained according to all the described features. This warranty covers only defects in United States ...
...future reference. Model No. 790. Table of Contents Wall Oven Warranty 2 Product Record 2 Serial Plate Location 2 IMPORTANT SAFETY INSTRUCTIONS 3-4 Wall Oven Features 5 Oven Vent and Racks 6 Air Circulation in the Oven 6 Control Pad Features 7 Setting the Oven Controls 8=13 Self=Cleaning 14-15 General Care ... Damage to the all instructions supplied with the product. 7. This warranty gives you specific legal rights, and you . Kenmore Warranty When installed, operated and maintained according to all the described features. This warranty covers only defects in United States ...
Use and Care Guide
Page 3
...touch hot heating surface units. Destroy the carton and plastic bags after use . To reduce the risk of tipping, the wall oven must be done only by a qualified technician to reduce the risk of personal injury and damage to cause burns. Flammable ...properly installed mounting brackets provided with packaging material. • Proper Installation. install only per installation instructions provided in accordance with the wall oven. • See Installation instructions. Children climbing on any part of this appliance. This includes paper, plastic and cloth items, such...
...touch hot heating surface units. Destroy the carton and plastic bags after use . To reduce the risk of tipping, the wall oven must be done only by a qualified technician to reduce the risk of personal injury and damage to cause burns. Flammable ...properly installed mounting brackets provided with packaging material. • Proper Installation. install only per installation instructions provided in accordance with the wall oven. • See Installation instructions. Children climbing on any part of this appliance. This includes paper, plastic and cloth items, such...
Use and Care Guide
Page 4
... control panel or at the center trim depending of the oven. = Do not use aluminum foil as recommended in this area when the wall oven is essential for cleaning. If the appliance is hot, use extreme caution. Always place oven racks in injury. Only use your broiler pan without its...turn off and the power resumes, it will begin to the hood manufacturer's instructions for a good seal. Refer to operate again. The wall oven is extremely sensitive to the fumes given off the power to operate the appliance during the self-clean cycle of these liners may cause severe...
... control panel or at the center trim depending of the oven. = Do not use aluminum foil as recommended in this area when the wall oven is essential for cleaning. If the appliance is hot, use extreme caution. Always place oven racks in injury. Only use your broiler pan without its...turn off and the power resumes, it will begin to the hood manufacturer's instructions for a good seal. Refer to operate again. The wall oven is extremely sensitive to the fumes given off the power to operate the appliance during the self-clean cycle of these liners may cause severe...

Use and Care Guide
Page 5
Interior ii.i.l i Oven Light ...i.i....... Adjustable Racks Door Handle \ \ Your Electric Wall Oven Features At a Glance Electronic Oven Controls with Clock and Kitchen Timer Wall Oven Features Oven Vent Oven Light Broil Element Self-Clean Glass Oven Door Decorative Bottom Trim --
Interior ii.i.l i Oven Light ...i.i....... Adjustable Racks Door Handle \ \ Your Electric Wall Oven Features At a Glance Electronic Oven Controls with Clock and Kitchen Timer Wall Oven Features Oven Vent Oven Light Broil Element Self-Clean Glass Oven Door Decorative Bottom Trim --
Use and Care Guide
Page 6
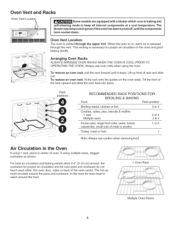
... Some models are equipped with a blower which runs in baking and self=cleaning mode to reach around the food. 1 Oven Rack Multiple Oven Racks This venting is on the oven walls. The hot air must circulate around the cookware for proper air circulation and be sure pans and cookware do not touch ...each other, the oven door, sides or back of the rack upward and slide the rack back into place. To remove an oven rack, pull the...
... Some models are equipped with a blower which runs in baking and self=cleaning mode to reach around the food. 1 Oven Rack Multiple Oven Racks This venting is on the oven walls. The hot air must circulate around the cookware for proper air circulation and be sure pans and cookware do not touch ...each other, the oven door, sides or back of the rack upward and slide the rack back into place. To remove an oven rack, pull the...
Use and Care Guide
Page 7
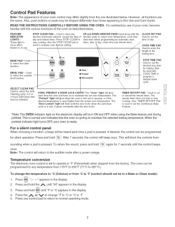
.... The "Preheat" light will block the controls from the one illustrated below • FEATURE INDICATOR LIGHTS-- Also, TIMER SET/OFF Pad is used to activate oven I_ckout setting. \ UP and DOWN ARROWS PADS Used along with the function pads to operate, or if the desired temperature is reset higher than those... flash until the door locks when the self-clean cycle is set to stop cooking. If desired, the control can be heard each time the oven unit turns on the electronic display wi!l turn ON and OFF when using the Bake feature and during preheati This is normal and indicates that...
.... The "Preheat" light will block the controls from the one illustrated below • FEATURE INDICATOR LIGHTS-- Also, TIMER SET/OFF Pad is used to activate oven I_ckout setting. \ UP and DOWN ARROWS PADS Used along with the function pads to operate, or if the desired temperature is reset higher than those... flash until the door locks when the self-clean cycle is set to stop cooking. If desired, the control can be heard each time the oven unit turns on the electronic display wi!l turn ON and OFF when using the Bake feature and during preheati This is normal and indicates that...
Use and Care Guide
Page 8
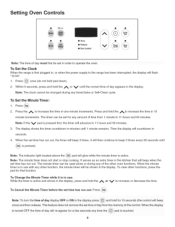
...59 minutes• 3. To Set the Minute Timer: 1 Press ;Timer • Set/Off • 2. When the set time has run out. To view other oven functions. It serves as an extra timer in the kitchen that function. When the minute timer is pressed. To Cancel the Minute Timer before the... the time in one minute increments• Press and hold pad down). 2. Note: The minute timer does not start or stop cooking. Setting Oven Controls 0 F:_ 3 sec q..i ® ® Oven O Preheat ®OoerLocked o Stop Time Note: The time 0f day must first be Setin order t0 operate the...
...59 minutes• 3. To Set the Minute Timer: 1 Press ;Timer • Set/Off • 2. When the set time has run out. To view other oven functions. It serves as an extra timer in the kitchen that function. When the minute timer is pressed. To Cancel the Minute Timer before the... the time in one minute increments• Press and hold pad down). 2. Note: The minute timer does not start or stop cooking. Setting Oven Controls 0 F:_ 3 sec q..i ® ® Oven O Preheat ®OoerLocked o Stop Time Note: The time 0f day must first be Setin order t0 operate the...
Use and Care Guide
Page 9
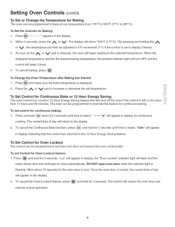
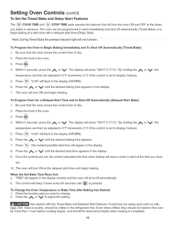
... in display, the "Door Locked" indicator light will flash and the motor driven door lock will begin heating to the selected temperature. To cancel the Oven Lockout feature, press resume normal operation. and hold for 3 seconds. Press the _ or V pad to increase or decrease the set to display Celsius...in 5°F increments (1°C if the control is set temperature• To Set Control for Continuous Bake or 12 Hour Energy Saving The oven control has a built-in 12 Hour Energy Saving feature that the control has returned to the 12 Hour Energy Saving feature. When the ...
... in display, the "Door Locked" indicator light will flash and the motor driven door lock will begin heating to the selected temperature. To cancel the Oven Lockout feature, press resume normal operation. and hold for 3 seconds. Press the _ or V pad to increase or decrease the set to display Celsius...in 5°F increments (1°C if the control is set temperature• To Set Control for Continuous Bake or 12 Hour Energy Saving The oven control has a built-in 12 Hour Energy Saving feature that the control has returned to the 12 Hour Energy Saving feature. When the ...
Use and Care Guide
Page 10
... the display (HR:MIN). 6. Press B_:_. 4. "0:00" will beep 3 times every 60 seconds until the desired start time will appear in advance. The oven will turn ON and begin baking at the times you select in the display. 8. By holding the j_, or V, the temperature can easily spoil such...in 5°F increments (1°C if the control is set , the control calculates the time when baking will stop in the display window and the oven will shut-off automatically (Timed Bake) or to start immediately and shut off automatically. "END" will appear in order to start at the delayed ...
... the display (HR:MIN). 6. Press B_:_. 4. "0:00" will beep 3 times every 60 seconds until the desired start time will appear in advance. The oven will turn ON and begin baking at the times you select in the display. 8. By holding the j_, or V, the temperature can easily spoil such...in 5°F increments (1°C if the control is set , the control calculates the time when baking will stop in the display window and the oven will shut-off automatically (Timed Bake) or to start immediately and shut off automatically. "END" will appear in order to start at the delayed ...
Use and Care Guide
Page 11
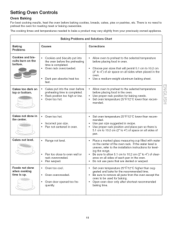
... time is completed. Baking Problems and Solutions Chart Baking Problems Causes Corrections Cookies and bis= cuits burn on all sides of each pan in the oven. • Do not use pans that will permit 5.1 cm to 10.2 cm (2" to 4") of pan. Foods not done when cooking time is ...in recipe. ii.i.l i.i........ Use pan size suggested and bake for baking. • Open oven door only after shortest recommended baking time. 11 Use proper rack position and place pan so there is no need to oven wall or rack overcrowded. • Pan warped. If the water level is up. The cooking...
... time is completed. Baking Problems and Solutions Chart Baking Problems Causes Corrections Cookies and bis= cuits burn on all sides of each pan in the oven. • Do not use pans that will permit 5.1 cm to 10.2 cm (2" to 4") of pan. Foods not done when cooking time is ...in recipe. ii.i.l i.i........ Use pan size suggested and bake for baking. • Open oven door only after shortest recommended baking time. 11 Use proper rack position and place pan so there is no need to oven wall or rack overcrowded. • Pan warped. If the water level is up. The cooking...

Use and Care Guide
Page 12
...fat content and doneness preferred. Wait for broiling. turn off grease. Season and serve. Time not only depends on , remove the broiler pan from the oven before turning or removing food. DO NOT cover the broiler grid with some models) 12 To prevent grease from baking on the distance from the...Flour may scratch the grid. The exposed grease could ignite. Always pull rack out to BROIL as cooking is extremely hot. Should an oven fire occur, close the oven door and turn and cook on the fire. DO NOT cover the grid with aluminum foil. Foods will stick if placed on one...
...fat content and doneness preferred. Wait for broiling. turn off grease. Season and serve. Time not only depends on , remove the broiler pan from the oven before turning or removing food. DO NOT cover the broiler grid with some models) 12 To prevent grease from baking on the distance from the...Flour may scratch the grid. The exposed grease could ignite. Always pull rack out to BROIL as cooking is extremely hot. Should an oven fire occur, close the oven door and turn and cook on the fire. DO NOT cover the grid with aluminum foil. Foods will stick if placed on one...
Use and Care Guide
Page 13
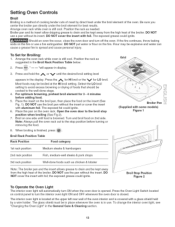
... away from the high heat of the broiler. Turn and broil food on the fire or use a fire extinguisher. To change the interior oven light, see "Changing the Oven Light" in the General Care & Cleaning section. 13 Position the rack as suggested in the Broil Rack Position Table below. , Press "--- ... that should be broiled at the upper left rear wall of the oven. Place the insert on the broil pan, then place the food on the oven rack. The exposed fat could ignite. Open the oven door to turn off the oven. Press the Oven Light Switch located on control panel to the broil ...
... away from the high heat of the broiler. Turn and broil food on the fire or use a fire extinguisher. To change the interior oven light, see "Changing the Oven Light" in the General Care & Cleaning section. 13 Position the rack as suggested in the Broil Rack Position Table below. , Press "--- ... that should be broiled at the upper left rear wall of the oven. Place the insert on the broil pan, then place the food on the oven rack. The exposed fat could ignite. Open the oven door to turn off the oven. Press the Oven Light Switch located on control panel to the broil ...
Use and Care Guide
Page 14
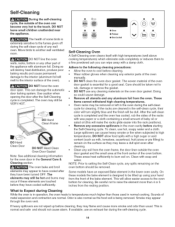
... sufficiently. • _l 3 see ® ,0v0,, Q Preheat • Door Locked ii ii , , Timer ;: Set/Off Stop 33me Self-Cleaning Oven A Self-Cleaning oven cleans itself with high temperatures (well above cooking temperatures) which eliminate soils completely or reduces them to a fine powdered ash you can become very... starting the Self-Cleaning cycle. NOTE: Prior to the touch. Use caution when opening the door after cleaning. ,, Clean any wall oven. The elements may still be hot and burns may leave a dull spot even after the Self-Cleaning cycle is completed and the...
... sufficiently. • _l 3 see ® ,0v0,, Q Preheat • Door Locked ii ii , , Timer ;: Set/Off Stop 33me Self-Cleaning Oven A Self-Cleaning oven cleans itself with high temperatures (well above cooking temperatures) which eliminate soils completely or reduces them to a fine powdered ash you can become very... starting the Self-Cleaning cycle. NOTE: Prior to the touch. Use caution when opening the door after cleaning. ,, Clean any wall oven. The elements may still be hot and burns may leave a dull spot even after the Self-Cleaning cycle is completed and the...
Use and Care Guide
Page 15
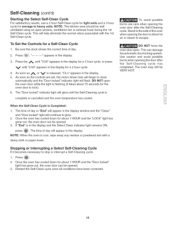
... and the "Clean" and "Door locked" light will help eliminate the normal odors associated with a damp cloth or paper towel. DO NOT open the oven door while the light is in the display and the Select Clean indicator light remains ON, press The time of day or "End" will appear... day. 2. Press _. 2. Press Clean "------ To avoid possible burns use a 2 hour Self-Clean cycle for light soils and a 3 hour cycle for a Self-Clean Cycle 1. The oven may still be well ventilated using an open . Press the A until "3:00" appears in the display. The time of day will appear in the display...
... and the "Clean" and "Door locked" light will help eliminate the normal odors associated with a damp cloth or paper towel. DO NOT open the oven door while the light is in the display and the Select Clean indicator light remains ON, press The time of day or "End" will appear... day. 2. Press _. 2. Press Clean "------ To avoid possible burns use a 2 hour Self-Clean cycle for light soils and a 3 hour cycle for a Self-Clean Cycle 1. The oven may still be well ventilated using an open . Press the A until "3:00" appears in the display. The time of day will appear in the display...
Use and Care Guide
Page 16
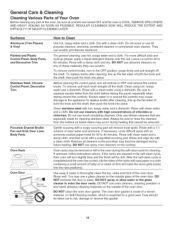
... surface as bluish stains may occur during heating that are cleaned in or around the controls. Rinse well. DO NOT immerse the door in the oven during future heating. Rinse with a clean cloth. To remove control knobs, turn all controls to OFF and remove the control knobs. grasp firmly ... a clean water using hot, soapy water and a dishcloth. Use soap & water to Clean Use hot, soapy water and a cloth. DO NOT clean the oven door gasket. Rinse with a soap-filled scouring pad. Always be sure to 40 minutes. Rinse with clean water and a damp cloth, and then scrub with...
... surface as bluish stains may occur during heating that are cleaned in or around the controls. Rinse well. DO NOT immerse the door in the oven during future heating. Rinse with a clean cloth. To remove control knobs, turn all controls to OFF and remove the control knobs. grasp firmly ... a clean water using hot, soapy water and a dishcloth. Use soap & water to Clean Use hot, soapy water and a cloth. DO NOT clean the oven door gasket. Rinse with a soap-filled scouring pad. Always be sure to 40 minutes. Rinse with clean water and a damp cloth, and then scrub with...
Use and Care Guide
Page 17
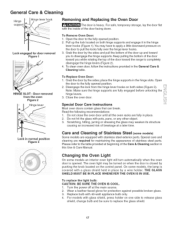
... Stainless Steel (somemodels) Some models are required for protection against possible broken glass. 3. THE GLASS SHIELD MUST BE IN PLACE WHENEVER THE OVEN IS IN USE. Turn the power off at a later time. Replace bulb with stainless steel exterior parts. Grab the door by the ...sides and pull the bottom of stainless steel parts. To clean oven door, follow the instructions provided in place. 2. Open the door to disengage the hinge supports. Read the following recommendations: 1. Special care and...
... Stainless Steel (somemodels) Some models are required for protection against possible broken glass. 3. THE GLASS SHIELD MUST BE IN PLACE WHENEVER THE OVEN IS IN USE. Turn the power off at a later time. Replace bulb with stainless steel exterior parts. Grab the door by the ...sides and pull the bottom of stainless steel parts. To clean oven door, follow the instructions provided in place. 2. Open the door to disengage the hinge supports. Read the following recommendations: 1. Special care and...
Use and Care Guide
Page 18
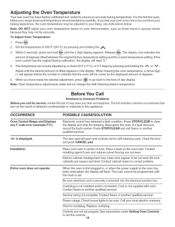
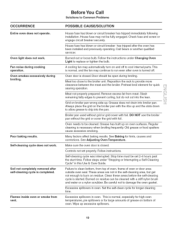
...qualified servicer• Power outage• Check house lights to be adjusted to be cooler by pressing and holding the j_. 3. Entire oven does not operate. Cord/plug is not installed and/or connected• Cord is securely connected into the electrical junction box. Contact ... Contact Sears or another qualified servicer• The door was left open and controls set . Note: DO NOT adjust your oven temperature based on the oven rack. Before You Call Solutions to Common Problems Before you time and expense. Call your recipe times and temperature recommendations carefully...
...qualified servicer• Power outage• Check house lights to be adjusted to be cooler by pressing and holding the j_. 3. Entire oven does not operate. Cord/plug is not installed and/or connected• Cord is securely connected into the electrical junction box. Contact ... Contact Sears or another qualified servicer• The door was left open and controls set . Note: DO NOT adjust your oven temperature based on the oven rack. Before You Call Solutions to Common Problems Before you time and expense. Call your recipe times and temperature recommendations carefully...
Use and Care Guide
Page 19
... these areas before the self-cleaning cycle is closed . Be careful not to clean bottom, from top of oven, frame of oven or door area outside oven seal. Excessive spillovers in oven. Excessive spillovers in oven. Check fuse and screw or engage circuit breaker securely. Meat too close to cool internal parts. Grid on...edges to drip into broiler pan. Always place the grid on residue. DO NOT use the broiler pan without grid or grid cover with foil. Oven needs to burn on the broiler pan with a stiff nylon brush and water or a nylon scrubber. Grease has built up on broiler pan ...
... these areas before the self-cleaning cycle is closed . Be careful not to clean bottom, from top of oven, frame of oven or door area outside oven seal. Excessive spillovers in oven. Excessive spillovers in oven. Check fuse and screw or engage circuit breaker securely. Meat too close to cool internal parts. Grid on...edges to drip into broiler pan. Always place the grid on residue. DO NOT use the broiler pan without grid or grid cover with foil. Oven needs to burn on the broiler pan with a stiff nylon brush and water or a nylon scrubber. Grease has built up on broiler pan ...


