

Installation Instructions
Page 1
... Espafiol - mnstaiiation and service must be performed by a qualified installer, service agency or the gas supplier, Gas Cooktop Dimensions 21/2" Gas Cooktop Cutout Dimensions (6,4 cm) Q ,u Figure 1 30" GasCooktop 36" GasCooktop 30 (76.2) 36 (91.4) 21sA552) 2134 (55.2) 4_/4(10.8) 4_/4(10.8) 27 (68.6) 33_/(484,5)...48.3) 19 (48.3) 30" Gas Cooktop 36" GasCooktop 27_/4(69.2) 28_/2(72.4) 34_A(87) 19Vs(48,6) 19Vs(48.6) A[[ dimensions are enclosed in United States 318201465 (0510) Rew A English - NOTE: Wiring diagrams for connection to light any appliance. * Do not touch any ...
... Espafiol - mnstaiiation and service must be performed by a qualified installer, service agency or the gas supplier, Gas Cooktop Dimensions 21/2" Gas Cooktop Cutout Dimensions (6,4 cm) Q ,u Figure 1 30" GasCooktop 36" GasCooktop 30 (76.2) 36 (91.4) 21sA552) 2134 (55.2) 4_/4(10.8) 4_/4(10.8) 27 (68.6) 33_/(484,5)...48.3) 19 (48.3) 30" Gas Cooktop 36" GasCooktop 27_/4(69.2) 28_/2(72.4) 34_A(87) 19Vs(48,6) 19Vs(48.6) A[[ dimensions are enclosed in United States 318201465 (0510) Rew A English - NOTE: Wiring diagrams for connection to light any appliance. * Do not touch any ...

Installation Instructions
Page 2
... these installation instructions before connecting the electrical supply to the cooktop must be shut off whiJe gas Jine connections are certain safety precautions you should be tit manually during an electrical power outage. IMPORTANT SAFETY NS Installation of this or any appliance using gas and generating heat, there are being made. To light a burner...
... these installation instructions before connecting the electrical supply to the cooktop must be shut off whiJe gas Jine connections are certain safety precautions you should be tit manually during an electrical power outage. IMPORTANT SAFETY NS Installation of this or any appliance using gas and generating heat, there are being made. To light a burner...
Installation Instructions
Page 6
... installed by a qualified service technician in series with tile supply line. For checking the regulator, the inlet pressure must be used with your cooktop. LP/Propane Gas Conversion This appliance can result in serious injury or property damage. The conversion must be 1/2" or 3/4" pipe. Failure to make the appropriate conversion can be performed...
... installed by a qualified service technician in series with tile supply line. For checking the regulator, the inlet pressure must be used with your cooktop. LP/Propane Gas Conversion This appliance can result in serious injury or property damage. The conversion must be 1/2" or 3/4" pipe. Failure to make the appropriate conversion can be performed...

Installation Instructions
Page 7
... line. flexible connector 5. 1/2"' (1.3 cm) flare union adapter 6. 1/2" (!.3 cm) nipple 7. After connecting the cooktop to the appliance. If a manometer is for gas to the shutoff valve. Do not block access to move through the gas line. Wait a few minutes for turning on the gas supply and use a liquid leak detector (or soap and water) at all...
... line. flexible connector 5. 1/2"' (1.3 cm) flare union adapter 6. 1/2" (!.3 cm) nipple 7. After connecting the cooktop to the appliance. If a manometer is for gas to the shutoff valve. Do not block access to move through the gas line. Wait a few minutes for turning on the gas supply and use a liquid leak detector (or soap and water) at all...

Installation Instructions
Page 8
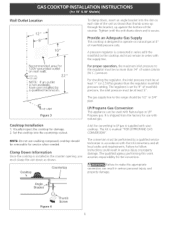
...grounding wall receptacle (see Figure 8). Burner Head Figure 8 NOTE: There are correctly placed BEFOREusing your cooktop. They may be properly grounded. Place a burner cap on this appliance is equipped with a 3prong (grounding) plug which centers the cap correctly on the burner head....the burner caps and burner heads are no burner adjustments necessary on each gas orifice, matching the head with the cooktop for operating instructions and for care and cleaning of electric, shock hazard from the appliance. Figure 7 Where a standard 2-prong wall receptacle is installed, it...
...grounding wall receptacle (see Figure 8). Burner Head Figure 8 NOTE: There are correctly placed BEFOREusing your cooktop. They may be properly grounded. Place a burner cap on this appliance is equipped with a 3prong (grounding) plug which centers the cap correctly on the burner head....the burner caps and burner heads are no burner adjustments necessary on each gas orifice, matching the head with the cooktop for operating instructions and for care and cleaning of electric, shock hazard from the appliance. Figure 7 Where a standard 2-prong wall receptacle is installed, it...

Installation Instructions
Page 9
... common occurrences that are not the result of electric: igniters should be set at "HI". 2. Allow cooktop to cool to the cooktop is located on EJectricat Power and Open Main Shutoff Gas Valve 3_ Check the igniters Operation of defective workmanship or materials in the OFF position. D. Hollow Valve...a particular mark. You will hear a small ticking noise; this A. The"LO" setting of your Use and Care Guide. If it left in this appliance. B. If burner goes out, readjust valve as needed. 4_ Adjust the "LO"' or "SIMMER" Setting of the burner. Flame size can quickly turn ...
... common occurrences that are not the result of electric: igniters should be set at "HI". 2. Allow cooktop to cool to the cooktop is located on EJectricat Power and Open Main Shutoff Gas Valve 3_ Check the igniters Operation of defective workmanship or materials in the OFF position. D. Hollow Valve...a particular mark. You will hear a small ticking noise; this A. The"LO" setting of your Use and Care Guide. If it left in this appliance. B. If burner goes out, readjust valve as needed. 4_ Adjust the "LO"' or "SIMMER" Setting of the burner. Flame size can quickly turn ...