Use and Care Guide
Page 2
... Care Guide, if this product caused by the use for : 1. Before Using Your New Vacuum 2 Kenmore Vacuum Cleaner Warranty 2 Important Safety Instructions 3 Parts and Features 4 Assembly 5 Use and Care 6 How Your Vacuum Works 6 How to Start Your Vacuum 6 Attachments 7 Attachments Use Chart 7 Vacuuming Tips 8 Performance Features 8 Cleaning The Dust Bin and Washable Filter ....9 Cleaning Motor Safety...
... Care Guide, if this product caused by the use for : 1. Before Using Your New Vacuum 2 Kenmore Vacuum Cleaner Warranty 2 Important Safety Instructions 3 Parts and Features 4 Assembly 5 Use and Care 6 How Your Vacuum Works 6 How to Start Your Vacuum 6 Attachments 7 Attachments Use Chart 7 Vacuuming Tips 8 Performance Features 8 Cleaning The Dust Bin and Washable Filter ....9 Cleaning Motor Safety...
Use and Care Guide
Page 3
...not use cleanerwithout dust bag and/or filters in useand beforeservicing. Closeattention _snecessarywhenusedbyor nearchildren. Replaceif cut or worn. Avoid vacuuming sharp objects. Do not use withdamagedcord or plug. Keep on chairs, tables,etc. CAUTION statements alert you to... pullcord around sharpedgesor corners.Do not runcleanerover cord. Donot put on floor. Read this manualbefore assemblingor using your vacuum cleaner. Please pay special attention to these substancescan createa fire hazard or explosion. Always turn cleaner off beforeconnectingor ...
...not use cleanerwithout dust bag and/or filters in useand beforeservicing. Closeattention _snecessarywhenusedbyor nearchildren. Replaceif cut or worn. Avoid vacuuming sharp objects. Do not use withdamagedcord or plug. Keep on chairs, tables,etc. CAUTION statements alert you to... pullcord around sharpedgesor corners.Do not runcleanerover cord. Donot put on floor. Read this manualbefore assemblingor using your vacuum cleaner. Please pay special attention to these substancescan createa fire hazard or explosion. Always turn cleaner off beforeconnectingor ...
Use and Care Guide
Page 4
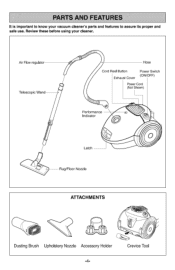
Review these before using your vacuum cleaner's parts and features to know your cleaner. Crevice Tool It is important to assure its proper and safe use. Air Flow regulator Hose Cord Reel Button Power Switch ExhaustCover (ON/OFF) PowerCord (NotShown) ATTACHMENTS Dusting Brush Upholstery Nozzle Accessory Holder -4-
Review these before using your vacuum cleaner's parts and features to know your cleaner. Crevice Tool It is important to assure its proper and safe use. Air Flow regulator Hose Cord Reel Button Power Switch ExhaustCover (ON/OFF) PowerCord (NotShown) ATTACHMENTS Dusting Brush Upholstery Nozzle Accessory Holder -4-
Use and Care Guide
Page 5
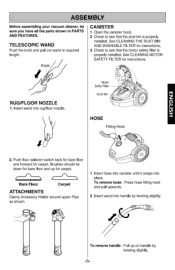
TELESCOPIC WAND Push the knob and pull out wand to see that the motor safety filter is properly installed. Open the canister hood. 2. Push floor selector switch back for bare floor and forward for instructions. 3. To remove hose : Press hose fitting hook and pull upwards. 2.... Hook 2. Insert hose into canister until it snaps into handle by twisting slightly. -5- Check to see that the dust bin is properly installed. Check to required length. Brushes should be sure you have all the parts shown in PARTS AND FEATURES. Before assembling your vacuum cleaner, be down for bare...
TELESCOPIC WAND Push the knob and pull out wand to see that the motor safety filter is properly installed. Open the canister hood. 2. Push floor selector switch back for bare floor and forward for instructions. 3. To remove hose : Press hose fitting hook and pull upwards. 2.... Hook 2. Insert hose into canister until it snaps into handle by twisting slightly. -5- Check to see that the dust bin is properly installed. Check to required length. Brushes should be sure you have all the parts shown in PARTS AND FEATURES. Before assembling your vacuum cleaner, be down for bare...
Use and Care Guide
Page 6
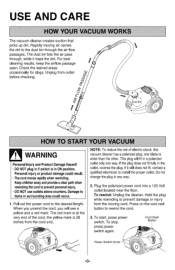
For best cleaning results, keep the airflow passage open. The red mark is at the very end of electric shock, this vacuum cleaner has a polarized plug; This plug will see a yellow and a red mark. If it still does not fit, contact a qualified electrician to the dust bin through , while it traps... the dirt. USE AND CARE The vacuum cleaner creates suction that picks up dirt. Unplug from the cord end. Plug the ...
For best cleaning results, keep the airflow passage open. The red mark is at the very end of electric shock, this vacuum cleaner has a polarized plug; This plug will see a yellow and a red mark. If it still does not fit, contact a qualified electrician to the dust bin through , while it traps... the dirt. USE AND CARE The vacuum cleaner creates suction that picks up dirt. Unplug from the cord end. Plug the ...
Use and Care Guide
Page 8
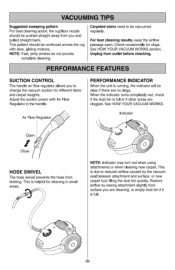
...air flow regulator allows you are cleaning, or empty dust bin if it is full or if other areas are no clogs. See HOW YOUR VACUUM WORKS. Suggested sweeping pattern For best cleaning action, the rug/floor nozzle should be clear if there are clogged. For best cleaning results, keep... Air Flow Regulator in small areas. This pattern should be pushed straight away from outlet before checking. Carpeted stairs need to change the vacuum suction for different fabric and carpet weights. This is due to reduced airflow caused by raising attachment slightly from twisting. See HOW YOUR...
...air flow regulator allows you are cleaning, or empty dust bin if it is full or if other areas are no clogs. See HOW YOUR VACUUM WORKS. Suggested sweeping pattern For best cleaning action, the rug/floor nozzle should be clear if there are clogged. For best cleaning results, keep... Air Flow Regulator in small areas. This pattern should be pushed straight away from outlet before checking. Carpeted stairs need to change the vacuum suction for different fabric and carpet weights. This is due to reduced airflow caused by raising attachment slightly from twisting. See HOW YOUR...
Use and Care Guide
Page 9
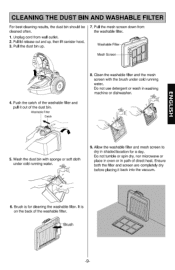
... completely dry before placing it out of the washable filter. -9- Pull lid release out and up . 7. Pull the dust bin up , then lift canister hood. 3. Wash the dust bin with the brush under cold running water. Unplug cord from the washable filter. Washable Filter 4. Push the catch of ...the washable filter and pull it back into the vacuum. 6. Do not use detergent or wash in path of direct heat. Allow the washable filter and mesh screen to dry in shaded location ...
... completely dry before placing it out of the washable filter. -9- Pull lid release out and up . 7. Pull the dust bin up , then lift canister hood. 3. Wash the dust bin with the brush under cold running water. Unplug cord from the washable filter. Washable Filter 4. Push the catch of ...the washable filter and pull it back into the vacuum. 6. Do not use detergent or wash in path of direct heat. Allow the washable filter and mesh screen to dry in shaded location ...
Use and Care Guide
Page 10
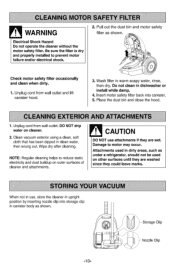
... motor safety filter. Place the dust bin and close the hood. 1. Unplug cord from wall outlet. Clean vacuum exterior using a clean, soft cloth that has been dipped in canister body as shown. NOTE: Regular cleaning helps to motor may occur. Unplug cord from wall outlet and lift... canister hood. 3. Attachments used in upright position by inserting nozzle clip into canister. 5. Nozzle Clip / -10- Be sure the filter is dry and properly installed to prevent motor failure and/or ...
... motor safety filter. Place the dust bin and close the hood. 1. Unplug cord from wall outlet. Clean vacuum exterior using a clean, soft cloth that has been dipped in canister body as shown. NOTE: Regular cleaning helps to motor may occur. Unplug cord from wall outlet and lift... canister hood. 3. Attachments used in upright position by inserting nozzle clip into canister. 5. Nozzle Clip / -10- Be sure the filter is dry and properly installed to prevent motor failure and/or ...

Use and Care Guide
Page 24
...-LE-FOYER MC (1-800-533-6937) www.sears.ca © Sears Brands, LLC @ Registered Trademark / T_,,_Trademark / sN Service Mark of carry-in products like vacuums, lawn equipment, iiiiiiiiiiiiiiiiiiiiiii and electronics, call or go on-line for the nearest Sears Parts and Repair Center. iiiiiiiiiiiiiiiiiiiiiii 1-800-488-1222 Anytime, day or...
...-LE-FOYER MC (1-800-533-6937) www.sears.ca © Sears Brands, LLC @ Registered Trademark / T_,,_Trademark / sN Service Mark of carry-in products like vacuums, lawn equipment, iiiiiiiiiiiiiiiiiiiiiii and electronics, call or go on-line for the nearest Sears Parts and Repair Center. iiiiiiiiiiiiiiiiiiiiiii 1-800-488-1222 Anytime, day or...
Service Guide
Page 3
... such as vinyl, paper, etc. 5) Sharp objects such as needles, pins, metal or glass particles, etc. 5. Close supervision is necessary when this vacuum cleaner is full of a moter safety filter, an exhaust filter, a washable filter and mesh screen.. 2) Never use the crevice tool more than 20... brush : for cleaning any crevice, inside corners of exchanging other parts, refer to the cleaner or injure persons. 7• Air exhausted from the vacuum cleaner is fulled or not. 8. Electric shock could occur if used by unfastening the screws. 2) Disconnect the lead wires., 3) Lift the old ...
... such as vinyl, paper, etc. 5) Sharp objects such as needles, pins, metal or glass particles, etc. 5. Close supervision is necessary when this vacuum cleaner is full of a moter safety filter, an exhaust filter, a washable filter and mesh screen.. 2) Never use the crevice tool more than 20... brush : for cleaning any crevice, inside corners of exchanging other parts, refer to the cleaner or injure persons. 7• Air exhausted from the vacuum cleaner is fulled or not. 8. Electric shock could occur if used by unfastening the screws. 2) Disconnect the lead wires., 3) Lift the old ...
Service Guide
Page 5
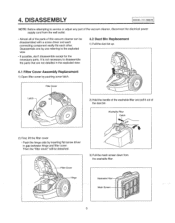
...cover" will be detached,. 3) Pull the mesh screen down from the wall outlet, • Almost all of the parts of this vacuum cleaner can be disassembled with a screw driver and each connecting component easily fits each other. It is not necessary to disassemble the parts... filter cover - Disassemble one by pushing cover latch_ Filter Cover Latch 2) Hold the handle of the washable filter and pull it out of the vacuum cleaner, disconnect the electrical power supply cord from the washable filter, Washable Mesh 4. DISASSEMBLY i. .i NOTE: Before attempting to the exploded view., ...
...cover" will be detached,. 3) Pull the mesh screen down from the wall outlet, • Almost all of the parts of this vacuum cleaner can be disassembled with a screw driver and each connecting component easily fits each other. It is not necessary to disassemble the parts... filter cover - Disassemble one by pushing cover latch_ Filter Cover Latch 2) Hold the handle of the washable filter and pull it out of the vacuum cleaner, disconnect the electrical power supply cord from the washable filter, Washable Mesh 4. DISASSEMBLY i. .i NOTE: Before attempting to the exploded view., ...


