Use and Care Guide
Page 2
...and Serial Number Plate. Before Using Your New Vacuum 2 Kenmore Vacuum Cleaner Warranty 2 Important Safety Instructions 3 Parts and Features 4 Assembly 5 Use and Care 6 How Your Vacuum Works 6 How to Start Your Vacuum 6 Attachments 7 Attachments Use Chart 7 Vacuuming Tips 8 Performance Features 8 Cleaning The Dust... nearest Sears store. For more information about the care and operation, call your new Kenmore vacuum. Model No. ONE YEAR FULL WARRANTY ON KENMORE VACUUM CLEANER When assembled, operated and maintained according to a defect in the safest and most effective...
...and Serial Number Plate. Before Using Your New Vacuum 2 Kenmore Vacuum Cleaner Warranty 2 Important Safety Instructions 3 Parts and Features 4 Assembly 5 Use and Care 6 How Your Vacuum Works 6 How to Start Your Vacuum 6 Attachments 7 Attachments Use Chart 7 Vacuuming Tips 8 Performance Features 8 Cleaning The Dust... nearest Sears store. For more information about the care and operation, call your new Kenmore vacuum. Model No. ONE YEAR FULL WARRANTY ON KENMORE VACUUM CLEANER When assembled, operated and maintained according to a defect in the safest and most effective...
Use and Care Guide
Page 3
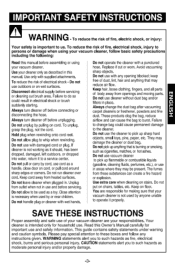
... _snecessarywhenusedbyor nearchildren. Replaceif cut or worn. Keep hair, loose clothing,fingers, and all parts of your vacuum cleaner are responsiblefor making surethat your vacuum cleaner. Failure to changebag could result in place. To reduce the risk of electrical shock- To reducethe risk... starting. Use extra care when cleaning on floor. Donot put on cord. You are your vacuum cleaner, follow any openingblocked; Your cleaner is important to these substancescan createa fire hazard or explosion. Read this manualbefore assemblingor using your responsibilities...
... _snecessarywhenusedbyor nearchildren. Replaceif cut or worn. Keep hair, loose clothing,fingers, and all parts of your vacuum cleaner are responsiblefor making surethat your vacuum cleaner. Failure to changebag could result in place. To reduce the risk of electrical shock- To reducethe risk... starting. Use extra care when cleaning on floor. Donot put on cord. You are your vacuum cleaner, follow any openingblocked; Your cleaner is important to these substancescan createa fire hazard or explosion. Read this manualbefore assemblingor using your responsibilities...
Use and Care Guide
Page 4
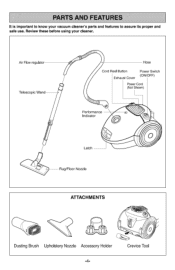
Air Flow regulator Hose Cord Reel Button Power Switch ExhaustCover (ON/OFF) PowerCord (NotShown) ATTACHMENTS Dusting Brush Upholstery Nozzle Accessory Holder -4- Review these before using your vacuum cleaner's parts and features to know your cleaner. Crevice Tool It is important to assure its proper and safe use.
Air Flow regulator Hose Cord Reel Button Power Switch ExhaustCover (ON/OFF) PowerCord (NotShown) ATTACHMENTS Dusting Brush Upholstery Nozzle Accessory Holder -4- Review these before using your vacuum cleaner's parts and features to know your cleaner. Crevice Tool It is important to assure its proper and safe use.
Use and Care Guide
Page 5
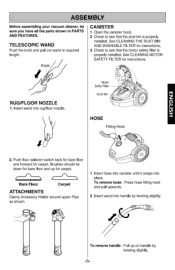
.... Bare Floor Carpet ATTACHMENTS Clamp Accessory Holder around upper Pipe as shown. 1. Insertwand intorug/floor nozzle. Insert hose into canister until it snaps into handle by twisting slightly. -5- TELESCOPIC WAND Push the knob and pull out wand to see that ...Fitting Hook 2. To remove hose : Press hose fitting hook and pull upwards. 2. Before assembling your vacuum cleaner, be down for bare floor and up on handle by twisting slightly. Knob CANISTER 1. See CLEANING MOTOR SAFETY FILTER for carpet. To remove handle : Pull up for instructions. 3.
.... Bare Floor Carpet ATTACHMENTS Clamp Accessory Holder around upper Pipe as shown. 1. Insertwand intorug/floor nozzle. Insert hose into canister until it snaps into handle by twisting slightly. -5- TELESCOPIC WAND Push the knob and pull out wand to see that ...Fitting Hook 2. To remove hose : Press hose fitting hook and pull upwards. 2. Before assembling your vacuum cleaner, be down for bare floor and up on handle by twisting slightly. Knob CANISTER 1. See CLEANING MOTOR SAFETY FILTER for carpet. To remove handle : Pull up for instructions. 3.
Use and Care Guide
Page 6
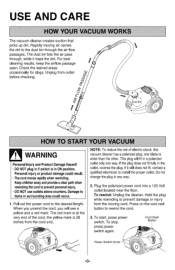
.... Unplug from the cord end. When you unwind the cord, you will fit in surrounding area could occur. 1. This plug will see a yellow and a red mark. Plug the polarized power cord into a 120 Volt outlet located near the floor. Hold the plug while rewinding to rewind the... the air pass through the air flow passages. Personalinjury or product damagecould result. • Thecordmoves rapidlywhenrewinding. Rapidly moving cord. USE AND CARE The vacuum cleaner creates suction that picks up dirt. Pull out the power cord to the dust bin through , while it still does not fit, contact a...
.... Unplug from the cord end. When you unwind the cord, you will fit in surrounding area could occur. 1. This plug will see a yellow and a red mark. Plug the polarized power cord into a 120 Volt outlet located near the floor. Hold the plug while rewinding to rewind the... the air pass through the air flow passages. Personalinjury or product damagecould result. • Thecordmoves rapidlywhenrewinding. Rapidly moving cord. USE AND CARE The vacuum cleaner creates suction that picks up dirt. Pull out the power cord to the dust bin through , while it still does not fit, contact a...
Use and Care Guide
Page 10
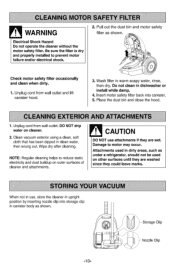
Insert motor safety filter back into storage clip in canister body as shown. Clean vacuum exterior using a clean, soft cloth that has been ... not be used in use attachments if they could leave marks. Unplug cord from wall outlet and lift canister hood. 3. When not in dirty areas, such as shown. Check motor safety filter occasionally and clean ...clean in upright position by inserting nozzle clip into canister. 5. Place the dust bin and close the hood. 1. Y.I I WARNING Electrical Shock Hazard Do not operate the cleaner without the motor safety filter. Wipe dry after ...
Insert motor safety filter back into storage clip in canister body as shown. Clean vacuum exterior using a clean, soft cloth that has been ... not be used in use attachments if they could leave marks. Unplug cord from wall outlet and lift canister hood. 3. When not in dirty areas, such as shown. Check motor safety filter occasionally and clean ...clean in upright position by inserting nozzle clip into canister. 5. Place the dust bin and close the hood. 1. Y.I I WARNING Electrical Shock Hazard Do not operate the cleaner without the motor safety filter. Wipe dry after ...
Service Guide
Page 3
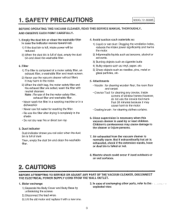
... to the exploded view. Dusting brush : for cleaning any crevice, inside corners of dust.. Close supervision is necessary when this vacuum cleaner is used outdoors or on wet surfaces• 2. Dust indicator Dust indicator shows you red color when the dust bin is ...Body Base by or near fire or direct sun ray, 3. SAFETY PRECAUTIONS t i i i.i i_11,1,1,_ I MODEL 721 ,,26082B I BEFORE OPERATING THIS VACUUM CLEANER, READ THIS SERVICE MANUAL THOROUGHLY, AND OBSERVE EACH POINT CAREFULLY. 1. Electric shock could occur if used by unfastening the screws. 2) Disconnect the lead wires...
... to the exploded view. Dusting brush : for cleaning any crevice, inside corners of dust.. Close supervision is necessary when this vacuum cleaner is used outdoors or on wet surfaces• 2. Dust indicator Dust indicator shows you red color when the dust bin is ...Body Base by or near fire or direct sun ray, 3. SAFETY PRECAUTIONS t i i i.i i_11,1,1,_ I MODEL 721 ,,26082B I BEFORE OPERATING THIS VACUUM CLEANER, READ THIS SERVICE MANUAL THOROUGHLY, AND OBSERVE EACH POINT CAREFULLY. 1. Electric shock could occur if used by unfastening the screws. 2) Disconnect the lead wires...
Service Guide
Page 5
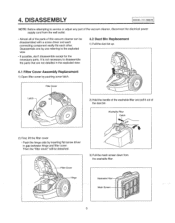
Disassemble one by pushing cover latch_ Filter Cover Latch 2) Hold the handle of the washable filter and pull it out of the vacuum cleaner, disconnect the electrical power supply cord from the washable filter, Washable Mesh Push the hinge side by inserting flat screw driver in the exploded... the "filter cover" will be detached,. 3) Pull the mesh screen down from the wall outlet, • Almost all of the parts of this vacuum cleaner can be disassembled with a screw driver and each connecting component easily fits each other. It is not necessary to service or adjust any part of...
Disassemble one by pushing cover latch_ Filter Cover Latch 2) Hold the handle of the washable filter and pull it out of the vacuum cleaner, disconnect the electrical power supply cord from the washable filter, Washable Mesh Push the hinge side by inserting flat screw driver in the exploded... the "filter cover" will be detached,. 3) Pull the mesh screen down from the wall outlet, • Almost all of the parts of this vacuum cleaner can be disassembled with a screw driver and each connecting component easily fits each other. It is not necessary to service or adjust any part of...


