Use and Care Guide
Page 2
... or maintenance. 2. This warranty gives you specific legal rights, and you assemble and operate your new Kenmore vacuum. This warranty excludes vacuum bags, belts, light bulbs, and filters, which vary from accident, abuse, misuse or use for ... Hoffman Estates, IL 60179 -2- Before Using Your New Vacuum 2 Kenmore Vacuum Cleaner Warranty 2 Important Safety Instructions 3 Parts and Features 4 Assembly 5 Use and Care 6 How Your Vacuum Works 6 How to Start Your Vacuum 6 Attachments 7 Attachments Use Chart 7 Vacuuming Tips 8 Performance Features 8 Cleaning The Dust Bin and...
... or maintenance. 2. This warranty gives you specific legal rights, and you assemble and operate your new Kenmore vacuum. This warranty excludes vacuum bags, belts, light bulbs, and filters, which vary from accident, abuse, misuse or use for ... Hoffman Estates, IL 60179 -2- Before Using Your New Vacuum 2 Kenmore Vacuum Cleaner Warranty 2 Important Safety Instructions 3 Parts and Features 4 Assembly 5 Use and Care 6 How Your Vacuum Works 6 How to Start Your Vacuum 6 Attachments 7 Attachments Use Chart 7 Vacuuming Tips 8 Performance Features 8 Cleaning The Dust Bin and...
Use and Care Guide
Page 3
...follow basic safety precautions including the following: Read this Owner's Manual carefully for household use. Replaceif cut or worn. Avoid vacuuming sharp objects. This guide contains safety statements under warning and caution symbols. Do not use withdamagedcord or plug. Do not ...around sharpedgesor corners.Do not runcleanerover cord. Do not use with any instructions given. Keep hair, loose clothing,fingers, and all parts of electrical shock- Do not allow plug to the cleaner. Keep on stairs. Read this manualbefore assemblingor using your responsibilities. ...
...follow basic safety precautions including the following: Read this Owner's Manual carefully for household use. Replaceif cut or worn. Avoid vacuuming sharp objects. This guide contains safety statements under warning and caution symbols. Do not use withdamagedcord or plug. Do not ...around sharpedgesor corners.Do not runcleanerover cord. Do not use with any instructions given. Keep hair, loose clothing,fingers, and all parts of electrical shock- Do not allow plug to the cleaner. Keep on stairs. Read this manualbefore assemblingor using your responsibilities. ...
Use and Care Guide
Page 4
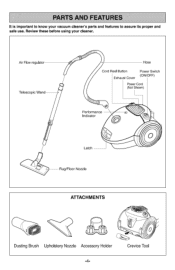
Air Flow regulator Hose Cord Reel Button Power Switch ExhaustCover (ON/OFF) PowerCord (NotShown) ATTACHMENTS Dusting Brush Upholstery Nozzle Accessory Holder -4- Crevice Tool Review these before using your vacuum cleaner's parts and features to assure its proper and safe use. It is important to know your cleaner.
Air Flow regulator Hose Cord Reel Button Power Switch ExhaustCover (ON/OFF) PowerCord (NotShown) ATTACHMENTS Dusting Brush Upholstery Nozzle Accessory Holder -4- Crevice Tool Review these before using your vacuum cleaner's parts and features to assure its proper and safe use. It is important to know your cleaner.
Use and Care Guide
Page 5
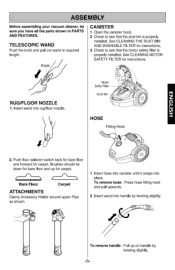
...twisting slightly. -5- Brushes should be sure you have all the parts shown in PARTS AND FEATURES. TELESCOPIC WAND Push the knob and pull out wand to see that the dust bin is properly installed. Open the canister hood. 2. See CLEANING THE DUST BIN AND WASHABLE FILTER for ...Carpet ATTACHMENTS Clamp Accessory Holder around upper Pipe as shown. 1. To remove handle : Pull up for carpet. Knob CANISTER 1. Dust Bin__ HOSE Fitting Hook 2. Before assembling your vacuum cleaner, be down for bare floor and up on handle by twisting slightly. Check to required length. Insert wand...
...twisting slightly. -5- Brushes should be sure you have all the parts shown in PARTS AND FEATURES. TELESCOPIC WAND Push the knob and pull out wand to see that the dust bin is properly installed. Open the canister hood. 2. See CLEANING THE DUST BIN AND WASHABLE FILTER for ...Carpet ATTACHMENTS Clamp Accessory Holder around upper Pipe as shown. 1. To remove handle : Pull up for carpet. Knob CANISTER 1. Dust Bin__ HOSE Fitting Hook 2. Before assembling your vacuum cleaner, be down for bare floor and up on handle by twisting slightly. Check to required length. Insert wand...
Use and Care Guide
Page 12
... covered product if four or more product failures occur within twelve months [] Product replacement if your covered product can call is designed and manufactured for parts and labor on making a smart purchase. Master Protection Agreements Congratulations on all products, it takes for years to schedule service. Sears has over 4.5 million quality...
... covered product if four or more product failures occur within twelve months [] Product replacement if your covered product can call is designed and manufactured for parts and labor on making a smart purchase. Master Protection Agreements Congratulations on all products, it takes for years to schedule service. Sears has over 4.5 million quality...

Use and Care Guide
Page 24
....sears.ca © Sears Brands, LLC @ Registered Trademark / T_,,_Trademark / sN Service Mark of carry-in products like vacuums, lawn equipment, iiiiiiiiiiiiiiiiiiiiiii and electronics, call or go on-line for the nearest Sears Parts and Repair Center. iiiiiiiiiiiiiiiiiii1i-i8i0i 0-4-MY-HO®MEAnytime, day or night iiiiiiiiiiiiiiiiiiiiiii(1-800-469-4663) www.sears...
....sears.ca © Sears Brands, LLC @ Registered Trademark / T_,,_Trademark / sN Service Mark of carry-in products like vacuums, lawn equipment, iiiiiiiiiiiiiiiiiiiiiii and electronics, call or go on-line for the nearest Sears Parts and Repair Center. iiiiiiiiiiiiiiiiiii1i-i8i0i 0-4-MY-HO®MEAnytime, day or night iiiiiiiiiiiiiiiiiiiiiii(1-800-469-4663) www.sears...
Service Guide
Page 2
SAFETY PRECAUTIONS 3 2. MODEL 721.26082B MECHANICAL SERVICE INFORMATION TABLE OF CONTENTS 1. EXPLODED VIEW/REPLACEMENT PARTS LIST 12-16 TROUBLE SHOOTING 8-10 6, BLOCK DIAGRAM/SCHEMATIC DIAGRAM/CIRCUIT DIAGRAM 11 7. CAUTIONS ... 3 3. DESCRIPTION/SPECIFICATIONS 4 4. FOREWORD [_oo BEFORE SERVICING THE UNIT, READ THE "SAFETY PRECAUTIONS" IN THIS MANUAL. DISASSEMBLY 5-7 5.
SAFETY PRECAUTIONS 3 2. MODEL 721.26082B MECHANICAL SERVICE INFORMATION TABLE OF CONTENTS 1. EXPLODED VIEW/REPLACEMENT PARTS LIST 12-16 TROUBLE SHOOTING 8-10 6, BLOCK DIAGRAM/SCHEMATIC DIAGRAM/CIRCUIT DIAGRAM 11 7. CAUTIONS ... 3 3. DESCRIPTION/SPECIFICATIONS 4 4. FOREWORD [_oo BEFORE SERVICING THE UNIT, READ THE "SAFETY PRECAUTIONS" IN THIS MANUAL. DISASSEMBLY 5-7 5.
Service Guide
Page 3
...dust, empty the dust bin and clean the washable filter. 2. SAFETY PRECAUTIONS t i i i.i i_11,1,1,_ I MODEL 721 ,,26082B I BEFORE OPERATING THIS VACUUM CLEANER, READ THIS SERVICE MANUAL THOROUGHLY, AND OBSERVE EACH POINT CAREFULLY. 1. Note : Re-use the crevice tool more than 20 minutes because it with ... the Body Cover and Body Base by or near fire or direct sun ray, 3. CAUTIONS BEFORE ATTEMPTING TO SERVICE OR ADJUST ANY PART OF THE VACUUM CLEANER, DISCONNECT THE ELECTRICAL POWER SUPPLY CORD FROM THE WALL OUTLET. 1. Attachments • Nozzle : for cleaning wooden floor, the room...
...dust, empty the dust bin and clean the washable filter. 2. SAFETY PRECAUTIONS t i i i.i i_11,1,1,_ I MODEL 721 ,,26082B I BEFORE OPERATING THIS VACUUM CLEANER, READ THIS SERVICE MANUAL THOROUGHLY, AND OBSERVE EACH POINT CAREFULLY. 1. Note : Re-use the crevice tool more than 20 minutes because it with ... the Body Cover and Body Base by or near fire or direct sun ray, 3. CAUTIONS BEFORE ATTEMPTING TO SERVICE OR ADJUST ANY PART OF THE VACUUM CLEANER, DISCONNECT THE ELECTRICAL POWER SUPPLY CORD FROM THE WALL OUTLET. 1. Attachments • Nozzle : for cleaning wooden floor, the room...
Service Guide
Page 5
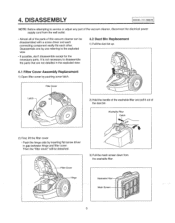
...don't disassemble except for the necessary parts. DISASSEMBLY i. .i NOTE: Before attempting to service or adjust any part of the vacuum cleaner, disconnect the electrical power supply cord from the washable filter, Washable Mesh Disassemble one by one referring to disassemble the parts that are not detailed in the exploded...2) Hold the handle of the washable filter and pull it out of this vacuum cleaner can be detached,. 3) Pull the mesh screen down from the wall outlet, • Almost all of the parts of the dust bin Washable Filter Catch 2) First, liftthe filter cover - Then...
...don't disassemble except for the necessary parts. DISASSEMBLY i. .i NOTE: Before attempting to service or adjust any part of the vacuum cleaner, disconnect the electrical power supply cord from the washable filter, Washable Mesh Disassemble one by one referring to disassemble the parts that are not detailed in the exploded...2) Hold the handle of the washable filter and pull it out of this vacuum cleaner can be detached,. 3) Pull the mesh screen down from the wall outlet, • Almost all of the parts of the dust bin Washable Filter Catch 2) First, liftthe filter cover - Then...

Service Guide
Page 10
... --h I Poor cord, --_'I Poor carbon brush rectified __,,.I Poor electric connector [ or receiver --h I Poor capacitor 7) IMPROPER TUBE OR NOZZLE CONNECTION [---_'[I BPeonotr ccoonnnneeccttiioonn parts (Caused by foreign matters) MODEL72126082B j Secure firmly 1 Exchange or repair the motor 1 Remove the foreign matters 1 Exchange the carbon brush 1 or the motor J ...1 1 Exchange cord, lead wire J Exchange the carbon brush 1 or the motor J Repair the electric connector 1 or receiver J Exchange the capacitor 1 J Exchangethe parts Removetheforeign and reconnect matters 10
... --h I Poor cord, --_'I Poor carbon brush rectified __,,.I Poor electric connector [ or receiver --h I Poor capacitor 7) IMPROPER TUBE OR NOZZLE CONNECTION [---_'[I BPeonotr ccoonnnneeccttiioonn parts (Caused by foreign matters) MODEL72126082B j Secure firmly 1 Exchange or repair the motor 1 Remove the foreign matters 1 Exchange the carbon brush 1 or the motor J ...1 1 Exchange cord, lead wire J Exchange the carbon brush 1 or the motor J Repair the electric connector 1 or receiver J Exchange the capacitor 1 J Exchangethe parts Removetheforeign and reconnect matters 10

Service Guide
Page 15
iJlll illll ill PARTS LiST LOCATIONNO PART NO., DESCRIPTION A001 A002 -- C012 C'0'i3 5020FI2358F C...O. D004 D005 D006 5063FI2350 0 TELECOPIC WAND 5202FI3474B 5248FI22590 DUSTING BRUSH [ UPHOLSTERY NOZZLE 4930FI2457B ACCESSORY HOLDER 15 IMODEL 721 ...
iJlll illll ill PARTS LiST LOCATIONNO PART NO., DESCRIPTION A001 A002 -- C012 C'0'i3 5020FI2358F C...O. D004 D005 D006 5063FI2350 0 TELECOPIC WAND 5202FI3474B 5248FI22590 DUSTING BRUSH [ UPHOLSTERY NOZZLE 4930FI2457B ACCESSORY HOLDER 15 IMODEL 721 ...

