Owners Manual
Page 2
... all moving parts. An appliance should always followed, including the following : DAN G ER,_Toreduce the risk of this adjustment. 4. owner's manual. Keep ventilation openings of electric shock: 1. following ::;;;::: Read all instructions before cleaning. 2. Never o with_ controller free Jmulation ii is used as threading the needle, changing the needle, threading the bobbin, changing the presser foot, and the like. 15. iMPORTANT SAFETY iNSTRUCTiONS This machine is designed and manufactured for its inten( Use only attachments 3.
... all moving parts. An appliance should always followed, including the following : DAN G ER,_Toreduce the risk of this adjustment. 4. owner's manual. Keep ventilation openings of electric shock: 1. following ::;;;::: Read all instructions before cleaning. 2. Never o with_ controller free Jmulation ii is used as threading the needle, changing the needle, threading the bobbin, changing the presser foot, and the like. 15. iMPORTANT SAFETY iNSTRUCTiONS This machine is designed and manufactured for its inten( Use only attachments 3.
Owners Manual
Page 5
... provide: • free care and for the proper operation of this sewing machine, except for normal machine in the owner's manual • free replacement of belts, light bulbs, needle plates and accessory parts if they are defective in material or workmanship This 90 day warranty does not include sewing machine needles, which ,,lectrical equipment of this sewing machine to state. Warranty service is available by returning this sewing ma;ed control, is defective...
... provide: • free care and for the proper operation of this sewing machine, except for normal machine in the owner's manual • free replacement of belts, light bulbs, needle plates and accessory parts if they are defective in material or workmanship This 90 day warranty does not include sewing machine needles, which ,,lectrical equipment of this sewing machine to state. Warranty service is available by returning this sewing ma;ed control, is defective...
Owners Manual
Page 8
...operation of this sewing machine, except for normal machine care and mainten_ i_ _ in the owner s manual • free replacement of b_i:_: iJ_t bulbs, needle plates and accessory parts if they are only included in the 90 day warranty described bei does not of plate exterior ssory parts...service is available for only 90 days from the date of purchase. electronic light which are defective in material or workmanship. Kenmore Sewing Machine Warranty Full 25 Year Warranty on Sewing Machine Die=Cast Metal Frame For 25 years from the date of purchase, Sears will provide free repair...
...operation of this sewing machine, except for normal machine care and mainten_ i_ _ in the owner s manual • free replacement of b_i:_: iJ_t bulbs, needle plates and accessory parts if they are only included in the 90 day warranty described bei does not of plate exterior ssory parts...service is available for only 90 days from the date of purchase. electronic light which are defective in material or workmanship. Kenmore Sewing Machine Warranty Full 25 Year Warranty on Sewing Machine Die=Cast Metal Frame For 25 years from the date of purchase, Sears will provide free repair...
Owners Manual
Page 14
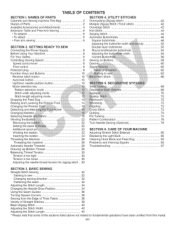
... Needle Drop Position 34 Using the Seam Guides 36 Turning Square Corners 36 Sewing from the Edge of Thick Fabric 36 Variety of Straight Stitches 38 Basic Zigzag Stitch 40 Adjusting the Stitch Width 40 Adjusting the Stitch Length 40 * Please note that some of Parts 2 Available Accessories and Attachments 4 Extension Table and Free Arm Sewing 6 • To detatch 6 • To attach 6 • Free arm sewing 6 SECTION 2. TABLE OF CONTENTS SECTION I. CARE OF YOUR MACHINE Adjusting Stretch Stitch Balance 80 Replacing the Light Bulb 80 Cleaning Hook Race and Feed Dog...
... Needle Drop Position 34 Using the Seam Guides 36 Turning Square Corners 36 Sewing from the Edge of Thick Fabric 36 Variety of Straight Stitches 38 Basic Zigzag Stitch 40 Adjusting the Stitch Width 40 Adjusting the Stitch Length 40 * Please note that some of Parts 2 Available Accessories and Attachments 4 Extension Table and Free Arm Sewing 6 • To detatch 6 • To attach 6 • Free arm sewing 6 SECTION 2. TABLE OF CONTENTS SECTION I. CARE OF YOUR MACHINE Adjusting Stretch Stitch Balance 80 Replacing the Light Bulb 80 Cleaning Hook Race and Feed Dog...
Owners Manual
Page 17
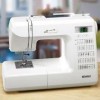
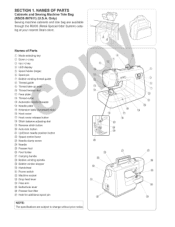
... display Spool holder (large) Spool pin Bobbin winding thread guide _) Thread guide Thread take-u Thread tens (_) Face plate Thread Automatic @ Needle plat_ Extension table _6) Hook cover Hook cover release button @) Stitch balance adjusting dial Reverse stitch button Auto-lock button _) Up/Down needle position button Speed control lever Needle clamp screw @ Needle Presser foot _6_ Foot holder Carrying handle @ Bobbin winding spindle Bobbin winder stopper Handwheel @ Power switch @ Machine socket Drop feed lever @ Free arm @ Buttonhole lever Presser foot lifter @ Hole for additional spool pin...
... display Spool holder (large) Spool pin Bobbin winding thread guide _) Thread guide Thread take-u Thread tens (_) Face plate Thread Automatic @ Needle plat_ Extension table _6) Hook cover Hook cover release button @) Stitch balance adjusting dial Reverse stitch button Auto-lock button _) Up/Down needle position button Speed control lever Needle clamp screw @ Needle Presser foot _6_ Foot holder Carrying handle @ Bobbin winding spindle Bobbin winder stopper Handwheel @ Power switch @ Machine socket Drop feed lever @ Free arm @ Buttonhole lever Presser foot lifter @ Hole for additional spool pin...
Owners Manual
Page 19
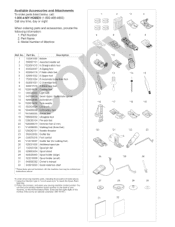
Model Number of Machine provide the f._ Part No. 1 102261000 Bobbin Description 2 650807101 Assorted needle set 3 *823801015 H:Straight stitch foot 4 832523007 A:Zigzag foot 5 822804118 F:Satin stitch fool 6 829801002 E:Zipper foot 7 753801004 R:Automatic bu !i _ foot 8 822801001 C:Overedge foc 9 82081701_ 10 11 b 12 Seam ripper / Bu!!enholi 13 14 needle 15 16 17 *941850000 18 *685803002 UItraglide foot 19 *200005104 Pin-tuck foot 20 *820809014 Hemmer foot (2 mm) 21 *214509003 Walking foot (Even foot) 22 *200262101 Needle threader 23 802422002 ...
Model Number of Machine provide the f._ Part No. 1 102261000 Bobbin Description 2 650807101 Assorted needle set 3 *823801015 H:Straight stitch foot 4 832523007 A:Zigzag foot 5 822804118 F:Satin stitch fool 6 829801002 E:Zipper foot 7 753801004 R:Automatic bu !i _ foot 8 822801001 C:Overedge foc 9 82081701_ 10 11 b 12 Seam ripper / Bu!!enholi 13 14 needle 15 16 17 *941850000 18 *685803002 UItraglide foot 19 *200005104 Pin-tuck foot 20 *820809014 Hemmer foot (2 mm) 21 *214509003 Walking foot (Even foot) 22 *200262101 Needle threader 23 802422002 ...
Owners Manual
Page 23
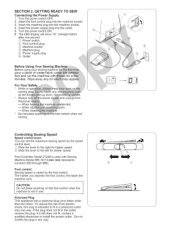
... way. control when not Controlling Sewing Speed Speed control lever: You can set the maximum sewing speed by the foot control. To reduce the risk of waste fabric foot and run the machine with Sewing Machine Model 385.19110.xxx (xxx represents numbers 000 through 999). Insert the foot control plug into the machine socket. 4. Foot control: Sewing speed is used with minutes. lever, le power machi and unplug from )arts. Turn the power switch OFF. 2. Foot Controller Model 21249 is varied by the speed control lever. _i_...
... way. control when not Controlling Sewing Speed Speed control lever: You can set the maximum sewing speed by the foot control. To reduce the risk of waste fabric foot and run the machine with Sewing Machine Model 385.19110.xxx (xxx represents numbers 000 through 999). Insert the foot control plug into the machine socket. 4. Foot control: Sewing speed is used with minutes. lever, le power machi and unplug from )arts. Turn the power switch OFF. 2. Foot Controller Model 21249 is varied by the speed control lever. _i_...

Owners Manual
Page 33
..., Satin, .... Use lue needle to pierce the fabric without fraying the needle thread. Special needles should be used for sewing lightweight fabrics so the fabric will not be used on certain fabrics. In the needles case there is one each of size 11, 14, 16, 18 and blue needle. Selecting Needle and Fabric For general sewing use needle size 11 or 14. Heavy fabrics require a needle large enough to eliminate skipped stitches when sewing knits and synthetic fabrics...
..., Satin, .... Use lue needle to pierce the fabric without fraying the needle thread. Special needles should be used for sewing lightweight fabrics so the fabric will not be used on certain fabrics. In the needles case there is one each of size 11, 14, 16, 18 and blue needle. Selecting Needle and Fabric For general sewing use needle size 11 or 14. Heavy fabrics require a needle large enough to eliminate skipped stitches when sewing knits and synthetic fabrics...
Owners Manual
Page 37
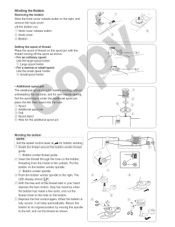
... spool: Use the large spool holder. _i_ Large spool holder • For a narrow or small spool: Use the small spool holder. _2_ Small spool holder • Additional s The additional unthreading Set the spoc place the felt !le. (0 Spool C2_Additional sp _3_Felt _4_Spool stand _5_Hole for the additional spool pin spool pin, Winding the bobbin NSeOtTtEhe: speed control lever at.._ for bobbin winding. [i_ Guide the thread around the bobbin winder thread guide. _i_ Bobbin winder thread guide [21 Insert the thread through the hole on the spool pin with the thread coming...
... spool: Use the large spool holder. _i_ Large spool holder • For a narrow or small spool: Use the small spool holder. _2_ Small spool holder • Additional s The additional unthreading Set the spoc place the felt !le. (0 Spool C2_Additional sp _3_Felt _4_Spool stand _5_Hole for the additional spool pin spool pin, Winding the bobbin NSeOtTtEhe: speed control lever at.._ for bobbin winding. [i_ Guide the thread around the bobbin winder thread guide. _i_ Bobbin winder thread guide [21 Insert the thread through the hole on the spool pin with the thread coming...

Owners Manual
Page 45
... J side of the fabric, and the stitch feels bumpy, turn the dial to a higher tension setting number to loosen the [he right ,_ls Tension is tc _i_ Needle _2_ Bobbin (Top _3_ Toti _4_ Right side _5_ Wrong side ( :fabric If the needle thread s rough on : - To match this appearance, adjust the needle tension. Adjusting the needle thread tension for correct appearance. Each stitch is too loose _i_ Right side (Top...
... J side of the fabric, and the stitch feels bumpy, turn the dial to a higher tension setting number to loosen the [he right ,_ls Tension is tc _i_ Needle _2_ Bobbin (Top _3_ Toti _4_ Right side _5_ Wrong side ( :fabric If the needle thread s rough on : - To match this appearance, adjust the needle tension. Adjusting the needle thread tension for correct appearance. Each stitch is too loose _i_ Right side (Top...
Owners Manual
Page 47
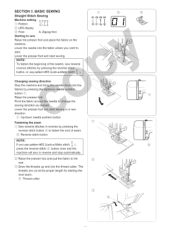
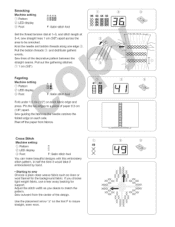
Lower the presser foot and start . Raise the Pivot the fabric ige the sewing direction as Lower the a new direction. BASIC SEWING Straight Stitch Sewing Machine setting _i_ Pattern: _2_LED display ol 020304 +II €_cl_old _3_Foot: A: Zigzag foot Starting to start sewing. Lower the needle into the fabric where you use pattern #03 (Lock-a-Mat 0,?20304 ILl I , ), press the reverse stitch _2_ button once and the machine will sew in reverse by pressing button _i_. SECTION 3. NOTE: To fasten the beginning of seam. _2_ Reverse stitch button NOTE: 03...
Lower the presser foot and start . Raise the Pivot the fabric ige the sewing direction as Lower the a new direction. BASIC SEWING Straight Stitch Sewing Machine setting _i_ Pattern: _2_LED display ol 020304 +II €_cl_old _3_Foot: A: Zigzag foot Starting to start sewing. Lower the needle into the fabric where you use pattern #03 (Lock-a-Mat 0,?20304 ILl I , ), press the reverse stitch _2_ button once and the machine will sew in reverse by pressing button _i_. SECTION 3. NOTE: To fasten the beginning of seam. _2_ Reverse stitch button NOTE: 03...
Owners Manual
Page 57
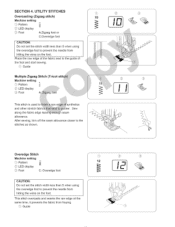
... start sewing. _i_ Guide Multiple Zigzag Stitch (Tricot Machine setting [ 10 [I allowance. SECTION 4. Place the raw edge of the fabric next to the stitches as shown. UTiLiTY STITCHES Overcasting (Zigzag stitch) Machine setting _i_ Pattern _2_LED display _3_Foot A:Zigzag foot or C:Overedge foot CAUTION: Do not set the stitch width less than 5 when using the overedge foot to prevent the needle from fraying. _i_ Guide J This stitch overcasts and seams the raw edge at the same time...
... start sewing. _i_ Guide Multiple Zigzag Stitch (Tricot Machine setting [ 10 [I allowance. SECTION 4. Place the raw edge of the fabric next to the stitches as shown. UTiLiTY STITCHES Overcasting (Zigzag stitch) Machine setting _i_ Pattern _2_LED display _3_Foot A:Zigzag foot or C:Overedge foot CAUTION: Do not set the stitch width less than 5 when using the overedge foot to prevent the needle from fraying. _i_ Guide J This stitch overcasts and seams the raw edge at the same time...

Owners Manual
Page 63
... difficult to hold the button. _3_Button holder NOTE: If the button is no gap between the slider and spring holder, otherwise the left through the hole on the foot. J Then lower the foot. _6_Buttonhole mark _7_Starting point _8_Slider _9_No gap _# Spring holder _ Sewing gap NOTE: Make sure there is extremely thick, buttonhole. Place the automatic buttonhole foot with its pin just under the foot and lower the needle at the starting point.
... difficult to hold the button. _3_Button holder NOTE: If the button is no gap between the slider and spring holder, otherwise the left through the hole on the foot. J Then lower the foot. _6_Buttonhole mark _7_Starting point _8_Slider _9_No gap _# Spring holder _ Sewing gap NOTE: Make sure there is extremely thick, buttonhole. Place the automatic buttonhole foot with its pin just under the foot and lower the needle at the starting point.
Owners Manual
Page 73
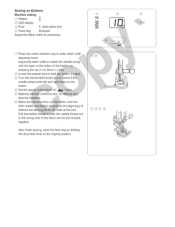
... threads together, After finish sewing, raise the feed dog by shifting the drop feed lever to enter stitch width adjusting mode. draw and trim both stitches but lei Pull the bobbin fl the beginning of the holes on the pressing the Up (4-)or Down (-) [2J Lower the presser foot to hold [31Turn the handwheel toward if tt needle enters both left and ri on Buttons Machine setting 10 _i_ Pattern...
... threads together, After finish sewing, raise the feed dog by shifting the drop feed lever to enter stitch width adjusting mode. draw and trim both stitches but lei Pull the bobbin fl the beginning of the holes on the pressing the Up (4-)or Down (-) [2J Lower the presser foot to hold [31Turn the handwheel toward if tt needle enters both left and ri on Buttons Machine setting 10 _i_ Pattern...
Owners Manual
Page 75
.... The LED display shows d5, which indicates the neutral setting. (A) If the left through the hole on the foot. [i_i1Lower the needle into the fabric at starting point. Darning Machine setting _i_ Pattern _2_LED display _3_Foot R: Automatic buttonhole foot [iiq Pull the button holder fully to the back. [ii_ Draw the needle thread to the required length and press the reverse stitch button. O9 E:i E:2[131 AAAAAAAA I111111111111111 It11111111111111 I111111111111111 I111111111111111 I111111111111111...
.... The LED display shows d5, which indicates the neutral setting. (A) If the left through the hole on the foot. [i_i1Lower the needle into the fabric at starting point. Darning Machine setting _i_ Pattern _2_LED display _3_Foot R: Automatic buttonhole foot [iiq Pull the button holder fully to the back. [ii_ Draw the needle thread to the required length and press the reverse stitch button. O9 E:i E:2[131 AAAAAAAA I111111111111111 It11111111111111 I111111111111111 I111111111111111 I111111111111111...
Owners Manual
Page 77
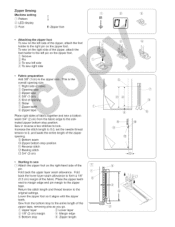
... right sides of the pin. Return the stitch length and thread tension to lock. Zipper Sewing Machine setting _i_ Pattern _2_LED display _3_Foot 01 E: Zipper foot Attaching the zipper foot To sew on the left side _4_To sew right side Fabric preparation Add 3/8" (lcm)to the zipper si overall opening . _9_Bottom seam _ Zipper bottom stop position _ Reverse stitch _ Basting stitch _i_ 3/4" (2 cm) • Starting to sew [iq Attach the zipper foot on the zipper foot. Sew in reverse a few stitches to the original settings. Place the zipper teeth next to...
... right sides of the pin. Return the stitch length and thread tension to lock. Zipper Sewing Machine setting _i_ Pattern _2_LED display _3_Foot 01 E: Zipper foot Attaching the zipper foot To sew on the left side _4_To sew right side Fabric preparation Add 3/8" (lcm)to the zipper si overall opening . _9_Bottom seam _ Zipper bottom stop position _ Reverse stitch _ Basting stitch _i_ 3/4" (2 cm) • Starting to sew [iq Attach the zipper foot on the zipper foot. Sew in reverse a few stitches to the original settings. Place the zipper teeth next to...
Owners Manual
Page 87
... you choose light weight fabric, use a tear away backing for the background fabric. Use the placement arrow "A" on each side. Sew outward from fabrics. Pull the bobbin threads _3_and distribute gathers evenly. Smocking Machine setting _i_ Pattern _2_LED display _3_Foot 36434445 }}_ F: Satin stitch foot 36 43 44 45 Set the thread tension dial at 1-3, and stitch length at 3-4, sew straight lines 1 cm (3/8") apart across the area to insure straight, even rows. 1 1 Knot the needle and bobbin threads along...
... you choose light weight fabric, use a tear away backing for the background fabric. Use the placement arrow "A" on each side. Sew outward from fabrics. Pull the bobbin threads _3_and distribute gathers evenly. Smocking Machine setting _i_ Pattern _2_LED display _3_Foot 36434445 }}_ F: Satin stitch foot 36 43 44 45 Set the thread tension dial at 1-3, and stitch length at 3-4, sew straight lines 1 cm (3/8") apart across the area to insure straight, even rows. 1 1 Knot the needle and bobbin threads along...

Owners Manual
Page 93
... presser foot and carefully turn the fabric. Use the additional spool pin and spoo shown (refer to 3.0 or less. Thread the needles _6_from front to the twin needle. When twin needle sewing is an optional item. J Do not set the stitch width wider than 3.0, otherwise I CthAeUnTeIOedNle: will hit the needle plate and break. To avoid the thread twisting, it is advisable to thread the machine one on , and select the stitch pattern. Twin Needle Sewing Machine setting _i_ Pattern...
... presser foot and carefully turn the fabric. Use the additional spool pin and spoo shown (refer to 3.0 or less. Thread the needles _6_from front to the twin needle. When twin needle sewing is an optional item. J Do not set the stitch width wider than 3.0, otherwise I CthAeUnTeIOedNle: will hit the needle plate and break. To avoid the thread twisting, it is advisable to thread the machine one on , and select the stitch pattern. Twin Needle Sewing Machine setting _i_ Pattern...

Owners Manual
Page 95
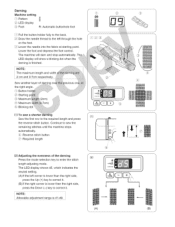
... OF YOUR MACHINE Adjusting Stretch Stitch Balance The sewing results of the stretch stitch patterns may vary depending upon the sewing conditions, such as sewing speed, type of the fabric, number of "+". (C)lf the pattern is c_ standard setting _: Replacing the WARNINGS: Turn OFF the power before touching it has cooled down before replacing the light bulb. Open face plate cover. NOTE: Replace the bulb with the lamp socket holes. Always refer to use. _i_ Stretch stitch balancing dial _2_Standard setting mark...
... OF YOUR MACHINE Adjusting Stretch Stitch Balance The sewing results of the stretch stitch patterns may vary depending upon the sewing conditions, such as sewing speed, type of the fabric, number of "+". (C)lf the pattern is c_ standard setting _: Replacing the WARNINGS: Turn OFF the power before touching it has cooled down before replacing the light bulb. Open face plate cover. NOTE: Replace the bulb with the lamp socket holes. Always refer to use. _i_ Stretch stitch balancing dial _2_Standard setting mark...
Owners Manual
Page 102
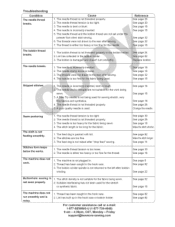
... = Friday support@kenmore-sewing.com i See page 52 i See page 18 i See page 82 i See page 82 J Troubleshooting f Condition The needle thread breaks. The needle is not plugged in the hook race or bobbin holder. The stitch length is too tong for the thread, i See page 30 i See page 18 The machine does not work. 1, The machine is either too heavy or too fine for the fabric being...
... = Friday support@kenmore-sewing.com i See page 52 i See page 18 i See page 82 i See page 82 J Troubleshooting f Condition The needle thread breaks. The needle is not plugged in the hook race or bobbin holder. The stitch length is too tong for the thread, i See page 30 i See page 18 The machine does not work. 1, The machine is either too heavy or too fine for the fabric being...


