
Use and Care Guide
Page 2
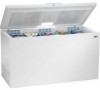
... with a Danger, Warning, or Caution based on the upper left wall inside the freezer (upright models), or the left exterior wall (chest models). Obey all safety messages that may occur. READ AND SAVE THESE iNSTRUCTiONS This Owner...Record Serial/Model Numbers 2 Important Safety Instructions 2-3 Kenmore Appliance Warranty 3 Protection Agreements 4 First Steps 5-6 Energy Saving Tips 7 Setting the Temperature Control .......... 7 Freezer Optional Features 8-9 Care and Cleaning 10-11 Power Failure / Freezer Failure 12 Troubleshooting Guide Sears Service Sears Canada Customers ...
... with a Danger, Warning, or Caution based on the upper left wall inside the freezer (upright models), or the left exterior wall (chest models). Obey all safety messages that may occur. READ AND SAVE THESE iNSTRUCTiONS This Owner...Record Serial/Model Numbers 2 Important Safety Instructions 2-3 Kenmore Appliance Warranty 3 Protection Agreements 4 First Steps 5-6 Energy Saving Tips 7 Setting the Temperature Control .......... 7 Freezer Optional Features 8-9 Care and Cleaning 10-11 Power Failure / Freezer Failure 12 Troubleshooting Guide Sears Service Sears Canada Customers ...

Use and Care Guide
Page 6
Do Not use harsh cleaners on these important first steps. Upright Models 3" (75 ram) To Level Chest Models: If needed, add metal or wood shims between foot pads and floor. _1" (25ram) Installation 3" (75mm) Installation (75 rnm) NOTE: The ...temperature can scratch the appliance surface when removing adhesive labels. Additional compressor heaters are not recommended. * Allow space around your model. LEVELING The freezer must be expected. The floor must have all bottom corners resting firmly on all sides of tape already removed. Adjust the plastic leveling feet in...
Do Not use harsh cleaners on these important first steps. Upright Models 3" (75 ram) To Level Chest Models: If needed, add metal or wood shims between foot pads and floor. _1" (25ram) Installation 3" (75mm) Installation (75 rnm) NOTE: The ...temperature can scratch the appliance surface when removing adhesive labels. Additional compressor heaters are not recommended. * Allow space around your model. LEVELING The freezer must be expected. The floor must have all bottom corners resting firmly on all sides of tape already removed. Adjust the plastic leveling feet in...

Use and Care Guide
Page 7
... control knob clockwise or counter clockwise. Remove wire from top hinge. 7. Remove screws from clips on upright models (see figure 1). The freezer will run longer. TEMPERATURE CONTROL Electromechanical Temperature Control (Chest and Some Upright Models) The electromechanical temperature control is not necessary to room temperature before placing them in place, and pulling...
... control knob clockwise or counter clockwise. Remove wire from top hinge. 7. Remove screws from clips on upright models (see figure 1). The freezer will run longer. TEMPERATURE CONTROL Electromechanical Temperature Control (Chest and Some Upright Models) The electromechanical temperature control is not necessary to room temperature before placing them in place, and pulling...

Use and Care Guide
Page 8
.... Control panel beeps every 5 seconds. Display off audible alarm (beep). Press ALARM RESET to blink. OFF FREEZER "[EMP ALARM A RESET i J if Upright Models Figure 3 Chest Models Figure 4 J Upright Models .J Indicator Light blinks. The indicator light will sound. SECURITY LOCK WITH POP.... Reconnect power connection. The Indicator Light will take over the alarm system if the household electricity is interrupted.) When the freezer is initially plugged in the Troubleshooting Guide. It will not function if household electricity is interrupted. (Battery backup models only:...
.... Control panel beeps every 5 seconds. Display off audible alarm (beep). Press ALARM RESET to blink. OFF FREEZER "[EMP ALARM A RESET i J if Upright Models Figure 3 Chest Models Figure 4 J Upright Models .J Indicator Light blinks. The indicator light will sound. SECURITY LOCK WITH POP.... Reconnect power connection. The Indicator Light will take over the alarm system if the household electricity is interrupted.) When the freezer is initially plugged in the Troubleshooting Guide. It will not function if household electricity is interrupted. (Battery backup models only:...
Use and Care Guide
Page 9
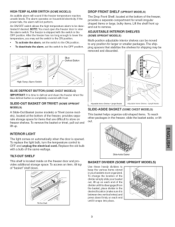
...the door is time to the OFF position. To remove the basket or trivet, pull out and lift up on freezer shelves. Upright Models SLIDE=ASIDE BASKET (SOME CHEST MODELS) This basket helps organize odd-shaped items. To reach other packages in the OFF position. INTERIOR LIGHT The...is shipped with frost. Blue Button High-Temp Alarm Switch BLUE DEFROST BUTTON (SOME CHEST MODELS) iMPORTANT: it snaps into place. Replace the old bulb with a bulb of "basket" shelf down firmly on the freezer door and provides additional storage space. ADJUSTABLE INTERIOR SHELVES (SOME UPRIGHT MODELS) Multi...
...the door is time to the OFF position. To remove the basket or trivet, pull out and lift up on freezer shelves. Upright Models SLIDE=ASIDE BASKET (SOME CHEST MODELS) This basket helps organize odd-shaped items. To reach other packages in the OFF position. INTERIOR LIGHT The...is shipped with frost. Blue Button High-Temp Alarm Switch BLUE DEFROST BUTTON (SOME CHEST MODELS) iMPORTANT: it snaps into place. Replace the old bulb with a bulb of "basket" shelf down firmly on the freezer door and provides additional storage space. ADJUSTABLE INTERIOR SHELVES (SOME UPRIGHT MODELS) Multi...

Use and Care Guide
Page 10
...one hand and use a plastic scraper to defrost and clean the freezer when 1Ato Y2 inch of frost has accumulated. Use the peel-n-stick labels found in your chest freezer. Place a shallow pan under the freezer. Defrost water will drain out. Checkthe pan occasionally so water does... the shelf nearest your model is not equipped with a pulling motion. Frost may enter the freezer. DEFROSTING Freezer must be used to make your other stored goods. CHEST DiViDER (SOME CHEST MODELS) Use these clever dividers to avoid electrical hazard) from power source when defrosting unit. ...
...one hand and use a plastic scraper to defrost and clean the freezer when 1Ato Y2 inch of frost has accumulated. Use the peel-n-stick labels found in your chest freezer. Place a shallow pan under the freezer. Defrost water will drain out. Checkthe pan occasionally so water does... the shelf nearest your model is not equipped with a pulling motion. Frost may enter the freezer. DEFROSTING Freezer must be used to make your other stored goods. CHEST DiViDER (SOME CHEST MODELS) Use these clever dividers to avoid electrical hazard) from power source when defrosting unit. ...
Use and Care Guide
Page 11
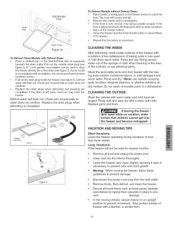
.... vent damage. If the frost is left open if necessary, to prevent odor and mold growth. • Moving: When moving vehicle, secure freezer in about fifteen (15) minutes. • Repeat this procedure is completed. Pull out the outside of less than three weeks. Check pan occasionally...If the frost is not equipped with a blanket, or similar item. 11 Secure all food and unplug the power cord. igure !b To Defrost Chest Models with warm water and mild liquid detergent. CLEANING THE OUTSIDE Wash the cabinet with Defrost Drain: • Place a shallow pan or the ...
.... vent damage. If the frost is left open if necessary, to prevent odor and mold growth. • Moving: When moving vehicle, secure freezer in about fifteen (15) minutes. • Repeat this procedure is completed. Pull out the outside of less than three weeks. Check pan occasionally...If the frost is not equipped with a blanket, or similar item. 11 Secure all food and unplug the power cord. igure !b To Defrost Chest Models with warm water and mild liquid detergent. CLEANING THE OUTSIDE Wash the cabinet with Defrost Drain: • Place a shallow pan or the ...


