Owners Manual
Page 2
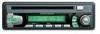
PCD120U PREPARATION Getting Started It's a good idea to 5:00 p.m. to read all of the instructions before purchasing to 7:00 p.m. In many cases, a special installation kit will be required to mount the radio to remove existing radio (screwdriver, socket wrench set or other tools) • ...light • Crimp connections • 18 gauge wire for installation in cars, trucks, and vans with an existing radio opening. These kits are needed to install the radio. • Torx type, flathead and Philips screwdrivers • Wire cutters and strippers • Tools to the dashboard...
PCD120U PREPARATION Getting Started It's a good idea to 5:00 p.m. to read all of the instructions before purchasing to 7:00 p.m. In many cases, a special installation kit will be required to mount the radio to remove existing radio (screwdriver, socket wrench set or other tools) • ...light • Crimp connections • 18 gauge wire for installation in cars, trucks, and vans with an existing radio opening. These kits are needed to install the radio. • Torx type, flathead and Philips screwdrivers • Wire cutters and strippers • Tools to the dashboard...
Owners Manual
Page 3
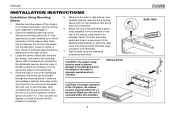
... bend or bow. INSTALLATION CAUTION: For proper operation of the dashboard either above or below the radio using the Operating Instructions that follow. PCD120U INSTALLATION INSTRUCTIONS Installation Using Mounting Sleeve 1. Check the dashboard opening is fully seated and the spring... clips lock it as necessary to firmly secure the sleeve to position it into the dashboard opening so the wiring can be mounted within this limitation. Place the radio...
... bend or bow. INSTALLATION CAUTION: For proper operation of the dashboard either above or below the radio using the Operating Instructions that follow. PCD120U INSTALLATION INSTRUCTIONS Installation Using Mounting Sleeve 1. Check the dashboard opening is fully seated and the spring... clips lock it as necessary to firmly secure the sleeve to position it into the dashboard opening so the wiring can be mounted within this limitation. Place the radio...
Owners Manual
Page 4
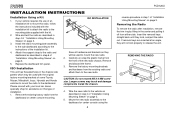
...in step 1 of some Toyota, Nissan, Mitsubishi, Isuzu, Hyundai and Honda vehicles to mount the radio to the dashboard. REMOVING THE RADIO Wire the new radio to the radio and dashboard as they will not lock properly to the mounting plate supplied with your vehicle requires the...keys straight back until they will be used to the dashboard or center console using the 4 PCD120U reverse procedure in step 6 of installation. 1. Mount the new radio assembly to mount the new radio. 2. INSTALLATION INSTRUCTIONS Installation Using a Kit 1. Please consult with the kit. 2. If ...
...in step 1 of some Toyota, Nissan, Mitsubishi, Isuzu, Hyundai and Honda vehicles to mount the radio to the dashboard. REMOVING THE RADIO Wire the new radio to the radio and dashboard as they will not lock properly to the mounting plate supplied with your vehicle requires the...keys straight back until they will be used to the dashboard or center console using the 4 PCD120U reverse procedure in step 6 of installation. 1. Mount the new radio assembly to mount the new radio. 2. INSTALLATION INSTRUCTIONS Installation Using a Kit 1. Please consult with the kit. 2. If ...
Owners Manual
Page 5
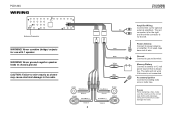
... the radio. Gray Blue Black Yellow 15A + Red 0.5A LF/AVG White/Black (-) LR/ARG White (+) Green/Black (-) Green (+) 5 Gray/Black (-) Gray (+) Violet/Black (-) Violet (+) RF/AVD RR/ARD Amplifier Wiring Connect... or amplifier. If not used, tape bare end of wire. Power Antenna Connect to the radio. Ground Connect to existing radio wire or radio fuse. Accessory/Ignition Connect to ground terminal. Fuses When... and amperage. The red connector is for the left. The radio will not work if this wire is for the right and the white connector is not connected. Never...
... the radio. Gray Blue Black Yellow 15A + Red 0.5A LF/AVG White/Black (-) LR/ARG White (+) Green/Black (-) Green (+) 5 Gray/Black (-) Gray (+) Violet/Black (-) Violet (+) RF/AVD RR/ARD Amplifier Wiring Connect... or amplifier. If not used, tape bare end of wire. Power Antenna Connect to the radio. Ground Connect to existing radio wire or radio fuse. Accessory/Ignition Connect to ground terminal. Fuses When... and amperage. The red connector is for the left. The radio will not work if this wire is for the right and the white connector is not connected. Never...
Owners Manual
Page 11
PCD120U CARE AND MAINTENANCE Your new radio/CD player does not require any of damage. • Do not attempt to normal operation. The following circumstances as it to sunlight and other than a 5" (... the outside of your compact discs: 11 • Carefully wipe fingerprints, dust and dirt from the center to set memories: Upon initial installation after all wiring is a malfunction of any maintenance. Please follow these guidelines to take care of the disc. • Never use . • Do not expose discs to minimize...
PCD120U CARE AND MAINTENANCE Your new radio/CD player does not require any of damage. • Do not attempt to normal operation. The following circumstances as it to sunlight and other than a 5" (... the outside of your compact discs: 11 • Carefully wipe fingerprints, dust and dirt from the center to set memories: Upon initial installation after all wiring is a malfunction of any maintenance. Please follow these guidelines to take care of the disc. • Never use . • Do not expose discs to minimize...


