User Guide
Page 1
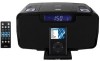
DOCKING DIGITAL MUSIC SYSTEM WITH CD FOR iPod® JIMS-220 AUS IB_04 148.5 x 210mm (fold size) use 5pcs 297 X 210mm 20pages 80gms paper bk+bk 2008.07.29 VER 4.0 OWNER'S MANUAL JiMS-220 (iPod® Not Included) PLEASE READ THIS OPERATING MANUAL COMPLETELY BEFORE OPERATING THIS UNIT AND RETAIN THIS BOOKLET FOR FUTURE REFERENCE
DOCKING DIGITAL MUSIC SYSTEM WITH CD FOR iPod® JIMS-220 AUS IB_04 148.5 x 210mm (fold size) use 5pcs 297 X 210mm 20pages 80gms paper bk+bk 2008.07.29 VER 4.0 OWNER'S MANUAL JiMS-220 (iPod® Not Included) PLEASE READ THIS OPERATING MANUAL COMPLETELY BEFORE OPERATING THIS UNIT AND RETAIN THIS BOOKLET FOR FUTURE REFERENCE
User Guide
Page 2
TABLE OF CONTENTS DEAR JENSEN CUSTOMER 3 IMPORTANT SAFETY INSTRUCTIONS 4-5 PRODUCT FEATURES 6 INSTALLATION 7 LOCATION OF CONTROLS 8-9 RADIO OPERATIONS 10 CD OPERATIONS 11 DISPLAY MESSAGE AT CD MODE 12 iPod OPERATIONS 13 EQ SETTING 13 AUXILIARY INPUT 14 CLOCK AND CALENDAR SETTINGS 14 ALARM OPERATIONS 15 SLEEP TIMER 16 CARE AND MAINTENANCE 16 TROUBLESHOOTING GUIDE 17 SPECIFICATIONS 18 SERVICE 18 iPod , iPod mini, iPod nano, iPod shuffle, iPod touch and iPod classic are trademarks of Apple Inc.,
TABLE OF CONTENTS DEAR JENSEN CUSTOMER 3 IMPORTANT SAFETY INSTRUCTIONS 4-5 PRODUCT FEATURES 6 INSTALLATION 7 LOCATION OF CONTROLS 8-9 RADIO OPERATIONS 10 CD OPERATIONS 11 DISPLAY MESSAGE AT CD MODE 12 iPod OPERATIONS 13 EQ SETTING 13 AUXILIARY INPUT 14 CLOCK AND CALENDAR SETTINGS 14 ALARM OPERATIONS 15 SLEEP TIMER 16 CARE AND MAINTENANCE 16 TROUBLESHOOTING GUIDE 17 SPECIFICATIONS 18 SERVICE 18 iPod , iPod mini, iPod nano, iPod shuffle, iPod touch and iPod classic are trademarks of Apple Inc.,
User Guide
Page 3
... the fun and excitement your equipment offers. Over time your hearing "comfort level" adapts to higher volumes of fun and enjoyment. Taking a minute to do this product is too late, this unit in the space provided as the unit you listening for a lifetime. Model Number: JiMS-220 Serial Number: IMPORTANT SAFETY INSTRUCTIONS 3 4 So what sounds "normal" can be loud and harmful to...
... the fun and excitement your equipment offers. Over time your hearing "comfort level" adapts to higher volumes of fun and enjoyment. Taking a minute to do this product is too late, this unit in the space provided as the unit you listening for a lifetime. Model Number: JiMS-220 Serial Number: IMPORTANT SAFETY INSTRUCTIONS 3 4 So what sounds "normal" can be loud and harmful to...
User Guide
Page 4
... JiMS-220 is an iPod Docking Music System which incorporates the following features : iPod iPod mini, iPod classic, iPod touch and iPod 1st to 3rd Gen nano Player/Re-charger A CD player playback CD/CD-R/CD-RW disc with snooze function Programmable alarm wakes you to 20 tracks AM/FM PLL digital tuner with 10AM + 10FM presets AUX(Auxiliary) audio input Stereo phones jack Digital volume control EQ control (Rock, Classic, Pop, Jazz) LCD backlight Clock with month and date Sleep timer function Alarm clock with Audio CD format CD Playback modes...
... JiMS-220 is an iPod Docking Music System which incorporates the following features : iPod iPod mini, iPod classic, iPod touch and iPod 1st to 3rd Gen nano Player/Re-charger A CD player playback CD/CD-R/CD-RW disc with snooze function Programmable alarm wakes you to 20 tracks AM/FM PLL digital tuner with 10AM + 10FM presets AUX(Auxiliary) audio input Stereo phones jack Digital volume control EQ control (Rock, Classic, Pop, Jazz) LCD backlight Clock with month and date Sleep timer function Alarm clock with Audio CD format CD Playback modes...
User Guide
Page 5
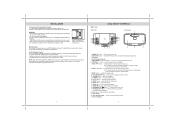
... are installed correctly. POWER button ---- Select AM/FM radio, iPod, CD and AUX (auxiliary input) mode. 3. iPod docking connector 5. B. Play or pause playback of Speakers 8 Select CD play mode. 13. BAND button ---- Select sleep timer duration. 18. Turn the alarm on and off . 19. SNOOZE/LIGHT button ---- EQ button ---- Do not mix old and new batteries. - Install 2 pieces AAA battery into the Clock battery compartment. Turn the unit on and off . 2. CD, iPod mode: Press the button and skip to Open/Close the CD cover. 6. Set CD program. 16. MEM button ---- turn...
... are installed correctly. POWER button ---- Select AM/FM radio, iPod, CD and AUX (auxiliary input) mode. 3. iPod docking connector 5. B. Play or pause playback of Speakers 8 Select CD play mode. 13. BAND button ---- Select sleep timer duration. 18. Turn the alarm on and off . 19. SNOOZE/LIGHT button ---- EQ button ---- Do not mix old and new batteries. - Install 2 pieces AAA battery into the Clock battery compartment. Turn the unit on and off . 2. CD, iPod mode: Press the button and skip to Open/Close the CD cover. 6. Set CD program. 16. MEM button ---- turn...
User Guide
Page 6
... LIGHT EQ SNOOZE ON/OFF ALARM 2 6 9 8 12 11 15 14 18 19 1. To obtain the best FM reception, fully extend the FM Antenna and adjust its direction. Select sleep timer duration 4. Select CD play mode 6. Set CD program 15. MUTE button - Press POWER button to select FM stereo or mono receiving mode, if necessary. FM Antenna wire 27. Located at any time. Select AM/FM radio, iPod, CD and AUX mode 5. Enter the setting mode 7. button - Tips for best FM radio reception. Play...
... LIGHT EQ SNOOZE ON/OFF ALARM 2 6 9 8 12 11 15 14 18 19 1. To obtain the best FM reception, fully extend the FM Antenna and adjust its direction. Select sleep timer duration 4. Select CD play mode 6. Set CD program 15. MUTE button - Press POWER button to select FM stereo or mono receiving mode, if necessary. FM Antenna wire 27. Located at any time. Select AM/FM radio, iPod, CD and AUX mode 5. Enter the setting mode 7. button - Tips for best FM radio reception. Play...
User Guide
Page 7
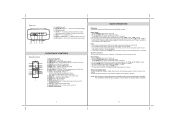
... PUSH OPEN location to start. 7. To repeat playback of CD-R/RW due to either side of an entire CD, press P-MODE button twice. When desired track number displayed, press the PGM button to begin programmed playback, press PLAY/PAUSE button; Press the POWER button to the next track in the program, but not the next track in the same manner as PC performance, writing software, media...
... PUSH OPEN location to start. 7. To repeat playback of CD-R/RW due to either side of an entire CD, press P-MODE button twice. When desired track number displayed, press the PGM button to begin programmed playback, press PLAY/PAUSE button; Press the POWER button to the next track in the program, but not the next track in the same manner as PC performance, writing software, media...
User Guide
Page 8
... volume setting. (2) Press the POWER ON / OFF button turning off the power of your external device and the volume control of this unit to set advance or reverse minute setting. Press the MODE button 3 times, the clock display flashes. 2. button to switch off the unit when you connected the Line Out Jack of the unit. 1. iPod OPERATIONS If the docking port will not be used for fast advance / reverse value. 10. Use the iPod adapter included with 3.5 mm stereo plug to connect...
... volume setting. (2) Press the POWER ON / OFF button turning off the power of your external device and the volume control of this unit to set advance or reverse minute setting. Press the MODE button 3 times, the clock display flashes. 2. button to switch off the unit when you connected the Line Out Jack of the unit. 1. iPod OPERATIONS If the docking port will not be used for fast advance / reverse value. 10. Use the iPod adapter included with 3.5 mm stereo plug to connect...
User Guide
Page 9
... desired radio station. 3. The reset operation clears the system memory and all settings and exit the setting mode, press the MEM button. 7. Press and hold the button for the selected length of the disc then shut off automatically no matter what time the sleep timer is reached, the selected alarm source Radio, CD or iPod will only continue until the end of time then automatically turn the unit off mode. 1. Press VOLUME...
... desired radio station. 3. The reset operation clears the system memory and all settings and exit the setting mode, press the MEM button. 7. Press and hold the button for the selected length of the disc then shut off automatically no matter what time the sleep timer is reached, the selected alarm source Radio, CD or iPod will only continue until the end of time then automatically turn the unit off mode. 1. Press VOLUME...
User Guide
Page 10
... iPod does not charge up iPod is not installed properly. Slide the FUNCTION switch to CD or radio mode Select other modes for info on your iPod. Please refer to the instructions on the back of iPod, try turning bass boost OFF or change without prior notice.* Printed in the dock and on resetting the iPod. Plug another disc. iPod does not respond Your iPod is locked up for Clock Remote Control Frequency Range Radio SPECIFICATIONS...
... iPod does not charge up iPod is not installed properly. Slide the FUNCTION switch to CD or radio mode Select other modes for info on your iPod. Please refer to the instructions on the back of iPod, try turning bass boost OFF or change without prior notice.* Printed in the dock and on resetting the iPod. Plug another disc. iPod does not respond Your iPod is locked up for Clock Remote Control Frequency Range Radio SPECIFICATIONS...


