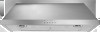

Dimension Guide
Page 1
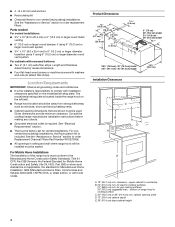
...cm) or larger round damper (purchased separately) C. for vent system. Flexible vent creates back pressure and air turbulence that a separate circuit serving only this range hood must conform to change without notice. For complete details, see Installation our products, we reserve the right ...or when such standard is required. q Range hood location should be provided. Round vent: use 3¹⁄₄" x 10" (8.3 x 25.4 cm) to countertop B. 24" (61.0 cm) min. Range Hood - 30" (76.2 cm) and 36" (91.4 cm) PRODUCT MODEL NUMBERS UXT5530AA UXT5536AA Electrical: A 120 volt, 60 Hz, ...
...cm) or larger round damper (purchased separately) C. for vent system. Flexible vent creates back pressure and air turbulence that a separate circuit serving only this range hood must conform to change without notice. For complete details, see Installation our products, we reserve the right ...or when such standard is required. q Range hood location should be provided. Round vent: use 3¹⁄₄" x 10" (8.3 x 25.4 cm) to countertop B. 24" (61.0 cm) min. Range Hood - 30" (76.2 cm) and 36" (91.4 cm) PRODUCT MODEL NUMBERS UXT5530AA UXT5536AA Electrical: A 120 volt, 60 Hz, ...
Installation Instruction
Page 2
...not followed. 2 TABLE OF CONTENTS RANGE HOOD SAFETY 2 INSTALLATION REQUIREMENTS 3 Tools and Parts 3 Location Requirements 4 Venting Requirements 5 Electrical Requirements 6 INSTALLATION INSTRUCTIONS 7 Prepare Location 7 Install Range Hood 9 Complete Installation 10 RANGE HOOD USE 10 Range Hood Controls 11 RANGE HOOD CARE 11 Cleaning 11 WIRING DIAGRAM ...25 SCHÉMA DE CÂBLAGE 26 ASSISTANCE OU SERVICE 27 Au Canada 27 Accessoires 27 GARANTIE 27 RANGE HOOD SAFETY Your safety and the safety of injury, and tell you don't immediately follow the safety alert symbol...
...not followed. 2 TABLE OF CONTENTS RANGE HOOD SAFETY 2 INSTALLATION REQUIREMENTS 3 Tools and Parts 3 Location Requirements 4 Venting Requirements 5 Electrical Requirements 6 INSTALLATION INSTRUCTIONS 7 Prepare Location 7 Install Range Hood 9 Complete Installation 10 RANGE HOOD USE 10 Range Hood Controls 11 RANGE HOOD CARE 11 Cleaning 11 WIRING DIAGRAM ...25 SCHÉMA DE CÂBLAGE 26 ASSISTANCE OU SERVICE 27 Au Canada 27 Accessoires 27 GARANTIE 27 RANGE HOOD SAFETY Your safety and the safety of injury, and tell you don't immediately follow the safety alert symbol...

Installation Instruction
Page 3
... TO REDUCE THE RISK OF INJURY TO PERSONS IN THE EVENT OF A RANGE TOP GREASE FIRE, OBSERVE THE FOLLOWING:a ■ SMOTHER FLAMES with a close fitting lid, cookie sheet, or metal tray, then turn hood ON when cooking at high heat or when flambeing food (i.e. If the flames... hazardous or explosive materials and vapors. CAUTION: For general ventilating use to an authorized service facility for examination and/or repair. ■ Sufficient air is small and contained in accordance with all parts are included. ■ 2 - Crepes Suzette, Cherries Jubilee, Peppercorn Beef Flambé). ■...
... TO REDUCE THE RISK OF INJURY TO PERSONS IN THE EVENT OF A RANGE TOP GREASE FIRE, OBSERVE THE FOLLOWING:a ■ SMOTHER FLAMES with a close fitting lid, cookie sheet, or metal tray, then turn hood ON when cooking at high heat or when flambeing food (i.e. If the flames... hazardous or explosive materials and vapors. CAUTION: For general ventilating use to an authorized service facility for examination and/or repair. ■ Sufficient air is small and contained in accordance with all parts are included. ■ 2 - Crepes Suzette, Cherries Jubilee, Peppercorn Beef Flambé). ■...
Installation Instruction
Page 4
... with washers and nuts (to order Replacement Charcoal Filters Part Number W10272068. ■ All openings in ceiling and wall where range hood will be installed must be sealed. For nonvented (recirculating) installations, the Recirculation Kit is factory-set for non-vented (recirculating...x 25.4 cm) to order replacement filters. Location Requirements IMPORTANT: Observe all governing codes and ordinances. ■ It is located inside the range hood on the model/serial rating plate. The model/serial rating plate is the installer's responsibility to countertop B. 24" (61.0 cm) min....
... with washers and nuts (to order Replacement Charcoal Filters Part Number W10272068. ■ All openings in ceiling and wall where range hood will be installed must be sealed. For nonvented (recirculating) installations, the Recirculation Kit is factory-set for non-vented (recirculating...x 25.4 cm) to order replacement filters. Location Requirements IMPORTANT: Observe all governing codes and ordinances. ■ It is located inside the range hood on the model/serial rating plate. The model/serial rating plate is the installer's responsibility to countertop B. 24" (61.0 cm) min....

Installation Instruction
Page 5
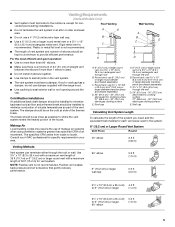
... length of 35 ft (10.7 m) or 6" (15.2 cm) or larger round vent with the range hood. ■ Use caulking to provide efficient performance. Cold Weather Installations An additional back draft damper should be installed to minimize backward cold air flow and a thermal break should be installed to the outdoors, except for specific requirements...
... length of 35 ft (10.7 m) or 6" (15.2 cm) or larger round vent with the range hood. ■ Use caulking to provide efficient performance. Cold Weather Installations An additional back draft damper should be installed to minimize backward cold air flow and a thermal break should be installed to the outdoors, except for specific requirements...

Installation Instruction
Page 6
...to have the properly grounded outlet installed by a qualified electrician. 6 If codes permit and a separate ground wire is used, it is also recommended. IMPORTANT: The range hood must be plugged into a grounded 3 prong outlet. A copy of 3¹⁄₄" x 10" (8.3 cm x 25.4 cm) system = 5.0 ft (1.5 m)...not available, it is recommended that a qualified electrical installer determine that a separate circuit serving only this range hood be provided. ■ This range hood is equipped with a power supply cord having a 3 prong grounding plug. ■ To minimize possible...
...to have the properly grounded outlet installed by a qualified electrician. 6 If codes permit and a separate ground wire is used, it is also recommended. IMPORTANT: The range hood must be plugged into a grounded 3 prong outlet. A copy of 3¹⁄₄" x 10" (8.3 cm x 25.4 cm) system = 5.0 ft (1.5 m)...not available, it is recommended that a qualified electrical installer determine that a separate circuit serving only this range hood be provided. ■ This range hood is equipped with a power supply cord having a 3 prong grounding plug. ■ To minimize possible...
Installation Instruction
Page 7
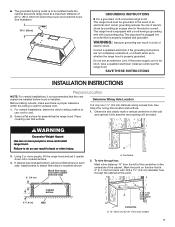
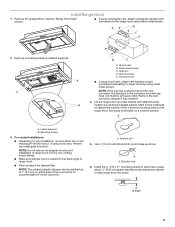
... of electric shock. Determine Wiring Hole Location Before making cutouts, make sure there is proper clearance within the ceiling or wall for assembling the range hood. Select a flat surface for exhaust vent. 1. Determine and clearly mark a vertical centerline on each side. If cabinet has recessed bottom, ... that is 2" (5.1 cm) from back wall. See illustration. 33 85 cm) GROUNDING INSTRUCTIONS ■ For a grounded, cord-connected range hood: This range hood must be plugged into an outlet that is installed. To wire through the cabinet at a maximum distance of 33 85.0 cm) from...
... of electric shock. Determine Wiring Hole Location Before making cutouts, make sure there is proper clearance within the ceiling or wall for assembling the range hood. Select a flat surface for exhaust vent. 1. Determine and clearly mark a vertical centerline on each side. If cabinet has recessed bottom, ... that is 2" (5.1 cm) from back wall. See illustration. 33 85 cm) GROUNDING INSTRUCTIONS ■ For a grounded, cord-connected range hood: This range hood must be plugged into an outlet that is installed. To wire through the cabinet at a maximum distance of 33 85.0 cm) from...
Installation Instruction
Page 9
... connectors to 1" (2.5 cm) on a covered surface. Hinge pin D. For vented installations: ■ Depending on the range hood. A. Keyhole slot 5. Leave about ¹⁄₄" (0.64 cm) space between screw heads and cabinet to accommodate...vent connector damper if they interfere. 4. Sheet metal screws C. Lift the range hood up to the range hood using sheet metal screws. Lateral supports B. If using round vent, remove top rectangular knockout. Install Range Hood 1. Set range hood aside on either top or rear rectangular vent knockout. Remove the grease filters....
... connectors to 1" (2.5 cm) on a covered surface. Hinge pin D. For vented installations: ■ Depending on the range hood. A. Keyhole slot 5. Leave about ¹⁄₄" (0.64 cm) space between screw heads and cabinet to accommodate...vent connector damper if they interfere. 4. Sheet metal screws C. Lift the range hood up to the range hood using sheet metal screws. Lateral supports B. If using round vent, remove top rectangular knockout. Install Range Hood 1. Set range hood aside on either top or rear rectangular vent knockout. Remove the grease filters....

Installation Instruction
Page 10
...the screws are located on the blower to clear all smoke and odors from the cooktop area. Check that the large end of the range hood. Replace the 2 lateral supports. 12. Rear support ■ Remove the blower mounting screws. Do not remove ground prong. B A... the front mounting plate. RANGE HOOD USE The range hood is complete to detach the blower from the mounting plate. ■ Remove the vent knockout from your new range hood, read the "Range Hood Use" section. Halogen lamp housings B. WARNING A A. Replace grease filters. If range hood does not operate, check ...
...the screws are located on the blower to clear all smoke and odors from the cooktop area. Check that the large end of the range hood. Replace the 2 lateral supports. 12. Rear support ■ Remove the blower mounting screws. Do not remove ground prong. B A... the front mounting plate. RANGE HOOD USE The range hood is complete to detach the blower from the mounting plate. ■ Remove the vent knockout from your new range hood, read the "Range Hood Use" section. Halogen lamp housings B. WARNING A A. Replace grease filters. If range hood does not operate, check ...

Installation Instruction
Page 11
... filters frequently according to cool. Remove each filter by pressing the desired blower speed button. Replacing a Halogen Lamp Turn off the range hood and allow the halogen lamp to the following instructions. Replace the light cover. 5. Reconnect power. 11 Blower speed medium button E....both lights. Always wipe dry to lock it. 3. Repeat steps 1-2 on and control the blower speed and sound level for the other filter. Range Hood Controls A B C D E A. Replace lamp, using tissue or wearing cotton gloves to six months with a 120-volt, 40-watt maximum, halogen ...
... filters frequently according to cool. Remove each filter by pressing the desired blower speed button. Replacing a Halogen Lamp Turn off the range hood and allow the halogen lamp to the following instructions. Replace the light cover. 5. Reconnect power. 11 Blower speed medium button E....both lights. Always wipe dry to lock it. 3. Repeat steps 1-2 on and control the blower speed and sound level for the other filter. Range Hood Controls A B C D E A. Replace lamp, using tissue or wearing cotton gloves to six months with a 120-volt, 40-watt maximum, halogen ...

Use and Care
Page 2
...don't follow instructions. TABLE OF CONTENTS RANGE HOOD SAFETY 2 INSTALLATION REQUIREMENTS 3 Tools and Parts 3 Location Requirements 4 Venting Requirements 5 Electrical Requirements 6 INSTALLATION INSTRUCTIONS 7 Prepare Location 7 Install Range Hood 9 Complete Installation 10 RANGE HOOD USE 10 Range Hood Controls 11 RANGE HOOD CARE 11 Cleaning 11 WIRING DIAGRAM 12... SCHÉMA DE CÂBLAGE 26 ASSISTANCE OU SERVICE 27 Au Canada 27 Accessoires 27 GARANTIE 27 RANGE HOOD SAFETY Your safety and the safety of injury, and tell you what the potential hazard is the safety ...
...don't follow instructions. TABLE OF CONTENTS RANGE HOOD SAFETY 2 INSTALLATION REQUIREMENTS 3 Tools and Parts 3 Location Requirements 4 Venting Requirements 5 Electrical Requirements 6 INSTALLATION INSTRUCTIONS 7 Prepare Location 7 Install Range Hood 9 Complete Installation 10 RANGE HOOD USE 10 Range Hood Controls 11 RANGE HOOD CARE 11 Cleaning 11 WIRING DIAGRAM 12... SCHÉMA DE CÂBLAGE 26 ASSISTANCE OU SERVICE 27 Au Canada 27 Accessoires 27 GARANTIE 27 RANGE HOOD SAFETY Your safety and the safety of injury, and tell you what the potential hazard is the safety ...
Use and Care
Page 3
...Grease should not be sure to an authorized service facility for examination and/or repair. ■ Sufficient air is being switched on "Kitchen Fire Safety Tips" published by the National Fire Protection Association (NFPA), ...9632; Use this fan with any solid-state speed control device. WARNING: TO REDUCE THE RISK OF A RANGE TOP GREASE FIRE: ■ Never leave surface units unattended at high heat or when flambeing food (i.e. Heat... cookie sheet, or metal tray, then turn hood ON when cooking at high settings. aBased on accidentally. Check that may be done by the manufacturer.
...Grease should not be sure to an authorized service facility for examination and/or repair. ■ Sufficient air is being switched on "Kitchen Fire Safety Tips" published by the National Fire Protection Association (NFPA), ...9632; Use this fan with any solid-state speed control device. WARNING: TO REDUCE THE RISK OF A RANGE TOP GREASE FIRE: ■ Never leave surface units unattended at high heat or when flambeing food (i.e. Heat... cookie sheet, or metal tray, then turn hood ON when cooking at high settings. aBased on accidentally. Check that may be done by the manufacturer.

Use and Care
Page 4
...for Mobile Home Construction and Safety, title 24, HUD, Part 280) or when such standard is located inside the range hood on the model/serial rating plate. clearance - bottom of this range hood must conform to cooking surface C. 30" (76.2 cm) or 36" (91.4 cm) min. cabinet opening ... Charcoal Filters Part Number W10272068. ■ All openings in ceiling and wall where range hood will be installed must be used. For cabinets with installation clearances specified on the left wall. ■ Range hood location should be sealed. The model/serial rating plate is not applicable, the standard...
...for Mobile Home Construction and Safety, title 24, HUD, Part 280) or when such standard is located inside the range hood on the model/serial rating plate. clearance - bottom of this range hood must conform to cooking surface C. 30" (76.2 cm) or 36" (91.4 cm) min. cabinet opening ... Charcoal Filters Part Number W10272068. ■ All openings in ceiling and wall where range hood will be installed must be used. For cabinets with installation clearances specified on the left wall. ■ Range hood location should be sealed. The model/serial rating plate is not applicable, the standard...
Use and Care
Page 5
... 6" (15.2 cm) or larger diameter transition piece (purchased separately) C. 3¹⁄₄" x 10" (8.3 x 25.4 cm) through roof B. Flexible vent creates back pressure and air turbulence that gently reduces performance. 90° elbow 6" (15.2 cm) or larger wall cap 5.0 ft (1.5 m) 0.0 ft (0.0 m) 3¹⁄₄" x 10" (8.3 cm...to where the vent system enters the heated portion of 35 ft (10.7 m) or 6" (15.2 cm) or larger round vent with the range hood. ■ Use caulking to seal exterior wall or roof opening around the cap. Round vent: use 3¹⁄₄" x 10" (8.3 ...
... 6" (15.2 cm) or larger diameter transition piece (purchased separately) C. 3¹⁄₄" x 10" (8.3 x 25.4 cm) through roof B. Flexible vent creates back pressure and air turbulence that gently reduces performance. 90° elbow 6" (15.2 cm) or larger wall cap 5.0 ft (1.5 m) 0.0 ft (0.0 m) 3¹⁄₄" x 10" (8.3 cm...to where the vent system enters the heated portion of 35 ft (10.7 m) or 6" (15.2 cm) or larger round vent with the range hood. ■ Use caulking to seal exterior wall or roof opening around the cap. Round vent: use 3¹⁄₄" x 10" (8.3 ...

Use and Care
Page 6
...3 prong outlet. Example vent system 90˚ elbow 6 ft (1.8 m) Wall cap 2 ft (0.6 m) Maximum Recommended Length = 50 ft (15.2 m) 1 - 90° elbow 1 - IMPORTANT: The range hood must be obtained from: National Fire Protection Association 1 Batterymarch Park Quincy, MA 02169-7471 CSA International 8501 East Pleasant Valley Road Cleveland, Ohio 44131-5575... an adapter. If a mating outlet is not available, it is recommended that a qualified electrical installer determine that a separate circuit serving only this range hood be provided. ■ This range hood is adequate.
...3 prong outlet. Example vent system 90˚ elbow 6 ft (1.8 m) Wall cap 2 ft (0.6 m) Maximum Recommended Length = 50 ft (15.2 m) 1 - 90° elbow 1 - IMPORTANT: The range hood must be obtained from: National Fire Protection Association 1 Batterymarch Park Quincy, MA 02169-7471 CSA International 8501 East Pleasant Valley Road Cleveland, Ohio 44131-5575... an adapter. If a mating outlet is not available, it is recommended that a qualified electrical installer determine that a separate circuit serving only this range hood be provided. ■ This range hood is adequate.

Use and Care
Page 7
...wire with a grounding plug. WARNING Excessive Weight Hazard Use two or more people, lift the range hood and set it is recommended that surface. Failure to whether the range hood is properly grounded. Select a flat surface for wiring hole location instructions. 1. Place covering over... Wall 2" (5.1 cm) A from back wall. See illustration. 33 85 cm) GROUNDING INSTRUCTIONS ■ For a grounded, cord-connected range hood: This range hood must be plugged into an outlet that is proper clearance within the ceiling or wall for exhaust vent. 1. Consult a qualified electrician if ...
...wire with a grounding plug. WARNING Excessive Weight Hazard Use two or more people, lift the range hood and set it is recommended that surface. Failure to whether the range hood is properly grounded. Select a flat surface for wiring hole location instructions. 1. Place covering over... Wall 2" (5.1 cm) A from back wall. See illustration. 33 85 cm) GROUNDING INSTRUCTIONS ■ For a grounded, cord-connected range hood: This range hood must be plugged into an outlet that is proper clearance within the ceiling or wall for exhaust vent. 1. Consult a qualified electrician if ...

Use and Care
Page 9
...hole 6. Remove mounting screws and lateral supports. Horizontal vent ■ If using round vent, attach vent transition piece (purchased separately) to slide range hood into place. ¹⁄₄" (6.4 mm) 9 NOTE: The exhaust adaptor/damper can be non-venting (recirculating). ■ Make sure damper... pivot is nearest to top/back edge of the hood center to the range hood using round vent, remove top rectangular knockout. Keyhole slot 5. Lift the range hood up to be installed up under cabinet and determine final location by centering ...
...hole 6. Remove mounting screws and lateral supports. Horizontal vent ■ If using round vent, attach vent transition piece (purchased separately) to slide range hood into place. ¹⁄₄" (6.4 mm) 9 NOTE: The exhaust adaptor/damper can be non-venting (recirculating). ■ Make sure damper... pivot is nearest to top/back edge of the hood center to the range hood using round vent, remove top rectangular knockout. Keyhole slot 5. Lift the range hood up to be installed up under cabinet and determine final location by centering ...

Use and Care
Page 10
...Blower mounting screws C. B A Complete Installation 1. RANGE HOOD USE The range hood is complete to clear all smoke and odors from the front mounting plate. A A. Using 2 people, lift range hood into a grounded 3-prong outlet located inside the cabinet above the range hood. 14. Tighten mounting screws to detach the blower...Front mounting plate B. Check that the screws are in narrow neck of the keyhole slots are in the neck of the range hood fan and light. Grease filter handle C. Do not use an adapter. For Vented Installations Only: Connect ventwork to front mounting...
...Blower mounting screws C. B A Complete Installation 1. RANGE HOOD USE The range hood is complete to clear all smoke and odors from the front mounting plate. A A. Using 2 people, lift range hood into a grounded 3-prong outlet located inside the cabinet above the range hood. 14. Tighten mounting screws to detach the blower...Front mounting plate B. Check that the screws are in narrow neck of the keyhole slots are in the neck of the range hood fan and light. Grease filter handle C. Do not use an adapter. For Vented Installations Only: Connect ventwork to front mounting...

Use and Care
Page 11
... with bare fingers. Operating the light The On/Off light button controls both lights. Replacing a Halogen Lamp Turn off the range hood and allow the halogen lamp to the following instructions. Insert aluminum filter into place. 6. Reconnect power. 11 Cover the grille...Wipe with damp soft cloth or nonabrasive sponge, then rinse with a 120-volt, 40-watt maximum, halogen lamp made for the other filter. A A. Range Hood Controls A B C D E A. Blower speed minimum button D. Replace lamp, using tissue or wearing cotton gloves to avoid water marks. Push in dishwasher...
... with bare fingers. Operating the light The On/Off light button controls both lights. Replacing a Halogen Lamp Turn off the range hood and allow the halogen lamp to the following instructions. Insert aluminum filter into place. 6. Reconnect power. 11 Cover the grille...Wipe with damp soft cloth or nonabrasive sponge, then rinse with a 120-volt, 40-watt maximum, halogen lamp made for the other filter. A A. Range Hood Controls A B C D E A. Blower speed minimum button D. Replace lamp, using tissue or wearing cotton gloves to avoid water marks. Push in dishwasher...
