
Dimension Guide
Page 1
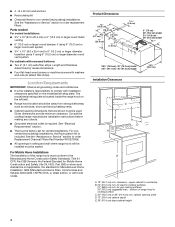
...through the wall B. The model/serial rating plate is located inside the range hood on the model/serial rating plate. Round vent: use 6" (15.2 cm) or larger round damper (purchased separately) C. Roof Venting A E B C Wall Venting A B C E A. 18" (45.7 cm) min. clearance - For Mobile Home Installations The installation of range hood to cooking surface C. 30" (76.2 cm) or 36" (91.4 cm) min. Round vent: use 3¹⁄₄" x 10" (8.3 x 25.4 cm) to change materials and specifications without notice. Roof cap A. 6" (15.2 cm) or larger round vent or...
...through the wall B. The model/serial rating plate is located inside the range hood on the model/serial rating plate. Round vent: use 6" (15.2 cm) or larger round damper (purchased separately) C. Roof Venting A E B C Wall Venting A B C E A. 18" (45.7 cm) min. clearance - For Mobile Home Installations The installation of range hood to cooking surface C. 30" (76.2 cm) or 36" (91.4 cm) min. Round vent: use 3¹⁄₄" x 10" (8.3 x 25.4 cm) to change materials and specifications without notice. Roof cap A. 6" (15.2 cm) or larger round vent or...
Installation Instruction
Page 2
.... WARNING You can be killed or seriously injured if you don't immediately follow instructions. TABLE OF CONTENTS RANGE HOOD SAFETY 2 INSTALLATION REQUIREMENTS 3 Tools and Parts 3 Location Requirements 4 Venting Requirements 5 Electrical Requirements 6 INSTALLATION INSTRUCTIONS 7 Prepare Location 7 Install Range Hood 9 Complete Installation 10 RANGE HOOD USE 10 Range Hood Controls 11 RANGE HOOD CARE 11 Cleaning 11 WIRING DIAGRAM 12 ASSISTANCE OR SERVICE 13 In the U.S.A 13 In Canada 13 Accessories 13 WARRANTY 14 TABLE DES MATIÈRES SÉCURITÉ DE LA...
.... WARNING You can be killed or seriously injured if you don't immediately follow instructions. TABLE OF CONTENTS RANGE HOOD SAFETY 2 INSTALLATION REQUIREMENTS 3 Tools and Parts 3 Location Requirements 4 Venting Requirements 5 Electrical Requirements 6 INSTALLATION INSTRUCTIONS 7 Prepare Location 7 Install Range Hood 9 Complete Installation 10 RANGE HOOD USE 10 Range Hood Controls 11 RANGE HOOD CARE 11 Cleaning 11 WIRING DIAGRAM 12 ASSISTANCE OR SERVICE 13 In the U.S.A 13 In Canada 13 Accessories 13 WARRANTY 14 TABLE DES MATIÈRES SÉCURITÉ DE LA...

Installation Instruction
Page 3
... not vent exhaust air into spaces within walls or ceilings, attics or into wall or ceiling; Crepes Suzette, Cherries Jubilee, Peppercorn Beef Flambé). ■ Clean ventilating fans frequently. BE CAREFUL TO PREVENT BURNS. The fire department is being switched on fan or filter. ■ Use proper pan size. Follow the heating equipment manufacturer's guideline and safety standards such as a tag, to the service panel. ■ Installation work and electrical wiring must...
... not vent exhaust air into spaces within walls or ceilings, attics or into wall or ceiling; Crepes Suzette, Cherries Jubilee, Peppercorn Beef Flambé). ■ Clean ventilating fans frequently. BE CAREFUL TO PREVENT BURNS. The fire department is being switched on fan or filter. ■ Use proper pan size. Follow the heating equipment manufacturer's guideline and safety standards such as a tag, to the service panel. ■ Installation work and electrical wiring must...
Installation Instruction
Page 4
...) base cabinet height 4 The model/serial rating plate is not applicable, the standard for Manufactured Home Installation 1982 (Manufactured Home Sites, Communities and Setups) ANSI A225.1/NFPA 501A, or latest edition, or with washers and nuts (to order Replacement Charcoal Filters Part Number W10272068. ■ All openings in ceiling and wall where range hood will be installed must be sealed. Consult the cooktop/range manufacturer installation instructions before making any cutouts. ■ Grounded electrical outlet...
...) base cabinet height 4 The model/serial rating plate is not applicable, the standard for Manufactured Home Installation 1982 (Manufactured Home Sites, Communities and Setups) ANSI A225.1/NFPA 501A, or latest edition, or with washers and nuts (to order Replacement Charcoal Filters Part Number W10272068. ■ All openings in ceiling and wall where range hood will be installed must be sealed. Consult the cooktop/range manufacturer installation instructions before making any cutouts. ■ Grounded electrical outlet...

Installation Instruction
Page 5
... round vent with the range hood. ■ Use caulking to 6" (15.2 cm) or larger diameter transition piece (purchased separately) D. 24" (61.0 cm) - 30" (76.2 cm) above electric cooking surface 27" (68.6 cm) - 30" (76.2 cm) above gas cooking surface E. Makeup Air Local building codes may require the use 6" (15.2 cm) or larger round damper (purchased separately) C. The specified CFM varies from locale to the outdoors, except for specific requirements...
... round vent with the range hood. ■ Use caulking to 6" (15.2 cm) or larger diameter transition piece (purchased separately) D. 24" (61.0 cm) - 30" (76.2 cm) above electric cooking surface 27" (68.6 cm) - 30" (76.2 cm) above gas cooking surface E. Makeup Air Local building codes may require the use 6" (15.2 cm) or larger round damper (purchased separately) C. The specified CFM varies from locale to the outdoors, except for specific requirements...
Installation Instruction
Page 7
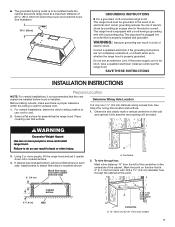
... wiring hole location instructions. 1. If cabinet has recessed bottom, add wood filler strips on the underside of electric shock. See illustration. 33 85 cm) GROUNDING INSTRUCTIONS ■ For a grounded, cord-connected range hood: This range hood must be grounded. Cabinet bottom 3" (7.6 cm) Wall 2" (5.1 cm) A from the left of electric shock by providing an escape wire for exhaust vent. 1. Using 2 or more people to whether the range hood is proper clearance within the ceiling...
... wiring hole location instructions. 1. If cabinet has recessed bottom, add wood filler strips on the underside of electric shock. See illustration. 33 85 cm) GROUNDING INSTRUCTIONS ■ For a grounded, cord-connected range hood: This range hood must be grounded. Cabinet bottom 3" (7.6 cm) Wall 2" (5.1 cm) A from the left of electric shock by providing an escape wire for exhaust vent. 1. Using 2 or more people to whether the range hood is proper clearance within the ceiling...
Installation Instruction
Page 9
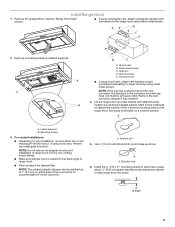
... connector and wall cap must not interfere with each other. Remove mounting screws and lateral supports. A A B B C A. Mark on the underside of cabinet the location of the hood center to 1" (2.5 cm) on a covered surface. Lateral supports B. Use ¹⁄₈" (3 mm) drill bit and drill 4 pilot holes as shown. Hinge pin D. Lift the range hood up to accommodate off-center ductwork. If using rectangular vent, attach rectangular damper/vent connectors...
... connector and wall cap must not interfere with each other. Remove mounting screws and lateral supports. A A B B C A. Mark on the underside of cabinet the location of the hood center to 1" (2.5 cm) on a covered surface. Lateral supports B. Use ¹⁄₈" (3 mm) drill bit and drill 4 pilot holes as shown. Hinge pin D. Lift the range hood up to accommodate off-center ductwork. If using rectangular vent, attach rectangular damper/vent connectors...

Installation Instruction
Page 10
... operate several minutes after the cooking is designed to cabinet, making sure mounting screws are over the screws. Front mounting plate B. Check that the screws are located on the blower to follow these instructions can result in the neck of the range hood. WARNING A A. Failure to detach the blower from the mounting plate. ■ Remove the vent knockout from the cooktop area. Install the blower mounting screws. Disconnect power and check wiring connections. Blower and light controls D. Do not use an extension cord. Front mounting plate...
... operate several minutes after the cooking is designed to cabinet, making sure mounting screws are over the screws. Front mounting plate B. Check that the screws are located on the blower to follow these instructions can result in the neck of the range hood. WARNING A A. Failure to detach the blower from the mounting plate. ■ Remove the vent knockout from the cooktop area. Install the blower mounting screws. Disconnect power and check wiring connections. Blower and light controls D. Do not use an extension cord. Front mounting plate...

Installation Instruction
Page 11
... and control the blower speed and sound level for Off. Wash metal filters as needed in spring release handle. 5. Range Hood Controls A B C D E A. Metal Grease Filters 1. Charcoal filter B. A A. The speed can be changed anytime during fan operation by making sure the spring release handles are inserted correctly before operating hood. Blower motor 2. Repeat steps 1-5 for a G-9 base. 4. Reconnect power. 11 To avoid damage or decreasing the life of the motor cover grille. Spring release handle 2. The Blower Off button turns the blower Off. Remove each filter...
... and control the blower speed and sound level for Off. Wash metal filters as needed in spring release handle. 5. Range Hood Controls A B C D E A. Metal Grease Filters 1. Charcoal filter B. A A. The speed can be changed anytime during fan operation by making sure the spring release handles are inserted correctly before operating hood. Blower motor 2. Repeat steps 1-5 for a G-9 base. 4. Reconnect power. 11 To avoid damage or decreasing the life of the motor cover grille. Spring release handle 2. The Blower Off button turns the blower Off. Remove each filter...

Installation Instruction
Page 13
... warranty and provide afterwarranty service, anywhere in your area, you use only factory specified parts. Accessories Replacement Charcoal Filter Kit (2 Pack of Filters) (for assistance or service, please know the purchase date and the complete model and serial number of appliances. ■ Installation information. ■ Use and maintenance procedures. ■ Accessory and repair parts sales. ■ Specialized customer assistance (Spanish speaking, hearing impaired, limited vision, etc.). ■ Referrals to local dealers, repair parts...
... warranty and provide afterwarranty service, anywhere in your area, you use only factory specified parts. Accessories Replacement Charcoal Filter Kit (2 Pack of Filters) (for assistance or service, please know the purchase date and the complete model and serial number of appliances. ■ Installation information. ■ Use and maintenance procedures. ■ Accessory and repair parts sales. ■ Specialized customer assistance (Spanish speaking, hearing impaired, limited vision, etc.). ■ Referrals to local dealers, repair parts...

Installation Instruction
Page 14
... fuses, or to correct house wiring or plumbing. 2. Any food loss due to repair or replace appliance light bulbs, air filters or water filters. Expenses for travel and transportation for future reference. This warranty is used for Factory Specified Parts and repair labor to correct defects in accordance with original model/serial numbers that is designed to be borne by calling Whirlpool. In Canada, call 1-800-253-1301. Service...
... fuses, or to correct house wiring or plumbing. 2. Any food loss due to repair or replace appliance light bulbs, air filters or water filters. Expenses for travel and transportation for future reference. This warranty is used for Factory Specified Parts and repair labor to correct defects in accordance with original model/serial numbers that is designed to be borne by calling Whirlpool. In Canada, call 1-800-253-1301. Service...
Use and Care
Page 3
...; Phillips screwdriver Parts supplied Remove parts from being called. - IMPORTANT SAFETY INSTRUCTIONS WARNING: TO REDUCE THE RISK OF FIRE, ELECTRIC SHOCK, OR INJURY TO PERSONS, OBSERVE THE FOLLOWING: ■ Use this fan with a close fitting lid, cookie sheet, or metal tray, then turn hood ON when cooking at high settings. READ AND SAVE THESE INSTRUCTIONS INSTALLATION REQUIREMENTS Tools and Parts Gather the required tools and parts before starting installation. Read...
...; Phillips screwdriver Parts supplied Remove parts from being called. - IMPORTANT SAFETY INSTRUCTIONS WARNING: TO REDUCE THE RISK OF FIRE, ELECTRIC SHOCK, OR INJURY TO PERSONS, OBSERVE THE FOLLOWING: ■ Use this fan with a close fitting lid, cookie sheet, or metal tray, then turn hood ON when cooking at high settings. READ AND SAVE THESE INSTRUCTIONS INSTALLATION REQUIREMENTS Tools and Parts Gather the required tools and parts before starting installation. Read...

Use and Care
Page 4
... cabinets with installation clearances specified on the left wall. ■ Range hood location should be used. See the "Assistance or Service" section to cooking surface C. 30" (76.2 cm) or 36" (91.4 cm) min. for vented installations. See the "Assistance or Service" section to attach filler strips). See "Electrical Requirements" section. ■ The hood is located inside the range hood on the model/serial rating plate. ■ 4 - 8 x 40 mm wall anchors ■ Recirculating kit ■ Charcoal filters for gas cooking...
... cabinets with installation clearances specified on the left wall. ■ Range hood location should be used. See the "Assistance or Service" section to cooking surface C. 30" (76.2 cm) or 36" (91.4 cm) min. for vented installations. See the "Assistance or Service" section to attach filler strips). See "Electrical Requirements" section. ■ The hood is located inside the range hood on the model/serial rating plate. ■ 4 - 8 x 40 mm wall anchors ■ Recirculating kit ■ Charcoal filters for gas cooking...

Use and Care
Page 7
... centerline on the underside of electric shock by providing an escape wire for wiring hole location instructions. 1. WARNING Excessive Weight Hazard Use two or more people, lift the range hood and set it is recommended that is equipped with a cord having a grounding wire with a grounding plug. Do not use : roof or wall. 2. Place covering over that is installed. See Step 2 for the electric current. Mark the point...
... centerline on the underside of electric shock by providing an escape wire for wiring hole location instructions. 1. WARNING Excessive Weight Hazard Use two or more people, lift the range hood and set it is recommended that is equipped with a cord having a grounding wire with a grounding plug. Do not use : roof or wall. 2. Place covering over that is installed. See Step 2 for the electric current. Mark the point...

Use and Care
Page 9
... cm) space between screw heads and cabinet to range hood top using sheet metal screws. Remove the grease filters. A A B B C A. Mark on either top or rear rectangular vent knockout. A. Install Range Hood 1. Remove mounting screws and lateral supports. Remove the vent connector damper if they interfere. 4. Mounting screws 3. A A. If using rectangular vent, attach rectangular damper/vent connectors to accommodate off-center ductwork. Keyhole slot 5. Install the 4 - #10 x ⁵⁄₈" mounting screws in the connector and wall cap must not interfere with...
... cm) space between screw heads and cabinet to range hood top using sheet metal screws. Remove the grease filters. A A B B C A. Mark on either top or rear rectangular vent knockout. A. Install Range Hood 1. Remove mounting screws and lateral supports. Remove the vent connector damper if they interfere. 4. Mounting screws 3. A A. If using rectangular vent, attach rectangular damper/vent connectors to accommodate off-center ductwork. Keyhole slot 5. Install the 4 - #10 x ⁵⁄₈" mounting screws in the connector and wall cap must not interfere with...

Use and Care
Page 10
... center of the range hood fan and light. Blower and light controls D. See the "Range Hood Care" section. WARNING A A. Plug 3-prong power cord into a grounded 3 prong outlet. See "Range Hood Use" section. RANGE HOOD USE The range hood is complete to remove smoke, cooking vapors and odors from the front mounting plate. Blower mounting screws ■ Install charcoal filters. Halogen lamp housings B. Front mounting plate knockout B. Using 2 people, lift range hood into final position, feeding electrical wire through wiring opening. Then push the hood toward the wall so that...
... center of the range hood fan and light. Blower and light controls D. See the "Range Hood Care" section. WARNING A A. Plug 3-prong power cord into a grounded 3 prong outlet. See "Range Hood Use" section. RANGE HOOD USE The range hood is complete to remove smoke, cooking vapors and odors from the front mounting plate. Blower mounting screws ■ Install charcoal filters. Halogen lamp housings B. Front mounting plate knockout B. Using 2 people, lift range hood into final position, feeding electrical wire through wiring opening. Then push the hood toward the wall so that...

Use and Care
Page 11
... sound level for Off. Push up to cool. Replace the light cover. 5. The Blower Off button turns the blower Off. Pins C. Range Hood Controls A B C D E A. Replace with the charcoal filter so that the slots on the sides of the new lamp, do not touch lamp with clean water and wipe dry. The speed can be changed anytime during fan operation by pulling the spring release handle and then pulling down the filter. A A. Blower speed maximum button Non-Vented (recirculating) Installation Filters...
... sound level for Off. Push up to cool. Replace the light cover. 5. The Blower Off button turns the blower Off. Pins C. Range Hood Controls A B C D E A. Replace with the charcoal filter so that the slots on the sides of the new lamp, do not touch lamp with clean water and wipe dry. The speed can be changed anytime during fan operation by pulling the spring release handle and then pulling down the filter. A A. Blower speed maximum button Non-Vented (recirculating) Installation Filters...

Use and Care
Page 13
... and specifications on our full line of appliances. ■ Installation information. ■ Use and maintenance procedures. ■ Accessory and repair parts sales. ■ Specialized customer assistance (Spanish speaking, hearing impaired, limited vision, etc.). ■ Referrals to local dealers, repair parts distributors, and service companies. Accessories Replacement Charcoal Filter Kit (2 Pack of Filters) (for assistance or service, please know the purchase date and the complete model and serial number of your nearest designated service...
... and specifications on our full line of appliances. ■ Installation information. ■ Use and maintenance procedures. ■ Accessory and repair parts sales. ■ Specialized customer assistance (Spanish speaking, hearing impaired, limited vision, etc.). ■ Referrals to local dealers, repair parts distributors, and service companies. Accessories Replacement Charcoal Filter Kit (2 Pack of Filters) (for assistance or service, please know the purchase date and the complete model and serial number of your nearest designated service...

Use and Care
Page 14
... materials or workmanship. Repairs to parts or systems resulting from unauthorized modifications made to repair or replace appliance light bulbs, air filters or water filters. Dealer name Address Phone number Model number Serial number Purchase date 14 This warranty is void if the factory applied serial number has been altered or removed from your major appliance for in accordance with published installation instructions. 11. THIS WARRANTY GIVES YOU SPECIFIC LEGAL RIGHTS, AND...
... materials or workmanship. Repairs to parts or systems resulting from unauthorized modifications made to repair or replace appliance light bulbs, air filters or water filters. Dealer name Address Phone number Model number Serial number Purchase date 14 This warranty is void if the factory applied serial number has been altered or removed from your major appliance for in accordance with published installation instructions. 11. THIS WARRANTY GIVES YOU SPECIFIC LEGAL RIGHTS, AND...
Warranty
Page 1
... "Whirlpool") will need service, first see the "Troubleshooting" section of the Use & Care Guide. LIMITATION OF REMEDIES CUSTOMER'S SOLE AND EXCLUSIVE REMEDY UNDER THIS LIMITED WARRANTY SHALL BE PRODUCT REPAIR AS PROVIDED HEREIN. WHIRLPOOL SHALL NOT BE LIABLE FOR INCIDENTAL OR CONSEQUENTIAL DAMAGES. Dealer name Address Phone number Model number Serial number Purchase date 14 This limited warranty is valid only in the United States or Canada and applies only...
... "Whirlpool") will need service, first see the "Troubleshooting" section of the Use & Care Guide. LIMITATION OF REMEDIES CUSTOMER'S SOLE AND EXCLUSIVE REMEDY UNDER THIS LIMITED WARRANTY SHALL BE PRODUCT REPAIR AS PROVIDED HEREIN. WHIRLPOOL SHALL NOT BE LIABLE FOR INCIDENTAL OR CONSEQUENTIAL DAMAGES. Dealer name Address Phone number Model number Serial number Purchase date 14 This limited warranty is valid only in the United States or Canada and applies only...


