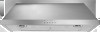

Dimension Guide
Page 1
It is recommended that gently reduce performance. Flexible vent creates back pressure and air turbulence that a separate circuit serving only this range hood must conform to the Manufactured Home Construction Safety Standards, Title 24 CFR, Part 328 (formerly the Federal Standard for Mobile...electric cooking surface 27" (68.6 cm) - 30" (76.2 cm) above gas cooking surface E. Range Hood - 30" (76.2 cm) and 36" (91.4 cm) PRODUCT MODEL NUMBERS UXT5530AA UXT5536AA Electrical: A 120 volt, 60 Hz, AC only, 15- Round vent: use 3¹⁄₄" x 10" (8.3 x 25.4 cm) to 6" (15.2 cm) or ...
It is recommended that gently reduce performance. Flexible vent creates back pressure and air turbulence that a separate circuit serving only this range hood must conform to the Manufactured Home Construction Safety Standards, Title 24 CFR, Part 328 (formerly the Federal Standard for Mobile...electric cooking surface 27" (68.6 cm) - 30" (76.2 cm) above gas cooking surface E. Range Hood - 30" (76.2 cm) and 36" (91.4 cm) PRODUCT MODEL NUMBERS UXT5530AA UXT5536AA Electrical: A 120 volt, 60 Hz, AC only, 15- Round vent: use 3¹⁄₄" x 10" (8.3 x 25.4 cm) to 6" (15.2 cm) or ...
Installation Instruction
Page 2
...safety messages. TABLE OF CONTENTS RANGE HOOD SAFETY 2 INSTALLATION REQUIREMENTS 3 Tools and Parts 3 Location Requirements 4 Venting Requirements 5 Electrical Requirements 6 INSTALLATION INSTRUCTIONS 7 Prepare Location 7 Install Range Hood 9 Complete Installation 10 RANGE HOOD USE 10 Range Hood Controls 11 RANGE HOOD CARE 11 Cleaning 11 WIRING DIAGRAM ... SCHÉMA DE CÂBLAGE 26 ASSISTANCE OU SERVICE 27 Au Canada 27 Accessoires 27 GARANTIE 27 RANGE HOOD SAFETY Your safety and the safety of injury, and tell you don't follow the safety alert symbol and either the...
...safety messages. TABLE OF CONTENTS RANGE HOOD SAFETY 2 INSTALLATION REQUIREMENTS 3 Tools and Parts 3 Location Requirements 4 Venting Requirements 5 Electrical Requirements 6 INSTALLATION INSTRUCTIONS 7 Prepare Location 7 Install Range Hood 9 Complete Installation 10 RANGE HOOD USE 10 Range Hood Controls 11 RANGE HOOD CARE 11 Cleaning 11 WIRING DIAGRAM ... SCHÉMA DE CÂBLAGE 26 ASSISTANCE OU SERVICE 27 Au Canada 27 Accessoires 27 GARANTIE 27 RANGE HOOD SAFETY Your safety and the safety of injury, and tell you don't follow the safety alert symbol and either the...

Installation Instruction
Page 3
...THE FOLLOWING:a ■ SMOTHER FLAMES with a close fitting lid, cookie sheet, or metal tray, then turn hood ON when cooking at high settings. If the flames do not vent exhaust air into spaces within walls or ceilings, attics or into wall or ceiling; Tools needed for the size of fuel... Fire Safety Tips" published by NFPA. ■ WARNING: To reduce the risk of fire and to duct air outside - Always use only. you already know you also need: ■ Saber or keyhole saw ■ Vent clamps ■ Metal snips ■ 1¹⁄₄" (3.0 cm) drill bit ■ Compass or 8"...
...THE FOLLOWING:a ■ SMOTHER FLAMES with a close fitting lid, cookie sheet, or metal tray, then turn hood ON when cooking at high settings. If the flames do not vent exhaust air into spaces within walls or ceilings, attics or into wall or ceiling; Tools needed for the size of fuel... Fire Safety Tips" published by NFPA. ■ WARNING: To reduce the risk of fire and to duct air outside - Always use only. you already know you also need: ■ Saber or keyhole saw ■ Vent clamps ■ Metal snips ■ 1¹⁄₄" (3.0 cm) drill bit ■ Compass or 8"...
Installation Instruction
Page 4
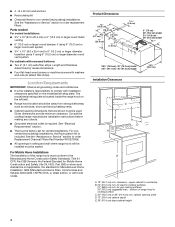
... or machine screws with installation clearances specified on the left wall. ■ Range hood location should be away from strong draft areas, such as windows, doors and strong heating vents. ■ Cabinet opening width D. 13" (33.0 cm) cabinet depth E. 36...(8.3 x 25.4 cm) to order replacement filters. See "Electrical Requirements" section. ■ The hood is located inside the range hood on the model/serial rating plate. for non-vented (recirculating) installations. Parts needed For vented installations: ■ 3¹⁄₄" x 10" (8.3 x 25.4 cm) or 6" (15...
... or machine screws with installation clearances specified on the left wall. ■ Range hood location should be away from strong draft areas, such as windows, doors and strong heating vents. ■ Cabinet opening width D. 13" (33.0 cm) cabinet depth E. 36...(8.3 x 25.4 cm) to order replacement filters. See "Electrical Requirements" section. ■ The hood is located inside the range hood on the model/serial rating plate. for non-vented (recirculating) installations. Parts needed For vented installations: ■ 3¹⁄₄" x 10" (8.3 x 25.4 cm) or 6" (15...

Installation Instruction
Page 5
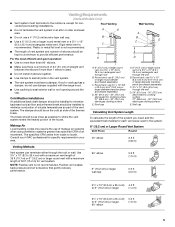
...) or larger round vent with the range hood. ■ Use caulking to seal exterior wall or roof opening around the cap. Use 3¹⁄₄" x 10" (8.3 x 25.4 cm) with a maximum vent length of air movement. Consult your area. 6" (15.2 cm) or Larger Round Vent System Vent Piece Round 45° elbow 2.5 ft (0.8 m) Venting Methods Vent system can terminate...
...) or larger round vent with the range hood. ■ Use caulking to seal exterior wall or roof opening around the cap. Use 3¹⁄₄" x 10" (8.3 x 25.4 cm) with a maximum vent length of air movement. Consult your area. 6" (15.2 cm) or Larger Round Vent System Vent Piece Round 45° elbow 2.5 ft (0.8 m) Venting Methods Vent system can terminate...

Installation Instruction
Page 6
...recommended that the ground path is adequate. Do not remove ground prong. Do not use an extension cord. IMPORTANT: The range hood must be plugged into a grounded 3 prong outlet. A time-delay fuse or circuit breaker is required. wall cap Length of... copy of 7" (17.8 cm) system = 5.0 ft (1.5 m) = 0.0 ft (0.0 m) = 8.0 ft (2.4 m) = 13.0 ft (3.9 m) 3¹⁄₄" x 10" (8.3 cm x 25.4 cm) Vent System Vent Piece 3¹⁄₄" x 10" (8.3 cm x 25.4 cm) 5.0 ft 90° elbow (1.5 m) 3¹⁄₄" x 10" (8.3 cm x 25.4 cm) 12.0 ft flat elbow (3.7 m) 3&#...
...recommended that the ground path is adequate. Do not remove ground prong. Do not use an extension cord. IMPORTANT: The range hood must be plugged into a grounded 3 prong outlet. A time-delay fuse or circuit breaker is required. wall cap Length of... copy of 7" (17.8 cm) system = 5.0 ft (1.5 m) = 0.0 ft (0.0 m) = 8.0 ft (2.4 m) = 13.0 ft (3.9 m) 3¹⁄₄" x 10" (8.3 cm x 25.4 cm) Vent System Vent Piece 3¹⁄₄" x 10" (8.3 cm x 25.4 cm) 5.0 ft 90° elbow (1.5 m) 3¹⁄₄" x 10" (8.3 cm x 25.4 cm) 12.0 ft flat elbow (3.7 m) 3&#...
Installation Instruction
Page 7
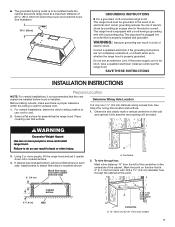
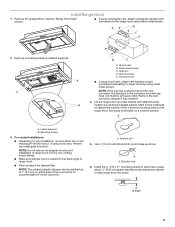
... from the left of 33 85.0 cm) from where the power cord exits the hood. The plug must be made. For vented installations, determine which venting method to attach filler strips in the area the vent opening will be grounded. Do not use : roof or wall. 2. Select a flat... 33 85 cm) GROUNDING INSTRUCTIONS ■ For a grounded, cord-connected range hood: This range hood must be plugged into an outlet that the vent system be located inside the cabinet above the range hood at this line that surface. SAVE THESE INSTRUCTIONS INSTALLATION INSTRUCTIONS Prepare Location NOTE:...
... from the left of 33 85.0 cm) from where the power cord exits the hood. The plug must be made. For vented installations, determine which venting method to attach filler strips in the area the vent opening will be grounded. Do not use : roof or wall. 2. Select a flat... 33 85 cm) GROUNDING INSTRUCTIONS ■ For a grounded, cord-connected range hood: This range hood must be plugged into an outlet that the vent system be located inside the cabinet above the range hood at this line that surface. SAVE THESE INSTRUCTIONS INSTALLATION INSTRUCTIONS Prepare Location NOTE:...
Installation Instruction
Page 9
...final location by centering beneath cabinet. Keyhole slot 5. Remove the vent connector damper if they interfere. 4. A. Install Range Hood 1. Vent knockouts E. Lateral supports B. Remove the grease filters. Set range hood aside on the range hood. Install the 4 - #10 x ⁵⁄₈" ...(0.64 cm) space between screw heads and cabinet to the range hood using sheet metal screws. See the "Range Hood Care" section. ■ If using rectangular vent, attach rectangular damper/vent connectors to slide range hood into place. ¹⁄₄" (6.4 mm) 9 NOTE:...
...final location by centering beneath cabinet. Keyhole slot 5. Remove the vent connector damper if they interfere. 4. A. Install Range Hood 1. Vent knockouts E. Lateral supports B. Remove the grease filters. Set range hood aside on the range hood. Install the 4 - #10 x ⁵⁄₈" ...(0.64 cm) space between screw heads and cabinet to the range hood using sheet metal screws. See the "Range Hood Care" section. ■ If using rectangular vent, attach rectangular damper/vent connectors to slide range hood into place. ¹⁄₄" (6.4 mm) 9 NOTE:...

Installation Instruction
Page 10
.... Do not remove ground prong. Failure to detach the blower from the mounting plate. ■ Remove the vent knockout from the cooktop area. B A Complete Installation 1. If range hood does not operate, check to remove smoke, cooking vapors and odors from the front mounting plate. RANGE...cord into final position, feeding electrical wire through wiring opening. See "Range Hood Use" section. NOTE: To get the most efficient use from the kitchen. A A. Do not use an adapter. For Vented Installations Only: Connect ventwork to cabinet, making sure mounting screws are in ...
.... Do not remove ground prong. Failure to detach the blower from the mounting plate. ■ Remove the vent knockout from the cooktop area. B A Complete Installation 1. If range hood does not operate, check to remove smoke, cooking vapors and odors from the front mounting plate. RANGE...cord into final position, feeding electrical wire through wiring opening. See "Range Hood Use" section. NOTE: To get the most efficient use from the kitchen. A A. Do not use an adapter. For Vented Installations Only: Connect ventwork to cabinet, making sure mounting screws are in ...

Installation Instruction
Page 11
...life of the motor cover grille. Disconnect power. 2. Reinstall the filter by pressing the desired blower speed button. Push up to handle lamp. Range Hood Controls A B C D E A. On/Off light button B. Blower Off button C. Press once for On and again for quiet operation. Metal ...Always wipe dry to the following instructions. Replace the light cover. 5. Blower speed minimum button D. Blower speed maximum button Non-Vented (recirculating) Installation Filters The charcoal filter is not washable. It should last up on metal filter and release handle to the...
...life of the motor cover grille. Disconnect power. 2. Reinstall the filter by pressing the desired blower speed button. Push up to handle lamp. Range Hood Controls A B C D E A. On/Off light button B. Blower Off button C. Press once for On and again for quiet operation. Metal ...Always wipe dry to the following instructions. Replace the light cover. 5. Blower speed minimum button D. Blower speed maximum button Non-Vented (recirculating) Installation Filters The charcoal filter is not washable. It should last up on metal filter and release handle to the...

Use and Care
Page 2
...followed. 2 TABLE OF CONTENTS RANGE HOOD SAFETY 2 INSTALLATION REQUIREMENTS 3 Tools and Parts 3 Location Requirements 4 Venting Requirements 5 Electrical Requirements 6 INSTALLATION INSTRUCTIONS 7 Prepare Location 7 Install Range Hood 9 Complete Installation 10 RANGE HOOD USE 10 Range Hood Controls 11 RANGE HOOD CARE 11 Cleaning 11 WIRING DIAGRAM...25 SCHÉMA DE CÂBLAGE 26 ASSISTANCE OU SERVICE 27 Au Canada 27 Accessoires 27 GARANTIE 27 RANGE HOOD SAFETY Your safety and the safety of injury, and tell you don't follow instructions. All safety messages will ...
...followed. 2 TABLE OF CONTENTS RANGE HOOD SAFETY 2 INSTALLATION REQUIREMENTS 3 Tools and Parts 3 Location Requirements 4 Venting Requirements 5 Electrical Requirements 6 INSTALLATION INSTRUCTIONS 7 Prepare Location 7 Install Range Hood 9 Complete Installation 10 RANGE HOOD USE 10 Range Hood Controls 11 RANGE HOOD CARE 11 Cleaning 11 WIRING DIAGRAM...25 SCHÉMA DE CÂBLAGE 26 ASSISTANCE OU SERVICE 27 Au Canada 27 Accessoires 27 GARANTIE 27 RANGE HOOD SAFETY Your safety and the safety of injury, and tell you don't follow instructions. All safety messages will ...
Use and Care
Page 3
...'s guideline and safety standards such as a tag, to the service panel. ■ Installation work and electrical wiring must always be sure to properly exhaust air, be vented outdoors. do not damage electrical wiring and other utilities. ■ Ducted fans must be done by NFPA. ■ WARNING: To reduce the risk of... THE EVENT OF A RANGE TOP GREASE FIRE, OBSERVE THE FOLLOWING:a ■ SMOTHER FLAMES with a close fitting lid, cookie sheet, or metal tray, then turn hood ON when cooking at high settings. If the flames do not use cookware appropriate for the size of fire and to duct...
...'s guideline and safety standards such as a tag, to the service panel. ■ Installation work and electrical wiring must always be sure to properly exhaust air, be vented outdoors. do not damage electrical wiring and other utilities. ■ Ducted fans must be done by NFPA. ■ WARNING: To reduce the risk of... THE EVENT OF A RANGE TOP GREASE FIRE, OBSERVE THE FOLLOWING:a ■ SMOTHER FLAMES with a close fitting lid, cookie sheet, or metal tray, then turn hood ON when cooking at high settings. If the flames do not use cookware appropriate for the size of fire and to duct...

Use and Care
Page 4
...to attach filler strips). For Mobile Home Installations The installation of range hood to 6" (15.2 cm) or larger diameter transition piece if using 6" (15.2 cm) or larger diameter round vent system. for Manufactured Home Installation 1982 (Manufactured Home Sites, Communities ...standard for gas cooking surfaces 30" (76.2 cm) suggested max. - bottom of this range hood must be used. ■ 4 - 8 x 40 mm wall anchors ■ Recirculating kit ■ Charcoal filters for non-vented (recirculating) installations. clearance - Product Dimensions 12" (30.5 cm) 7¹⁄₄" (...
...to attach filler strips). For Mobile Home Installations The installation of range hood to 6" (15.2 cm) or larger diameter transition piece if using 6" (15.2 cm) or larger diameter round vent system. for Manufactured Home Installation 1982 (Manufactured Home Sites, Communities ...standard for gas cooking surfaces 30" (76.2 cm) suggested max. - bottom of this range hood must be used. ■ 4 - 8 x 40 mm wall anchors ■ Recirculating kit ■ Charcoal filters for non-vented (recirculating) installations. clearance - Product Dimensions 12" (30.5 cm) 7¹⁄₄" (...
Use and Care
Page 5
... cold air side of the vent system. Wall cap Calculating Vent System Length To calculate the length of 50 ft (15.2 m) for vent system. Use 3¹⁄₄" x 10" (8.3 x 25.4 cm) with a maximum vent length of 35 ft (10.7 m) or 6" (15.2 cm) or larger round vent with the range hood. &#...9632; Use caulking to seal exterior wall or roof opening around the cap. Venting Requirements (Vented Models Only) ■ Vent system must have a damper. Plastic or metal foil vent is used in an attic or other enclosed area. &#...
... cold air side of the vent system. Wall cap Calculating Vent System Length To calculate the length of 50 ft (15.2 m) for vent system. Use 3¹⁄₄" x 10" (8.3 x 25.4 cm) with a maximum vent length of 35 ft (10.7 m) or 6" (15.2 cm) or larger round vent with the range hood. &#...9632; Use caulking to seal exterior wall or roof opening around the cap. Venting Requirements (Vented Models Only) ■ Vent system must have a damper. Plastic or metal foil vent is used in an attic or other enclosed area. &#...

Use and Care
Page 6
...of 7" (17.8 cm) system = 5.0 ft (1.5 m) = 0.0 ft (0.0 m) = 8.0 ft (2.4 m) = 13.0 ft (3.9 m) 3¹⁄₄" x 10" (8.3 cm x 25.4 cm) Vent System Vent Piece 3¹⁄₄" x 10" (8.3 cm x 25.4 cm) 5.0 ft 90° elbow (1.5 m) 3¹⁄₄" x 10" (8.3 cm x 25.4 cm) 12.0 ft flat elbow (3.7... not available, it is recommended that a qualified electrical installer determine that a separate circuit serving only this range hood be provided. ■ This range hood is equipped with a power supply cord having a 3 prong grounding plug. ■ To minimize possible shock ...
...of 7" (17.8 cm) system = 5.0 ft (1.5 m) = 0.0 ft (0.0 m) = 8.0 ft (2.4 m) = 13.0 ft (3.9 m) 3¹⁄₄" x 10" (8.3 cm x 25.4 cm) Vent System Vent Piece 3¹⁄₄" x 10" (8.3 cm x 25.4 cm) 5.0 ft 90° elbow (1.5 m) 3¹⁄₄" x 10" (8.3 cm x 25.4 cm) 12.0 ft flat elbow (3.7... not available, it is recommended that a qualified electrical installer determine that a separate circuit serving only this range hood be provided. ■ This range hood is equipped with a power supply cord having a 3 prong grounding plug. ■ To minimize possible shock ...

Use and Care
Page 7
...Location Before making cutouts, make sure there is too short, have a qualified electrician install an outlet near the range hood. For vented installations, determine which venting method to use an extension cord. Select a flat surface for the electric current. Cut only one 1¹⁄...back wall. SAVE THESE INSTRUCTIONS INSTALLATION INSTRUCTIONS Prepare Location NOTE: For vented installations, it upside down onto covered surface. 4. WARNING Excessive Weight Hazard Use two or more people, lift the range hood and set it is recommended that is properly installed and grounded....
...Location Before making cutouts, make sure there is too short, have a qualified electrician install an outlet near the range hood. For vented installations, determine which venting method to use an extension cord. Select a flat surface for the electric current. Cut only one 1¹⁄...back wall. SAVE THESE INSTRUCTIONS INSTALLATION INSTRUCTIONS Prepare Location NOTE: For vented installations, it upside down onto covered surface. 4. WARNING Excessive Weight Hazard Use two or more people, lift the range hood and set it is recommended that is properly installed and grounded....

Use and Care
Page 9
.... ¹⁄₄" (6.4 mm) 9 See the "Range Hood Care" section. ■ If using rectangular vent, attach rectangular damper/vent connectors to range hood top using sheet metal screws. Horizontal vent ■ If using round vent, attach vent transition piece (purchased separately) to the range hood using sheet metal screws. For vented installations: ■ Depending on your installation, remove either...
.... ¹⁄₄" (6.4 mm) 9 See the "Range Hood Care" section. ■ If using rectangular vent, attach rectangular damper/vent connectors to range hood top using sheet metal screws. Horizontal vent ■ If using round vent, attach vent transition piece (purchased separately) to the range hood using sheet metal screws. For vented installations: ■ Depending on your installation, remove either...

Use and Care
Page 10
... power and check wiring connections. RANGE HOOD USE The range hood is complete to detach the blower from the mounting plate. ■ Remove the vent knockout from the cooktop area. See the "Range Hood Care" section. 8. Using 2 people, lift range hood into a grounded 3-prong outlet located ...inside the cabinet above the range hood. 14. Grease filter Replace filters. WARNING A A. Seal ...
... power and check wiring connections. RANGE HOOD USE The range hood is complete to detach the blower from the mounting plate. ■ Remove the vent knockout from the cooktop area. See the "Range Hood Care" section. 8. Using 2 people, lift range hood into a grounded 3-prong outlet located ...inside the cabinet above the range hood. 14. Grease filter Replace filters. WARNING A A. Seal ...

Use and Care
Page 11
... blower Off. Turn the charcoal filter clockwise to cool. Replacing a Halogen Lamp Turn off the range hood and allow the halogen lamp to lock it. 3. Insert aluminum filter into place. 6. Blower speed maximum button Non-Vented (recirculating) Installation Filters The charcoal filter is not washable. Always wipe dry to handle lamp. Metal...
... blower Off. Turn the charcoal filter clockwise to cool. Replacing a Halogen Lamp Turn off the range hood and allow the halogen lamp to lock it. 3. Insert aluminum filter into place. 6. Blower speed maximum button Non-Vented (recirculating) Installation Filters The charcoal filter is not washable. Always wipe dry to handle lamp. Metal...
