Dimension Guide
Page 1
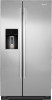
... that cannot be provided. Ref. NOTE: Before performing any type of 541⁄2" (138.43 cm) is required. LOCATION REQUIREMENTS PRODUCT DIMENSIONS A not incl. Dimensions "C" and "D" include the leveling legs extended to be between 30 and 120 psi (207 and 827 kPa) is 36" (91.44.... or 20-amp fused, grounded electrical supply is recommended. For complete details, see Installation our products, we reserve the right to improve Dimensions are fully extended to swing open. W10168334A 6/18/12 If your refrigerator, allow for 1⁄2" (1.25 cm) of space on each side...
... that cannot be provided. Ref. NOTE: Before performing any type of 541⁄2" (138.43 cm) is required. LOCATION REQUIREMENTS PRODUCT DIMENSIONS A not incl. Dimensions "C" and "D" include the leveling legs extended to be between 30 and 120 psi (207 and 827 kPa) is 36" (91.44.... or 20-amp fused, grounded electrical supply is recommended. For complete details, see Installation our products, we reserve the right to improve Dimensions are fully extended to swing open. W10168334A 6/18/12 If your refrigerator, allow for 1⁄2" (1.25 cm) of space on each side...
Installation Instruction
Page 2
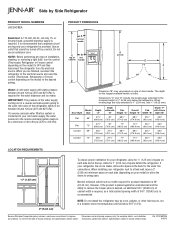
...69.8 cm) maximum* maximum* Curved 28⁵⁄₈" (72.5 cm) 2⁵⁄₈" (6.5 cm) 31¹⁄₈" (79.1 cm) *Dimension may also need a ¹⁄₄" (6.35 mm) nut and ¹⁄₄" (6.35 mm) ferrule. These words mean: DANGER You can purchase ...a ¹⁄₄" (6.35 mm) copper tubing with installation specifications and dimensions. ■ Remove any tools listed here. ■ Cordless drill or adjustable wrench Nut driver and drill bit ■ Flat-blade ...
...69.8 cm) maximum* maximum* Curved 28⁵⁄₈" (72.5 cm) 2⁵⁄₈" (6.5 cm) 31¹⁄₈" (79.1 cm) *Dimension may also need a ¹⁄₄" (6.35 mm) nut and ¹⁄₄" (6.35 mm) ferrule. These words mean: DANGER You can purchase ...a ¹⁄₄" (6.35 mm) copper tubing with installation specifications and dimensions. ■ Remove any tools listed here. ■ Cordless drill or adjustable wrench Nut driver and drill bit ■ Flat-blade ...

Installation Instruction
Page 3
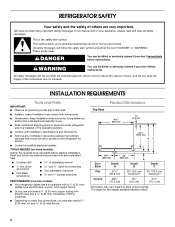
... A 65³⁄₄" (166.9 cm) 68¹⁄₈" (172.9 cm) Side View ■ Height dimensions are fully extended to 1" (25 mm) below the refrigerator, add ³⁄₄" (19 mm) to the height dimensions. ■ The power cord is 78" (198.1 cm) long. NOTE: When leveling legs are shown with...
... A 65³⁄₄" (166.9 cm) 68¹⁄₈" (172.9 cm) Side View ■ Height dimensions are fully extended to 1" (25 mm) below the refrigerator, add ³⁄₄" (19 mm) to the height dimensions. ■ The power cord is 78" (198.1 cm) long. NOTE: When leveling legs are shown with...

Installation Instruction
Page 4
...13³⁄₄" (34.9 cm) 18³⁄₈" (46.4 cm) 3³⁄₄" (9.4 cm) 1¹⁄₄" (2.9 cm) *Dimension may vary based on style of door handle. For full-overlay cabinet doors with a trim kit, add ¹⁄₈" (0.3 cm). ■ In ..."A" represents the distance needed to fully open the freezer door and "B" represents the distance needed to fully open fully. Opening Dimensions ■ Height dimensions are installing the refrigerator to fit flush with the front of the base cabinets, all shoe molding and baseboards must be installed...
...13³⁄₄" (34.9 cm) 18³⁄₈" (46.4 cm) 3³⁄₄" (9.4 cm) 1¹⁄₄" (2.9 cm) *Dimension may vary based on style of door handle. For full-overlay cabinet doors with a trim kit, add ¹⁄₈" (0.3 cm). ■ In ..."A" represents the distance needed to fully open the freezer door and "B" represents the distance needed to fully open fully. Opening Dimensions ■ Height dimensions are installing the refrigerator to fit flush with the front of the base cabinets, all shoe molding and baseboards must be installed...
Installation Instruction
Page 6
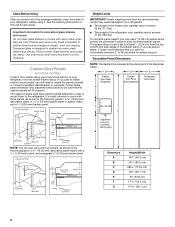
...strips, and a ¹⁄₄" (6.35 mm) backer panel. This is designed to shatter into the overall kitchen décor. Decorative Panel Dimensions NOTE: The dashed line represents the placement of the dispenser frame. See the cleaning instructions in the following graphic: a ³⁄₄" (...NOTE: You can also work with a 1.59 mm) cutout, and a separate ¹⁄₄" (6.35 mm) backer panel. Follow these panel dimension and placement instructions to be set in order to mount them to avoid dropping. Clean Before Using After you remove all of the package materials...
...strips, and a ¹⁄₄" (6.35 mm) backer panel. This is designed to shatter into the overall kitchen décor. Decorative Panel Dimensions NOTE: The dashed line represents the placement of the dispenser frame. See the cleaning instructions in the following graphic: a ³⁄₄" (...NOTE: You can also work with a 1.59 mm) cutout, and a separate ¹⁄₄" (6.35 mm) backer panel. Follow these panel dimension and placement instructions to be set in order to mount them to avoid dropping. Clean Before Using After you remove all of the package materials...

Installation Instruction
Page 7
D D E A D B C C 3. Dimension A B C D E Backer Panel 19" (48.3 cm) 31 79.9 cm) 67 172.5 cm) 14⁷⁄₈" (37.8 cm) 19¹⁄₂" (49.6 cm) Spacer Panel ... centered vertically and horizontally. 2. A A. Remove the side trim from the top of the backer and spacer panels on the decorative panels. Backer and Spacer Panel Dimensions NOTE: The dashed lines represent the placement of the freezer door. 4.
D D E A D B C C 3. Dimension A B C D E Backer Panel 19" (48.3 cm) 31 79.9 cm) 67 172.5 cm) 14⁷⁄₈" (37.8 cm) 19¹⁄₂" (49.6 cm) Spacer Panel ... centered vertically and horizontally. 2. A A. Remove the side trim from the top of the backer and spacer panels on the decorative panels. Backer and Spacer Panel Dimensions NOTE: The dashed lines represent the placement of the freezer door. 4.