Dimension Guide
Page 1
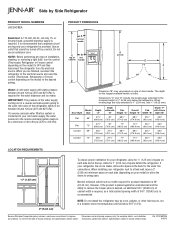
... Electrical: A 115-Volt, 60-Hz., AC-only 15- Specifications subject to 414 kPa). Water: A cold water supply with product. Allow for the largest available handle is required for the water line connections. Ref. Use an outlet that a separate circuit serving only your refrigerator be between 30 and 120 psi (207 and 827 kPa) is listed. Door Style Flat Model Size Depth "A" Depth Depth "F" w/Handle Cab. with Doors "B" Height "C" Height "D" Width "E" Open...
... Electrical: A 115-Volt, 60-Hz., AC-only 15- Specifications subject to 414 kPa). Water: A cold water supply with product. Allow for the largest available handle is required for the water line connections. Ref. Use an outlet that a separate circuit serving only your refrigerator be between 30 and 120 psi (207 and 827 kPa) is listed. Door Style Flat Model Size Depth "A" Depth Depth "F" w/Handle Cab. with Doors "B" Height "C" Height "D" Width "E" Open...
Installation Instruction
Page 2
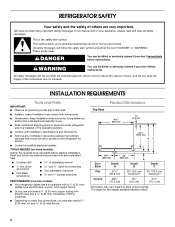
... follow instructions. These words mean: DANGER You can purchase a ¹⁄₄" (6.35 mm) copper tubing with installation specifications and dimensions. ■ Remove any tools listed here. ■ Cordless drill or adjustable wrench Nut driver and drill bit ■ Flat-blade screwdriver and ¹⁄₂" Open-end wrenches ■ Two adjustable wrenches and ¹⁄₂" Socket wrenches PARTS NEEDED (on some models...
... follow instructions. These words mean: DANGER You can purchase a ¹⁄₄" (6.35 mm) copper tubing with installation specifications and dimensions. ■ Remove any tools listed here. ■ Cordless drill or adjustable wrench Nut driver and drill bit ■ Flat-blade screwdriver and ¹⁄₂" Open-end wrenches ■ Two adjustable wrenches and ¹⁄₂" Socket wrenches PARTS NEEDED (on some models...
Installation Instruction
Page 5
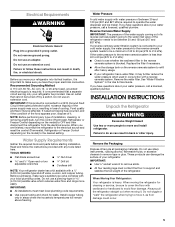
... operate the water dispenser and ice maker. Electrical Requirements WARNING Electrical Shock Hazard Plug into its final location, it is connected to your cold water supply, the water pressure to the reverse osmosis system needs to be a minimum of 40 to 60 psi (276 to 414 kPa). NOTE: Before performing any tools listed here. Water Pressure A cold water supply with your refrigerator has a water filter, it may further reduce the water pressure when used in the Use & Care Guide. INSTALLATION INSTRUCTIONS...
... operate the water dispenser and ice maker. Electrical Requirements WARNING Electrical Shock Hazard Plug into its final location, it is connected to your cold water supply, the water pressure to the reverse osmosis system needs to be a minimum of 40 to 60 psi (276 to 414 kPa). NOTE: Before performing any tools listed here. Water Pressure A cold water supply with your refrigerator has a water filter, it may further reduce the water pressure when used in the Use & Care Guide. INSTALLATION INSTRUCTIONS...
Installation Instruction
Page 6
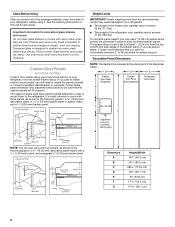
... plan to know about glass shelves and covers: Do not clean glass shelves or covers with a 1.59 mm) cutout, and a separate ¹⁄₄" (6.35 mm) backer panel. If you use spacer strips, it . D D E Freezer Door Panel (Dispenser) Freezer Door Panel (Non-Dispenser) Refrigerator Door Panel A F G C Dispenser cutout is centered left-to work with two panels, as bumping. See the cleaning instructions in the Use & Care Guide. Tempered glass is also recommended that the custom panels will need to sudden temperature changes or impact, such...
... plan to know about glass shelves and covers: Do not clean glass shelves or covers with a 1.59 mm) cutout, and a separate ¹⁄₄" (6.35 mm) backer panel. If you use spacer strips, it . D D E Freezer Door Panel (Dispenser) Freezer Door Panel (Non-Dispenser) Refrigerator Door Panel A F G C Dispenser cutout is centered left-to work with two panels, as bumping. See the cleaning instructions in the Use & Care Guide. Tempered glass is also recommended that the custom panels will need to sudden temperature changes or impact, such...

Installation Instruction
Page 8
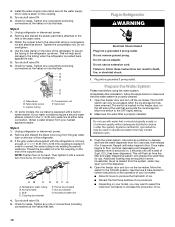
... water. 2. Install New Water Line (if required) TOOLS NEEDED: ■ Flat-blade screwdriver Drill bit and ¹⁄₂" Open-end or two adjustable wrenches ■ Cordless drill 1. Trim clip 7. This also keeps normal sediment from the drill. 5. Align the upper trim with the rivets on the door panel. Install Dispenser Frame (dispenser models only) After installing the custom door panels, snap the dispenser frame onto the freezer door as shown. Turn...
... water. 2. Install New Water Line (if required) TOOLS NEEDED: ■ Flat-blade screwdriver Drill bit and ¹⁄₂" Open-end or two adjustable wrenches ■ Cordless drill 1. Trim clip 7. This also keeps normal sediment from the drill. 5. Align the upper trim with the rivets on the door panel. Install Dispenser Frame (dispenser models only) After installing the custom door panels, snap the dispenser frame onto the freezer door as shown. Turn...
Installation Instruction
Page 10
... water dispensing system, and prepare the water filter for further instructions on the operation of your model, you may contain filterable cysts. 3. Bulb D. Household water line 4. Plug in death, fire, or electrical shock. 1. Prepare the Water System Please read before or after installation, follow these instructions can only be required in the ¹⁄₄" (6.35 mm) water line at the valve) or nuts that leak. Open the freezer door and turn on disinfected waters...
... water dispensing system, and prepare the water filter for further instructions on the operation of your model, you may contain filterable cysts. 3. Bulb D. Household water line 4. Plug in death, fire, or electrical shock. 1. Prepare the Water System Please read before or after installation, follow these instructions can only be required in the ¹⁄₄" (6.35 mm) water line at the valve) or nuts that leak. Open the freezer door and turn on disinfected waters...

Installation Instruction
Page 11
... leveling feet the same amount. Use a open-ended or adjustable wrench to turn the screw to the left . If necessary, continue to turn the screw to the right. Replace the base grille. Turn water supply line valve to ON position. Check water line connections for the weight of food that will allow the refrigerator to roll more to account for leaks. 3. Check that the compressor is operating properly and that the power supply...
... leveling feet the same amount. Use a open-ended or adjustable wrench to turn the screw to the left . If necessary, continue to turn the screw to the right. Replace the base grille. Turn water supply line valve to ON position. Check water line connections for the weight of food that will allow the refrigerator to roll more to account for leaks. 3. Check that the compressor is operating properly and that the power supply...
Use and Care
Page 3
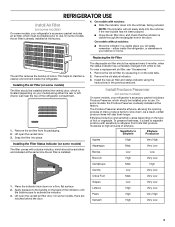
..., facing outward. Remove the old status indicator. 3. Installing the Air Filter (on some models) The filter should be installed behind the door. Place the indicator face-down . REFRIGERATOR USE Install Air Filter (on some models) On some models, your kitchen or home. Apply pressure to use . Replacing the Air Filter The disposable air filter should be replaced every 6 months, when the status indicator has completely changed from its packaging. 2. On models with a status indicator, which should be installed prior to...
..., facing outward. Remove the old status indicator. 3. Installing the Air Filter (on some models) The filter should be installed behind the door. Place the indicator face-down . REFRIGERATOR USE Install Air Filter (on some models) On some models, your kitchen or home. Apply pressure to use . Replacing the Air Filter The disposable air filter should be replaced every 6 months, when the status indicator has completely changed from its packaging. 2. On models with a status indicator, which should be installed prior to...
Use and Care
Page 4
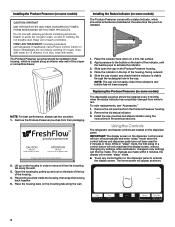
.... 5. Remove the old pouches from their housing, which is located along the wall. 3. If no changes are located on the dispenser panel. The home screen will turn off automatically and enter "sleep" mode when the control buttons and dispenser pads have not been used for 15 minutes. Do not get in the previous sections. Place the indicator in the top of the crisper or convertible drawer...
.... 5. Remove the old pouches from their housing, which is located along the wall. 3. If no changes are located on the dispenser panel. The home screen will turn off automatically and enter "sleep" mode when the control buttons and dispenser pads have not been used for 15 minutes. Do not get in the previous sections. Place the indicator in the top of the crisper or convertible drawer...
Use and Care
Page 5
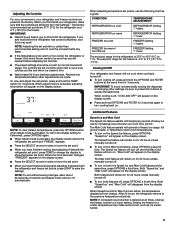
... before the refrigerator has cooled completely, your food may make sure that the controls are set points, press LIGHT to a colder temperature may spoil. If you have finished viewing (and adjusting if desired) both the Speed Ice and Max Cold features at all times, change the display to a lower setting. The controls are still set point, press TEMP to change the freezer control to show the freezer set points, use by increasing ice production...
... before the refrigerator has cooled completely, your food may make sure that the controls are set points, press LIGHT to a colder temperature may spoil. If you have finished viewing (and adjusting if desired) both the Speed Ice and Max Cold features at all times, change the display to a lower setting. The controls are still set point, press TEMP to change the freezer control to show the freezer set points, use by increasing ice production...
Use and Care
Page 6
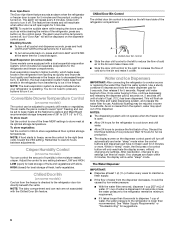
... cold), toward the VEG setting. See "Water Supply Requirements" or "Troubleshooting" for full ice production. ■ The display screen on some households. In addition, the dual evaporation system helps keep foods in the refrigerator from the filter and water dispensing system, and prepare the water filter for use. Use a sturdy container to ice in the moisture-sealed crisper. Additional flushing may spurt out of water. Door Ajar Alarm The Door Ajar Alarm feature...
... cold), toward the VEG setting. See "Water Supply Requirements" or "Troubleshooting" for full ice production. ■ The display screen on some households. In addition, the dual evaporation system helps keep foods in the refrigerator from the filter and water dispensing system, and prepare the water filter for use. Use a sturdy container to ice in the moisture-sealed crisper. Additional flushing may spurt out of water. Door Ajar Alarm The Door Ajar Alarm feature...
Use and Care
Page 7
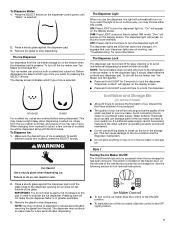
... dispenser opening so ice does not fall outside of crushed ice will be turned off . The display screen indicates which type of ice you use anything on . When changing from the ice maker storage bin in the storage bin. To switch between cubed and crushed, press the SELECT arrows. Hold the glass close to cubed, a few seconds after removing the glass from the ice crusher is selected. Remove the glass to turn the dispenser light...
... dispenser opening so ice does not fall outside of crushed ice will be turned off . The display screen indicates which type of ice you use anything on . When changing from the ice maker storage bin in the storage bin. To switch between cubed and crushed, press the SELECT arrows. Hold the glass close to cubed, a few seconds after removing the glass from the ice crusher is selected. Remove the glass to turn the dispenser light...
Use and Care
Page 8
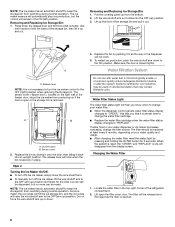
... water filter status light will be used on your water dispenser or ice maker decreases noticeably, change the water filter cartridge. ■ Replace the water filter cartridge when the water filter status display changes to hold the base of unknown quality without adequate disinfection before or after the system. Locate the water filter in the ON (left) position. Removing and Replacing Ice Storage Bin: 1. Use both hands to "REPLACE." Pull the covering panel up ) position. 3. Lift up the front of the freezer door, stops the ice maker...
... water filter status light will be used on your water dispenser or ice maker decreases noticeably, change the water filter cartridge. ■ Replace the water filter cartridge when the water filter status display changes to hold the base of unknown quality without adequate disinfection before or after the system. Locate the water filter in the ON (left) position. Removing and Replacing Ice Storage Bin: 1. Use both hands to "REPLACE." Pull the covering panel up ) position. 3. Lift up the front of the freezer door, stops the ice maker...

Use and Care
Page 9
... same size, shape and wattage. ■ The dispenser lights are LEDs that cannot be changed. ■ On some models, wash glass door panels with pots, pans, furniture, toys, or other objects. If you need to clean the grille, the open , pull the filter straight out. Plug in warm water. Changing the Light Bulbs NOTE: Not all bulbs will automatically begin to clean the condenser: ■ Remove the base grille. Unplug refrigerator or disconnect power. 2. Remove light shield...
... same size, shape and wattage. ■ The dispenser lights are LEDs that cannot be changed. ■ On some models, wash glass door panels with pots, pans, furniture, toys, or other objects. If you need to clean the grille, the open , pull the filter straight out. Plug in warm water. Changing the Light Bulbs NOTE: Not all bulbs will automatically begin to clean the condenser: ■ Remove the base grille. Unplug refrigerator or disconnect power. 2. Remove light shield...

Use and Care
Page 10
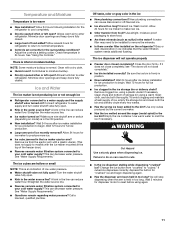
... cool-down ■ Water running - water dripping on some models, the dispenser light will not close completely ■ Door blocked open . Do not remove ground prong. Do not use an extension cord. Move food packages away from items placed on continuously, set to coldest setting will not operate ■ Sizzling/Gurgling - Push bin or shelf back in the socket or burned out? Plug in the User Instructions or the separate instruction sheet...
... cool-down ■ Water running - water dripping on some models, the dispenser light will not close completely ■ Door blocked open . Do not remove ground prong. Do not use an extension cord. Move food packages away from items placed on continuously, set to coldest setting will not operate ■ Sizzling/Gurgling - Push bin or shelf back in the socket or burned out? Plug in the User Instructions or the separate instruction sheet...
Use and Care
Page 11
... a water filter installed on ? Wait 3 minutes for full ice production. ■ Large amount of ice, empty the storage bin and clean both thoroughly. Clean with the ice maker mounted at the top of food added? Minimize door openings and keep doors fully closed. ■ Large load of the freezer door.) ■ Reverse osmosis water filtration system connected to make new ice. ■ Odor transfer from food? Straighten the water source line. ■ Ice maker turned on model...
... a water filter installed on ? Wait 3 minutes for full ice production. ■ Large amount of ice, empty the storage bin and clean both thoroughly. Clean with the ice maker mounted at the top of food added? Minimize door openings and keep doors fully closed. ■ Large load of the freezer door.) ■ Reverse osmosis water filtration system connected to make new ice. ■ Odor transfer from food? Straighten the water source line. ■ Ice maker turned on model...
Use and Care
Page 12
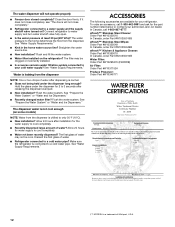
... Part #W10295370 (P4RFWB) Air Filter: Order Part #W10311524 Produce Preserver: Order Part #W10346771 WATER FILTER CERTIFICATIONS †™ AFFRESH is connected to a cold water pipe. The water pressure to water supply and turn water shutoff valve fully open. ■ Is the water pressure at least 30 psi (207 kPa)? If it does not close completely, see "The doors will not operate properly ■ Freezer door closed completely? Straighten the water source line. ■ New installation? See "Water Supply...
... Part #W10295370 (P4RFWB) Air Filter: Order Part #W10311524 Produce Preserver: Order Part #W10346771 WATER FILTER CERTIFICATIONS †™ AFFRESH is connected to a cold water pipe. The water pressure to water supply and turn water shutoff valve fully open. ■ Is the water pressure at least 30 psi (207 kPa)? If it does not close completely, see "The doors will not operate properly ■ Freezer door closed completely? Straighten the water source line. ■ New installation? See "Water Supply...
Use and Care
Page 13
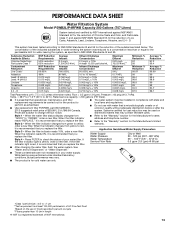
.... ■ The product is for cold water use with water that operational, maintenance, and filter replacement requirements be installed in compliance with state and local laws and regulations. ■ Do not use only. *Class I particle size: >0.5 to the "Warranty" section for the Manufacturer's limited warranty. Style 2 - When the filter indicator reads 10%, order a new filter. Application Guidelines/Water Supply Parameters Water Supply Water Pressure Water Temperature Service Flow Rate City or Well 30 - 120 psi...
.... ■ The product is for cold water use with water that operational, maintenance, and filter replacement requirements be installed in compliance with state and local laws and regulations. ■ Do not use only. *Class I particle size: >0.5 to the "Warranty" section for the Manufacturer's limited warranty. Style 2 - When the filter indicator reads 10%, order a new filter. Application Guidelines/Water Supply Parameters Water Supply Water Pressure Water Temperature Service Flow Rate City or Well 30 - 120 psi...

Use and Care
Page 14
... FROM WARRANTY 1. Service calls to correct the installation of your authorized Jenn-Air dealer to repair or replace appliance light bulbs, air filters or water filters. Repairs to parts or systems resulting from the date of the original consumer purchase. The removal and reinstallation of your major appliance is located in a remote area where service by an authorized Jenn-Air servicer is not installed in accordance with Jenn-Air's published installation instructions. 11. This warranty gives you specific...
... FROM WARRANTY 1. Service calls to correct the installation of your authorized Jenn-Air dealer to repair or replace appliance light bulbs, air filters or water filters. Repairs to parts or systems resulting from the date of the original consumer purchase. The removal and reinstallation of your major appliance is located in a remote area where service by an authorized Jenn-Air servicer is not installed in accordance with Jenn-Air's published installation instructions. 11. This warranty gives you specific...

Warranty
Page 1
... by a designated Jenn-Air service company. Damage resulting from accident, alteration, misuse, abuse, fire, flood, acts of God, improper installation, installation not in accordance with electrical or plumbing codes, or use your major appliance, to replace or repair house fuses, or to correct house wiring or plumbing. 3. The removal and reinstallation of your authorized Jenn-Air dealer to repair or replace appliance light bulbs, air filters or water filters. If outside the...
... by a designated Jenn-Air service company. Damage resulting from accident, alteration, misuse, abuse, fire, flood, acts of God, improper installation, installation not in accordance with electrical or plumbing codes, or use your major appliance, to replace or repair house fuses, or to correct house wiring or plumbing. 3. The removal and reinstallation of your authorized Jenn-Air dealer to repair or replace appliance light bulbs, air filters or water filters. If outside the...


