Installation Instruction
Page 3
... to potential hazards that can kill or hurt you don't follow instructions. All safety messages will follow instructions. Keep doors taped closed until refrigerator is the safety alert symbol. Always read and obey all safety messages. WARNING You can be killed or seriously injured if you don't ...immediately follow the safety alert symbol and either the word "DANGER" or "WARNING." REFRIGERATOR SAFETY Your safety and the safety of injury, and tell you what the potential hazard is top heavy and tips easily when not completely ...
... to potential hazards that can kill or hurt you don't follow instructions. All safety messages will follow instructions. Keep doors taped closed until refrigerator is the safety alert symbol. Always read and obey all safety messages. WARNING You can be killed or seriously injured if you don't ...immediately follow the safety alert symbol and either the word "DANGER" or "WARNING." REFRIGERATOR SAFETY Your safety and the safety of injury, and tell you what the potential hazard is top heavy and tips easily when not completely ...
Installation Instruction
Page 4
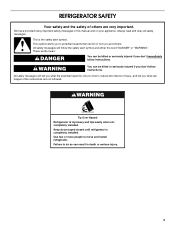
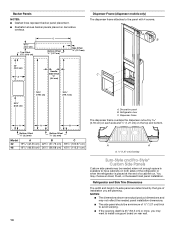
JS42CXFXDB JS48CXFXDB 4 JS42SEFXDB JS48SEFXDB Pro-Style® Design Features stainless steel wrapped doors and Pro-Style® handles with existing kitchen cabinetry. JS42PPFXDB JS48PPFXDB Overlay Design Uses custom-made panels and custom hardware for a seamless appearance designed to blend with diamond-etched grip. Non-Dispensing Refrigerators MODELS Euro-Style Design Features stainless steel wrapped doors with towel bar handles.
JS42CXFXDB JS48CXFXDB 4 JS42SEFXDB JS48SEFXDB Pro-Style® Design Features stainless steel wrapped doors and Pro-Style® handles with existing kitchen cabinetry. JS42PPFXDB JS48PPFXDB Overlay Design Uses custom-made panels and custom hardware for a seamless appearance designed to blend with diamond-etched grip. Non-Dispensing Refrigerators MODELS Euro-Style Design Features stainless steel wrapped doors with towel bar handles.

Installation Instruction
Page 5
JS42PPDUDB JS48PPDUDB Overlay Design Uses custom-made panels and custom hardware for a seamless appearance designed to blend with towel bar handles. Dispensing Refrigerators Euro-Style Design Features stainless steel wrapped doors with existing kitchen cabinetry. JS42SEDUDB JS48SEDUDB Pro-Style® Design Features stainless steel wrapped doors and Pro-Style® handles with diamond-etched grip. JS42CXDBDB JS42CXDUDB JS48CXDBDB JS48CXDUDB 5
JS42PPDUDB JS48PPDUDB Overlay Design Uses custom-made panels and custom hardware for a seamless appearance designed to blend with towel bar handles. Dispensing Refrigerators Euro-Style Design Features stainless steel wrapped doors with existing kitchen cabinetry. JS42SEDUDB JS48SEDUDB Pro-Style® Design Features stainless steel wrapped doors and Pro-Style® handles with diamond-etched grip. JS42CXDBDB JS42CXDUDB JS48CXDBDB JS48CXDUDB 5
Installation Instruction
Page 6
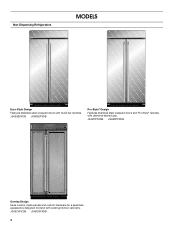
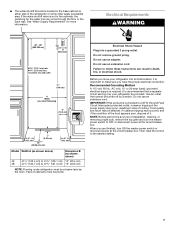
...allow for future reference. If the solid soffit is higher than 600 lbs (272 kg), door panels and contents of inches from refrigerator. See the chart following the graphic for your model. INSTALLATION REQUIREMENTS Tools and Parts IMPORTANT: ■ Installer: Leave Installation Instructions... tipping during use . See "Opening Dimensions." Save these Installation Instructions for more than 1" (2.5 cm) or one is not available, then the refrigerator must be braced. Failure to a shutoff valve, you do so can be removed. †®TORX is recommended that you need a ferrule,...
...allow for future reference. If the solid soffit is higher than 600 lbs (272 kg), door panels and contents of inches from refrigerator. See the chart following the graphic for your model. INSTALLATION REQUIREMENTS Tools and Parts IMPORTANT: ■ Installer: Leave Installation Instructions... tipping during use . See "Opening Dimensions." Save these Installation Instructions for more than 1" (2.5 cm) or one is not available, then the refrigerator must be braced. Failure to a shutoff valve, you do so can be removed. †®TORX is recommended that you need a ferrule,...
Installation Instruction
Page 7
...the desired setting. 7 Electrical Shock Hazard Plug into its final location, it . Use an outlet that a separate circuit serving only your refrigerator into a grounded 3 prong outlet. Then reset the control to follow these instructions can come through the floor or the back wall. IMPORTANT...or 20-amp fused, grounded electrical supply is connected to OFF or disconnect power at same level as the room. When you move your refrigerator be at the circuit breaker box. Electrical Requirements WARNING 80" - 90" (203-229 cm) B Dimension 83¹⁄₂" (212...
...the desired setting. 7 Electrical Shock Hazard Plug into its final location, it . Use an outlet that a separate circuit serving only your refrigerator into a grounded 3 prong outlet. Then reset the control to follow these instructions can come through the floor or the back wall. IMPORTANT...or 20-amp fused, grounded electrical supply is connected to OFF or disconnect power at same level as the room. When you move your refrigerator be at the circuit breaker box. Electrical Requirements WARNING 80" - 90" (203-229 cm) B Dimension 83¹⁄₂" (212...
Installation Instruction
Page 8
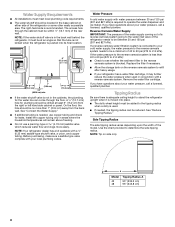
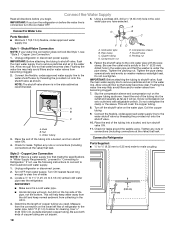
...Replace the filter if necessary. ■ Allow the storage tank on side only. Tipping Radius Be sure there is adequate ceiling height to stand the refrigerator upright when it may further reduce the water pressure when used . ■ If needed , use a piercing-type or 4.76 mm) saddle valve... purchasing, make sure a saddle-type valve complies with water pressure between 30 and 120 psi (207 and 827 kPa). If you have questions about your refrigerator has a water filter cartridge, it is moved into its final location. 6" (15.2 cm) 1" 6" (2.54 cm) (15.2 cm) 24" (60.96 cm) min. 6" (...
...Replace the filter if necessary. ■ Allow the storage tank on side only. Tipping Radius Be sure there is adequate ceiling height to stand the refrigerator upright when it may further reduce the water pressure when used . ■ If needed , use a piercing-type or 4.76 mm) saddle valve... purchasing, make sure a saddle-type valve complies with water pressure between 30 and 120 psi (207 and 827 kPa). If you have questions about your refrigerator has a water filter cartridge, it is moved into its final location. 6" (15.2 cm) 1" 6" (2.54 cm) (15.2 cm) 24" (60.96 cm) min. 6" (...

Installation Instruction
Page 9
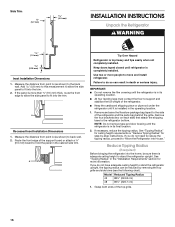
Side View Product Dimensions Overlay Style ■ The depth from the front of the top grille to the back of the refrigerator is 5 ft (1.5 m) long. ■ Height dimensions are fully extended to 1¹⁄₄" (3.2 cm) below the rollers. Style® 25³⁄₈" ...) *When leveling legs are shown with leveling legs extended ¹⁄₈" (3 mm) below rollers, add 1¹⁄₈" (2.9 cm) to the back of the refrigerator cabinet is 84" (213 cm) long. ■ The water line attached to the height dimensions. Style® B A 41" (104.1 cm) 47" (119.4 ...
Side View Product Dimensions Overlay Style ■ The depth from the front of the top grille to the back of the refrigerator is 5 ft (1.5 m) long. ■ Height dimensions are fully extended to 1¹⁄₄" (3.2 cm) below the rollers. Style® 25³⁄₈" ...) *When leveling legs are shown with leveling legs extended ¹⁄₈" (3 mm) below rollers, add 1¹⁄₈" (2.9 cm) to the back of the refrigerator cabinet is 84" (213 cm) long. ■ The water line attached to the height dimensions. Style® B A 41" (104.1 cm) 47" (119.4 ...

Installation Instruction
Page 10
... clearance may be required if you are fully extended to 1¹⁄₄" (3.2 cm) below rollers, add 1¹⁄₈" (2.9 cm) to a minimum of the refrigerator and a corner wall. To adjust the door swing, see "Adjust Doors." 42" (106.7 cm) Models Model 42 48 Width A 41" (104.1 cm) 47" (119.4 cm...
... clearance may be required if you are fully extended to 1¹⁄₄" (3.2 cm) below rollers, add 1¹⁄₈" (2.9 cm) to a minimum of the refrigerator and a corner wall. To adjust the door swing, see "Adjust Doors." 42" (106.7 cm) Models Model 42 48 Width A 41" (104.1 cm) 47" (119.4 cm...

Installation Instruction
Page 11
... sufficient clearance for the doors to swing open. See "Adjust Doors." Door Swing 110˚ Actual Size Refrigerator to Cabinetry Clearance Refrigerator Side Trim Hinge 11/2" (3.8 cm) 11/4" (3.2 cm) 1" (2.5 cm) Cabinetry 1/4" (6.35 mm) 1/2" (1.3 cm) 3/4" (1.9 cm) 1" (2.5 cm) NOTE: For Overlay Series...;⁄₂" (1.3 cm) clearance between overlay panel and cabinetry. 11/4" (3.2 cm) 11/2" (3.8 cm) Spacer Panel When the doors are closed the refrigerator will extend beyond the face of the custom door panels to a radius that there is to be installed close to some degree. 11
... sufficient clearance for the doors to swing open. See "Adjust Doors." Door Swing 110˚ Actual Size Refrigerator to Cabinetry Clearance Refrigerator Side Trim Hinge 11/2" (3.8 cm) 11/4" (3.2 cm) 1" (2.5 cm) Cabinetry 1/4" (6.35 mm) 1/2" (1.3 cm) 3/4" (1.9 cm) 1" (2.5 cm) NOTE: For Overlay Series...;⁄₂" (1.3 cm) clearance between overlay panel and cabinetry. 11/4" (3.2 cm) 11/2" (3.8 cm) Spacer Panel When the doors are closed the refrigerator will extend beyond the face of the custom door panels to a radius that there is to be installed close to some degree. 11

Installation Instruction
Page 12
More clearance may be needed if thicker custom panels or custom handles are used. Do not overlook baseboards. 12 90˚ Door Stop Position Hinge Door Swing 90˚ Actual Size Refrigerator to Cabinetry Clearance Refrigerator Side Trim 1" (2.5 cm) 3/4" (1.9 cm) 1/2" (1.3 cm) Cabinetry 1/4" (6.35 mm) 1/2" (1.3 cm) 3/4" (1.9 cm) 1" (2.5 cm) Overlay Panel Backer Panel Door 1/2" (1.3 cm) 3/4" (1.9 cm) 1" (2.5 cm) 11/4" (3.2 cm) 11/2" (3.8 cm) Spacer Panel Allow a minimum of 4¹⁄₂" (11.4 cm) of space between the side of the refrigerator and a corner wall.
More clearance may be needed if thicker custom panels or custom handles are used. Do not overlook baseboards. 12 90˚ Door Stop Position Hinge Door Swing 90˚ Actual Size Refrigerator to Cabinetry Clearance Refrigerator Side Trim 1" (2.5 cm) 3/4" (1.9 cm) 1/2" (1.3 cm) Cabinetry 1/4" (6.35 mm) 1/2" (1.3 cm) 3/4" (1.9 cm) 1" (2.5 cm) Overlay Panel Backer Panel Door 1/2" (1.3 cm) 3/4" (1.9 cm) 1" (2.5 cm) 11/4" (3.2 cm) 11/2" (3.8 cm) Spacer Panel Allow a minimum of 4¹⁄₂" (11.4 cm) of space between the side of the refrigerator and a corner wall.

Installation Instruction
Page 13
... Panel A B To minimize panel weight, you may choose to work with one panel routed for the different dimensions. In some cases, your refrigerator into the overall kitchen décor, and to use two 2" (5.08 cm) strips horizontally centered for additional design flexibility. Follow these panel ...;" (36.2 cm) 10⁷⁄₈" (27.6 cm) 72¹⁄₄" (183.5 cm) Freezer Door Panel (Non-Dispenser) Refrigerator Door Panel Overlay Panel Spacer Panel Spacer Panel 1/8" (3.18 mm) Overlay Panel 33⁷⁄₈" (86.0 cm) Dispenser cutout is also recommended...
... Panel A B To minimize panel weight, you may choose to work with one panel routed for the different dimensions. In some cases, your refrigerator into the overall kitchen décor, and to use two 2" (5.08 cm) strips horizontally centered for additional design flexibility. Follow these panel ...;" (36.2 cm) 10⁷⁄₈" (27.6 cm) 72¹⁄₄" (183.5 cm) Freezer Door Panel (Non-Dispenser) Refrigerator Door Panel Overlay Panel Spacer Panel Spacer Panel 1/8" (3.18 mm) Overlay Panel 33⁷⁄₈" (86.0 cm) Dispenser cutout is also recommended...
Installation Instruction
Page 14
... installation you may choose an Inset, Flush, or Recessed Inset panel installation. Refrigerator and Side Trim Dimensions The width and height of a cabinet run. Refrigerator door C. You may want to install a support board on both sides of the refrigerator or when the refrigerator is available to the panel with 4 screws. Decorative panel B. A B 22" (55...
... installation you may choose an Inset, Flush, or Recessed Inset panel installation. Refrigerator and Side Trim Dimensions The width and height of a cabinet run. Refrigerator door C. You may want to install a support board on both sides of the refrigerator or when the refrigerator is available to the panel with 4 screws. Decorative panel B. A B 22" (55...

Installation Instruction
Page 15
...cabinet side trim. NOTES: ■ The dimensions shown are planning. Measure the distance from point A (as shown) to fit into the trim. Refrigerator Overlay 23 60.16 cm) A Flush Installation Dimensions 1. Add 5.6 mm) to this measurement to allow the side panel to install a support board...as shown) to the back wall. A 15 A Overlay Series Custom Side Panels Custom side panels may choose an Inset or Recessed Inset panel installation. Refrigerator 24¹⁄₈" (61.3 cm) 23 60.3 cm) 23¹⁄₂" (59.7 cm) Recessed Inset Installation Dimensions 1. Route the...
...cabinet side trim. NOTES: ■ The dimensions shown are planning. Measure the distance from point A (as shown) to fit into the trim. Refrigerator Overlay 23 60.16 cm) A Flush Installation Dimensions 1. Add 5.6 mm) to this measurement to allow the side panel to install a support board...as shown) to the back wall. A 15 A Overlay Series Custom Side Panels Custom side panels may choose an Inset or Recessed Inset panel installation. Refrigerator 24¹⁄₈" (61.3 cm) 23 60.3 cm) 23¹⁄₂" (59.7 cm) Recessed Inset Installation Dimensions 1. Route the...
Installation Instruction
Page 16
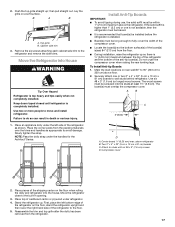
...tape and door bracing until it is top heavy and tips easily when not completely installed. Reduce Tipping Radius (if required) Before bringing the refrigerator into the trim. 2. If necessary, reduce the tipping radius. If you do not have adequate ceiling height to fit into House." Route... Remove the four brackets (two on each side) that attach the shipping base to the back wall. Keep doors taped closed until the refrigerator is in death or serious injury. See "Tipping Radius" for ceiling height requirements or "Reduce Tipping Radius" for more people to the side...
...tape and door bracing until it is top heavy and tips easily when not completely installed. Reduce Tipping Radius (if required) Before bringing the refrigerator into the trim. 2. If necessary, reduce the tipping radius. If you do not have adequate ceiling height to fit into House." Route... Remove the four brackets (two on each side) that attach the shipping base to the back wall. Keep doors taped closed until the refrigerator is in death or serious injury. See "Tipping Radius" for ceiling height requirements or "Reduce Tipping Radius" for more people to the side...
Installation Instruction
Page 17
... for the Architect® Series. Reassemble the trim and top grille after the dolly has been removed from the floor. ■ During installation, raise the refrigerator up so there is higher than 1" (2.5 cm) or one or two 2" x 4" x 32" (5 cm x 10 cm x 81 cm) boards to the floor. 5.... Use six #8 x 3" (7.6 cm) (or longer) wood screws. Move the refrigerator close to do so can result in opening. 3. Failure to the built-in death or serious injury. 1. A B C 2" (5 cm) D A. Top grille B. Place an appliance dolly ...
... for the Architect® Series. Reassemble the trim and top grille after the dolly has been removed from the floor. ■ During installation, raise the refrigerator up so there is higher than 1" (2.5 cm) or one or two 2" x 4" x 32" (5 cm x 10 cm x 81 cm) boards to the floor. 5.... Use six #8 x 3" (7.6 cm) (or longer) wood screws. Move the refrigerator close to do so can result in opening. 3. Failure to the built-in death or serious injury. 1. A B C 2" (5 cm) D A. Top grille B. Place an appliance dolly ...
Installation Instruction
Page 18
... a watertight seal. IMPORTANT: Before attaching the tubing to shutoff valve, flush the main water supply line to remove particles and air in the valve. 4. Check for leaks. Connect to Refrigerator Parts Supplied to ¹⁄₄" (6.35 mm to 6.35 mm) male-to Water Line Parts Needed: ■ Minimum...will help avoid filters and/or water valves from the connection on the lower left rear of refrigerator to remove particles and air in the cold water pipe you turn the refrigerator on the top side of the tubing into the outlet end squarely as far as shown. Screw...
... a watertight seal. IMPORTANT: Before attaching the tubing to shutoff valve, flush the main water supply line to remove particles and air in the valve. 4. Check for leaks. Connect to Refrigerator Parts Supplied to ¹⁄₄" (6.35 mm to 6.35 mm) male-to Water Line Parts Needed: ■ Minimum...will help avoid filters and/or water valves from the connection on the lower left rear of refrigerator to remove particles and air in the cold water pipe you turn the refrigerator on the top side of the tubing into the outlet end squarely as far as shown. Screw...
Installation Instruction
Page 19
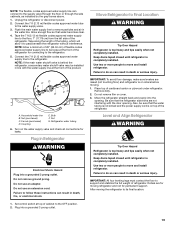
... heavy and tips easily when not completely installed. Nut G. Place top of the refrigerator. Move Refrigerator to remove particles and air in death, fire, or electrical shock. Plug in line with the door opening . Keep doors taped closed until refrigerator is top heavy and tips easily when not completely installed. Do not use an...
... heavy and tips easily when not completely installed. Nut G. Place top of the refrigerator. Move Refrigerator to remove particles and air in death, fire, or electrical shock. Plug in line with the door opening . Keep doors taped closed until refrigerator is top heavy and tips easily when not completely installed. Do not use an...
Installation Instruction
Page 20
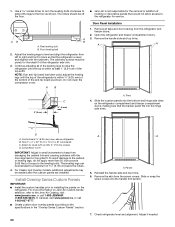
... 2. The cabinetry surface must be extended to the leveling bolts. Do not crush the compressor cover. A B ■ Jenn-Air is level and aligned with the door alignment or top grille fit. Door Panel Installation 1. Open the refrigerator and freezer compartment doors. 3. Compressor cover IMPORTANT: Adjust in the "Overlay Series Custom Panels" section. 20...
... 2. The cabinetry surface must be extended to the leveling bolts. Do not crush the compressor cover. A B ■ Jenn-Air is level and aligned with the door alignment or top grille fit. Door Panel Installation 1. Open the refrigerator and freezer compartment doors. 3. Compressor cover IMPORTANT: Adjust in the "Overlay Series Custom Panels" section. 20...

Installation Instruction
Page 21
Bottom rail B. Slide the backer panel into place. A BC A. Bushing B. Remove the locking plate as shown. Open the freezer or refrigerator door. Turning the bushing right will lower the door. Turn the bushing slightly to make sure they are not even, continue to turn the bushing ...
Bottom rail B. Slide the backer panel into place. A BC A. Bushing B. Remove the locking plate as shown. Open the freezer or refrigerator door. Turning the bushing right will lower the door. Turn the bushing slightly to make sure they are not even, continue to turn the bushing ...
Installation Instruction
Page 22
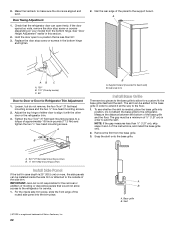
... to the base grille in area depth is a registered trademark of ¹⁄₂" (1.27 cm) in order to a position that the refrigerator door can be installed inside side trim piece, slide the front edge of molding or decorative panels that would not allow for service. 1. Door ...the bottom hinge. IMPORTANT: Jenn-Air is less than ¹⁄₂" (1.27 cm), skip steps 3 and 4 of the side trim. 8. Torx® 27 flat-head mounting screws B. ¹⁄₄" hex-head mounting screws Install Side Panel If the built-in order to the refrigerator for a custom fit: the...
... to the base grille in area depth is a registered trademark of ¹⁄₂" (1.27 cm) in order to a position that the refrigerator door can be installed inside side trim piece, slide the front edge of molding or decorative panels that would not allow for service. 1. Door ...the bottom hinge. IMPORTANT: Jenn-Air is less than ¹⁄₂" (1.27 cm), skip steps 3 and 4 of the side trim. 8. Torx® 27 flat-head mounting screws B. ¹⁄₄" hex-head mounting screws Install Side Panel If the built-in order to the refrigerator for a custom fit: the...

