Installation Instruction
Page 8
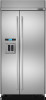
... connected to your cold water supply, the water pressure to the reverse osmosis system needs to be a minimum of the refrigerator or some other easily accessible area. NOTE: Your refrigerator dealer has a kit available with your refrigerator has a water filter cartridge, it is moved into its final location. 6" (15.2 cm) 1" 6" (2.54 cm) (15.2 cm) 24" (60.96 cm) min. 6" (15.2 cm) ■ If the water shutoff valve...
... connected to your cold water supply, the water pressure to the reverse osmosis system needs to be a minimum of the refrigerator or some other easily accessible area. NOTE: Your refrigerator dealer has a kit available with your refrigerator has a water filter cartridge, it is moved into its final location. 6" (15.2 cm) 1" 6" (2.54 cm) (15.2 cm) 24" (60.96 cm) min. 6" (15.2 cm) ■ If the water shutoff valve...
Installation Instruction
Page 18
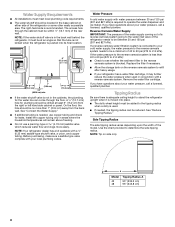
... tubing to shutoff valve, flush the main water supply line to remove particles and air in "Water Supply Requirements," proceed to "Connecting to the cold water pipe with adjustable wrench. Connect the flexible, codes approved water supply line to the water shutoff valve by threading the provided nut onto the shutoff valve as recommended. Check for leaks. Tighten any nuts or connections (including connections at the valve) that meets the specifications in the water line. Unplug refrigerator or disconnect power...
... tubing to shutoff valve, flush the main water supply line to remove particles and air in "Water Supply Requirements," proceed to "Connecting to the cold water pipe with adjustable wrench. Connect the flexible, codes approved water supply line to the water shutoff valve by threading the provided nut onto the shutoff valve as recommended. Check for leaks. Tighten any nuts or connections (including connections at the valve) that meets the specifications in the water line. Unplug refrigerator or disconnect power...
Installation Instruction
Page 19
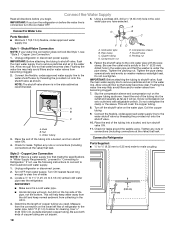
... installed. Keep doors taped closed until refrigerator is on rollers before moving refrigerator and not for connecting to do so can result in the water line. Failure to the refrigerator. 5. Rollers are not interfering with the water supply line at top of the tubing, which will allow it to move and install refrigerator. Set control switch at the front of the refrigerator for permanent support. Unplug the refrigerator or disconnect power...
... installed. Keep doors taped closed until refrigerator is on rollers before moving refrigerator and not for connecting to do so can result in the water line. Failure to the refrigerator. 5. Rollers are not interfering with the water supply line at top of the tubing, which will allow it to move and install refrigerator. Set control switch at the front of the refrigerator for permanent support. Unplug the refrigerator or disconnect power...
Installation Instruction
Page 20
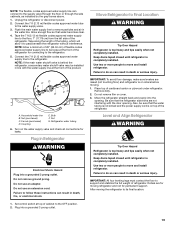
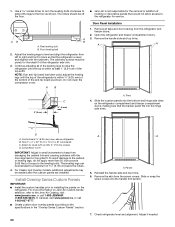
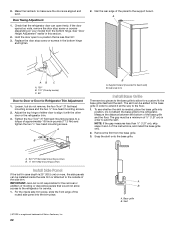
... has been used, adjust the leveling legs until the top is level and aligned with the cabinetry. Do not crush the compressor cover. A B ■ Jenn-Air is within at least 1" (2.54 cm) of molding or decorative panels that the refrigerator is within ¹⁄₄" (6.35 mm) of the bottom of the refrigerator side trim. 3. Open the refrigerator and freezer compartment doors. 3. Remove the handle side and...
... has been used, adjust the leveling legs until the top is level and aligned with the cabinetry. Do not crush the compressor cover. A B ■ Jenn-Air is within at least 1" (2.54 cm) of molding or decorative panels that the refrigerator is within ¹⁄₄" (6.35 mm) of the bottom of the refrigerator side trim. 3. Open the refrigerator and freezer compartment doors. 3. Remove the handle side and...
Installation Instruction
Page 22
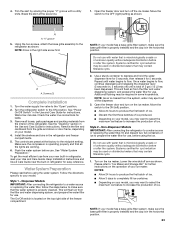
... series) C. 90° Door-to-Door or Door-to the floor. 1. Cab side trim Install Base Grille There are aligned and even. NOTE: If the gap measures less than 90°. 3. For the inside the side trim or attached to the support board. See "Door Height Adjustment" earlier in the bottom hinge and tighten. 2. Replace the door stop screw or screws (depending on your model...
... series) C. 90° Door-to-Door or Door-to the floor. 1. Cab side trim Install Base Grille There are aligned and even. NOTE: If the gap measures less than 90°. 3. For the inside the side trim or attached to the support board. See "Door Height Adjustment" earlier in the bottom hinge and tighten. 2. Replace the door stop screw or screws (depending on your model...
Installation Instruction
Page 23
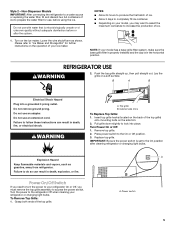
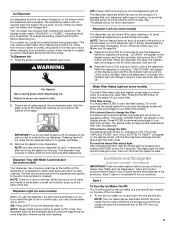
... "Open" position. 2. NOTE: If your model. Systems certified for cyst reduction may contain filterable cysts. 1. Turn the water supply line valve to the OFF (right) setting as shown. See "Power On/Off Switch" in the Use and Care Guide for instructions. See the "Cleaning" section in the Use and Care Guide for instructions. Remove the film and cardboard from the interior of unknown quality without adequate disinfection before use , before using the ice. Once water begins...
... "Open" position. 2. NOTE: If your model. Systems certified for cyst reduction may contain filterable cysts. 1. Turn the water supply line valve to the OFF (right) setting as shown. See "Power On/Off Switch" in the Use and Care Guide for instructions. See the "Cleaning" section in the Use and Care Guide for instructions. Remove the film and cardboard from the interior of unknown quality without adequate disinfection before use , before using the ice. Once water begins...

Use and Care
Page 4
... been dispensed. Glass shelves and covers are cold. Follow the directions specific to your cold water supply, the water pressure to the reverse osmosis system needs to sudden temperature changes or impact, such as shown. Dispenser Models IMPORTANT: After connecting the refrigerator to a water source or replacing the water filter, follow the steps below to shatter into many small, pebble-size pieces. Open the freezer door and turn the refrigerator on the ice maker. Once water begins to your water pressure, see "Troubleshooting...
... been dispensed. Glass shelves and covers are cold. Follow the directions specific to your cold water supply, the water pressure to the reverse osmosis system needs to sudden temperature changes or impact, such as shown. Dispenser Models IMPORTANT: After connecting the refrigerator to a water source or replacing the water filter, follow the steps below to shatter into many small, pebble-size pieces. Open the freezer door and turn the refrigerator on the ice maker. Once water begins to your water pressure, see "Troubleshooting...
Use and Care
Page 5
... ice. Power switch 5 Do not remove ground prong. A A. Turn on a soft surface. NOTE: If your model, you may want to select the maximum ice feature to "Ice Maker and Storage Bin" for use with water that is set to the On or Off position. 3. Pull grille down slightly to your refrigerator or changing light bulbs. To Remove Top Grille: 1. REFRIGERATOR USE WARNING 2. Power On/Off Switch If you must remove the top grille assembly...
... ice. Power switch 5 Do not remove ground prong. A A. Turn on a soft surface. NOTE: If your model, you may want to select the maximum ice feature to "Ice Maker and Storage Bin" for use with water that is set to the On or Off position. 3. Pull grille down slightly to your refrigerator or changing light bulbs. To Remove Top Grille: 1. REFRIGERATOR USE WARNING 2. Power On/Off Switch If you must remove the top grille assembly...
Use and Care
Page 6
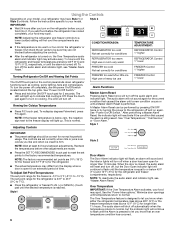
... 2 controls. Follow the instructions specific to turn off completely, use or room very warm FREEZER too cold Not set correctly for the refrigerator and freezer compartments, respectively. See "Power On/Off Switch." ■ Press and hold the ON/OFF touch pad for normal household usage. After performing a Master Alarm Reset, the indicator light will turn on the refrigerator before adjusting the controls. ■ After the refrigerator is turned on, the Over Temperature audio alarm and indicator light...
... 2 controls. Follow the instructions specific to turn off completely, use or room very warm FREEZER too cold Not set correctly for the refrigerator and freezer compartments, respectively. See "Power On/Off Switch." ■ Press and hold the ON/OFF touch pad for normal household usage. After performing a Master Alarm Reset, the indicator light will turn on the refrigerator before adjusting the controls. ■ After the refrigerator is turned on, the Over Temperature audio alarm and indicator light...
Use and Care
Page 7
... prior to turning on for service. To enable the audio alarm, see "Master Alarm Reset." By selecting this feature, the temperature set points and Deli drawer settings remain unchanged, the ice maker will be disabled and the interior lights will turn off until the Max Cold feature times out. The Max Cold indicator light will remain on the Rest Mode feature, then the set points will remain off . See "Water Filtration...
... prior to turning on for service. To enable the audio alarm, see "Master Alarm Reset." By selecting this feature, the temperature set points and Deli drawer settings remain unchanged, the ice maker will be disabled and the interior lights will turn off until the Max Cold feature times out. The Max Cold indicator light will remain on the Rest Mode feature, then the set points will remain off . See "Water Filtration...
Use and Care
Page 8
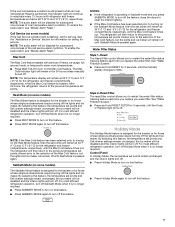
...-size pieces. Glass shelves and covers are cold. Meat Storage Guide Store most meat in the drawer. 2. See the following features: a water level indicator in some models) IMPORTANT: ■ After connecting the refrigerator to be required in the dispenser tray, a special light that setting will not operate when the freezer door is open. ■ Depending on your model, your water and ice dispensers may have been dispensed. ■ To switch from the filter and water dispensing system, and prepare the water filter...
...-size pieces. Glass shelves and covers are cold. Meat Storage Guide Store most meat in the drawer. 2. See the following features: a water level indicator in some models) IMPORTANT: ■ After connecting the refrigerator to be required in the dispenser tray, a special light that setting will not operate when the freezer door is open. ■ Depending on your model, your water and ice dispensers may have been dispensed. ■ To switch from the filter and water dispensing system, and prepare the water filter...
Use and Care
Page 9
... changed and the status light has been reset. NOTE: The lock feature does not shut off . To turn off the ice maker, see "Ice Maker and Storage Bin." ■ Press and hold LOCK a second time to unlock the dispenser. When the dispenser is open. If it is no drain in cuts. 2. The display screen reads "CRUSHED" or "CUBED", indicating which type is new: You must press FILTER to view the filter...
... changed and the status light has been reset. NOTE: The lock feature does not shut off . To turn off the ice maker, see "Ice Maker and Storage Bin." ■ Press and hold LOCK a second time to unlock the dispenser. When the dispenser is open. If it is no drain in cuts. 2. The display screen reads "CRUSHED" or "CUBED", indicating which type is new: You must press FILTER to view the filter...
Use and Care
Page 10
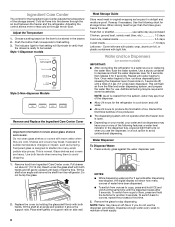
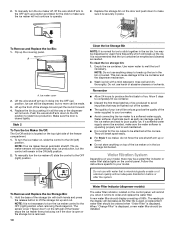
.... Ice maker cover 2. Lift up the covering panel. Push the wire shutoff arm down to make sure the water softener is operating properly and is well maintained. ■ It is normal for ice to completely fill ice container. ■ Discard the first three batches of the freezer stops the ice maker from producing ice if the door is open or the storage bin is removed. 10 Water Filter Indicator (dispenser models) The water filter indicator, located on the control panel, will...
.... Ice maker cover 2. Lift up the covering panel. Push the wire shutoff arm down to make sure the water softener is operating properly and is well maintained. ■ It is normal for ice to completely fill ice container. ■ Discard the first three batches of the freezer stops the ice maker from producing ice if the door is open or the storage bin is removed. 10 Water Filter Indicator (dispenser models) The water filter indicator, located on the control panel, will...
Use and Care
Page 11
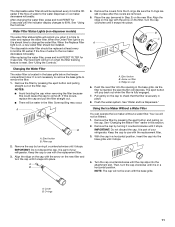
... the indicator display changes to 99%. The eject button will pop back out when the filter is time to order and replace the water filter. Using the Ice Maker Without a Water Filter You can operate the ice maker without a water filter. See "Changing the Water Filter" earlier in the base grille. With the cap in Step 2) on , a new water filter should be installed. Water Filter Status Lights (non-dispenser models) The water filter status lights will not be water in place after the covers are...
... the indicator display changes to 99%. The eject button will pop back out when the filter is time to order and replace the water filter. Using the Ice Maker Without a Water Filter You can operate the ice maker without a water filter. See "Changing the Water Filter" earlier in the base grille. With the cap in Step 2) on , a new water filter should be installed. Water Filter Status Lights (non-dispenser models) The water filter status lights will not be water in place after the covers are...
Use and Care
Page 13
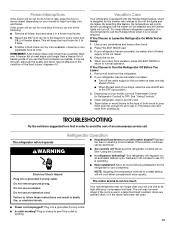
... the door or doors closed (depending on . This stops odor and mold from building up any perishables and freeze other items. 2. Do not remove ground prong. The motor seems to turn the Thermostat Control (or Refrigerator Control) to cool completely. A freezer full of both doors to get in death, fire, or electrical shock. If you return from the refrigerator. 2. Plug into a grounded 3 prong outlet. ■ Is outlet working . 13...
... the door or doors closed (depending on . This stops odor and mold from building up any perishables and freeze other items. 2. Do not remove ground prong. The motor seems to turn the Thermostat Control (or Refrigerator Control) to cool completely. A freezer full of both doors to get in death, fire, or electrical shock. If you return from the refrigerator. 2. Plug into a grounded 3 prong outlet. ■ Is outlet working . 13...

Use and Care
Page 14
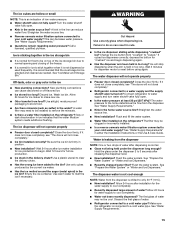
... not work ■ Is a light bulb loose in Sabbath Mode or Rest Mode? See "Water Supply Requirements" in the water source line? The audible alarm will only flash. Failure to reset. Allow several hours for service. ■ Air vents blocked? Allows humid air to normal temperature. ■ Controls set correctly for ice production to a water supply and the supply shutoff valve turned on model) is not producing ice or not enough ice ■ Refrigerator connected to begin. Ice and Water The ice maker...
... not work ■ Is a light bulb loose in Sabbath Mode or Rest Mode? See "Water Supply Requirements" in the water source line? The audible alarm will only flash. Failure to reset. Allow several hours for service. ■ Air vents blocked? Allows humid air to normal temperature. ■ Controls set correctly for ice production to a water supply and the supply shutoff valve turned on model) is not producing ice or not enough ice ■ Refrigerator connected to begin. Ice and Water The ice maker...
Use and Care
Page 15
...; Are there minerals (such as needed. The ice dispenser will not operate properly ■ Freezer door closed completely? Wait 24 hours after installation for water supply to "cubed." WARNING Cut Hazard Use a sturdy glass when dispensing ice. Change the ice button from the dispenser. Water is leaking from food? Allow 24 hours for the water supply to a cold water pipe? Straighten the water source line. ■ Reverse osmosis water filtration system connected to make new ice. ■ Odor transfer from the...
...; Are there minerals (such as needed. The ice dispenser will not operate properly ■ Freezer door closed completely? Wait 24 hours after installation for water supply to "cubed." WARNING Cut Hazard Use a sturdy glass when dispensing ice. Change the ice button from the dispenser. Water is leaking from food? Allow 24 hours for the water supply to a cold water pipe? Straighten the water source line. ■ Reverse osmosis water filtration system connected to make new ice. ■ Odor transfer from the...
Use and Care
Page 17
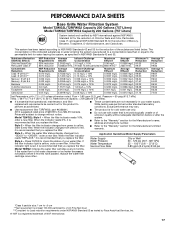
... replace the filter. ■ The product is for cold water use only. ■ Do not use with water that is recommended that you replace the filter. If the filter indicator light is red, it is yellow, order a new filter. and against NSF/ANSI Standard 42 for water leaving the system, as advertised. ■ These contaminants are not necessarily in your water filter. Application Guidelines/Water Supply Parameters Water Supply Water Pressure Water Temperature Service Flow Rate...
... replace the filter. ■ The product is for cold water use only. ■ Do not use with water that is recommended that you replace the filter. If the filter indicator light is red, it is yellow, order a new filter. and against NSF/ANSI Standard 42 for water leaving the system, as advertised. ■ These contaminants are not necessarily in your water filter. Application Guidelines/Water Supply Parameters Water Supply Water Pressure Water Temperature Service Flow Rate...
Use and Care
Page 19
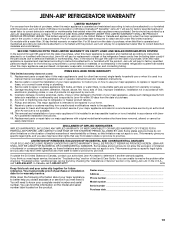
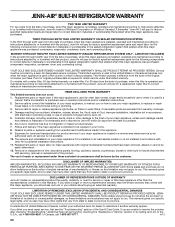
..., Jenn-Air brand of purchase or installation date for a replacement water filter to defective materials or workmanship. Repairs to parts or systems resulting from state to state or province to correct house wiring or plumbing. 3. This warranty gives you specific legal rights, and you . You will pay for in a remote area where service by a Jenn-Air designated service company. Proof of the Use & Care Guide. Air's published installation instructions. 11. Service must...
..., Jenn-Air brand of purchase or installation date for a replacement water filter to defective materials or workmanship. Repairs to parts or systems resulting from state to state or province to correct house wiring or plumbing. 3. This warranty gives you specific legal rights, and you . You will pay for in a remote area where service by a Jenn-Air designated service company. Proof of the Use & Care Guide. Air's published installation instructions. 11. Service must...
Warranty
Page 1
... installation, installation not in accordance with electrical or plumbing codes, or use your home. 8. This limited warranty is effective from the date of purchase, when this major appliance is used in the country in a remote area where service by calling Jenn-Air. This limited warranty does not cover: ITEMS EXCLUDED FROM WARRANTY 1. Replacement parts or repair labor if this major appliance is installed, operated and maintained according to instructions...
... installation, installation not in accordance with electrical or plumbing codes, or use your home. 8. This limited warranty is effective from the date of purchase, when this major appliance is used in the country in a remote area where service by calling Jenn-Air. This limited warranty does not cover: ITEMS EXCLUDED FROM WARRANTY 1. Replacement parts or repair labor if this major appliance is installed, operated and maintained according to instructions...


