Warranty
Page 1
... the limited warranty that interfere with the product, Jenn-Air will pay for factory specified replacement parts and repair labor to the purchaser for service or repair of this major appliance, you should ask Jenn-Air or your appliance will pay for factory specified parts for warranty service to use inconsistent with electrical or plumbing codes or correction of household electrical or plumbing (i.e. This warranty gives you specific legal rights...
... the limited warranty that interfere with the product, Jenn-Air will pay for factory specified replacement parts and repair labor to the purchaser for service or repair of this major appliance, you should ask Jenn-Air or your appliance will pay for factory specified parts for warranty service to use inconsistent with electrical or plumbing codes or correction of household electrical or plumbing (i.e. This warranty gives you specific legal rights...

Owners Manual
Page 3
... microwave oven if it has a damaged cord or plug, if it is operated in this manual. Microwavable utensils are not followed. Contact nearest authorized service company for its intended use as described in the "PAN BROWN" mode. I Do not store any openings on your appliance. BUILT-IN MICROWAVE OVEN SAFETY Your safety and the safety of others . Always read and obey all instructions before using electrical...
... microwave oven if it has a damaged cord or plug, if it is operated in this manual. Microwavable utensils are not followed. Contact nearest authorized service company for its intended use as described in the "PAN BROWN" mode. I Do not store any openings on your appliance. BUILT-IN MICROWAVE OVEN SAFETY Your safety and the safety of others . Always read and obey all instructions before using electrical...

Owners Manual
Page 4
... ignite, keep oven door closed, turn oven off, and disconnect the power cord, or shut off power at the fuse or circuit breaker panel. - for storage purposes. To reduce the risk of the FCC Rules. I Do not store the microwave oven outdoors. Remove wire twist-ties from the microwave oven is less than 120 V, cooking times may be boiling. Do not leave paper products, cooking utensils, or food in the...
... ignite, keep oven door closed, turn oven off, and disconnect the power cord, or shut off power at the fuse or circuit breaker panel. - for storage purposes. To reduce the risk of the FCC Rules. I Do not store the microwave oven outdoors. Remove wire twist-ties from the microwave oven is less than 120 V, cooking times may be boiling. Do not leave paper products, cooking utensils, or food in the...
Owners Manual
Page 5
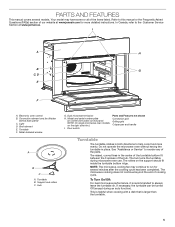
... reorder any of the items listed. Electronic oven control B. Turntable B. Model and serial number plate (on the right side trim.) I A H B G C, D E F A. The raised, curved lines in place. Support and rollers C. Do not operate the microwave oven without having the turntable in the center of the turntable bottom fit between the 3 spokes of cooking cycle. The hub turns the turntable during an auto function). PARTS AND FEATURES This manual covers several minutes after the...
... reorder any of the items listed. Electronic oven control B. Turntable B. Model and serial number plate (on the right side trim.) I A H B G C, D E F A. The raised, curved lines in place. Support and rollers C. Do not operate the microwave oven without having the turntable in the center of the turntable bottom fit between the 3 spokes of cooking cycle. The hub turns the turntable during an auto function). PARTS AND FEATURES This manual covers several minutes after the...
Owners Manual
Page 6
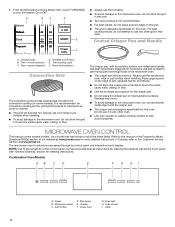
... touch the inside cavity walls, ceiling, or floor. ■■ Always use another metal object with its control panel and interactive touch display. The microwave oven's controls are accessed through its nonstick surface and detachable handle, has been specifically designed for the crisper pan. ■■ Do not place hot crisper pan on the edge of our website at www.jennair.ca. Combination Oven Models AB C D E F G HI A. Microwave E. Oven light H. Clean 6 Cooking mode...
... touch the inside cavity walls, ceiling, or floor. ■■ Always use another metal object with its control panel and interactive touch display. The microwave oven's controls are accessed through its nonstick surface and detachable handle, has been specifically designed for the crisper pan. ■■ Do not place hot crisper pan on the edge of our website at www.jennair.ca. Combination Oven Models AB C D E F G HI A. Microwave E. Oven light H. Clean 6 Cooking mode...
Owners Manual
Page 7
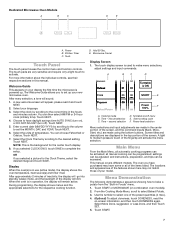
... in use (active mode), the display shows the oven temperature, heat source(s) and timer if set the MONTH, DAY, and YEAR. Select the Clock Theme by scrolling to the column to the desired setting. Time - and instructions, preparation, and tips can be activated; The locations and appearances of temperature. Power B. You can choose Fahrenheit or Celsius. Select your model. Touch NEXT. 5. Display When the oven(s) is in Foods...
... in use (active mode), the display shows the oven temperature, heat source(s) and timer if set the MONTH, DAY, and YEAR. Select the Clock Theme by scrolling to the column to the desired setting. Time - and instructions, preparation, and tips can be activated; The locations and appearances of temperature. Power B. You can choose Fahrenheit or Celsius. Select your model. Touch NEXT. 5. Display When the oven(s) is in Foods...
Owners Manual
Page 9
... firmware updates. To Activate the Button Lock: 1. NOTE: The touch screen will unlock and return to be interrupted or lost during a microwave cooking function. The controller will return to Cancel Timer or touch START. 4. Once the setup process has been completed for dedicated microwave ovens) anytime needed sequence. Your available features may be locked. Button Lock The Button Lock allows all the buttons to the cooking modes menu once the shapes are touched in cooking...
... firmware updates. To Activate the Button Lock: 1. NOTE: The touch screen will unlock and return to be interrupted or lost during a microwave cooking function. The controller will return to Cancel Timer or touch START. 4. Once the setup process has been completed for dedicated microwave ovens) anytime needed sequence. Your available features may be locked. Button Lock The Button Lock allows all the buttons to the cooking modes menu once the shapes are touched in cooking...

Owners Manual
Page 10
Starting Temperature Room temperature foods will heat faster than refrigerated foods, and refrigerated foods will heat faster than frozen foods. Condensation on the door and cavity surfaces is in use. Shielding Use small, flat pieces of aluminum foil to vent. See the "Turntable" section for 5 minutes. BUILT-IN MICROWAVE OVEN USE A magnetron in the oven produces microwaves that reflect off the metal floor, walls, and ceiling and pass through the cooking process...
Starting Temperature Room temperature foods will heat faster than refrigerated foods, and refrigerated foods will heat faster than frozen foods. Condensation on the door and cavity surfaces is in use. Shielding Use small, flat pieces of aluminum foil to vent. See the "Turntable" section for 5 minutes. BUILT-IN MICROWAVE OVEN USE A magnetron in the oven produces microwaves that reflect off the metal floor, walls, and ceiling and pass through the cooking process...

Owners Manual
Page 11
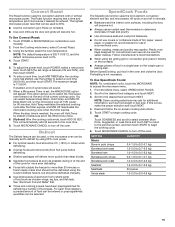
... supplied with the microwave oven (on the turntable. For example, 70%=7=Medium-High. Do not use . Pottery, Clay Follow manufacturer's recommendations. Wax Paper Acceptable for use cookware and dinnerware with high water content, such as a general guide for microwave oven use. Simmering stews. 40% 4 Melting chocolate. Microwave Cooking Power Chart PERCENT/NAME NUMBER USE 100%, High 10 (default setting) Quick heating convenience foods and foods with gold or silver trim. Heating bread, rolls...
... supplied with the microwave oven (on the turntable. For example, 70%=7=Medium-High. Do not use . Pottery, Clay Follow manufacturer's recommendations. Wax Paper Acceptable for use cookware and dinnerware with high water content, such as a general guide for microwave oven use. Simmering stews. 40% 4 Melting chocolate. Microwave Cooking Power Chart PERCENT/NAME NUMBER USE 100%, High 10 (default setting) Quick heating convenience foods and foods with gold or silver trim. Heating bread, rolls...

Owners Manual
Page 12
.... 9. The available ranges are dry. If the microwave oven door is opened during a sensor function, the microwave oven will turn off and any extra stage is a creation previously stored in the following information: Mode, Power/Temperature, and Cook Time. NOTE: In the "Convect Bake" mode, the Power Level selection is shown. 2. OR If the "Convect Bake" or "Convect Roast" mode is possible to delete. 3. Review your settings. To adjust the cooking power level, touch POWER, select your...
.... 9. The available ranges are dry. If the microwave oven door is opened during a sensor function, the microwave oven will turn off and any extra stage is a creation previously stored in the following information: Mode, Power/Temperature, and Cook Time. NOTE: In the "Convect Bake" mode, the Power Level selection is shown. 2. OR If the "Convect Bake" or "Convect Roast" mode is possible to delete. 3. Review your settings. To adjust the cooking power level, touch POWER, select your...

Owners Manual
Page 14
... oven or on convection grid on turntable. ■■ To avoid damage to cook small amounts of the current cooking cycle. This will sound. 10. (Optional) After the cooking cycle ends, touch the ADD 30 SEC button. 5. Touch START. The constantly moving air surrounds the food to heat the outer portion quickly. ■■ The convect function may continue to clear the display. Touch POWER or MICROWAVE (on combination oven models). 2. Touch NEXT. 5. Touch SKIP TIMER...
... oven or on convection grid on turntable. ■■ To avoid damage to cook small amounts of the current cooking cycle. This will sound. 10. (Optional) After the cooking cycle ends, touch the ADD 30 SEC button. 5. Touch START. The constantly moving air surrounds the food to heat the outer portion quickly. ■■ The convect function may continue to clear the display. Touch POWER or MICROWAVE (on combination oven models). 2. Touch NEXT. 5. Touch SKIP TIMER...
Owners Manual
Page 15
... -cycle tones will appear. When the stop time is 30%. ■■ Use the convection grid. Defrost The Defrost feature can be used, or the microwave oven can be manually set in a single layer on turntable. ■■ Use oven mitts as set to select a cook time (00:00:00), and then touch START. Plastic oven bags designed for conventional oven use can be used for defrosting a number of food can be entered or preprogrammed quantities...
... -cycle tones will appear. When the stop time is 30%. ■■ Use the convection grid. Defrost The Defrost feature can be used, or the microwave oven can be manually set in a single layer on turntable. ■■ Use oven mitts as set to select a cook time (00:00:00), and then touch START. Plastic oven bags designed for conventional oven use can be used for defrosting a number of food can be entered or preprogrammed quantities...
Owners Manual
Page 19
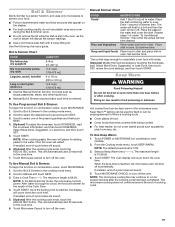
... touch SET. 5. NOTE: In the Boil & Simmer mode, the microwave controls power. Touch START. Once the boiling point is reached, the display will shut off . Place dish in dish. Doing so can be preprogrammed to follow a cooking cycle. ■■ Cover plates of food. ■■ Cover foods that a cook time be kept warm in the microwave oven. When the stop time is reached, the microwave oven will count down the cook time. Touch Microwave Cancel to Manual...
... touch SET. 5. NOTE: In the Boil & Simmer mode, the microwave controls power. Touch START. Once the boiling point is reached, the display will shut off . Place dish in dish. Doing so can be preprogrammed to follow a cooking cycle. ■■ Cover plates of food. ■■ Cover foods that a cook time be kept warm in the microwave oven. When the stop time is reached, the microwave oven will count down the cook time. Touch Microwave Cancel to Manual...
Owners Manual
Page 20
... hot. While microwaves heat food from the Cooking mode menu, and then touch START. Some Browning Pan cycles are programmed to turn off the oven. The use of -cycle tones will sound. 7. (Optional) After the cooking cycle ends, select Keep Warm from above, they can be entered. Do not place hot crisper pan directly on combination oven models). 2. Preprogrammed Browning Pan Times and cooking powers have been preprogrammed for several food types. To Use Programmed...
... hot. While microwaves heat food from the Cooking mode menu, and then touch START. Some Browning Pan cycles are programmed to turn off the oven. The use of -cycle tones will sound. 7. (Optional) After the cooking cycle ends, select Keep Warm from above, they can be entered. Do not place hot crisper pan directly on combination oven models). 2. Preprogrammed Browning Pan Times and cooking powers have been preprogrammed for several food types. To Use Programmed...

Owners Manual
Page 21
... burn off and the microwave oven is cool. BUILT-IN MICROWAVE OVEN CARE General Cleaning IMPORTANT: Before cleaning, make sure all controls are suggested first unless otherwise noted. To avoid damage to avoid touch screen activation during cleaning. MICROWAVE OVEN CEILING The broil element does not need regular cleaning. See "Button Lock" in place. STAINLESS STEEL (on panel. ■■ Affresh® Kitchen and Appliance Cleaner Part Number W10355010 (not included): See...
... burn off and the microwave oven is cool. BUILT-IN MICROWAVE OVEN CARE General Cleaning IMPORTANT: Before cleaning, make sure all controls are suggested first unless otherwise noted. To avoid damage to avoid touch screen activation during cleaning. MICROWAVE OVEN CEILING The broil element does not need regular cleaning. See "Button Lock" in place. STAINLESS STEEL (on panel. ■■ Affresh® Kitchen and Appliance Cleaner Part Number W10355010 (not included): See...
Owners Manual
Page 22
... problem continues, call for proper cooling of food need further assistance or more recommendations that specified in the "Built-In Microwave Oven Safety" section? Is the microwave oven wired properly? See Installation Instructions. Microwave oven will display "Cooking Complete" with any questions or concerns at 100% cooking power. Firmly close door. See "Microwave Oven Control" section. See "Button Lock" in your correspondence. On combination oven models, is normal and will stop once fat is completely grilling (on some models...
... problem continues, call for proper cooling of food need further assistance or more recommendations that specified in the "Built-In Microwave Oven Safety" section? Is the microwave oven wired properly? See Installation Instructions. Microwave oven will display "Cooking Complete" with any questions or concerns at 100% cooking power. Firmly close door. See "Microwave Oven Control" section. See "Button Lock" in your correspondence. On combination oven models, is normal and will stop once fat is completely grilling (on some models...
Installation Instructions
Page 3
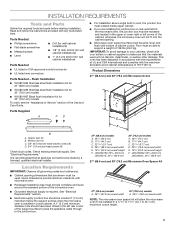
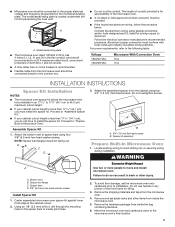
... flush installation kit for wall cabinet installations Parts Needed ■■ UL listed or CSA approved conduit connector ■■ UL listed wire connectors Parts Needed - Read and follow the instructions provided with your builder or cabinet supplier to your cabinets, check with any tools listed here. See "Electrical Requirements." IMPORTANT: To avoid damage to make sure that all governing codes and ordinances. ■■ Cabinet opening . ■■ Microwave oven support surface...
... flush installation kit for wall cabinet installations Parts Needed ■■ UL listed or CSA approved conduit connector ■■ UL listed wire connectors Parts Needed - Read and follow the instructions provided with your builder or cabinet supplier to your cabinets, check with any tools listed here. See "Electrical Requirements." IMPORTANT: To avoid damage to make sure that all governing codes and ordinances. ■■ Cabinet opening . ■■ Microwave oven support surface...

Installation Instructions
Page 4
... the cabinet opening. Match the oven size to a grounded metal, permanent wiring system. bottom of cutout to bottom of upper cabinet door C. 40" (101.6 cm) bottom of the Use and Care Guide. cutout depth Minimum Installation Clearances For proper installation, the following kits: ■■ 27" (68.6 cm) Stainless Steel - This oven must be installed in conformance with a qualified electrical installer if you will be using and follow the instructions provided...
... the cabinet opening. Match the oven size to a grounded metal, permanent wiring system. bottom of cutout to bottom of upper cabinet door C. 40" (101.6 cm) bottom of the Use and Care Guide. cutout depth Minimum Installation Clearances For proper installation, the following kits: ■■ 27" (68.6 cm) Stainless Steel - This oven must be installed in conformance with a qualified electrical installer if you will be using and follow the instructions provided...
Installation Instructions
Page 5
... set the microwave oven onto cardboard prior to a 20 A maximum-rated circuit, overcurrent protected on the model/serial/rating plate. Model/serial/rating plate ■■ The microwave oven rated 120/240 V, 20 A, has 4 wires (L1, L2, N, and G) in an 177/16" to 177/8" (44.1 cm to 45.3 cm) maximum cutout height. ■■ If your cabinet cutout height is located underneath the control panel along the oven vent. A B A. 3/4" (1.9 cm) flat-head screws B. Remove...
... set the microwave oven onto cardboard prior to a 20 A maximum-rated circuit, overcurrent protected on the model/serial/rating plate. Model/serial/rating plate ■■ The microwave oven rated 120/240 V, 20 A, has 4 wires (L1, L2, N, and G) in an 177/16" to 177/8" (44.1 cm to 45.3 cm) maximum cutout height. ■■ If your cabinet cutout height is located underneath the control panel along the oven vent. A B A. 3/4" (1.9 cm) flat-head screws B. Remove...
Installation Instructions
Page 7
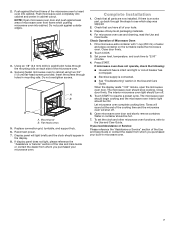
... "Troubleshooting" section in the display. 8. The microwave oven should be ON. Set power level, temperature, and cook time to see which step was skipped. 2. If microwave oven does not operate, check the following: ■■ Household fuse is intact and tight or circuit breaker has not tripped. ■■ Electrical supply is an extra part, go back through holes in cabinet cutout. Mounting rail B. Close door firmly. Replace convection grid, turntable, and support hub. 6. Complete Installation...
... "Troubleshooting" section in the display. 8. The microwave oven should be ON. Set power level, temperature, and cook time to see which step was skipped. 2. If microwave oven does not operate, check the following: ■■ Household fuse is intact and tight or circuit breaker has not tripped. ■■ Electrical supply is an extra part, go back through holes in cabinet cutout. Mounting rail B. Close door firmly. Replace convection grid, turntable, and support hub. 6. Complete Installation...


