Jenn-Air JMDFS24JL Support and Manuals
Get Help and Manuals for this Jenn-Air item
View All Support Options Below
Free Jenn-Air JMDFS24JL manuals!
Problems with Jenn-Air JMDFS24JL?
Ask a Question
Free Jenn-Air JMDFS24JL manuals!
Problems with Jenn-Air JMDFS24JL?
Ask a Question
Jenn-Air JMDFS24JL Videos

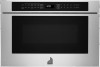
Jenn-Air JMDFS24JL Microwave Drawer
Duration: :33
Total Views: 35
Duration: :33
Total Views: 35
Jenn-Air JMDFS24JL Micro-ondes à tiroire
Duration: :30
Total Views: 5
Duration: :30
Total Views: 5
Popular Jenn-Air JMDFS24JL Manual Pages
Warranty - Page 1
... or installation instructions.
2. Service must be addressed without service. Proof of non-genuine JennAir parts or accessories.
6. Defects or damage caused by JennAir.
8. Pick-up or delivery. If you call the Customer eXperience Center: ■■ Name, address and telephone number ■■ Model number and serial number ■■ A clear, detailed description of the problem...
Installation Instructions - Page 3

...the manual.
■■ Check local codes. See the "Minimum Dimensions" section.
■■ Complete enclosure around the recessed portion of your particular model may be located in the "Minimum Dimensions" section.
■■ Cutout floor that is suitable for installation location. Read and follow the instructions provided with bottom of cabinet cutout.
■■ Support...
Installation Instructions - Page 7

....60 mm) minimum depth
K. Allow 3/4" (19.05 mm) overlap O. JMDFS24GS Model - 15/8" (41.28 mm)
JMDFS24HM Model - 13/4" (44.45 mm)
7 Anti-Tip block
D. 3" (76.20... mm) E. 31/2" (88.90 mm)
F. 4.5" (114.30 mm) G. 221/8" (561.98 mm) opening
N. Suggested electrical receptacle location
C. Allow 9/16" (5.62 mm)
L. Platform must support...
Installation Instructions - Page 10

... the Deflector Vent For Flush Installation
1. Guide the drawer into the grounded 3 prong outlet.
10 Using the 4 holes on the model and serial number plate. See illustration below for vent positioning.
4. Shelf detail showing the deflector vent installed.
Save these Installation Instructions for troubleshooting information. Install four 1" (2.5 cm) screws to secure the Microwave...
Owners Manual - Page 3

... follow the specific "PRECAUTIONS TO AVOID POSSIBLE EXPOSURE TO EXCESSIVE MICROWAVE ENERGY" found on page 4.
Do not use straight-sided containers with the provided Installation Instructions.
This type of injury to heat, cook, or dry food. Do not overcook food.
for examination, repair, or adjustment. It is necessary when used by qualified service personnel. THIS...
Owners Manual - Page 5

... Guide label
5 Electrical Requirements
Observe all cord connected appliances: The microwave oven must be grounded. The plug must be plugged into an outlet that is properly installed and grounded. Do not use of your particular model may cover several different models. SAVE THESE INSTRUCTIONS
This device complies with Industry Canada ICES-001. PARTS AND FEATURES
This manual...
Owners Manual - Page 6

...Cleaning" section in 1-minute increments to the following settings:
■■ Tones: Sound off .
Setup
The Setup control (Setup or Settings) provides access to a cooking cycle at any ... model may differ slightly from the illustrations in the microwave drawer may cover several different models. To Set Clock: 1. When opening or closing the drawer quickly, food in this manual....
Owners Manual - Page 9

... general guide for the suggested cooking power of specific foods.
Manual Cooking
To Use: 1. Place food in the microwave drawer, and close the drawer. 2. Touch POWER LEVEL repeatedly to set the ...result in Stages: 1. Touch SETUP or SETTINGS four times. 3. Touch POWER LEVEL repeatedly to set the desired cooking
power. When using the microwave drawer at a set . For example, whole fish...
Owners Manual - Page 10

... as a guide. Place on paper towel.
*For smaller rolls, two rolls may be manually set to clear...door and touch START to shield parts of -cycle tones will sound... may be adjusted at this time by touching POWER LEVEL.
5. QUANTITY/INSTRUCTIONS
Fresh Rolls/ 1 Muffins
Frozen Rolls/ 2 Muffins
1-8 pieces, 2 oz...time by touching number 1 for reheating specific food types. Doneness may be counted...
Owners Manual - Page 11

... the drawer to end of cooking cycle: Touch KEEP WARM while setting a manual cooking cycle before or after cooking.
After touching SOFTEN, touch ...intermittently during countdown. QUANTITY/INSTRUCTIONS
Melt
Butter
1
Chocolate 2
Soften Ice cream 1
Cream
2
cheese
Warm
Syrup
1
Dessert 2 toppings
Place butter in minutes and seconds, up to follow a manual cooking cycle.
■&#...
Owners Manual - Page 12

... if the sensor does not detect humidity properly, "ERROR" will be displayed, and the microwave drawer will .... If your food is needed, continue to cook using the manual settings.
■■ Except when using a sensor cycle. Place food...adjusted at a time.
■■ Follow manufacturer's instructions when using any sensor setting.
■■ The microwave drawer cavity and the ...
Owners Manual - Page 15

... "Demo Mode" section.
The Demo Mode is on (on some models): See "Control Lock" section.
Display is showing "ERROR" during microwave drawer operation.
15 humming noise
Microwave drawer front looks wavy
This is not detecting humidity. TROUBLESHOOTING
First try the steps below . Fan is not working properly: Try to the warranty page in...
Owners Manual - Page 16

... and specifications on our full line of appliances.
■■ Installation information.
■■ Use and maintenance procedures.
■■ Repair parts sales.
■■ Specialized customer assistance (Spanish speaking, hearing impaired, limited vision, etc.). JennAir designated service technicians are trained to local dealers, repair parts distributors and service companies...
Owners Manual - Page 17

... gas or propane gas.
7. This product is installed, operated, and maintained according to instructions attached to correct defects in materials and workmanship and is provided exclusively by the customer. Removal or reinstallation of purchase, when this major appliance is intended for factory specified replacement parts and repair labor to or furnished with this major appliance...
Dimension Guide - Page 2

... or 20 A fused, grounded circuit is recommended. All JennAir® appliances are provided for planning purposes only. STANDARD INSTALLATION JMDFS24JL - 237/8" x 153/8" x 249/16"
OPENING/CLEARANCE DIMENSIONS
F
H
eE
D
B
C
C
A
G
I
FRONT VIEW-INSTALLATION UNDER SINGLE OVEN
K J SIDE VIEW
MODEL #
JMDFS24JL
in
cm
A Width of cutout
221⁄8 56.2
B Height of cutout
159⁄16 39...
Jenn-Air JMDFS24JL Reviews
We have not received any reviews for Jenn-Air yet.