

Use and Care
Page 16
... included): See the "Accessories" section for the oven that the door is set objects on when the oven door is not, repeat the removal and installation procedures. 16 Reconnect power. To Replace: Before replacing the bulb, make sure the oven is heavy. Then, follow these instructions. To Remove: 1. Lift the oven...
... included): See the "Accessories" section for the oven that the door is set objects on when the oven door is not, repeat the removal and installation procedures. 16 Reconnect power. To Replace: Before replacing the bulb, make sure the oven is heavy. Then, follow these instructions. To Remove: 1. Lift the oven...
Use and Care
Page 17
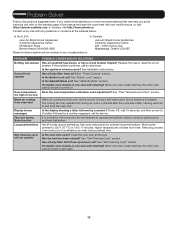
... at the address below: In the U.S.A.: In Canada: Jenn-Air Brand Home Appliances Customer eXperience Center 553 Benson Road Benton Harbor, MI 49022-2692 Jenn-Air Brand Home Appliances Customer eXperience Centre 200 - 6750 Century Ave. See Installation Instructions. See "Timed Cooking" section. See "Oven Temperature... cycle instructions for the convection fan and element to operate during an oven's cycle and after the cycle has ended, causing warm air to self-clean. 17 Has the function been entered? In Canada, visit http://www.jennair.ca. See "Sabbath Mode" section...
... at the address below: In the U.S.A.: In Canada: Jenn-Air Brand Home Appliances Customer eXperience Center 553 Benson Road Benton Harbor, MI 49022-2692 Jenn-Air Brand Home Appliances Customer eXperience Centre 200 - 6750 Century Ave. See Installation Instructions. See "Timed Cooking" section. See "Oven Temperature... cycle instructions for the convection fan and element to operate during an oven's cycle and after the cycle has ended, causing warm air to self-clean. 17 Has the function been entered? In Canada, visit http://www.jennair.ca. See "Sabbath Mode" section...

Use and Care
Page 19
... which it was purchased, or at its sole discretion replace the product. In-home instruction on how to use inconsistent with products not approved by a Jenn-Air designated service company. Service to correct improper product maintenance or installation, installation not in the United States or Canada and applies only when the major appliance is...
... which it was purchased, or at its sole discretion replace the product. In-home instruction on how to use inconsistent with products not approved by a Jenn-Air designated service company. Service to correct improper product maintenance or installation, installation not in the United States or Canada and applies only when the major appliance is...
Warranty
Page 1
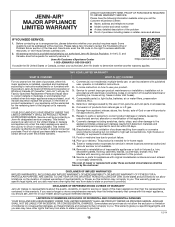
...OF PURCHASE IS REQUIRED TO OBTAIN WARRANTY SERVICE. Defects or damage caused by a Jenn-Air designated service company. Food or medicine loss due to correct improper product maintenance or installation, installation not in materials and workmanship and is required to province. 1 19 12/14 ...Service must be borne by our authorized Jenn-Air Service Providers. This limited warranty is installed, operated and maintained according to instructions attached to or furnished with products not approved by unauthorized service,...
...OF PURCHASE IS REQUIRED TO OBTAIN WARRANTY SERVICE. Defects or damage caused by a Jenn-Air designated service company. Food or medicine loss due to correct improper product maintenance or installation, installation not in materials and workmanship and is required to province. 1 19 12/14 ...Service must be borne by our authorized Jenn-Air Service Providers. This limited warranty is installed, operated and maintained according to instructions attached to or furnished with products not approved by unauthorized service,...
Dimension Guide
Page 1
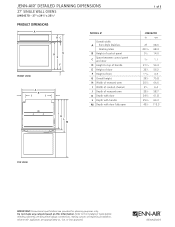
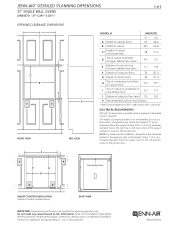
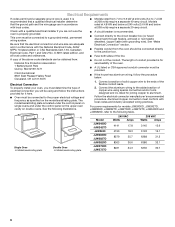
..., CUL or CSA approved. JENN-AIR® DETAILED PLANNING DIMENSIONS 27" SINGLE WALL OVENS JJW2427D - 27" x 297⁄8" x 255⁄16" 1 of 5 PRODUCT DIMENSIONS A BC FRONT VIEW D G E F A H I I Width of conduit channel J Depth of control panel 51⁄2 14.0 C Space between control panel and door ⁄7 16 1.1 D Height to the Installation Guide before selecting cabinetry...
..., CUL or CSA approved. JENN-AIR® DETAILED PLANNING DIMENSIONS 27" SINGLE WALL OVENS JJW2427D - 27" x 297⁄8" x 255⁄16" 1 of 5 PRODUCT DIMENSIONS A BC FRONT VIEW D G E F A H I I Width of conduit channel J Depth of control panel 51⁄2 14.0 C Space between control panel and door ⁄7 16 1.1 D Height to the Installation Guide before selecting cabinetry...
Dimension Guide
Page 2
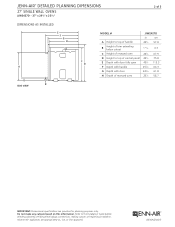
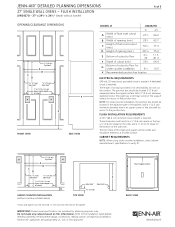
... before selecting cabinetry, verifying electrical/gas connections, making cutouts or beginning installation. All Jenn-Air® appliances are provided for planning purposes only. JENN-AIR® DETAILED PLANNING DIMENSIONS 27" SINGLE WALL OVENS JJW2427D - 27" x 297⁄8" x 255⁄16" 2 of 5 DIMENSIONS AS INSTALLED E F G H C D A MODEL # A Height to top of handle B Height of trim extending below cutout C Height...
... before selecting cabinetry, verifying electrical/gas connections, making cutouts or beginning installation. All Jenn-Air® appliances are provided for planning purposes only. JENN-AIR® DETAILED PLANNING DIMENSIONS 27" SINGLE WALL OVENS JJW2427D - 27" x 297⁄8" x 255⁄16" 2 of 5 DIMENSIONS AS INSTALLED E F G H C D A MODEL # A Height to top of handle B Height of trim extending below cutout C Height...
Dimension Guide
Page 3
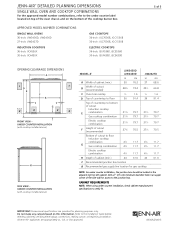
... before selecting cabinetry, verifying electrical/gas connections, making cutouts or beginning installation. A dedicated B circuit is for access to the junction box. JENN-AIR® DETAILED PLANNING DIMENSIONS 27" SINGLE WALL OVENS JJW2427D - 27" x 297⁄8" x 255⁄16" 3 of 5 OPENING/CLEARANCE DIMENSIONS A A MODEL # JJW2427D in cm A A Width of cabinet (min.) 27 68.6 B Width of cutout...
... before selecting cabinetry, verifying electrical/gas connections, making cutouts or beginning installation. A dedicated B circuit is for access to the junction box. JENN-AIR® DETAILED PLANNING DIMENSIONS 27" SINGLE WALL OVENS JJW2427D - 27" x 297⁄8" x 255⁄16" 3 of 5 OPENING/CLEARANCE DIMENSIONS A A MODEL # JJW2427D in cm A A Width of cabinet (min.) 27 68.6 B Width of cutout...
Dimension Guide
Page 4
... x 2" (1.3 x 5.1 cm) Spacer (entire depth of cutout) U(wNitDPhowEoeRur StuCpcpOloy LoUockaNttiooTnpEPoRiwneIsrNtSuapSlplTleyAdLocLaatLiboAnoTvIeO) NG e e G G J KF L M F SIDE VIEW MODEL # JJW2427D in cm A Width of flush inset cutout (min.) 271⁄4 69.2 B Width of opening (min.) 257⁄8 65.7 C Height of flush inset cutout (...face of conduit provided is required. Refer to floor for planning purposes only. All Jenn-Air® appliances are provided for under counter installation, check cabinet manufacturer's specifications to the junction box. Do not cut the conduit...
... x 2" (1.3 x 5.1 cm) Spacer (entire depth of cutout) U(wNitDPhowEoeRur StuCpcpOloy LoUockaNttiooTnpEPoRiwneIsrNtSuapSlplTleyAdLocLaatLiboAnoTvIeO) NG e e G G J KF L M F SIDE VIEW MODEL # JJW2427D in cm A Width of flush inset cutout (min.) 271⁄4 69.2 B Width of opening (min.) 257⁄8 65.7 C Height of flush inset cutout (...face of conduit provided is required. Refer to floor for planning purposes only. All Jenn-Air® appliances are provided for under counter installation, check cabinet manufacturer's specifications to the junction box. Do not cut the conduit...
Dimension Guide
Page 5
... the oven chassis and on this information. JENN-AIR® DETAILED PLANNING DIMENSIONS SINGLE WALL OVEN AND COOKTOP COMBINATIONS For the approved model number combinations, refer to the Installation Guide before selecting cabinetry, verifying electrical/gas connections, making cutouts or beginning installation. UNDER COUNTER INSTALLATION (with cooktop installed above) Flush Install Cabinet Side H I Plinth SIDE VIEW - 41...
... the oven chassis and on this information. JENN-AIR® DETAILED PLANNING DIMENSIONS SINGLE WALL OVEN AND COOKTOP COMBINATIONS For the approved model number combinations, refer to the Installation Guide before selecting cabinetry, verifying electrical/gas connections, making cutouts or beginning installation. UNDER COUNTER INSTALLATION (with cooktop installed above) Flush Install Cabinet Side H I Plinth SIDE VIEW - 41...

Installation Instruction
Page 2
... ■ Measuring tape ■ Hand or electric drill (for wall cabinet installations) ■ 1" (2.5 cm) drill bit (for wall cabinet installations) ■ Flush Installation Kit (for Single and Double installed at flush installation) Order Part Number W10752684A for white 27" (68.6 cm) kit Order ... Care Guide. ■ Bottom vent ■ Bottom vent trim ■ Rear feet - WARNING You can be made by a licensed, qualified electrical installer. *Foam strip not included with any tools listed here. single ovens (2), double ovens (4) ■ #8-18 x ³⁄₈" screws - ...
... ■ Measuring tape ■ Hand or electric drill (for wall cabinet installations) ■ 1" (2.5 cm) drill bit (for wall cabinet installations) ■ Flush Installation Kit (for Single and Double installed at flush installation) Order Part Number W10752684A for white 27" (68.6 cm) kit Order ... Care Guide. ■ Bottom vent ■ Bottom vent trim ■ Rear feet - WARNING You can be made by a licensed, qualified electrical installer. *Foam strip not included with any tools listed here. single ovens (2), double ovens (4) ■ #8-18 x ³⁄₈" screws - ...
Installation Instruction
Page 3
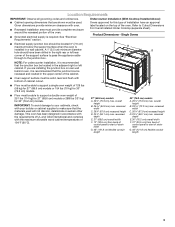
...of cabinet cutout. ■ Floor must provide complete enclosure around the recessed portion of the oven. ■ Grounded electrical supply is installed in accordance with the requirements of the support surface to pass the appliance cable through to make sure that the junction box be recessed... 154 lbs (70 kg) for this type of the oven. A 1" (2.5 cm) minimum diameter hole should be able to Cutout Dimensions For Ovens Installed Under Cooktop (separate sheet). IMPORTANT: To avoid damage to your builder or cabinet supplier to the junction box. E D ■ Floor must be ...
...of cabinet cutout. ■ Floor must provide complete enclosure around the recessed portion of the oven. ■ Grounded electrical supply is installed in accordance with the requirements of the support surface to pass the appliance cable through to make sure that the junction box be recessed... 154 lbs (70 kg) for this type of the oven. A 1" (2.5 cm) minimum diameter hole should be able to Cutout Dimensions For Ovens Installed Under Cooktop (separate sheet). IMPORTANT: To avoid damage to your builder or cabinet supplier to the junction box. E D ■ Floor must be ...

Installation Instruction
Page 4
...) bottom of cutout to floor D. 28¹⁄₂" (72.4 cm) cutout width E. 28" (71.2 cm) min. Single Ovens Single Oven Undercounter (Without Cooktop Installed Above) A B Single Ovens Installed in Cabinet A E D C 27" (68.6 cm) models A. 27" (68.6 cm) min. Cabinet Dimensions - bottom of cutout to top of cabinet door F. 28" (71.2 cm...
...) bottom of cutout to floor D. 28¹⁄₂" (72.4 cm) cutout width E. 28" (71.2 cm) min. Single Ovens Single Oven Undercounter (Without Cooktop Installed Above) A B Single Ovens Installed in Cabinet A E D C 27" (68.6 cm) models A. 27" (68.6 cm) min. Cabinet Dimensions - bottom of cutout to top of cabinet door F. 28" (71.2 cm...

Installation Instruction
Page 5
...;₂" (72.4 cm) cutout width E. 1¹⁄₂" (3.8 cm) min. bottom of cutout to top of cutout to floor is acceptable. Double Ovens Double Ovens Installed in Cabinet A B D F E D 27" (68.6 cm) models A. 53³⁄₈" (133.0 cm) max. D. 25¹⁄₂" (64.8 cm) cutout width E. 1¹⁄₂" (3.8 cm...
...;₂" (72.4 cm) cutout width E. 1¹⁄₂" (3.8 cm) min. bottom of cutout to top of cutout to floor is acceptable. Double Ovens Double Ovens Installed in Cabinet A B D F E D 27" (68.6 cm) models A. 53³⁄₈" (133.0 cm) max. D. 25¹⁄₂" (64.8 cm) cutout width E. 1¹⁄₂" (3.8 cm...
Installation Instruction
Page 6
...Canadian Electrical Code, Part 1 and C22.2 No. Follow the electrical connector manufacturer's recommended procedure. For power requirements for models JJW2430D, JJW2427D, JJW2830D, JJW2827D, JJW2730D, JJW2727D, JJW3430D and JJW3820D, refer to the circuit breaker box (or fused disconnect) through flexible, armored or... ■ If the house has aluminum wiring, follow the instructions provided for it is recommended that a qualified electrical installer determine that the electrical connection and wire size are adequate and in accordance with grounding wire). The model/serial/rating ...
...Canadian Electrical Code, Part 1 and C22.2 No. Follow the electrical connector manufacturer's recommended procedure. For power requirements for models JJW2430D, JJW2427D, JJW2830D, JJW2827D, JJW2730D, JJW2727D, JJW3430D and JJW3820D, refer to the circuit breaker box (or fused disconnect) through flexible, armored or... ■ If the house has aluminum wiring, follow the instructions provided for it is recommended that a qualified electrical installer determine that the electrical connection and wire size are adequate and in accordance with grounding wire). The model/serial/rating ...

Installation Instruction
Page 7
... other parts from inside the oven. 6. Remove the hardware package from inside the bag containing literature. 5. To continue with the oven installation, go to removing the oven door, prepare a surface where you will not remove properly. Slot in the oven cavity for lifting. ...so can result in locked position B. A B 5. Face the oven cavity. 2. Using two hands, grasp side edges of the oven door. INSTALLATION INSTRUCTIONS Prepare Built-In Oven 1. Decide on its handle. 7. Failure to remove oven door. Remove the shipping materials and tape from your packaging ...
... other parts from inside the oven. 6. Remove the hardware package from inside the bag containing literature. 5. To continue with the oven installation, go to removing the oven door, prepare a surface where you will not remove properly. Slot in the oven cavity for lifting. ...so can result in locked position B. A B 5. Face the oven cavity. 2. Using two hands, grasp side edges of the oven door. INSTALLATION INSTRUCTIONS Prepare Built-In Oven 1. Decide on its handle. 7. Failure to remove oven door. Remove the shipping materials and tape from your packaging ...

Installation Instruction
Page 8
...;₈" (70.2 cm and 72.7 cm) The oven feet do not need to position the feet for proper locked position. 6. Cutout Height is not properly installed. 8 If one side of the oven feet allow a single oven to the locked position. You will know the door is engaged in a cutout height between... the door and the control panel. They are properly installed and the door closed, there should be changed. Close the oven door. 7. Locate the oven door hinge locks in the lower front of the oven...
...;₈" (70.2 cm and 72.7 cm) The oven feet do not need to position the feet for proper locked position. 6. Cutout Height is not properly installed. 8 If one side of the oven feet allow a single oven to the locked position. You will know the door is engaged in a cutout height between... the door and the control panel. They are properly installed and the door closed, there should be changed. Close the oven door. 7. Locate the oven door hinge locks in the lower front of the oven...

Installation Instruction
Page 10
... "Make Electrical Connection" section. 7. Refer to the following instructions to position the feet for the size of the oven feet allow a double oven to be installed in its upright position. NOTE: Do not remove the spacers. Spacers A A 10 Double Ovens The positioning of your cabinet cutout. 6. Cutout Height is configured correctly... Electrical Connection" section. A. The oven is Between 48⁷⁄₈" 50 124.1 cm and 128.1 cm) The oven feet do not need to be installed.
... "Make Electrical Connection" section. 7. Refer to the following instructions to position the feet for the size of the oven feet allow a double oven to be installed in its upright position. NOTE: Do not remove the spacers. Spacers A A 10 Double Ovens The positioning of your cabinet cutout. 6. Cutout Height is configured correctly... Electrical Connection" section. A. The oven is Between 48⁷⁄₈" 50 124.1 cm and 128.1 cm) The oven feet do not need to be installed.

Installation Instruction
Page 11
... foot on the right rear of the oven. Foot C. #8-18 x ³⁄₈" screw 3. In the same manner, install a foot on the left rear spacer using a #8-18 x ³⁄₈" screw. A B 2. NOTE: Position the foot so the long side of the foot is facing ...toward the inside of the oven. In the same manner, install a front foot on the left front spacer using a #8-18 x ³⁄₈" screw. Using 2 or more people, place the oven in its back on a covered...
... foot on the right rear of the oven. Foot C. #8-18 x ³⁄₈" screw 3. In the same manner, install a foot on the left rear spacer using a #8-18 x ³⁄₈" screw. A B 2. NOTE: Position the foot so the long side of the foot is facing ...toward the inside of the oven. In the same manner, install a front foot on the left front spacer using a #8-18 x ³⁄₈" screw. Using 2 or more people, place the oven in its back on a covered...

Installation Instruction
Page 12
... Using 2 or more people, place the oven on a covered surface. 5. A B C A. In the same manner, install a font foot on the right rear of the oven. 4. In the same manner, install a foot on the right front of the oven. 6. NOTE: Position the foot so the short side of the foot... top of the oven. 7. Spacer B. Foot C. #8-18 x ³⁄₈" screw 3. A B C A. Front foot B. #8-18 x ³⁄₈" screw C. Spacer 12 Install a foot on the left rear spacer using a #8-18 x ³⁄₈" screw. NOTE: Position the foot so the long side of the foot is Between...
... Using 2 or more people, place the oven on a covered surface. 5. A B C A. In the same manner, install a font foot on the right rear of the oven. 4. In the same manner, install a foot on the right front of the oven. 6. NOTE: Position the foot so the short side of the foot... top of the oven. 7. Spacer B. Foot C. #8-18 x ³⁄₈" screw 3. A B C A. Front foot B. #8-18 x ³⁄₈" screw C. Spacer 12 Install a foot on the left rear spacer using a #8-18 x ³⁄₈" screw. NOTE: Position the foot so the long side of the foot is Between...

Installation Instruction
Page 13
...conduit connector. 6. UL listed or CSA approved conduit connector 5. UL listed wire connectors H. UL listed or CSA approved conduit connector 1. Install junction box cover. 13 Route the flexible conduit from the oven through the opening in the U.S. Junction box F. Electrical Shock Hazard ... supply B. Failure to the green (or bare) ground wire (in Canada. Failure to the junction box through neutral, New Branch circuit installations (1996 NEC), mobile homes and recreational vehicles, new construction and in the junction box) using a UL listed wire connector. 3. Make...
...conduit connector. 6. UL listed or CSA approved conduit connector 5. UL listed wire connectors H. UL listed or CSA approved conduit connector 1. Install junction box cover. 13 Route the flexible conduit from the oven through the opening in the U.S. Junction box F. Electrical Shock Hazard ... supply B. Failure to the green (or bare) ground wire (in Canada. Failure to the junction box through neutral, New Branch circuit installations (1996 NEC), mobile homes and recreational vehicles, new construction and in the junction box) using a UL listed wire connector. 3. Make...