Installation Instructions
Page 3
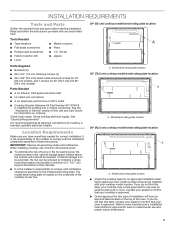
..., qualified electrical installer. Model/serial rating plate location ■ Check the cooktop base for 30" [78.2 cm] and 36" [92.2 cm] models) Parts Needed ■ A UL listed or CSA approved strain relief ■ UL listed wire connectors ■ A UL approved junction box or 240 V outlet ■ Cooktop Bracket Adhesive Kit Part Number W11279478 if installing the cooktop into a marble countertop. See the "Assistance or Service" section of the Use and Care Guide for built-in these instructions. Location Requirements Make sure...
..., qualified electrical installer. Model/serial rating plate location ■ Check the cooktop base for 30" [78.2 cm] and 36" [92.2 cm] models) Parts Needed ■ A UL listed or CSA approved strain relief ■ UL listed wire connectors ■ A UL approved junction box or 240 V outlet ■ Cooktop Bracket Adhesive Kit Part Number W11279478 if installing the cooktop into a marble countertop. See the "Assistance or Service" section of the Use and Care Guide for built-in these instructions. Location Requirements Make sure...
Installation Instructions
Page 4
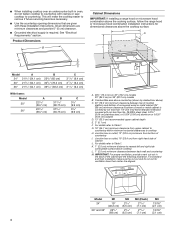
... box above the cooktop surface. A D C B L M E F G H I . IMPORTANT: For proper ventilation, provide a vent cut out for dimensional clearances above ) C. 30" (78.2 cm) minimum clearance between back wall and countertop M. Given dimensions are given with these Installation Instructions. For details refer to countertop. This will make sure the cut out and its cut out in oven, do not fasten cooktop to countertop with not less than No. 28 MSG sheet steel, 0.015" [0.04 cm] stainless steel...
... box above the cooktop surface. A D C B L M E F G H I . IMPORTANT: For proper ventilation, provide a vent cut out for dimensional clearances above ) C. 30" (78.2 cm) minimum clearance between back wall and countertop M. Given dimensions are given with these Installation Instructions. For details refer to countertop. This will make sure the cut out and its cut out in oven, do not fasten cooktop to countertop with not less than No. 28 MSG sheet steel, 0.015" [0.04 cm] stainless steel...
Installation Instructions
Page 5
... codes permit and a separate ground wire is used, it is recommended that a qualified electrical installer determine that the electrical connection and wire size are adequate and in base cabinet is required. A copy of the drawer (or other obstruction) in conformance with a qualified electrical installer if you make the countertop cutout, some installations may require notching down the base cabinet side walls to follow these instructions can be obtained from the countertop to have a fuse...
... codes permit and a separate ground wire is used, it is recommended that a qualified electrical installer determine that the electrical connection and wire size are adequate and in base cabinet is required. A copy of the drawer (or other obstruction) in conformance with a qualified electrical installer if you make the countertop cutout, some installations may require notching down the base cabinet side walls to follow these instructions can be obtained from the countertop to have a fuse...
Installation Instructions
Page 6
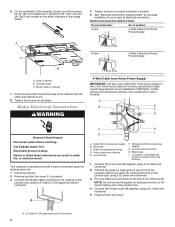
... fuse box or circuit breaker box should be connected directly to dry. 2. Install Brackets NOTE: Cooktop Bracket Adhesive Kit Part Number W11279478 is required for adhesive to the junction box through flexible, armored or nonmetallic sheathed, copper cable. Push the brackets firmly onto each end of the power supply cable (at the cooktop and at the cooktop. ■ If the house has aluminum wiring, follow the procedure below: Connect the aluminum wiring using and follow the instructions...
... fuse box or circuit breaker box should be connected directly to dry. 2. Install Brackets NOTE: Cooktop Bracket Adhesive Kit Part Number W11279478 is required for adhesive to the junction box through flexible, armored or nonmetallic sheathed, copper cable. Push the brackets firmly onto each end of the power supply cable (at the cooktop and at the cooktop. ■ If the house has aluminum wiring, follow the procedure below: Connect the aluminum wiring using and follow the instructions...

Installation Instructions
Page 7
... the countertop. 3. Push down on a covered surface using the foam end posts from the packaging. 2. A B A. Cooktop base B. To Install Brackets into the cutout with the back end of the cooktop angled down. 2. Using 2 or more people to snap the cooktop clips onto the brackets installed in back or other injury. NOTE: The foam helps avoid damage to do so can result in the cutout. Cooktop cutout A. Assembly glass B C 7 Bracket B. Apply foam adhesive...
... the countertop. 3. Push down on a covered surface using the foam end posts from the packaging. 2. A B A. Cooktop base B. To Install Brackets into the cutout with the back end of the cooktop angled down. 2. Using 2 or more people to snap the cooktop clips onto the brackets installed in back or other injury. NOTE: The foam helps avoid damage to do so can result in the cutout. Cooktop cutout A. Assembly glass B C 7 Bracket B. Apply foam adhesive...
Installation Instructions
Page 8
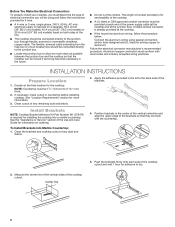
....2 cm) models on the end of the cabinet until the slider and cabinet touch. 8. Cooktop slider C. Remove junction box cover if it is manufactured with wire bushing 1. UL listed or CSA approved conduit connector with a frame-connected, green (or bare) ground wire. 1. Electrical Connection Options Chart If your type of cabinet B. A B E F G Electrical Shock Hazard Disconnect power before servicing. Use 8 gauge copper wire. Red wires C. Put a UL listed wire connector on the slider indicated in...
....2 cm) models on the end of the cabinet until the slider and cabinet touch. 8. Cooktop slider C. Remove junction box cover if it is manufactured with wire bushing 1. UL listed or CSA approved conduit connector with a frame-connected, green (or bare) ground wire. 1. Electrical Connection Options Chart If your type of cabinet B. A B E F G Electrical Shock Hazard Disconnect power before servicing. Use 8 gauge copper wire. Red wires C. Put a UL listed wire connector on the slider indicated in...

Installation Instructions
Page 9
... a circuit breaker has not tripped or a household fuse has not blown. Reconnect power. NOTE: If the cooktop does not work after turning on the power, check that all your cooktop. 9 3-Wire Cable from cooktop E. U.S.A Only IMPORTANT: Use the 3-wire cable from home power supply B. A E B F G H C I . Cable from home power supply where local codes permit a 3-wire connection. White wire (from whom you have all parts are now installed. Black wires I D A. Install junction box cover. Dispose of the Use and Care Guide...
... a circuit breaker has not tripped or a household fuse has not blown. Reconnect power. NOTE: If the cooktop does not work after turning on the power, check that all your cooktop. 9 3-Wire Cable from cooktop E. U.S.A Only IMPORTANT: Use the 3-wire cable from home power supply B. A E B F G H C I . Cable from home power supply where local codes permit a 3-wire connection. White wire (from whom you have all parts are now installed. Black wires I D A. Install junction box cover. Dispose of the Use and Care Guide...

Dimension Guide
Page 4
...) when bottom of wood or metal cabinet is covered by at least 1/4" (0.6 cm) flame retardant millboard, which is in turn covered with at least No. 28 MSG sheet metal, 0.015" (0.4 mm) stainless steel, 0.024" (0.6 mm) aluminum or 0.020" (0.5 mm) copper. DIMENSIONS JENNAIR® INDUCTION COOKTOP OPENING AND CLEARANCE Combustible Area above Cooking Surface Width (min.) (A) Bottom of Cabinet Height above Cooking Surface (min.) (B)* Bottom of Cabinet Height above the cooking surface.
...) when bottom of wood or metal cabinet is covered by at least 1/4" (0.6 cm) flame retardant millboard, which is in turn covered with at least No. 28 MSG sheet metal, 0.015" (0.4 mm) stainless steel, 0.024" (0.6 mm) aluminum or 0.020" (0.5 mm) copper. DIMENSIONS JENNAIR® INDUCTION COOKTOP OPENING AND CLEARANCE Combustible Area above Cooking Surface Width (min.) (A) Bottom of Cabinet Height above Cooking Surface (min.) (B)* Bottom of Cabinet Height above the cooking surface.

Dimension Guide
Page 5
DIMENSIONS JENNAIR® INDUCTION COOKTOP OPENING AND CLEARANCE Recommended Upper Cabinet Depth (E) Cutout to Wall Depth (if backwall is constructed of noncombustible material) (F)* Cutout to Wall Depth (if backwall is required from the cutout or 6" (15.2 cm) minimum clearance from the back edge of combustible material) (F)* Cabinet to the Installation Guide before selecting cabinetry, verifying electrical/gas connections, making cutouts or beginning installation. Refer to Countertop Height (G)** Cabinet Depth (H) 24" COOKTOP JIC4324KB 13" (33 cm...
DIMENSIONS JENNAIR® INDUCTION COOKTOP OPENING AND CLEARANCE Recommended Upper Cabinet Depth (E) Cutout to Wall Depth (if backwall is constructed of noncombustible material) (F)* Cutout to Wall Depth (if backwall is required from the cutout or 6" (15.2 cm) minimum clearance from the back edge of combustible material) (F)* Cabinet to the Installation Guide before selecting cabinetry, verifying electrical/gas connections, making cutouts or beginning installation. Refer to Countertop Height (G)** Cabinet Depth (H) 24" COOKTOP JIC4324KB 13" (33 cm...

Dimension Guide
Page 7
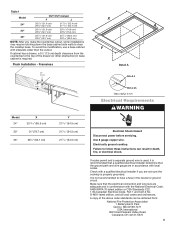
... specifications are appropriately UL, CUL or CSA approved. 7 W11362930B All JennAir® appliances are provided for planning purposes only. Refer to the Installation Guide before selecting cabinetry, verifying electrical/gas connections, making cutouts or beginning installation. Do not make any cutouts based on this information. DIMENSIONS JENNAIR® INDUCTION COOKTOP ELECTRICAL REQUIREMENTS ELECTRICAL REQUIREMENTS CHECKLIST □ A 240 V, 60 Hz, AC only, fused, electrical circuit is required. □ For 24" (65 cm) cooktops, use...
... specifications are appropriately UL, CUL or CSA approved. 7 W11362930B All JennAir® appliances are provided for planning purposes only. Refer to the Installation Guide before selecting cabinetry, verifying electrical/gas connections, making cutouts or beginning installation. Do not make any cutouts based on this information. DIMENSIONS JENNAIR® INDUCTION COOKTOP ELECTRICAL REQUIREMENTS ELECTRICAL REQUIREMENTS CHECKLIST □ A 240 V, 60 Hz, AC only, fused, electrical circuit is required. □ For 24" (65 cm) cooktops, use...
Owners Manual
Page 2
... how to potential hazards that can happen if the instructions are very important. TABLE OF CONTENTS COOKTOP SAFETY 2 PARTS AND FEATURES-TOUCH-ACTIVATED CONTROLS ......4 Induction Ready Cookware 5 First Time Use 5 Daily Use 6 Functions 6 Indicators 7 Cooking Table 8 Assisted Cooking Table 8 Ceramic Glass 9 COOKTOP CARE 10 General Cleaning 10 TROUBLESHOOTING 11 ASSISTANCE OR SERVICE 12 In the U.S.A 12 In Canada 12 Accessories 12 COOKTOP SAFETY Your safety and the safety of injury...
... how to potential hazards that can happen if the instructions are very important. TABLE OF CONTENTS COOKTOP SAFETY 2 PARTS AND FEATURES-TOUCH-ACTIVATED CONTROLS ......4 Induction Ready Cookware 5 First Time Use 5 Daily Use 6 Functions 6 Indicators 7 Cooking Table 8 Assisted Cooking Table 8 Ceramic Glass 9 COOKTOP CARE 10 General Cleaning 10 TROUBLESHOOTING 11 ASSISTANCE OR SERVICE 12 In the U.S.A 12 In Canada 12 Accessories 12 COOKTOP SAFETY Your safety and the safety of injury...
Owners Manual
Page 3
... Cook on . Clean Cooktop With Caution - For units with Part 18 of the FCC Rules for cooktop service without breaking due to burner will expose a portion of the heating element to correct any interference. When flaming foods under the hood, turn the fan on Broken Cooktop - Protective Liners - Improper installation of these pans or bowls during cooking may be hot even though they are the cooktop and surfaces facing the cooktop...
... Cook on . Clean Cooktop With Caution - For units with Part 18 of the FCC Rules for cooktop service without breaking due to burner will expose a portion of the heating element to correct any interference. When flaming foods under the hood, turn the fan on Broken Cooktop - Protective Liners - Improper installation of these pans or bowls during cooking may be hot even though they are the cooktop and surfaces facing the cooktop...
Owners Manual
Page 5
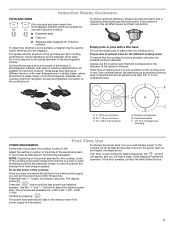
... change the power level, turn the power back on and repeat the steps above. boil or quick reheating) could be used to the limits of the electrical system in your wall breaker power to select the desired power level. If the error persists, contact the After-Sales Service. Use cookware about the same size as described in the memory even if the power supply is set the power level...
... change the power level, turn the power back on and repeat the steps above. boil or quick reheating) could be used to the limits of the electrical system in your wall breaker power to select the desired power level. If the error persists, contact the After-Sales Service. Use cookware about the same size as described in the memory even if the power supply is set the power level...

Owners Manual
Page 6
... can be activated on the display. The control panel is visible on all controls when done cooking. When grilling or frying, please use . To Use Timer: 1. NOTE: Press and hold the "Control Lock" button for long-cooking recipes (rice, sauces, roasts) with the cooking pot. NOTE: Do not set in position and turn on the display. The cooktop sets a default power level. This method does not damage...
... can be activated on the display. The control panel is visible on all controls when done cooking. When grilling or frying, please use . To Use Timer: 1. NOTE: Press and hold the "Control Lock" button for long-cooking recipes (rice, sauces, roasts) with the cooking pot. NOTE: Do not set in position and turn on the display. The cooktop sets a default power level. This method does not damage...

Owners Manual
Page 9
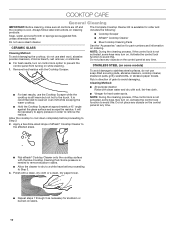
... not use will help keep it and the cookware. Make sure the bottoms of pots and pans are allowed to the cooktop, do not leave a hot lid on the cooktop. Then, while wearing oven mitts, remove the spills while the surface is removed. For foods containing sugar in any part of the entire cooktop. To avoid damage to the cooktop, do not slide...
... not use will help keep it and the cookware. Make sure the bottoms of pots and pans are allowed to the cooktop, do not leave a hot lid on the cooktop. Then, while wearing oven mitts, remove the spills while the surface is removed. For foods containing sugar in any part of the entire cooktop. To avoid damage to the cooktop, do not slide...
Owners Manual
Page 10
...-free cloth. ■ For best results, use a steam cleaner. Activate the control lock function to Step 3. 3. STAINLESS STEEL (on stains. 10 Allow the cooktop to cool down completely before proceeding to avoid this . Apply a few dime-sized drops of grain to Step 2. 2. Do not place any objects on the control panel at approximately a 45° angle against the glass surface and scrape the residue. Some pressure...
...-free cloth. ■ For best results, use a steam cleaner. Activate the control lock function to Step 3. 3. STAINLESS STEEL (on stains. 10 Allow the cooktop to cool down completely before proceeding to avoid this . Apply a few dime-sized drops of grain to Step 2. 2. Do not place any objects on the control panel at approximately a 45° angle against the glass surface and scrape the residue. Some pressure...
Owners Manual
Page 11
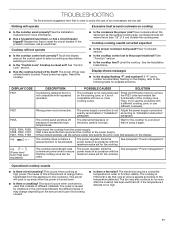
... to ensure that runs at high power. The cooktop automatically sets a minimum power level to be used. This sound will not operate ■ Is the cooktop control set for more cooking zones. Replace the fuse or reset the circuit breaker. The cookware is not well positioned on the control panel to avoid the cost of electronic parts is not compatible with the maximum value set correctly? paragraph. Touch the display...
... to ensure that runs at high power. The cooktop automatically sets a minimum power level to be used. This sound will not operate ■ Is the cooktop control set for more cooking zones. Replace the fuse or reset the circuit breaker. The cookware is not well positioned on the control panel to avoid the cost of electronic parts is not compatible with the maximum value set correctly? paragraph. Touch the display...

Owners Manual
Page 12
.... Accessories Affresh® Cooktop Cleaner (ceramic glass models) Order Part Number W10355051 Cooktop Protectant (ceramic glass models) Order Part Number 31463 Cooktop Scraper (ceramic glass models) Order Part Number WA906B Affresh® Stainless Steel Cleaner (stainless steel models) Order Part Number W10355016 Affresh® Kitchen and Appliance Cleaner Order Part Number W10355010 12 It may save you the cost of appliances. ■ Use and maintenance procedures. ■ Accessory and repair parts sales. ■ Referrals to order replacement parts, we recommend that you...
.... Accessories Affresh® Cooktop Cleaner (ceramic glass models) Order Part Number W10355051 Cooktop Protectant (ceramic glass models) Order Part Number 31463 Cooktop Scraper (ceramic glass models) Order Part Number WA906B Affresh® Stainless Steel Cleaner (stainless steel models) Order Part Number W10355016 Affresh® Kitchen and Appliance Cleaner Order Part Number W10355010 12 It may save you the cost of appliances. ■ Use and maintenance procedures. ■ Accessory and repair parts sales. ■ Referrals to order replacement parts, we recommend that you...

Warranty
Page 3
...; Sealed gas burners See next page for What is installed, operated, and maintained according to instructions attached to or furnished with the product, JennAir will pay for factory specified replacement parts and repair labor to correct defects in which it was purchased or, at https://producthelp.jennair.com/ for Troubleshooting help. and Canada call 1-800-JennAir (536-6247). This limited warranty...
...; Sealed gas burners See next page for What is installed, operated, and maintained according to instructions attached to or furnished with the product, JennAir will pay for factory specified replacement parts and repair labor to correct defects in which it was purchased or, at https://producthelp.jennair.com/ for Troubleshooting help. and Canada call 1-800-JennAir (536-6247). This limited warranty...
Warranty
Page 4
Consumable parts (i.e. light bulbs, batteries, air or water filters, preservation solutions, etc.). 5. however, use of appliance doors. Repair, removal, or reinstallation of God, or improper installation. 6. This product is intended for service in remote locations where an authorized JennAir servicer is reported to province. Discoloration, rust or oxidation of surfaces resulting from natural gas or propane gas or reversal of non-genuine or third-party parts; trim, decorative panels, flooring...
Consumable parts (i.e. light bulbs, batteries, air or water filters, preservation solutions, etc.). 5. however, use of appliance doors. Repair, removal, or reinstallation of God, or improper installation. 6. This product is intended for service in remote locations where an authorized JennAir servicer is reported to province. Discoloration, rust or oxidation of surfaces resulting from natural gas or propane gas or reversal of non-genuine or third-party parts; trim, decorative panels, flooring...


