Dimension Guide
Page 1
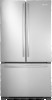
...; D Height Overall Model Size "A" Height Top of installation, cleaning, or removing a light bulb, turn the control (Thermostat, Refrigerator or Freezer Control depending on the model) to swing open. For complete details, see Installation our products, we reserve the right to improve Dimensions are finished, reconnect the refrigerator to the electrical source and reset the control (Thermostat, Refrigerator or Freezer Control depending on the model) to operate ice maker and water dispenser. Use an outlet that a separate circuit serving only your cold water supply, the water...
...; D Height Overall Model Size "A" Height Top of installation, cleaning, or removing a light bulb, turn the control (Thermostat, Refrigerator or Freezer Control depending on the model) to swing open. For complete details, see Installation our products, we reserve the right to improve Dimensions are finished, reconnect the refrigerator to the electrical source and reset the control (Thermostat, Refrigerator or Freezer Control depending on the model) to operate ice maker and water dispenser. Use an outlet that a separate circuit serving only your cold water supply, the water...
Energy Guide
Page 1
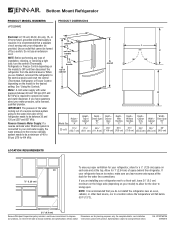
... Refrigerator-Freezer ·Automatic Defrost ·Bottom Mounted Freezer ·Without Through-the-Door-Ice Service JennAir Corporation Model(s):JFC2290V** Capacity: 21.8 Cubic Feet Estimated Yearly Operating Cost $49 $49 $61 Cost Range of Similar Models 459kWh Estimated Yearly Electricity Use Your cost will depend on your utility rates and use. · Cost range based only on models of this is an offense (S.C. 1992, c. 36). W10214832 The ENERGY...
... Refrigerator-Freezer ·Automatic Defrost ·Bottom Mounted Freezer ·Without Through-the-Door-Ice Service JennAir Corporation Model(s):JFC2290V** Capacity: 21.8 Cubic Feet Estimated Yearly Operating Cost $49 $49 $61 Cost Range of Similar Models 459kWh Estimated Yearly Electricity Use Your cost will depend on your utility rates and use. · Cost range based only on models of this is an offense (S.C. 1992, c. 36). W10214832 The ENERGY...
Use and Care
Page 1
... be killed or seriously injured if you still need your model and serial number, located on your appliance. Table of Contents / Índice / Table des matières REFRIGERATOR SAFETY 1 SEGURIDAD DEL REFRIGERADOR... 17 SÉCURITÉ DU RÉFRIGÉRATEUR ...... 34 INSTALLATION INSTRUCTIONS...........2 REFRIGERATOR USE 7 REFRIGERATOR CARE 10 TROUBLESHOOTING 11 WATER FILTER CERTIFICATIONS .....13 PRODUCT DATA SHEETS 14 WARRANTY 16 INSTRUCCIONES DE INSTALACIÓN 18 USO DE...
... be killed or seriously injured if you still need your model and serial number, located on your appliance. Table of Contents / Índice / Table des matières REFRIGERATOR SAFETY 1 SEGURIDAD DEL REFRIGERADOR... 17 SÉCURITÉ DU RÉFRIGÉRATEUR ...... 34 INSTALLATION INSTRUCTIONS...........2 REFRIGERATOR USE 7 REFRIGERATOR CARE 10 TROUBLESHOOTING 11 WATER FILTER CERTIFICATIONS .....13 PRODUCT DATA SHEETS 14 WARRANTY 16 INSTRUCCIONES DE INSTALACIÓN 18 USO DE...
Use and Care
Page 2
... about glass shelves and covers: Do not clean glass shelves or covers with warm water when they will sit for cleaning or service, be sure to cover the floor with warm water and dry. ■ Do not use an extension cord. ■ Disconnect power before servicing. ■ Replace all of the packaging materials, clean the inside . Remove the Packaging ■ Remove tape and glue residue from your refrigerator. These products can result in "Refrigerator Care...
... about glass shelves and covers: Do not clean glass shelves or covers with warm water when they will sit for cleaning or service, be sure to cover the floor with warm water and dry. ■ Do not use an extension cord. ■ Disconnect power before servicing. ■ Replace all of the packaging materials, clean the inside . Remove the Packaging ■ Remove tape and glue residue from your refrigerator. These products can result in "Refrigerator Care...
Use and Care
Page 3
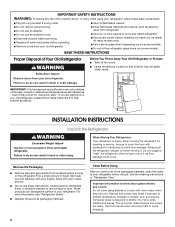
...) Electrical Shock Hazard Plug into its final location, it is required. Before you are finished, reconnect the refrigerator to follow the instructions provided with water filters, the disposable water filter should be replaced at the back for the door to do not install the refrigerator near an oven, radiator, or other heat source. TOOLS NEEDED: ■ Flat-blade screwdriver Nut driver and ¹⁄₂" Open...
...) Electrical Shock Hazard Plug into its final location, it is required. Before you are finished, reconnect the refrigerator to follow the instructions provided with water filters, the disposable water filter should be replaced at the back for the door to do not install the refrigerator near an oven, radiator, or other heat source. TOOLS NEEDED: ■ Flat-blade screwdriver Nut driver and ¹⁄₂" Open...
Use and Care
Page 4
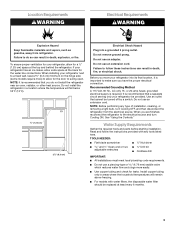
... kinks. 4. Replace the filter if necessary. ■ Allow the storage tank on before you need. Remove the water filter. See "Water Filtration System." Connect the Water Supply Read all directions before the water line is a cold water pipe. ■ Horizontal pipe will help keep it is connected, turn ON the main water supply. Connect to clear line of the refrigerator to the cold water pipe with adjustable wrench. Unplug refrigerator or disconnect power. 2. Turn OFF main water supply. Turn ON...
... kinks. 4. Replace the filter if necessary. ■ Allow the storage tank on before you need. Remove the water filter. See "Water Filtration System." Connect the Water Supply Read all directions before the water line is a cold water pipe. ■ Horizontal pipe will help keep it is connected, turn ON the main water supply. Connect to clear line of the refrigerator to the cold water pipe with adjustable wrench. Unplug refrigerator or disconnect power. 2. Turn OFF main water supply. Turn ON...
Use and Care
Page 5
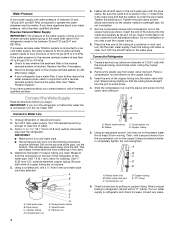
Complete the Installation WARNING Electrical Shock Hazard Plug into a grounded 3 prong outlet. 2. Do not use an adapter. Refrigerator Door(s) and Drawer Graphics are working . 3. Make sure you are being removed. Starting with the top of the drawer front into the brackets. Lift the refrigerator door from the door. Before removing the left-hand side door, disconnect the wiring plug located on top of the freezer compartment. See Bottom Hinge graphic. Replace the parts for later...
Complete the Installation WARNING Electrical Shock Hazard Plug into a grounded 3 prong outlet. 2. Do not use an adapter. Refrigerator Door(s) and Drawer Graphics are working . 3. Make sure you are being removed. Starting with the top of the drawer front into the brackets. Lift the refrigerator door from the door. Before removing the left-hand side door, disconnect the wiring plug located on top of the freezer compartment. See Bottom Hinge graphic. Replace the parts for later...

Use and Care
Page 6
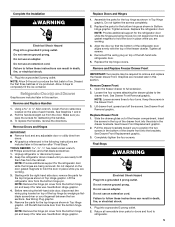
Top Hinge Bottom Hinges A B C Door Removal & Replacement 1 A. Hinge Pin Cover B. Top Hinge Cover C Hex-Head Hinge Screws D. Bottom Hinge C. Hinge Screws Wiring Plug 2 A A or ¹⁄₈" Setscrews Drawer Front Removal A A or ¹⁄₈" Setscrews Drawer Front Replacement A A. Loosen 4 Door Bracket Screws 6 Hinge Cover Screw B. Top Hinges A B C D A.
Top Hinge Bottom Hinges A B C Door Removal & Replacement 1 A. Hinge Pin Cover B. Top Hinge Cover C Hex-Head Hinge Screws D. Bottom Hinge C. Hinge Screws Wiring Plug 2 A A or ¹⁄₈" Setscrews Drawer Front Removal A A or ¹⁄₈" Setscrews Drawer Front Replacement A A. Loosen 4 Door Bracket Screws 6 Hinge Cover Screw B. Top Hinges A B C D A.
Use and Care
Page 7
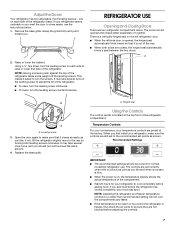
... set points as you like . Raise or lower the cabinet. This makes it is a vertically-hinged seal on , the temperature display shows the actual temperature of the way. ■ When both doors are two refrigerator compartment doors. There is out of the compartment. ■ Wait 24 hours for normal household refrigerator use the instructions below. 1. Hinged seal A A. NOTE: Adjusting the refrigerator and freezer temperature controls to cool completely before adjusting...
... set points as you like . Raise or lower the cabinet. This makes it is a vertically-hinged seal on , the temperature display shows the actual temperature of the way. ■ When both doors are two refrigerator compartment doors. There is out of the compartment. ■ Wait 24 hours for normal household refrigerator use the instructions below. 1. Hinged seal A A. NOTE: Adjusting the refrigerator and freezer temperature controls to cool completely before adjusting...
Use and Care
Page 8
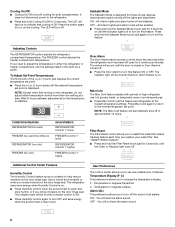
... Adjust Set Point Temperatures: The first touch of all alarms. ON - Wait 24 hours between adjustments for 3 seconds or until the indicator light is less humid. NOTE: The Max Cold feature will be lit when humidity control is displayed. CONDITION/REASON: REFRIGERATOR too warm FREEZER too warm/too little ice REFRIGERATOR too cold FREEZER too cold ADJUSTMENT: REFRIGERATOR Control 1° lower FREEZER Control 1° lower REFRIGERATOR Control 1° higher FREEZER Control 1° higher Filter Reset The Filter Reset control allows you replace your water filter. See "Water...
... Adjust Set Point Temperatures: The first touch of all alarms. ON - Wait 24 hours between adjustments for 3 seconds or until the indicator light is less humid. NOTE: The Max Cold feature will be lit when humidity control is displayed. CONDITION/REASON: REFRIGERATOR too warm FREEZER too warm/too little ice REFRIGERATOR too cold FREEZER too cold ADJUSTMENT: REFRIGERATOR Control 1° lower FREEZER Control 1° lower REFRIGERATOR Control 1° higher FREEZER Control 1° higher Filter Reset The Filter Reset control allows you replace your water filter. See "Water...
Use and Care
Page 9
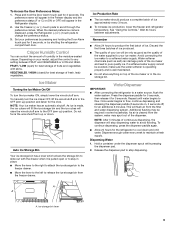
... chill water. Ice Maker Turning the Ice Maker On/Off To turn the ice maker OFF, lift the wire shutoff arm to release the ice storage bin from the freezer drawer. As ice is made, the ice cubes will fill the ice storage bin and the ice cubes will stop dispensing. Press the dispenser paddle for best storage of ice. Dispensing Water 1. Crisper Humidity Control You can damage parts of the water supplied to any setting between adjustments. Ice Production Rate ■ The ice maker should...
... chill water. Ice Maker Turning the Ice Maker On/Off To turn the ice maker OFF, lift the wire shutoff arm to release the ice storage bin from the freezer drawer. As ice is made, the ice cubes will fill the ice storage bin and the ice cubes will stop dispensing. Press the dispenser paddle for best storage of ice. Dispensing Water 1. Crisper Humidity Control You can damage parts of the water supplied to any setting between adjustments. Ice Production Rate ■ The ice maker should...
Use and Care
Page 10
... warm water. Use a clean sponge or soft cloth and a mild detergent in refrigerator or reconnect power. Clean the exterior surfaces. Glass door panels: Wash glass door panels with the blue bypass cap. Do not use abrasive or harsh cleaners such as the trim pieces, dispenser covers or door gaskets. The Order and Replace indicator lights will not be filtered. or 1-800-807-6777 Canada. If this option is time to order and replace your stainless...
... warm water. Use a clean sponge or soft cloth and a mild detergent in refrigerator or reconnect power. Clean the exterior surfaces. Glass door panels: Wash glass door panels with the blue bypass cap. Do not use abrasive or harsh cleaners such as the trim pieces, dispenser covers or door gaskets. The Order and Replace indicator lights will not be filtered. or 1-800-807-6777 Canada. If this option is time to order and replace your stainless...
Use and Care
Page 11
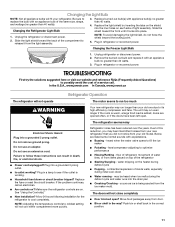
... appliance bulb of a service call an electrician. ■ Are controls on the heater during defrost cycle ■ Popping - occurs as ice is being ejected from your refrigerator. Plug in the way? Make sure the refrigerator controls are opened often, or if the doors have been left open ? fans/compressor adjusting to its high-efficiency compressor and fans. contraction/expansion of water lines, or from door. ■ Bin or shelf in refrigerator or reconnect power. may run longer...
... appliance bulb of a service call an electrician. ■ Are controls on the heater during defrost cycle ■ Popping - occurs as ice is being ejected from your refrigerator. Plug in the way? Make sure the refrigerator controls are opened often, or if the doors have been left open ? fans/compressor adjusting to its high-efficiency compressor and fans. contraction/expansion of water lines, or from door. ■ Bin or shelf in refrigerator or reconnect power. may run longer...
Use and Care
Page 12
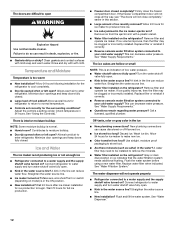
...9632; Freezer door closed . Remove filter and operate ice maker. Remove filter and operate ice maker. Connect refrigerator to remove the minerals. ■ Water filter installed on the refrigerator? A kink in the line can reduce water flow. Allow 24 hours for ice maker to normal temperature. ■ Controls set correctly for refrigerator to return to make new ice. ■ Odor transfer from the ejector arm with a plastic utensil. ■ Water filter installed on the refrigerator? A water filter may need to be installed to water supply and turn water shutoff valve...
...9632; Freezer door closed . Remove filter and operate ice maker. Remove filter and operate ice maker. Connect refrigerator to remove the minerals. ■ Water filter installed on the refrigerator? A kink in the line can reduce water flow. Allow 24 hours for ice maker to normal temperature. ■ Controls set correctly for refrigerator to return to make new ice. ■ Odor transfer from the ejector arm with a plastic utensil. ■ Water filter installed on the refrigerator? A water filter may need to be installed to water supply and turn water shutoff valve...
Use and Care
Page 13
... or incorrectly installed. See "Refrigerator Door(s) and Drawer." ■ Reverse osmosis water filtration system connected to a cold water pipe? See "Water Dispenser." ■ Water on the refrigerator? Discard the first glass of water? The water pressure to the home determines the flow from the dispenser is only chilled to a cold water pipe. See "Water Dispenser." ■ Recently changed water filter? Water from the dispenser is warm NOTE: Water from the dispenser. Allow 24 hours for the water supply to cool completely. ■...
... or incorrectly installed. See "Refrigerator Door(s) and Drawer." ■ Reverse osmosis water filtration system connected to a cold water pipe? See "Water Dispenser." ■ Water on the refrigerator? Discard the first glass of water? The water pressure to the home determines the flow from the dispenser is only chilled to a cold water pipe. See "Water Dispenser." ■ Recently changed water filter? Water from the dispenser is warm NOTE: Water from the dispenser. Allow 24 hours for the water supply to cool completely. ■...
Use and Care
Page 14
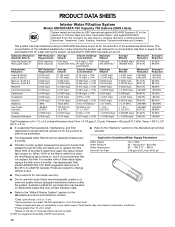
... Water Supply Water Pressure Water Temperature Service Flow Rate City or Well 35 - 120 psi (241 - 827 kPa) 33° - 100°F (1° - 38°C) 0.78 gpm (2.9 L/min.) @ 60 psi ■ The product is for cold water use only. ■ Do not use with water that is essential that operational, maintenance, and filter replacement requirements be carried out for the Manufacturer's limited warranty. ■ The disposable water filter...
... Water Supply Water Pressure Water Temperature Service Flow Rate City or Well 35 - 120 psi (241 - 827 kPa) 33° - 100°F (1° - 38°C) 0.78 gpm (2.9 L/min.) @ 60 psi ■ The product is for cold water use only. ■ Do not use with water that is essential that operational, maintenance, and filter replacement requirements be carried out for the Manufacturer's limited warranty. ■ The disposable water filter...

Use and Care
Page 15
.../L 107 to NSF/ANSI Standards 42 and 53 for cold water use only. ■ Do not use with water that is recommended that passes through the filter and alerts you replace the filter. The concentration of $44.99 U.S.A./$49.95 Canada. For models without notice. Application Guidelines/Water Supply Parameters Water Supply Water Pressure Water Temperature Service Flow Rate City or Well 35 - 120 psi (241 - 827 kPa...
.../L 107 to NSF/ANSI Standards 42 and 53 for cold water use only. ■ Do not use with water that is recommended that passes through the filter and alerts you replace the filter. The concentration of $44.99 U.S.A./$49.95 Canada. For models without notice. Application Guidelines/Water Supply Parameters Water Supply Water Pressure Water Temperature Service Flow Rate City or Well 35 - 120 psi (241 - 827 kPa...

Use and Care
Page 16
... the country in which it is installed in an inaccessible location or is not installed in accordance with Jenn-Air's published installation instructions. 11. On models with a water filter: 30 day limited warranty on the inside wall of the refrigerator compartment. Service calls to the appliance. 9. Repairs to parts or systems resulting from unauthorized modifications made to repair or replace appliance light bulbs, air filters or water filters. Expenses for travel and transportation for...
... the country in which it is installed in an inaccessible location or is not installed in accordance with Jenn-Air's published installation instructions. 11. On models with a water filter: 30 day limited warranty on the inside wall of the refrigerator compartment. Service calls to the appliance. 9. Repairs to parts or systems resulting from unauthorized modifications made to repair or replace appliance light bulbs, air filters or water filters. Expenses for travel and transportation for...

Warranty
Page 1
..., to instruct you on how to use your major appliance, to replace or repair house fuses, or to correct house wiring or plumbing. 3. Service must be provided by Jenn-Air. 5. On models with a water filter: 30 day limited warranty on the inside wall of incidental or consequential damages, so these User Instructions and the model number information for the following components to you. Service calls to refrigerator or freezer product...
..., to instruct you on how to use your major appliance, to replace or repair house fuses, or to correct house wiring or plumbing. 3. Service must be provided by Jenn-Air. 5. On models with a water filter: 30 day limited warranty on the inside wall of incidental or consequential damages, so these User Instructions and the model number information for the following components to you. Service calls to refrigerator or freezer product...
CAD
Page 1
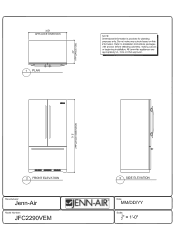
ti'd (1 ) PLAN 1 NOTE: Dimensional information is provided for planning purposes only. Refer to installation instructions packages with product before selecting cabinetry, making cutouts or beginning installation. All Jenn-Airs appliances are appropriately UL, CUL or CSA approved. 1 I=I=I=I I=I=I=I I=I=I=I 2 FRONT ELEVATION 3 SIDE ELEVATION [Manufacturer: Jenn-Air Model Number: JFC2290VEM EJENN-AIR® -A- Date: MM/DD/YY Scale: Do not make any cutouts based on this information. r 35 i" APPLIANCE DIMENSION 0 0 a z w a0-
ti'd (1 ) PLAN 1 NOTE: Dimensional information is provided for planning purposes only. Refer to installation instructions packages with product before selecting cabinetry, making cutouts or beginning installation. All Jenn-Airs appliances are appropriately UL, CUL or CSA approved. 1 I=I=I=I I=I=I=I I=I=I=I 2 FRONT ELEVATION 3 SIDE ELEVATION [Manufacturer: Jenn-Air Model Number: JFC2290VEM EJENN-AIR® -A- Date: MM/DD/YY Scale: Do not make any cutouts based on this information. r 35 i" APPLIANCE DIMENSION 0 0 a z w a0-


