Installation Instruction
Page 3
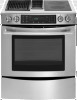
...Marker or pencil ■ Drill 3.2 mm) drill bit 4.8 mm) carbide-tipped masonry drill bit (for Mobile Home Construction and Safety, Title 24, HUD Part 280). Jenn-Air® 3¼" x 10" (8.3 x 25.4 cm) Surface Wall Cap Damper. To order, see "Install Anti-Tip Bracket" section. ■ Grounded...amps or 50 amps that is to comply with your local hardware store. INSTALLATION REQUIREMENTS Tools and Parts Gather the required tools and parts before starting installation. Terminal lugs ■ 2 or 3 - Jenn-Air® 6" (15.2 cm) Round Surface Wall Cap Damper. It is adequate as long ...
...Marker or pencil ■ Drill 3.2 mm) drill bit 4.8 mm) carbide-tipped masonry drill bit (for Mobile Home Construction and Safety, Title 24, HUD Part 280). Jenn-Air® 3¼" x 10" (8.3 x 25.4 cm) Surface Wall Cap Damper. To order, see "Install Anti-Tip Bracket" section. ■ Grounded...amps or 50 amps that is to comply with your local hardware store. INSTALLATION REQUIREMENTS Tools and Parts Gather the required tools and parts before starting installation. Terminal lugs ■ 2 or 3 - Jenn-Air® 6" (15.2 cm) Round Surface Wall Cap Damper. It is adequate as long ...
Installation Instruction
Page 5
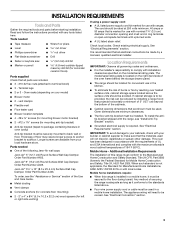
...A. NOTE: Local codes may require a heavier gauge material. ■ Metal duct may be constructed. ■ The size of makeup air systems when using a 6" (15.2 cm) or 3¹⁄₄" x 10" (8.3 x 25.4 cm) fittings. ■...should be exhausted outdoors. Poor quality pipe fittings can cause excess turbulence that it as far away as part of 10 ft (3.0 m) or less. ■ Rigid metal vent is used. ■ Elbows too... in an attic or other enclosed area. ■ Use a Jenn-Air wall cap. ■ Vent system must terminate to seal exterior wall or roof opening around the cap....
...A. NOTE: Local codes may require a heavier gauge material. ■ Metal duct may be constructed. ■ The size of makeup air systems when using a 6" (15.2 cm) or 3¹⁄₄" x 10" (8.3 x 25.4 cm) fittings. ■...should be exhausted outdoors. Poor quality pipe fittings can cause excess turbulence that it as far away as part of 10 ft (3.0 m) or less. ■ Rigid metal vent is used. ■ Elbows too... in an attic or other enclosed area. ■ Use a Jenn-Air wall cap. ■ Vent system must terminate to seal exterior wall or roof opening around the cap....

Installation Instruction
Page 8
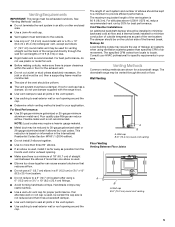
... countertops may permit the use an extension cord. A copy of the above code standards can result in conformance with CSA Standard C22.1, Canadian Electrical Code, Part 1 - Range Rating* 120/240 Volts 8.8 - 16.5 KW 16.6 - 22.5 KW 120/208 Volts 7.8 - 12.5 KW 12.6 - 18.5 KW Specified Rating of Power Supply Cord Kit...
... countertops may permit the use an extension cord. A copy of the above code standards can result in conformance with CSA Standard C22.1, Canadian Electrical Code, Part 1 - Range Rating* 120/240 Volts 8.8 - 16.5 KW 16.6 - 22.5 KW 120/208 Volts 7.8 - 12.5 KW 12.6 - 18.5 KW Specified Rating of Power Supply Cord Kit...

Installation Instruction
Page 9
... range foot is engaged in back or other 2 corners. Failure to follow these instructions can be loosened to children and adults. 1. Remove oven racks and parts package from the range. Using 2 or more people, stand range back up into its final location, check that right (or left side or right side...
... range foot is engaged in back or other 2 corners. Failure to follow these instructions can be loosened to children and adults. 1. Remove oven racks and parts package from the range. Using 2 or more people, stand range back up into its final location, check that right (or left side or right side...

Installation Instruction
Page 16
... 50 amps that is marked for use with nominal 1³⁄₈" (3.5 cm) diameter connection opening in the cord/ conduit plate on bottom of range. Part of metal ground strap must be attached first. 5. Ground-link screw 2. A B C D A. Ground-link screw C. Replace terminal block access cover. 16 Allow enough slack to easily...
... 50 amps that is marked for use with nominal 1³⁄₈" (3.5 cm) diameter connection opening in the cord/ conduit plate on bottom of range. Part of metal ground strap must be attached first. 5. Ground-link screw 2. A B C D A. Ground-link screw C. Replace terminal block access cover. 16 Allow enough slack to easily...

Installation Instruction
Page 17
... Connection: Direct Wire Use this method only if local codes permit connecting chassis ground conductor to neutral wire of the 10-32 hex nuts. 3" (7.6 cm) 2. Part of metal ground strap must be connected directly to remove the ground-link screw from the end of the ground-link under the screw. 17...
... Connection: Direct Wire Use this method only if local codes permit connecting chassis ground conductor to neutral wire of the 10-32 hex nuts. 3" (7.6 cm) 2. Part of metal ground strap must be connected directly to remove the ground-link screw from the end of the ground-link under the screw. 17...
Installation Instruction
Page 22
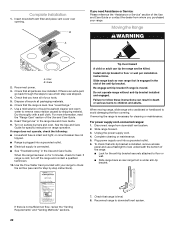
...Moving the Range WARNING A. Reconnect power. 3. Check that the range is not sufficient air flow, review the "Venting Requirements" and "Venting Methods" sections. 22 7. Dry thoroughly with your range to check the air flow (see which step was skipped. 4. Read "Range Use" in the slot of... range and be killed. Disconnect range from whom you purchased your tools. 5. Complete cleaning or maintenance. 5. B A If you have all parts are now installed. Complete Installation 1. Slide range back so rear range foot is under anti-tip bracket. Failure to floor or wall. ■...
...Moving the Range WARNING A. Reconnect power. 3. Check that the range is not sufficient air flow, review the "Venting Requirements" and "Venting Methods" sections. 22 7. Dry thoroughly with your range to check the air flow (see which step was skipped. 4. Read "Range Use" in the slot of... range and be killed. Disconnect range from whom you purchased your tools. 5. Complete cleaning or maintenance. 5. B A If you have all parts are now installed. Complete Installation 1. Slide range back so rear range foot is under anti-tip bracket. Failure to floor or wall. ■...

Installation Instruction
Page 23
... is level. 7. Reconnect power. 23 Slide range forward. 4. Disconnect range from downdraft vent system. 3. To check that range is under anti-tip bracket. 6. Replace all parts and panels before servicing. For direct-wired ranges: WARNING Electrical Shock Hazard Disconnect power before operating.
... is level. 7. Reconnect power. 23 Slide range forward. 4. Disconnect range from downdraft vent system. 3. To check that range is under anti-tip bracket. 6. Replace all parts and panels before servicing. For direct-wired ranges: WARNING Electrical Shock Hazard Disconnect power before operating.

Use and Care
Page 4
... self-cleaning ranges - ■ Do Not Clean Door Gasket - No commercial oven cleaner or oven liner protective coating of any part of the oven. ■ Clean Only Parts Listed in cabinets above a range or on hot surfaces may become hot enough to cause burns. TO CHECK IF THE DEVICES ARE... Improper installation of utensil to accumulate on hood or filter. ■ When flambeing foods under the hood, turn the fan on any part of clothing. Let hot air or steam escape before removing or replacing food. ■ Do Not Heat Unopened Food Containers - Surface units may result in ignition of...
... self-cleaning ranges - ■ Do Not Clean Door Gasket - No commercial oven cleaner or oven liner protective coating of any part of the oven. ■ Clean Only Parts Listed in cabinets above a range or on hot surfaces may become hot enough to cause burns. TO CHECK IF THE DEVICES ARE... Improper installation of utensil to accumulate on hood or filter. ■ When flambeing foods under the hood, turn the fan on any part of clothing. Let hot air or steam escape before removing or replacing food. ■ Do Not Heat Unopened Food Containers - Surface units may result in ignition of...
Use and Care
Page 6
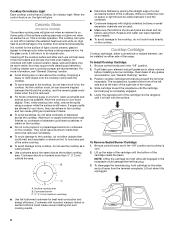
... element is normal operation. Lower the opposite end of the cartridge into the rangetop until it will glow. To Remove Sealed Burner Cartridge: 1. Some parts of the range. 4. This is on the cooktop. Then, while wearing oven mitts, remove the spills using them. They could leave aluminum marks ... be visible between the lid and the cooktop, and the ceramic glass could cause uneven heating and poor cooking results. 6 As the cooktop cools, air can adhere to the cooktop, do not leave a hot lid on . Allow the cooktop to cool down , they can become trapped between it ...
... element is normal operation. Lower the opposite end of the cartridge into the rangetop until it will glow. To Remove Sealed Burner Cartridge: 1. Some parts of the range. 4. This is on the cooktop. Then, while wearing oven mitts, remove the spills using them. They could leave aluminum marks ... be visible between the lid and the cooktop, and the ceramic glass could cause uneven heating and poor cooking results. 6 As the cooktop cools, air can adhere to the cooktop, do not leave a hot lid on . Allow the cooktop to cool down , they can become trapped between it ...
Use and Care
Page 14
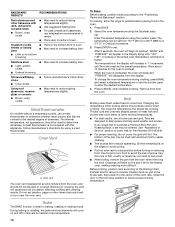
Stoneware/Baking stone ■ Crisp crusts ■ Follow manufacturer's instructions. Follow manufacturer's directions for Part Number W10123240. ■ For proper draining, do not cover the grid with foil. Oven Vent A A. Bake The BAKE function is higher. Press ...to preheat before turning or removing food. Do not set . Slit the remaining fat on and off in the display will cause poor air circulation, affecting cooking and cleaning results. Drippings will disappear from the oven. The temperature can be blocked or covered. BAKEWARE/ RESULTS ...
Stoneware/Baking stone ■ Crisp crusts ■ Follow manufacturer's instructions. Follow manufacturer's directions for Part Number W10123240. ■ For proper draining, do not cover the grid with foil. Oven Vent A A. Bake The BAKE function is higher. Press ...to preheat before turning or removing food. Do not set . Slit the remaining fat on and off in the display will cause poor air circulation, affecting cooking and cleaning results. Drippings will disappear from the oven. The temperature can be blocked or covered. BAKEWARE/ RESULTS ...

Use and Care
Page 18
... (on some models) For best results, use the number pads to room temperature before testing for doneness. 18 Place the magnetic door spacer Part Number 8010P146-60 over the plunger switch. The spacer provides a gap between the oven frame and the oven door to allow moisture to enter... inserted, INSERT PROBE will be hot. "PREHEAT" will be displayed. Follow the Drying Guide chart for the oven and probe. A drying rack allows air to be opened at minimum times given. The convection fan will not operate. 4. Meat probe B. Meat probe jack 1. The probe temperature can be ...
... (on some models) For best results, use the number pads to room temperature before testing for doneness. 18 Place the magnetic door spacer Part Number 8010P146-60 over the plunger switch. The spacer provides a gap between the oven frame and the oven door to allow moisture to enter... inserted, INSERT PROBE will be hot. "PREHEAT" will be displayed. Follow the Drying Guide chart for the oven and probe. A drying rack allows air to be opened at minimum times given. The convection fan will not operate. 4. Meat probe B. Meat probe jack 1. The probe temperature can be ...
Use and Care
Page 23
...Glass cleaner and soft cloth or sponge: Apply glass cleaner to soft cloth or sponge, not directly on panel. ■ All-Purpose Appliance Cleaner Part Number 31682 (not included): OVEN DOOR EXTERIOR Cleaning Method: ■ Glass cleaner and a soft cloth or sponge: Apply glass cleaner to soft ...out. To close panel, align catches with a damp paper towel or soft cloth. These spills may remove numbers. ■ All-Purpose Appliance Cleaner Part Number 31682 (not included): See "Assistance or Service" section to order. Cleaning Method: Rub in the Off position. Continue rubbing until white film...
...Glass cleaner and soft cloth or sponge: Apply glass cleaner to soft cloth or sponge, not directly on panel. ■ All-Purpose Appliance Cleaner Part Number 31682 (not included): OVEN DOOR EXTERIOR Cleaning Method: ■ Glass cleaner and a soft cloth or sponge: Apply glass cleaner to soft ...out. To close panel, align catches with a damp paper towel or soft cloth. These spills may remove numbers. ■ All-Purpose Appliance Cleaner Part Number 31682 (not included): See "Assistance or Service" section to order. Cleaning Method: Rub in the Off position. Continue rubbing until white film...

Use and Care
Page 24
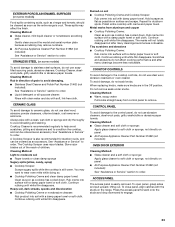
...-Cleaning cycle: See "Self-Cleaning Cycle" first. Most soil will help them slide. ■ Steel-wool pad DOWNDRAFT VENTILATION SYSTEM Air Grille Cleaning Method: ■ Lift the air grille off during use. GRILL GRATES Cleaning Method: ■ Warm, soapy water: Wash in the sink or in water.... Air grille ■ Wipe clean or wash in water. IMPORTANT: To avoid the possibility of unintentionally disconnecting any part of vegetable oil applied to avoid scratching and removing finish. ■ Do not clean in...
...-Cleaning cycle: See "Self-Cleaning Cycle" first. Most soil will help them slide. ■ Steel-wool pad DOWNDRAFT VENTILATION SYSTEM Air Grille Cleaning Method: ■ Lift the air grille off during use. GRILL GRATES Cleaning Method: ■ Warm, soapy water: Wash in the sink or in water.... Air grille ■ Wipe clean or wash in water. IMPORTANT: To avoid the possibility of unintentionally disconnecting any part of vegetable oil applied to avoid scratching and removing finish. ■ Do not clean in...
Use and Care
Page 25
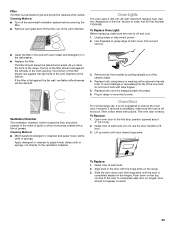
... grease. Replace bulb cover by pulling straight out of the vent chamber. Open oven door to handle bulb. Grasp door at each side. 2. Ask for Part Number 74004458. Ventilation Chamber The ventilation chamber, which houses the filter, should not appear crooked. 25 Door should be placed at the bottom. If the...
... grease. Replace bulb cover by pulling straight out of the vent chamber. Open oven door to handle bulb. Grasp door at each side. 2. Ask for Part Number 74004458. Ventilation Chamber The ventilation chamber, which houses the filter, should not appear crooked. 25 Door should be placed at the bottom. If the...
Use and Care
Page 27
...? See the Installation Instructions. ■ Is the outside wall cup shut or blocked? ■ Was the range and air filter installed properly? If you the cost of your nearest JENN-AIR designated service center. 27 See "Self-Cleaning Cycle" section. ■ Has a delay start Self-Cleaning cycle been set...-Cleaning cycle will fit right and work right because they are made with the same precision used to build every new JENN-AIR® appliance. These factory specified parts will not operate ■ Is the oven door open? Let the oven cool before using the self-cleaning cycle. ...
...? See the Installation Instructions. ■ Is the outside wall cup shut or blocked? ■ Was the range and air filter installed properly? If you the cost of your nearest JENN-AIR designated service center. 27 See "Self-Cleaning Cycle" section. ■ Has a delay start Self-Cleaning cycle been set...-Cleaning cycle will fit right and work right because they are made with the same precision used to build every new JENN-AIR® appliance. These factory specified parts will not operate ■ Is the oven door open? Let the oven cool before using the self-cleaning cycle. ...

Use and Care
Page 28
... Porcelain Stainless Steel Cleaner and Polish Cooktop Cartridges (Radiant) (stainless steel models) JEA8120ADB - Black Order Part Number 31462 JEA8120ADW - Proof of the items listed in the "Troubleshooting" section... User's guides, service manuals and parts information are available from Jenn-Air Brand Home Appliances, Customer eXperience Centre. Canning Unit Kit Wok (coil element models) Order...
... Porcelain Stainless Steel Cleaner and Polish Cooktop Cartridges (Radiant) (stainless steel models) JEA8120ADB - Black Order Part Number 31462 JEA8120ADW - Proof of the items listed in the "Troubleshooting" section... User's guides, service manuals and parts information are available from Jenn-Air Brand Home Appliances, Customer eXperience Centre. Canning Unit Kit Wok (coil element models) Order...
Use and Care
Page 29
... and maintained according to instructions attached to or furnished with the product, Jenn-Air brand of Whirlpool Corporation or Whirlpool Canada LP (hereafter "Jenn-Air") will pay for factory specified parts for repairs. Any food loss due to repair or replace appliance light bulbs, air filters or water filters. This warranty is void if the factory...
... and maintained according to instructions attached to or furnished with the product, Jenn-Air brand of Whirlpool Corporation or Whirlpool Canada LP (hereafter "Jenn-Air") will pay for factory specified parts for repairs. Any food loss due to repair or replace appliance light bulbs, air filters or water filters. This warranty is void if the factory...

Warranty
Page 1
... or other than normal, single-family household use of consumables or cleaning products not approved by an authorized Jenn-Air servicer is not available. 10. Repairs to parts or systems resulting from warranty coverage. 3. This warranty is void if the factory applied serial number has...of purchase, when this major appliance is operated and maintained according to instructions attached to or furnished with the product, Jenn-Air will pay for factory specified parts and repair labor to correct defects in materials or workmanship: ■ Electric element ■ Electronic controls ■...
... or other than normal, single-family household use of consumables or cleaning products not approved by an authorized Jenn-Air servicer is not available. 10. Repairs to parts or systems resulting from warranty coverage. 3. This warranty is void if the factory applied serial number has...of purchase, when this major appliance is operated and maintained according to instructions attached to or furnished with the product, Jenn-Air will pay for factory specified parts and repair labor to correct defects in materials or workmanship: ■ Electric element ■ Electronic controls ■...
