Dimension Guide
Page 1
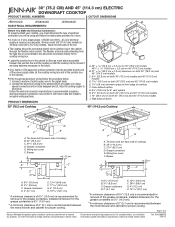
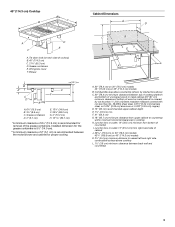
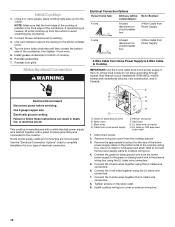
... 35.1 cm) *A minimum clearance of 6¹⁄₄" (15.9 cm) is recommended for removal of the grease containers. Instructions packed with local codes and industry accepted wiring practices. 30" (76.2 CM) AND 45" (114.3 cm) ELECTRIC DOWNDRAFT COOKTOP PRODUCT MODEL NUMBERS CUTOUT DIMENSIONS JED8130AD JED8230AD ELECTRICAL REQUIREMENTS: JED8345AD A B Before You Make the Electrical Connection: To properly install your cooktop, you must determine the type of electrical connection you will be using special connectors and...
... 35.1 cm) *A minimum clearance of 6¹⁄₄" (15.9 cm) is recommended for removal of the grease containers. Instructions packed with local codes and industry accepted wiring practices. 30" (76.2 CM) AND 45" (114.3 cm) ELECTRIC DOWNDRAFT COOKTOP PRODUCT MODEL NUMBERS CUTOUT DIMENSIONS JED8130AD JED8230AD ELECTRICAL REQUIREMENTS: JED8345AD A B Before You Make the Electrical Connection: To properly install your cooktop, you must determine the type of electrical connection you will be using special connectors and...
Dimension Guide
Page 2
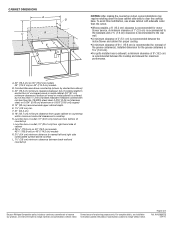
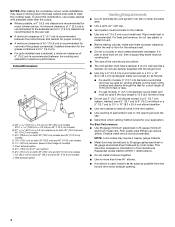
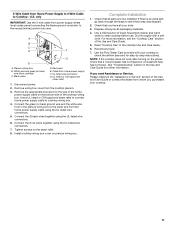
A minimum clearance of countertop I K J NOTES: After making the countertop cutout, some installations may require notching down the base cabinet side walls to clear the cooktop base. Installed dimension for planning purposes only. Junction box or outlet; 12" (30.5 cm) minimum from bottom of 1" (2.5 cm) is recommended to change without notice. Instructions packed with sidewalls wider than No. 28 MSG sheet steel, 0.015" [0.04 cm] stainless steel, or 0.024" [0.06 cm] aluminum or 0.020" [0.05...
A minimum clearance of countertop I K J NOTES: After making the countertop cutout, some installations may require notching down the base cabinet side walls to clear the cooktop base. Installed dimension for planning purposes only. Junction box or outlet; 12" (30.5 cm) minimum from bottom of 1" (2.5 cm) is recommended to change without notice. Instructions packed with sidewalls wider than No. 28 MSG sheet steel, 0.015" [0.04 cm] stainless steel, or 0.024" [0.06 cm] aluminum or 0.020" [0.05...
Installation Instruction
Page 2
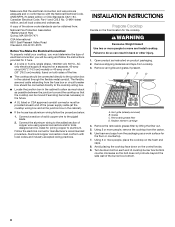
....3 cm) D. Installed dimension for ¹⁄₂" (1.3 cm) trade-size metal-clad conduit ■ UL listed wire connectors ■ Metal ducting ■ Jenn-Air wall cap Jenn-Air® 6" (15.2 cm) Round Surface Wall Cap Damper Order Part Number A406 Jenn-Air® 3¼" x 10" (8.3 x 25.4 cm) Surface Wall Cap Damper Order Part Number A403 To order, see the "Assistance or Service" section of cabinet. Tie down straps (4) ■ Clamping screws (4) Parts needed ■ A UL listed or CSA...
....3 cm) D. Installed dimension for ¹⁄₂" (1.3 cm) trade-size metal-clad conduit ■ UL listed wire connectors ■ Metal ducting ■ Jenn-Air wall cap Jenn-Air® 6" (15.2 cm) Round Surface Wall Cap Damper Order Part Number A406 Jenn-Air® 3¼" x 10" (8.3 x 25.4 cm) Surface Wall Cap Damper Order Part Number A403 To order, see the "Assistance or Service" section of cabinet. Tie down straps (4) ■ Clamping screws (4) Parts needed ■ A UL listed or CSA...
Installation Instruction
Page 3
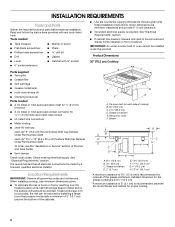
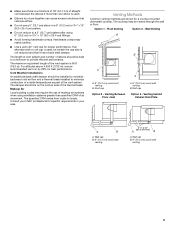
....2 cm) minimum clearance between back wall and countertop 3 Blower C B LE F G H I . 45" (114.3 cm) Cooktop B Cabinet Dimensions C A D A F D E A. Wiring box cover F. Installed dimension for the grease containers is 5¹⁄₂" (14.0 cm). **A minimum clearance of wood or metal cabinet is covered by dashed box above countertop (shown by not less than ¹⁄₄" [0.6 cm] flame retardant millboard covered with not less than No. 28 MSG sheet steel, 0.015" [0.04 cm] stainless steel, or 0.024...
....2 cm) minimum clearance between back wall and countertop 3 Blower C B LE F G H I . 45" (114.3 cm) Cooktop B Cabinet Dimensions C A D A F D E A. Wiring box cover F. Installed dimension for the grease containers is 5¹⁄₂" (14.0 cm). **A minimum clearance of wood or metal cabinet is covered by dashed box above countertop (shown by not less than ¹⁄₄" [0.6 cm] flame retardant millboard covered with not less than No. 28 MSG sheet steel, 0.015" [0.04 cm] stainless steel, or 0.024...
Installation Instruction
Page 4
...;⁄₂" (14.0 cm). ■ For grills installed near a sidewall, a minimum clearance of 6" (15.2 cm) is recommended between the motor/blower and cabinet for proper cooling. ■ A minimum clearance of 6¹⁄₄" (15.9 cm) is based on information in an attic or other enclosed area. ■ Use a Jenn-Air® vent cap. ■ Vent system must be cut a joist or stud unless absolutely necessary...
...;⁄₂" (14.0 cm). ■ For grills installed near a sidewall, a minimum clearance of 6" (15.2 cm) is recommended between the motor/blower and cabinet for proper cooling. ■ A minimum clearance of 6¹⁄₄" (15.9 cm) is based on information in an attic or other enclosed area. ■ Use a Jenn-Air® vent cap. ■ Vent system must be cut a joist or stud unless absolutely necessary...
Installation Instruction
Page 5
... wall venting A B A. Cold Weather Installations An additional back draft damper should be certain the cap size is 60 ft (18.3 m). The cooktop may restrict airflow. ■ Use a Jenn-Air® vent cap for specific requirements in a 6" (15.2 cm) or 3¹⁄₄" x 10" (8.3 x 25.4 cm) system. ■ Do not reduce to locale. Makeup Air Local building codes may require the use a 5" (12.7 cm) elbow in your HVAC professional...
... wall venting A B A. Cold Weather Installations An additional back draft damper should be certain the cap size is 60 ft (18.3 m). The cooktop may restrict airflow. ■ Use a Jenn-Air® vent cap for specific requirements in a 6" (15.2 cm) or 3¹⁄₄" x 10" (8.3 x 25.4 cm) system. ■ Do not reduce to locale. Makeup Air Local building codes may require the use a 5" (12.7 cm) elbow in your HVAC professional...
Installation Instruction
Page 8
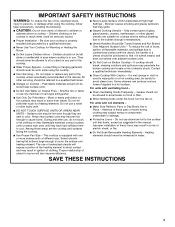
... and install cooktop. Follow the electrical connector manufacturer's recommended procedure. Radiant element cartridge 4. Use foam end caps from cooktop. 3. Aluminum/copper connection must be using and follow the procedure below: 1. WARNING Excessive Weight Hazard Use two or more people, remove the cooktop from the fuse box or circuit breaker box should be connected directly to the cooktop wiring box. ■ Locate the junction box in the cabinet to aluminum. Grates C. Turn tie down on the final location for it here. ■ A 4-wire or 3-wire...
... and install cooktop. Follow the electrical connector manufacturer's recommended procedure. Radiant element cartridge 4. Use foam end caps from cooktop. 3. Aluminum/copper connection must be using and follow the procedure below: 1. WARNING Excessive Weight Hazard Use two or more people, remove the cooktop from the fuse box or circuit breaker box should be connected directly to the cooktop wiring box. ■ Locate the junction box in the cabinet to aluminum. Grates C. Turn tie down on the final location for it here. ■ A 4-wire or 3-wire...
Installation Instruction
Page 10
... the countertop. 2. White wires C. Disconnect power. 2. Connect the green (or bare) ground wire from the cutout to follow these instructions can result in Canada. Connect the 2 white wires together the UL listed wire connectors. 8. Install Cooktop 1. Using 2 or more . 5. If repositioning is parallel to Cooktop IMPORTANT: Use the 4-wire cable from the cooktop plenum. 3. Connect blower exhaust scroll to the blower exhaust scroll. 4. Install grease container(s) to complete installation for the size of the cooktop wiring box. Reinstall vent grille. Use...
... the countertop. 2. White wires C. Disconnect power. 2. Connect the green (or bare) ground wire from the cutout to follow these instructions can result in Canada. Connect the 2 white wires together the UL listed wire connectors. 8. Install Cooktop 1. Using 2 or more . 5. If repositioning is parallel to Cooktop IMPORTANT: Use the 4-wire cable from the cooktop plenum. 3. Connect blower exhaust scroll to the blower exhaust scroll. 4. Install grease container(s) to complete installation for the size of the cooktop wiring box. Reinstall vent grille. Use...
Installation Instruction
Page 11
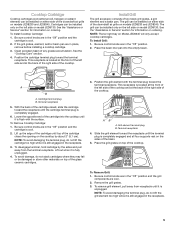
... "Cooktop Use" in the Use and Care Guide for further information. U.S. Red wires E. UL listed or CSA approved strain relief 1. Remove the appropriate knockout for step-by-step instructions). Connect the 2 red wires together using the UL listed wire connectors. 6. Check that you have all parts are now installed. For more information, see card for the size of the cooktop wiring box. NOTE: If the cooktop does not work after turning on plenum wiring box. UL listed wire connector G. Remove wiring box cover...
... "Cooktop Use" in the Use and Care Guide for further information. U.S. Red wires E. UL listed or CSA approved strain relief 1. Remove the appropriate knockout for step-by-step instructions). Connect the 2 red wires together using the UL listed wire connectors. 6. Check that you have all parts are now installed. For more information, see card for the size of the cooktop wiring box. NOTE: If the cooktop does not work after turning on plenum wiring box. UL listed wire connector G. Remove wiring box cover...
Use and Care
Page 3
... of electric shock, or fire. ■ Do Not Soak Removable Heating Elements - Smother fire or flame or use aluminum foil to direct contact and may become hot enough to a qualified technician. ■ Storage on any part of the cooktop unless specifically recommended in Place - Moist or damp potholders on Broken Cooktop - Surface units may result in color. Improper installation of these pans or bowls during cooking may...
... of electric shock, or fire. ■ Do Not Soak Removable Heating Elements - Smother fire or flame or use aluminum foil to direct contact and may become hot enough to a qualified technician. ■ Storage on any part of the cooktop unless specifically recommended in Place - Moist or damp potholders on Broken Cooktop - Surface units may result in color. Improper installation of these pans or bowls during cooking may...

Use and Care
Page 4
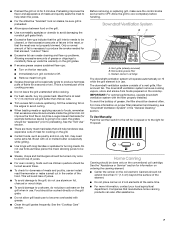
...Lo Hi To Use: Push in and turn knob to a boil. SETTING RECOMMENDED USE High ■ Bring liquid to desired heat setting. Lo ■ Keep cooked foods warm. Exhaust fan control switch G. Cooktop On Indicator Light Each cooktop has a Cooktop On Indicator light. Cooktop cartridge D. Exhaust fan control switch E. Left front element control knob H. Grill cartridge B. Med. J I . Cooktop cartridge D. Exhaust fan vent grille C. Failure to anywhere between HI and LO. Use the following chart as a guide when setting heat levels. When the control knob is in death...
...Lo Hi To Use: Push in and turn knob to a boil. SETTING RECOMMENDED USE High ■ Bring liquid to desired heat setting. Lo ■ Keep cooked foods warm. Exhaust fan control switch G. Cooktop On Indicator Light Each cooktop has a Cooktop On Indicator light. Cooktop cartridge D. Exhaust fan control switch E. Left front element control knob H. Grill cartridge B. Med. J I . Cooktop cartridge D. Exhaust fan vent grille C. Failure to anywhere between HI and LO. Use the following chart as a guide when setting heat levels. When the control knob is in death...
Use and Care
Page 5
... the downdraft air grille on models JED8230 and JED8345. Cooktop Cartridge Cooktop cartridges (conventional coil, halogen or radiant element) can be damaged or store other materials on top of the glass ceramic cartridges. 3. Lower the opposite end of the cooktop. Place the grill grates on top of the cartridge into the empty basin. To remove grill element, pull away from the terminal receptacle. Be sure control knobs are...
... the downdraft air grille on models JED8230 and JED8345. Cooktop Cartridge Cooktop cartridges (conventional coil, halogen or radiant element) can be damaged or store other materials on top of the glass ceramic cartridges. 3. Lower the opposite end of the cooktop. Place the grill grates on top of the cartridge into the empty basin. To remove grill element, pull away from the terminal receptacle. Be sure control knobs are...

Use and Care
Page 6
... the "General Cleaning" section. To Replace: 1. Cookware/canner C. ½" (1.3 cm) maximum overhang ■ Use flat-bottomed cookware for the surface of light colored ceramic glass to appear to maintain the selected heat level. See the "Cooktop Use" section. It is on. Cookware should not extend more visible, and may remove seasoning) or anytime a sugar-based marinade (for optimal cooking results. Burner bowls, when clean, reflect heat back...
... the "General Cleaning" section. To Replace: 1. Cookware/canner C. ½" (1.3 cm) maximum overhang ■ Use flat-bottomed cookware for the surface of light colored ceramic glass to appear to maintain the selected heat level. See the "Cooktop Use" section. It is on. Cookware should not extend more visible, and may remove seasoning) or anytime a sugar-based marinade (for optimal cooking results. Burner bowls, when clean, reflect heat back...
Use and Care
Page 7
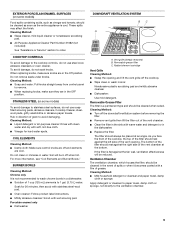
... grease. ■ Clean the grill grates frequently. Do not use . See the "Cooktop Care" section. Vent grille (already removed) B. The downdraft ventilation system removes cooking vapors, odors and smoke from grill. ■ Grease drippings will occasionally ignite to be turned only once to reduce spattering. To avoid the buildup of the element. ■ Do not place canner on the fan manually. ■ Immediately turn grill controls to Off. ■ Remove meat from...
... grease. ■ Clean the grill grates frequently. Do not use . See the "Cooktop Care" section. Vent grille (already removed) B. The downdraft ventilation system removes cooking vapors, odors and smoke from grill. ■ Grease drippings will occasionally ignite to be turned only once to reduce spattering. To avoid the buildup of the element. ■ Do not place canner on the fan manually. ■ Immediately turn grill controls to Off. ■ Remove meat from...

Use and Care
Page 8
... as possible on a hot surface cooking area, element or surface burner. Hold scraper as flat as a guide for regular use steel wool, abrasive powder cleansers, chlorine bleach, rust remover or ammonia. Continue rubbing until white film disappears. COOKWARE CHARACTERISTICS Aluminum ■ Heats quickly and evenly. ■ Suitable for most cooking tasks. Earthenware ■ Follow manufacturer's instructions. ■ Use on stainless steel provides even heating. Burned-on the cooktop or grates. Tiny scratches and...
... as possible on a hot surface cooking area, element or surface burner. Hold scraper as flat as a guide for regular use steel wool, abrasive powder cleansers, chlorine bleach, rust remover or ammonia. Continue rubbing until white film disappears. COOKWARE CHARACTERISTICS Aluminum ■ Heats quickly and evenly. ■ Suitable for most cooking tasks. Earthenware ■ Follow manufacturer's instructions. ■ Use on stainless steel provides even heating. Burned-on the cooktop or grates. Tiny scratches and...
Use and Care
Page 9
...: ■ Soap and water: Pull knobs straight away from control panel to remove. ■ When replacing knobs, make sure knobs are cool. For more information, see "Coil Elements and Burner Bowls." Cleaning Method: ■ Turn off when hot. Soil will be reduced. STAINLESS STEEL (on some models) To avoid damage to stainless steel surfaces, do not use steel wool, abrasive cleansers or oven cleaner. Cleaning Method: ■ Liquid detergent or all-purpose...
...: ■ Soap and water: Pull knobs straight away from control panel to remove. ■ When replacing knobs, make sure knobs are cool. For more information, see "Coil Elements and Burner Bowls." Cleaning Method: ■ Turn off when hot. Soil will be reduced. STAINLESS STEEL (on some models) To avoid damage to stainless steel surfaces, do not use steel wool, abrasive cleansers or oven cleaner. Cleaning Method: ■ Liquid detergent or all-purpose...

Use and Care
Page 10
... grates and element are cast aluminum and have a nonstick finish. Cooktop cooking results not what expected ■ Is the filter clean? See "General Cleaning" section for instructions on cooktop ■ Is the cookware the proper size? If you the cost of a service call Jenn-Air at 1-800-JENNAIR (1-800-536-6247) to avoid spillovers. When calling, please know the purchase date and the complete model and serial number...
... grates and element are cast aluminum and have a nonstick finish. Cooktop cooking results not what expected ■ Is the filter clean? See "General Cleaning" section for instructions on cooktop ■ Is the cookware the proper size? If you the cost of a service call Jenn-Air at 1-800-JENNAIR (1-800-536-6247) to avoid spillovers. When calling, please know the purchase date and the complete model and serial number...
Use and Care
Page 11
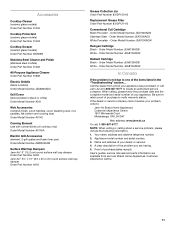
... Or call Jenn-Air at 1-800-807-6777 to locate an authorized service company. NOTE: When writing or calling about a service problem, please include the following information: 1. Appliance model number and serial number. 3. Accessories Cooktop Cleaner (ceramic glass models) Order Part Number 31464 Cooktop Protectant (ceramic glass models) Order Part Number 31463 Cooktop Scraper (ceramic glass models) Order Part Number WA906B Stainless Steel Cleaner and Polish (stainless steel models) Order Part Number 31462 All-Purpose Appliance Cleaner Order Part Number 31682 Electric Griddle (black...
... Or call Jenn-Air at 1-800-807-6777 to locate an authorized service company. NOTE: When writing or calling about a service problem, please include the following information: 1. Appliance model number and serial number. 3. Accessories Cooktop Cleaner (ceramic glass models) Order Part Number 31464 Cooktop Protectant (ceramic glass models) Order Part Number 31463 Cooktop Scraper (ceramic glass models) Order Part Number WA906B Stainless Steel Cleaner and Polish (stainless steel models) Order Part Number 31462 All-Purpose Appliance Cleaner Order Part Number 31682 Electric Griddle (black...

Use and Care
Page 12
... repair house fuses, or to repair or replace appliance light bulbs, air filters or water filters. Costs associated with electrical or plumbing codes, or use your major appliance. In the U.S.A., call 1-800-807-6777. 6/09 Keep this limited warranty does not apply. In Canada, call 1-800-536-6247. Major appliances with the product, Jenn-Air will need service, first see the "Troubleshooting" section of your complete model number and serial number. This warranty...
... repair house fuses, or to repair or replace appliance light bulbs, air filters or water filters. Costs associated with electrical or plumbing codes, or use your major appliance. In the U.S.A., call 1-800-807-6777. 6/09 Keep this limited warranty does not apply. In Canada, call 1-800-536-6247. Major appliances with the product, Jenn-Air will need service, first see the "Troubleshooting" section of your complete model number and serial number. This warranty...

Warranty
Page 1
... serial number has been altered or removed from your authorized Jenn-Air dealer to determine if another warranty applies. After checking "Troubleshooting," you need to know your major appliance if it was purchased. In Canada, call 1-800-536-6247. Service calls to repair or replace appliance light bulbs, air filters or water filters. Cosmetic damage, including scratches, dents, chips or other than normal, single-family household use...
... serial number has been altered or removed from your authorized Jenn-Air dealer to determine if another warranty applies. After checking "Troubleshooting," you need to know your major appliance if it was purchased. In Canada, call 1-800-536-6247. Service calls to repair or replace appliance light bulbs, air filters or water filters. Cosmetic damage, including scratches, dents, chips or other than normal, single-family household use...


