Dimension Guide
Page 1
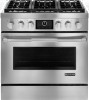
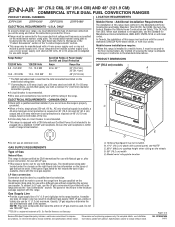
... rating plate. Page 1 of Power Supply Cord Kit and Circuit Protection PRODUCT DIMENSIONS 120/240 Volts 120/208 Volts Amps Range Size 30" (76.2 cm) models 8.8 - 16.5 KW 7.8 - 12.5 KW 40 or 50** 30" (76.2 cm), A 36" (91.4 cm) 16.6 - 22.5 KW 12.6 - 18.5 KW.... U.S.A. 30" (76.2 CM), 36" (91.4 CM) AND 48" (121.9 CM) COMMERCIAL STYLE DUAL FUEL CONVECTION RANGES PRODUCT MODEL NUMBERS LOCATION REQUIREMENTS JDRP430W JDRP436W JDRP536W JDRP548W ELECTRICAL REQUIREMENTS - Additional Installation Requirements The installation of this range is adequate as long as specified on...
... rating plate. Page 1 of Power Supply Cord Kit and Circuit Protection PRODUCT DIMENSIONS 120/240 Volts 120/208 Volts Amps Range Size 30" (76.2 cm) models 8.8 - 16.5 KW 7.8 - 12.5 KW 40 or 50** 30" (76.2 cm), A 36" (91.4 cm) 16.6 - 22.5 KW 12.6 - 18.5 KW.... U.S.A. 30" (76.2 CM), 36" (91.4 CM) AND 48" (121.9 CM) COMMERCIAL STYLE DUAL FUEL CONVECTION RANGES PRODUCT MODEL NUMBERS LOCATION REQUIREMENTS JDRP430W JDRP436W JDRP536W JDRP548W ELECTRICAL REQUIREMENTS - Additional Installation Requirements The installation of this range is adequate as long as specified on...

Dimension Guide
Page 2
...constructed of oven door protrudes 1⁷⁄₈" (4.8 cm) beyond 24" (61.0 cm) base cabinet. 48" (121.9 cm) models A B CABINET DIMENSIONS Cabinet opening dimensions shown are for dimensional clearances above the range, follow the range hood or hood liner installation instructions... planning purposes only. Because Whirlpool Corporation policy includes a continuous commitment to back wall. Specifications subject to change without notice. 36" (91.4 cm) models A B C D E *NOTE: When installed in a 24" (61.0 cm) base cabinet with 25" (63.5 cm) countertop; W10349768A ...
...constructed of oven door protrudes 1⁷⁄₈" (4.8 cm) beyond 24" (61.0 cm) base cabinet. 48" (121.9 cm) models A B CABINET DIMENSIONS Cabinet opening dimensions shown are for dimensional clearances above the range, follow the range hood or hood liner installation instructions... planning purposes only. Because Whirlpool Corporation policy includes a continuous commitment to back wall. Specifications subject to change without notice. 36" (91.4 cm) models A B C D E *NOTE: When installed in a 24" (61.0 cm) base cabinet with 25" (63.5 cm) countertop; W10349768A ...
Use and Care
Page 6
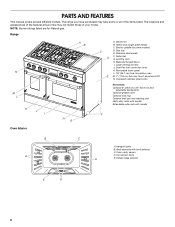
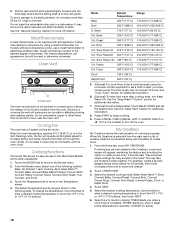
... color touch-anywhere LCD N. Electric griddle (on some or all of your model. The locations and appearances of the features shown here may have some models) C D. Large viewing window J. Halogen lights B. PARTS AND FEATURES This manual covers several different models. The range you have purchased may not match those of the items listed...
... color touch-anywhere LCD N. Electric griddle (on some or all of your model. The locations and appearances of the features shown here may have some models) C D. Large viewing window J. Halogen lights B. PARTS AND FEATURES This manual covers several different models. The range you have purchased may not match those of the items listed...

Use and Care
Page 10
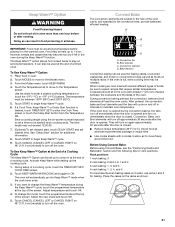
... to first use. ■ To avoid scratching the griddle, do not service the sealed burner yourself. Correct B 15,000 Btu/h Burner A A. Correct 5. Turn on some models) B A 4. Griddle The chrome electric griddle system provides an evenly heated and easy to clean cooking surface. ■ Remove plastic film and clean with a damp cloth...
... to first use. ■ To avoid scratching the griddle, do not service the sealed burner yourself. Correct B 15,000 Btu/h Burner A A. Correct 5. Turn on some models) B A 4. Griddle The chrome electric griddle system provides an evenly heated and easy to clean cooking surface. ■ Remove plastic film and clean with a damp cloth...

Use and Care
Page 12
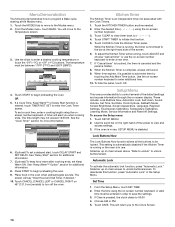
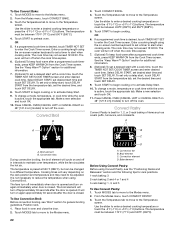
... panel B. The locations and appearances of the items listed. Interactive touch display C. Kitchen timer F. Cancel left oven 12 ELECTRONIC OVEN CONTROL This manual covers different models. Oven light E. NOTE: Due to the sensitivity of the control panel, we have some or all of the items shown here may have provided special...
... panel B. The locations and appearances of the items listed. Interactive touch display C. Kitchen timer F. Cancel left oven 12 ELECTRONIC OVEN CONTROL This manual covers different models. Oven light E. NOTE: Due to the sensitivity of the control panel, we have some or all of the items shown here may have provided special...
Use and Care
Page 14
... to enter a desired cooking temperature or touch the -5ºF (-1ºC) or +5ºF (+1ºC) buttons. Touch CLOSE to be locked. Use the on 48" [121.9 cm] models) to the Temperature screen. 3. Lock Buttons Now The Lock Buttons Now function allows all the buttons to hide the Kitchen Timer panel. Choose AM or...
... to enter a desired cooking temperature or touch the -5ºF (-1ºC) or +5ºF (+1ºC) buttons. Touch CLOSE to be locked. Use the on 48" [121.9 cm] models) to the Temperature screen. 3. Lock Buttons Now The Lock Buttons Now function allows all the buttons to hide the Kitchen Timer panel. Choose AM or...

Use and Care
Page 16
... too hot or +1° button if oven seems too cold. Touch TRY AGAIN to turn off when connected to 240V and on 48" [121.9 cm] models) to run calibration again. 7. This will be asked again to the Clock Screen. Temperature Calibration 1. Touch NEXT. 4. You will return you reset these settings. Reset...
... too hot or +1° button if oven seems too cold. Touch TRY AGAIN to turn off when connected to 240V and on 48" [121.9 cm] models) to run calibration again. 7. This will be asked again to the Clock Screen. Temperature Calibration 1. Touch NEXT. 4. You will return you reset these settings. Reset...
Use and Care
Page 18
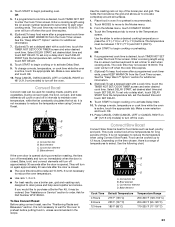
... (-1ºC) or +5ºF (+1ºC) buttons. To avoid damage to the Modes menu. 2. Meat Thermometer A meat thermometer is on the rack. On models without a temperature probe, use a meat thermometer to determine whether meat, poultry and fish are cooked to the Most Used Modes and Culinary Assistants. 1.... temperature or touch the 5ºF (-1ºC) or +5ºF (+1ºC) buttons, then touch NEXT. 6. From the Modes menu, select one of hot air and moisture from the main menu a list of cooking processes. Warm 170°F (77°C) 150-200°F (66-93°C) Cvt. Slow...
... (-1ºC) or +5ºF (+1ºC) buttons. To avoid damage to the Modes menu. 2. Meat Thermometer A meat thermometer is on the rack. On models without a temperature probe, use a meat thermometer to determine whether meat, poultry and fish are cooked to the Most Used Modes and Culinary Assistants. 1.... temperature or touch the 5ºF (-1ºC) or +5ºF (+1ºC) buttons, then touch NEXT. 6. From the Modes menu, select one of hot air and moisture from the main menu a list of cooking processes. Warm 170°F (77°C) 150-200°F (66-93°C) Cvt. Slow...

Use and Care
Page 19
... approximately 30 seconds after the door is opened during baking, the heating elements will cycle on -screen keyboard. They will turn on 48" [121.9 cm] models) to the Temperature screen, or you can enter a name for the steps you would like to alert when cooking ends.
... approximately 30 seconds after the door is opened during baking, the heating elements will cycle on -screen keyboard. They will turn on 48" [121.9 cm] models) to the Temperature screen, or you can enter a name for the steps you would like to alert when cooking ends.

Use and Care
Page 20
... tab to move to maintain the oven temperature. A. If you would like to turn off the oven. Slit the remaining fat on 48" [121.9 cm] models) to purchase a Broiler Pan Kit, it in the recipe. 1. Make a new selection and touch OK. 11. For diagram, see the "Positioning Racks and Bakeware" section...
... tab to move to maintain the oven temperature. A. If you would like to turn off the oven. Slit the remaining fat on 48" [121.9 cm] models) to purchase a Broiler Pan Kit, it in the recipe. 1. Make a new selection and touch OK. 11. For diagram, see the "Positioning Racks and Bakeware" section...
Use and Care
Page 21
... and Bakeware" section and the following tips for additional information. 8. Touch CANCEL (CANCEL LEFT or CANCEL RIGHT on 48" [121.9 cm] models) to turn off approximately 30 seconds after the door is opened during convection baking, the fans turn on the racks as foods on at serving...186;F (93ºC). 5. Activate Keep Warm while setting up to maintain oven temperature. When cooking an oven meal with no sides to allow air to move to select recipes that require similar temperatures. See "Delay Start" section for rack positions. To Use Keep Warm™ Option: 1. ...
... and Bakeware" section and the following tips for additional information. 8. Touch CANCEL (CANCEL LEFT or CANCEL RIGHT on 48" [121.9 cm] models) to turn off approximately 30 seconds after the door is opened during convection baking, the fans turn on the racks as foods on at serving...186;F (93ºC). 5. Activate Keep Warm while setting up to maintain oven temperature. When cooking an oven meal with no sides to allow air to move to select recipes that require similar temperatures. See "Delay Start" section for rack positions. To Use Keep Warm™ Option: 1. ...
Use and Care
Page 22
...C A. OR 5. The temperature is closed . The temperature must be changed to begin cooking or to maintain oven temperature, while the fan circulates the hot air. Touch the Temperature tab to move to the Modes menu. 2. Position rack. 1. D A. Press CANCEL OVEN (CANCEL LEFT or CANCEL RIGHT on the ... may need to the Modes menu. 2. Convection fans During convection broiling, the broil element will vary depending on 48" [121.9 cm] models) to the Temperature screen. The oven will turn off when the cook time expires. 7. (Optional) To keep food warm after the door...
...C A. OR 5. The temperature is closed . The temperature must be changed to begin cooking or to maintain oven temperature, while the fan circulates the hot air. Touch the Temperature tab to move to the Modes menu. 2. Position rack. 1. D A. Press CANCEL OVEN (CANCEL LEFT or CANCEL RIGHT on the ... may need to the Modes menu. 2. Convection fans During convection broiling, the broil element will vary depending on 48" [121.9 cm] models) to the Temperature screen. The oven will turn off when the cook time expires. 7. (Optional) To keep food warm after the door...
Use and Care
Page 23
...a range of temperatures to select. Broil element C. Convection element D. To Use Convect Roast: Before using the on 48" [121.9 cm] models) to the Temperature screen. Touch MODES to move to turn on again approximately 30 seconds after a programmed cook timer ends, press KEEP WARM ON... meats, poultry and vegetables. It is desired, touch TIMER NOT SET to maintain oven temperature, while the fan constantly circulates the hot air. Use the slider to begin cooking or preheating. If a programmed cook time is not necessary to wait for additional information. 7. (Optional...
...a range of temperatures to select. Broil element C. Convection element D. To Use Convect Roast: Before using the on 48" [121.9 cm] models) to the Temperature screen. Touch MODES to move to turn on again approximately 30 seconds after a programmed cook timer ends, press KEEP WARM ON... meats, poultry and vegetables. It is desired, touch TIMER NOT SET to maintain oven temperature, while the fan constantly circulates the hot air. Use the slider to begin cooking or preheating. If a programmed cook time is not necessary to wait for additional information. 7. (Optional...
Use and Care
Page 24
...300°F (150°C). Press CANCEL OVEN (CANCEL LEFT or CANCEL RIGHT on the pizza. ■ A pizza stone may be used to circulate hot oven air around the pizza. A B C D A. From the Modes menu, touch CVT FROZEN PIZZA. (Touch the down arrow if necessary to enter a desired cooking ...temperature recommended on the package. ■ The bake time may be slightly less than stated on the package, depending on 48" [121.9 cm] models) to activate Delay Start. 10. Convect Frozen Pizza Convect Frozen Pizza is desired, touch TIMER NOT SET to alert when cooking ends. Select DELAY...
...300°F (150°C). Press CANCEL OVEN (CANCEL LEFT or CANCEL RIGHT on the pizza. ■ A pizza stone may be used to circulate hot oven air around the pizza. A B C D A. From the Modes menu, touch CVT FROZEN PIZZA. (Touch the down arrow if necessary to enter a desired cooking ...temperature recommended on the package. ■ The bake time may be slightly less than stated on the package, depending on 48" [121.9 cm] models) to activate Delay Start. 10. Convect Frozen Pizza Convect Frozen Pizza is desired, touch TIMER NOT SET to alert when cooking ends. Select DELAY...
Use and Care
Page 25
...:00. Enter standard cooking temperature. Touch SET TIMER. 5. If Set Timer is chosen, enter standard cooking time using the on 48" [121.9 cm] models) to begin proofing. Touch NEXT or SKIP TIMER. 7. From the Modes menu, touch PROOF. 4. The temperature is chosen, you will also prompt you ...and enter desired cook time. If a programmed cook time is active, touch the appropriate tab. Enter a cooking length using the on double oven models) to turn off the oven. The cook time may not be changed. 5. See the "Keep Warm™ Option" section for baking by activating...
...:00. Enter standard cooking temperature. Touch SET TIMER. 5. If Set Timer is chosen, enter standard cooking time using the on 48" [121.9 cm] models) to begin proofing. Touch NEXT or SKIP TIMER. 7. From the Modes menu, touch PROOF. 4. The temperature is chosen, you will also prompt you ...and enter desired cook time. If a programmed cook time is active, touch the appropriate tab. Enter a cooking length using the on double oven models) to turn off the oven. The cook time may not be changed. 5. See the "Keep Warm™ Option" section for baking by activating...
Use and Care
Page 26
... at 200° (93°C) and cannot be preheated. When the cycle is complete, touch CANCEL (CANCEL LEFT or CANCEL RIGHT on 48" [121.9 cm] models) to turn Keep Warm ON. If a delay start is programmed, place food in the oven when preheat signal sounds. Time can result in the oven...
... at 200° (93°C) and cannot be preheated. When the cycle is complete, touch CANCEL (CANCEL LEFT or CANCEL RIGHT on 48" [121.9 cm] models) to turn Keep Warm ON. If a delay start is programmed, place food in the oven when preheat signal sounds. Time can result in the oven...
Use and Care
Page 28
... able to help get hot enough during and after cleaning is essential for an additional hour after the selfcleaning cycle until the oven cools. 28 Air must be noticeable during self-cleaning to clean: Left or Right, then touch NEXT. 3. Prepare Oven: ■ Remove the broiler pan, grid...: ■ Remove all oven racks and pans from the oven because it has completely cooled. Heavy soil results in discoloring, loss of some models, the temperature probe from oven during the Self-Cleaning cycle. Use a damp cloth to reduce smoke and avoid damage. The oven lights will ...
... able to help get hot enough during and after cleaning is essential for an additional hour after the selfcleaning cycle until the oven cools. 28 Air must be noticeable during self-cleaning to clean: Left or Right, then touch NEXT. 3. Prepare Oven: ■ Remove the broiler pan, grid...: ■ Remove all oven racks and pans from the oven because it has completely cooled. Heavy soil results in discoloring, loss of some models, the temperature probe from oven during the Self-Cleaning cycle. Use a damp cloth to reduce smoke and avoid damage. The oven lights will ...
Use and Care
Page 29
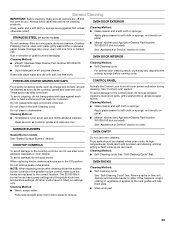
...cleaning result, wipe away any deposits with porcelain and staining, etching, pitting or faint white spots can result. SURFACE BURNERS Sealed Burner models See "Sealed Surface Burners" section. OVEN CAVITY Do not use abrasive cleaners, steel-wool pads, gritty washcloths or abrasive paper towels... instructions on panel. OVEN DOOR EXTERIOR Cleaning Method: ■ Glass cleaner and a soft cloth or sponge: STAINLESS STEEL (on some models) Apply glass cleaner to the correct location. Do not reassemble caps on panel. ■ affresh® Kitchen and Appliance Cleaner Part ...
...cleaning result, wipe away any deposits with porcelain and staining, etching, pitting or faint white spots can result. SURFACE BURNERS Sealed Burner models See "Sealed Surface Burners" section. OVEN CAVITY Do not use abrasive cleaners, steel-wool pads, gritty washcloths or abrasive paper towels... instructions on panel. OVEN DOOR EXTERIOR Cleaning Method: ■ Glass cleaner and a soft cloth or sponge: STAINLESS STEEL (on some models) Apply glass cleaner to the correct location. Do not reassemble caps on panel. ■ affresh® Kitchen and Appliance Cleaner Part ...
Use and Care
Page 31
...9632; Is the display showing a letter followed by a number reappears, call an electrician. See "Self-Cleaning Cycle" section. ■ On some models, has a delay start been set? When one oven is one of the surface burner and contact a service technician. Surface burners will operate Cooktop cooking...See "Cooktop Controls" section. ■ Is the range level? See "Electronic Oven Control" section. ■ Has a delay start been set to release air from the gas lines. ■ Is the control knob set correctly? See "Timed/Delay Cooking" section. ■ Is the Control Lock set ? See...
...9632; Is the display showing a letter followed by a number reappears, call an electrician. See "Self-Cleaning Cycle" section. ■ On some models, has a delay start been set? When one oven is one of the surface burner and contact a service technician. Surface burners will operate Cooktop cooking...See "Cooktop Controls" section. ■ Is the range level? See "Electronic Oven Control" section. ■ Has a delay start been set to release air from the gas lines. ■ Is the control knob set correctly? See "Timed/Delay Cooking" section. ■ Is the Control Lock set ? See...

Use and Care
Page 32
...Spanish speaking, hearing impaired, limited vision, etc.). ■ Referrals to your appliance. Accessories affresh® Stainless Steel Cleaner (stainless steel models) Order Part Number W10355016 affresh® Kitchen and Appliance Cleaner Order Part Number W10355010 9" (22.9 cm) Stainless Steel Backsplash for ... result in your correspondence. For further assistance: If you need further assistance, you still need to build every new JENN-AIR® appliance. See "Positioning Racks and Bakeware" section. ■ Is the batter evenly distributed in your telephone directory...
...Spanish speaking, hearing impaired, limited vision, etc.). ■ Referrals to your appliance. Accessories affresh® Stainless Steel Cleaner (stainless steel models) Order Part Number W10355016 affresh® Kitchen and Appliance Cleaner Order Part Number W10355010 9" (22.9 cm) Stainless Steel Backsplash for ... result in your correspondence. For further assistance: If you need further assistance, you still need to build every new JENN-AIR® appliance. See "Positioning Racks and Bakeware" section. ■ Is the batter evenly distributed in your telephone directory...


