Instructions
Page 1
'9' 9,'(2 3/$
'9' 9,'(2 3/$

Instructions
Page 2
... appareil. Ne pas enlever les vis ni les panneaux et ne pas ouvrir le coffret de l'appareil. 2. The lightning flash with the instructions, may be remote controlled. STANDBY/ON switch! Warnings, Cautions and Others Mises en garde, précautions et indications diverses CAUTION RISK OF ELECTRIC SHOCK DO NOT OPEN...
... appareil. Ne pas enlever les vis ni les panneaux et ne pas ouvrir le coffret de l'appareil. 2. The lightning flash with the instructions, may be remote controlled. STANDBY/ON switch! Warnings, Cautions and Others Mises en garde, précautions et indications diverses CAUTION RISK OF ELECTRIC SHOCK DO NOT OPEN...
Instructions
Page 3
... accessories 3 About this instruction manual 4 Notes on handling 5 Preliminary knowledge Page 6 Names of parts and controls 6 Front panel 6 Display window 7 Remote control unit 8 Rear panel 10 Operational Principles 11 On-screen displays 11 To prevent the monitor from burning out [SCREEN SAVER 13 On-screen guide...37 To repeat the current selection or all tracks [REPEAT] .......37 To repeat a desired part [A-B REPEAT 39 Selecting a scene angle of DVD VIDEO 40 To select a scene angle from the normal screen [ANGLE 40 To select a scene angle from the angle list display [ANGLE 41...
... accessories 3 About this instruction manual 4 Notes on handling 5 Preliminary knowledge Page 6 Names of parts and controls 6 Front panel 6 Display window 7 Remote control unit 8 Rear panel 10 Operational Principles 11 On-screen displays 11 To prevent the monitor from burning out [SCREEN SAVER 13 On-screen guide...37 To repeat the current selection or all tracks [REPEAT] .......37 To repeat a desired part [A-B REPEAT 39 Selecting a scene angle of DVD VIDEO 40 To select a scene angle from the normal screen [ANGLE 40 To select a scene angle from the angle list display [ANGLE 41...

Instructions
Page 5
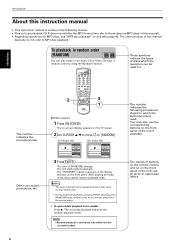
... • Audio/video cable (x 1) • Component video cable (x 1) • R6P(SUM-3)/AA(15F) batteries (x 2) Introduction English • Instruction manual (x 1) Introduction • AV compulink cable (x 1) • Remote Control Unit (x 1) ¢ -VOL 8 5 ¡ ∞ TEINTTLEER1 5SLCOHW+7-CLEAR4 PRE3VSISOELLUODEWISGC+ETSATNGSLTER1OS0BUETBVT-I/NT--E7-LXEZTOTOAV0UM74DTIOTPV+RVS0OC4GA8RN1ESSTITVVVEVF+R18PE15MP0TEUVAT5ITN29GPHTTOVVN392DI6C SELDEISCCT 3 CTAVN/CVIEDLEO TV6 TV3 TV STANDBDYV/TODVN RETURN...
... • Audio/video cable (x 1) • Component video cable (x 1) • R6P(SUM-3)/AA(15F) batteries (x 2) Introduction English • Instruction manual (x 1) Introduction • AV compulink cable (x 1) • Remote Control Unit (x 1) ¢ -VOL 8 5 ¡ ∞ TEINTTLEER1 5SLCOHW+7-CLEAR4 PRE3VSISOELLUODEWISGC+ETSATNGSLTER1OS0BUETBVT-I/NT--E7-LXEZTOTOAV0UM74DTIOTPV+RVS0OC4GA8RN1ESSTITVVVEVF+R18PE15MP0TEUVAT5ITN29GPHTTOVVN392DI6C SELDEISCCT 3 CTAVN/CVIEDLEO TV6 TV3 TV STANDBDYV/TODVN RETURN...
Instructions
Page 6
...by using the Random function. 2 DISC SELECT TV DVD STANDBY/ON TV DVD 3D TV/VIDEO REPEAT PHONIC CANCEL RETURN TV1 1 TV4 4 TV7 7 TV -/-- 10 TV2 TV3 2 3 TV5 TV6 5 6 TV8 TV9 8 9 TV0 MUTING 0 +10 ANGLE SUBTITLE AUDIO VFP DIGEST PROGRESSIVE SCAN ZOOM + PREVIOUS 4 CLEAR 7 SLOW1 SELECT 3 ...track will not be used . You may also use the corresponding buttons on the front panel. Other convenient procedures, etc. ON SCREEN REMOTE CONTROL 3 1 ¶ While stopped 1 Press ON SCREEN. After playing all given in uppercase letters. 4 The on-screen display appears...
...by using the Random function. 2 DISC SELECT TV DVD STANDBY/ON TV DVD 3D TV/VIDEO REPEAT PHONIC CANCEL RETURN TV1 1 TV4 4 TV7 7 TV -/-- 10 TV2 TV3 2 3 TV5 TV6 5 6 TV8 TV9 8 9 TV0 MUTING 0 +10 ANGLE SUBTITLE AUDIO VFP DIGEST PROGRESSIVE SCAN ZOOM + PREVIOUS 4 CLEAR 7 SLOW1 SELECT 3 ...track will not be used . You may also use the corresponding buttons on the front panel. Other convenient procedures, etc. ON SCREEN REMOTE CONTROL 3 1 ¶ While stopped 1 Press ON SCREEN. After playing all given in uppercase letters. 4 The on-screen display appears...

Instructions
Page 8
... (1 through 7) buttons/ indicators 5 3 (PLAY) button STANDBY STANDBY/ON DISC 1 DISC 2 DISC 3 DISC 4 DISC 5 DISC 6 DISC 7 PROGRESSIVE DVD/CD PLAYER EXCHANGE DISC SKIP 7-DISC PLAY & EXCHANGE DVD / VIDEO CD / CD OPEN/CLOSE 0 PLAY 3 STOP PAUSE 7 8 4 SKIP ¢ 8 Remote sensor 0 Display window 9 PROGRESSIVE indicator = 7 (STOP) button - When the indicator is illuminated, pressing the button activates the play exchange...
... (1 through 7) buttons/ indicators 5 3 (PLAY) button STANDBY STANDBY/ON DISC 1 DISC 2 DISC 3 DISC 4 DISC 5 DISC 6 DISC 7 PROGRESSIVE DVD/CD PLAYER EXCHANGE DISC SKIP 7-DISC PLAY & EXCHANGE DVD / VIDEO CD / CD OPEN/CLOSE 0 PLAY 3 STOP PAUSE 7 8 4 SKIP ¢ 8 Remote sensor 0 Display window 9 PROGRESSIVE indicator = 7 (STOP) button - When the indicator is illuminated, pressing the button activates the play exchange...
Instructions
Page 9
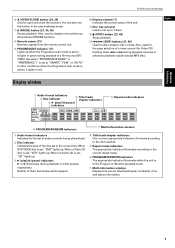
...according to display nine continuous still pictures (STROBE function). 8 Remote sensor (21) Receives signals from the remote control unit. 9 PROGRESSIVE indicator (17) Lights up when the Progressive scan mode is active. Also, used for Video CD). In other conditions when the Progressive scan mode is set up . 3 3 (play )/8 (pause)... of audio currently being played back. 2 Disc indicator Indicates the type of the unit. - Disc tray carousel Used to set , "DVD" lights up . When DVD VIDEO disc is active, it lights in the play exchange mode. 7 8 (PAUSE) button (27, 34, 46) Pauses playback. ...
...according to display nine continuous still pictures (STROBE function). 8 Remote sensor (21) Receives signals from the remote control unit. 9 PROGRESSIVE indicator (17) Lights up when the Progressive scan mode is active. Also, used for Video CD). In other conditions when the Progressive scan mode is set up . 3 3 (play )/8 (pause)... of audio currently being played back. 2 Disc indicator Indicates the type of the unit. - Disc tray carousel Used to set , "DVD" lights up . When DVD VIDEO disc is active, it lights in the play exchange mode. 7 8 (PAUSE) button (27, 34, 46) Pauses playback. ...
Instructions
Page 10
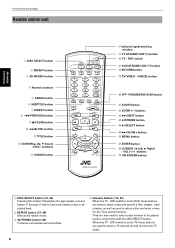
... a time for the Time search function. CH+ 5 ENTER 5 MENU VOL + CHOICE ∞ CH- PROGRESSIVE SCAN button * AUDIO button ( ZOOM +/- DVD switch $ DVD STANDBY/ON % RETURN button button ^ TV/VIDEO - TITLE button = CURSOR(5 Up, ∞ Down) - button - Preliminar y knowledge 5 Preliminary knowledge Remote control unit 1 DISC SELECT button 2 REPEAT button 3 3D PHONIC button 4 Numeric buttons 5 ANGLE button...
... a time for the Time search function. CH+ 5 ENTER 5 MENU VOL + CHOICE ∞ CH- PROGRESSIVE SCAN button * AUDIO button ( ZOOM +/- DVD switch $ DVD STANDBY/ON % RETURN button button ^ TV/VIDEO - TITLE button = CURSOR(5 Up, ∞ Down) - button - Preliminar y knowledge 5 Preliminary knowledge Remote control unit 1 DISC SELECT button 2 REPEAT button 3 3D PHONIC button 4 Numeric buttons 5 ANGLE button...
Instructions
Page 11
...Progressive scan mode active" on the TV screen. DVD switch (14, 23, 30) When setting this button while paused advances the still picture frame-by-frame. + 3/SELECT button (26, 30) Starts playback. See "How to control your TV. In this window toward the remote...(for a few seconds switches the scan mode between the progressive scan and interlace scan modes. English 9 Preliminar y knowledge Preliminary knowledge 5 ANGLE button (40, 41, 45) Changes camera angles during playback reverses playback rapidly (except MP3 disc). Pressing this button for DVD VIDEO/Video CD). ( ZOOM +/-...
...Progressive scan mode active" on the TV screen. DVD switch (14, 23, 30) When setting this button while paused advances the still picture frame-by-frame. + 3/SELECT button (26, 30) Starts playback. See "How to control your TV. In this window toward the remote...(for a few seconds switches the scan mode between the progressive scan and interlace scan modes. English 9 Preliminar y knowledge Preliminary knowledge 5 ANGLE button (40, 41, 45) Changes camera angles during playback reverses playback rapidly (except MP3 disc). Pressing this button for DVD VIDEO/Video CD). ( ZOOM +/-...
Instructions
Page 13
...any button) in some conditions. CH+ 5 ENTER 5 MENU VOL + CHOICE ∞ CH- ON SCREEN Numeric buttons CURSOR 5/∞/2/3 REMOTE CONTROL Opening display An opening display appears automatically (without pressing any picture (such as an Audio CD), the opening display does not disappear after... knowledge English ENTER DISC SELECT TV DVD STANDBY/ON TV DVD 3D TV/VIDEO REPEAT PHONIC CANCEL RETURN TV1 1 TV4 4 TV7 7 TV -/-- 10 TV2 TV3 2 3 TV5 TV6 5 6 TV8 TV9 8 9 TV0 MUTING 0 +10 ANGLE SUBTITLE AUDIO VFP DIGEST PROGRESSIVE SCAN - type item works when you can...
...any button) in some conditions. CH+ 5 ENTER 5 MENU VOL + CHOICE ∞ CH- ON SCREEN Numeric buttons CURSOR 5/∞/2/3 REMOTE CONTROL Opening display An opening display appears automatically (without pressing any picture (such as an Audio CD), the opening display does not disappear after... knowledge English ENTER DISC SELECT TV DVD STANDBY/ON TV DVD 3D TV/VIDEO REPEAT PHONIC CANCEL RETURN TV1 1 TV4 4 TV7 7 TV -/-- 10 TV2 TV3 2 3 TV5 TV6 5 6 TV8 TV9 8 9 TV0 MUTING 0 +10 ANGLE SUBTITLE AUDIO VFP DIGEST PROGRESSIVE SCAN - type item works when you can...

Instructions
Page 15
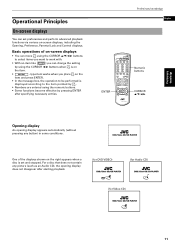
...time from burning out [SCREEN SAVER] A television monitor screen may be played back. When a Video CD disc is displayed for a long time. DVD/Video CD/CD PLAYER 13 Preliminar y knowledge VCD CONTROL display There are two types of the track Current track (St: start, End: end) number St. Preliminary ... shown on the right appears when an MP3 disc is displayed for over 5 minutes. • Pressing any button on the unit or the remote control unit will release the screen saver function and return to the previous display. • You can select the desired Group or track to ...
...time from burning out [SCREEN SAVER] A television monitor screen may be played back. When a Video CD disc is displayed for a long time. DVD/Video CD/CD PLAYER 13 Preliminar y knowledge VCD CONTROL display There are two types of the track Current track (St: start, End: end) number St. Preliminary ... shown on the right appears when an MP3 disc is displayed for over 5 minutes. • Pressing any button on the unit or the remote control unit will release the screen saver function and return to the previous display. • You can select the desired Group or track to ...

Instructions
Page 18
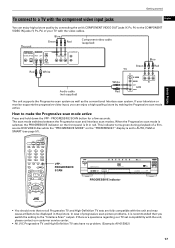
...audio sound quality, connect the AUDIO OUT jacks to your TV. NOTES • When connecting to a TV using the VIDEO OUT jack, make the Progressive scan mode active" on page 17. • Connect VIDEO OUT of the unit directly to the video input of the unit using the supplied audio/video...with stereo audio input and video input jacks using the S-video cable (optional) in addition to the (standard) video connection. See "AV COMPU LINK remote control system" on the front panel is lit, the VIDEO and S-VIDEO outputs do not feed the correct signals. Before making any connections • Do...
...audio sound quality, connect the AUDIO OUT jacks to your TV. NOTES • When connecting to a TV using the VIDEO OUT jack, make the Progressive scan mode active" on page 17. • Connect VIDEO OUT of the unit directly to the video input of the unit using the supplied audio/video...with stereo audio input and video input jacks using the S-video cable (optional) in addition to the (standard) video connection. See "AV COMPU LINK remote control system" on the front panel is lit, the VIDEO and S-VIDEO outputs do not feed the correct signals. Before making any connections • Do...
Instructions
Page 19
... 3 DISC 4 DISC 5 DISC 6 DISC 7 PROGRESSIVE DVD/CD PLAYER PROGRESSIVE indicator EXCHANGE DISC SKIP 7-DISC PLAY & EXCHANGE DVD / VIDEO CD / CD OPEN/CLOSE 0 PLAY 3 STOP PAUSE 7 8 4 SKIP ¢ REMOTE CONTROL • You should note that you can enjoy high picture quality by making the Progressive scan mode active. The scan mode switches between the Progressive scan and Interlace scan modes. In case of...
... 3 DISC 4 DISC 5 DISC 6 DISC 7 PROGRESSIVE DVD/CD PLAYER PROGRESSIVE indicator EXCHANGE DISC SKIP 7-DISC PLAY & EXCHANGE DVD / VIDEO CD / CD OPEN/CLOSE 0 PLAY 3 STOP PAUSE 7 8 4 SKIP ¢ REMOTE CONTROL • You should note that you can enjoy high picture quality by making the Progressive scan mode active. The scan mode switches between the Progressive scan and Interlace scan modes. In case of...

Instructions
Page 22
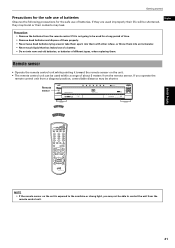
.... 3 Place the cover over the compartment, and press down on the point shown by an unsuitable AC power cord, only use . Using the remote control unit Using the remote control, you are inserted firmly. Caution • Do not damage, alter, twist, or pull the power cord, as this may cause fire,... of the compartment cover, and pull up the cover to open the compartment. 2 Place the two accessory R6P (SUM-3)/AA(15F) batteries in the remote control according to use the unit for more information. 20 See next page for a long time. • Disconnect the power cord before cleaning the ...
.... 3 Place the cover over the compartment, and press down on the point shown by an unsuitable AC power cord, only use . Using the remote control unit Using the remote control, you are inserted firmly. Caution • Do not damage, alter, twist, or pull the power cord, as this may cause fire,... of the compartment cover, and pull up the cover to open the compartment. 2 Place the two accessory R6P (SUM-3)/AA(15F) batteries in the remote control according to use the unit for more information. 20 See next page for a long time. • Disconnect the power cord before cleaning the ...
Instructions
Page 23
...light, you operate the remote control unit from the remote control unit. 21 CH+ 5 ENTER 5 MENU VOL + CHOICE ∞ CH- Remote sensor STANDBY STANDBY/ON DISC 1 DISC 2 DISC 3 DISC 4 DISC 5 DISC 6 DISC 7 PROGRESSIVE DVD/CD PLAYER EXCHANGE DISC SKIP 7-DISC PLAY & EXCHANGE DVD / VIDEO CD / ... from the remote sensor. Getting started DISC SELECT TV DVD STANDBY/ON TV DVD 3D TV/VIDEO REPEAT PHONIC CANCEL RETURN TV1 1 TV4 4 TV7 7 TV -/-- 10 TV2 TV3 2 3 TV5 TV6 5 6 TV8 TV9 8 9 TV0 MUTING 0 +10 ANGLE SUBTITLE AUDIO VFP DIGEST PROGRESSIVE SCAN ZOOM +...
...light, you operate the remote control unit from the remote control unit. 21 CH+ 5 ENTER 5 MENU VOL + CHOICE ∞ CH- Remote sensor STANDBY STANDBY/ON DISC 1 DISC 2 DISC 3 DISC 4 DISC 5 DISC 6 DISC 7 PROGRESSIVE DVD/CD PLAYER EXCHANGE DISC SKIP 7-DISC PLAY & EXCHANGE DVD / VIDEO CD / ... from the remote sensor. Getting started DISC SELECT TV DVD STANDBY/ON TV DVD 3D TV/VIDEO REPEAT PHONIC CANCEL RETURN TV1 1 TV4 4 TV7 7 TV -/-- 10 TV2 TV3 2 3 TV5 TV6 5 6 TV8 TV9 8 9 TV0 MUTING 0 +10 ANGLE SUBTITLE AUDIO VFP DIGEST PROGRESSIVE SCAN ZOOM +...
Instructions
Page 24
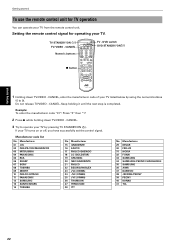
... + CHOICE ∞ CH- Keep holding down TV/VIDEO - CANCEL. 3 Try to 9). Manufacturer code list No. Manufacturer 01 JVC 02 PHILIPS/CCE/MAGNAVOX 03 MITSUBISHI 04 PANASONIC 05 RCA 06 SHARP 07 SONY 08 TOSHIBA 09 ZENITH 10 PHILCO/HITACHI 11 PANASONIC 12...9 TV0 MUTING 0 +10 ANGLE SUBTITLE AUDIO VFP DIGEST PROGRESSIVE SCAN - ON SCREEN TV - Example: To enter the manufacturer code "01": Press "0" then "1". 2 Press 7 while holding it until the next step is completed. TV STANDBY/ON TV/VIDEO - DVD switch DVD STANDBY/ON REMOTE CONTROL 1 Holding down TV/VIDEO - CANCEL, enter the...
... + CHOICE ∞ CH- Keep holding down TV/VIDEO - CANCEL. 3 Try to 9). Manufacturer code list No. Manufacturer 01 JVC 02 PHILIPS/CCE/MAGNAVOX 03 MITSUBISHI 04 PANASONIC 05 RCA 06 SHARP 07 SONY 08 TOSHIBA 09 ZENITH 10 PHILCO/HITACHI 11 PANASONIC 12...9 TV0 MUTING 0 +10 ANGLE SUBTITLE AUDIO VFP DIGEST PROGRESSIVE SCAN - ON SCREEN TV - Example: To enter the manufacturer code "01": Press "0" then "1". 2 Press 7 while holding it until the next step is completed. TV STANDBY/ON TV/VIDEO - DVD switch DVD STANDBY/ON REMOTE CONTROL 1 Holding down TV/VIDEO - CANCEL, enter the...

Instructions
Page 25
...+L Adjusts the TV volume. 5 Getting started The following buttons can be used for TV control, set operating a JVC TV. • If there is initially set the TV - CANCEL and numeric buttons for operating the TV: To...CANCEL Switches the TV input mode between TV and VIDEO. CH+ 5 ∞ CH- MUTING +10 Mutes the TV sound. DVD switch to 10 TV0 0 Selects the TV channels directly. * For some TVs, pressing "+10" functions as the "100+," ... selecting a channel number. Getting started 5 NOTES • The remote control unit is more than one until you succeed. 23
...+L Adjusts the TV volume. 5 Getting started The following buttons can be used for TV control, set operating a JVC TV. • If there is initially set the TV - CANCEL and numeric buttons for operating the TV: To...CANCEL Switches the TV input mode between TV and VIDEO. CH+ 5 ∞ CH- MUTING +10 Mutes the TV sound. DVD switch to 10 TV0 0 Selects the TV channels directly. * For some TVs, pressing "+10" functions as the "100+," ... selecting a channel number. Getting started 5 NOTES • The remote control unit is more than one until you succeed. 23
Instructions
Page 26
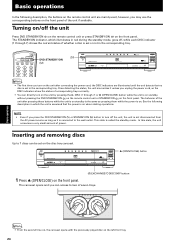
...same as it unless you may use the corresponding buttons on . STANDBY STANDBY/ON DISC 1 DISC 2 DISC 3 DISC 4 DISC 5 DISC 6 DISC 7 PROGRESSIVE DVD/CD PLAYER EXCHANGE DISC SKIP 7-DISC PLAY & EXCHANGE DVD / VIDEO CD / CD OPEN/CLOSE 0 PLAY 3 STOP PAUSE 7 8 4 SKIP ¢ 0 (OPEN/CLOSE) button EXCHANGE/ DISC SKIP button 1 ...in which the unit is assumed that no disc is called the standby mode. See the following description, the buttons on the remote control unit are illuminated until the unit detects that the power is on the front panel of the unit if available. Turning...
...same as it unless you may use the corresponding buttons on . STANDBY STANDBY/ON DISC 1 DISC 2 DISC 3 DISC 4 DISC 5 DISC 6 DISC 7 PROGRESSIVE DVD/CD PLAYER EXCHANGE DISC SKIP 7-DISC PLAY & EXCHANGE DVD / VIDEO CD / CD OPEN/CLOSE 0 PLAY 3 STOP PAUSE 7 8 4 SKIP ¢ 0 (OPEN/CLOSE) button EXCHANGE/ DISC SKIP button 1 ...in which the unit is assumed that no disc is called the standby mode. See the following description, the buttons on the remote control unit are illuminated until the unit detects that the power is on the front panel of the unit if available. Turning...
Instructions
Page 28
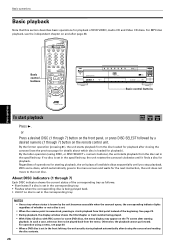
...Basic control buttons TV DVD DISC SELECT ¶ STANDBY/ON TV DVD 3D TV/VIDEO REPEAT PHONIC CANCEL RETURN TV1 1 TV4 4 TV7 7 TV -/-- 10 TV2 TV3 2 3 TV5 TV6 5 6 TV8 TV9 8 9 TV0 MUTING 0 +10 ANGLE SUBTITLE AUDIO VFP DIGEST PROGRESSIVE SCAN - By the latter ...button on and after closing the carousel and reading the disc contents. 26 ON SCREEN REMOTE CONTROL STANDBY STANDBY/ON DISC 1 DISC 2 DISC 3 DISC 4 DISC 5 DISC 6 DISC 7 PROGRESSIVE DVD/CD PLAYER EXCHANGE DISC SKIP 7-DISC PLAY & EXCHANGE DVD / VIDEO CD / CD OPEN/CLOSE 0 PLAY 3 STOP PAUSE 7 8 4 ...
...Basic control buttons TV DVD DISC SELECT ¶ STANDBY/ON TV DVD 3D TV/VIDEO REPEAT PHONIC CANCEL RETURN TV1 1 TV4 4 TV7 7 TV -/-- 10 TV2 TV3 2 3 TV5 TV6 5 6 TV8 TV9 8 9 TV0 MUTING 0 +10 ANGLE SUBTITLE AUDIO VFP DIGEST PROGRESSIVE SCAN - By the latter ...button on and after closing the carousel and reading the disc contents. 26 ON SCREEN REMOTE CONTROL STANDBY STANDBY/ON DISC 1 DISC 2 DISC 3 DISC 4 DISC 5 DISC 6 DISC 7 PROGRESSIVE DVD/CD PLAYER EXCHANGE DISC SKIP 7-DISC PLAY & EXCHANGE DVD / VIDEO CD / CD OPEN/CLOSE 0 PLAY 3 STOP PAUSE 7 8 4 ...

Instructions
Page 29
... press of 1 or ¡ increases the playback speed. Basic operations 27 To advance or reverse playback rapidly while monitoring ¶ During playback Method 1 (from the remote control unit only) Press 1 or ¡. Pressing 3 returns the unit to normal playback. Releasing the button returns the unit to normal playback. To stop playback...
... press of 1 or ¡ increases the playback speed. Basic operations 27 To advance or reverse playback rapidly while monitoring ¶ During playback Method 1 (from the remote control unit only) Press 1 or ¡. Pressing 3 returns the unit to normal playback. Releasing the button returns the unit to normal playback. To stop playback...


