Instruction Manual
Page 1
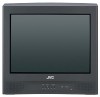
COLOR VIDEO MONITOR TM-21A2U INSTRUCTIONS Contents Important Safety Precautions ........ 2 Buttons and basic functions -Remote control 5 Buttons and basic functions -Main unit 6 How to operate menus 7 Basic setting for picture 8 Customized setting 9 Troubleshooting 10 Specifications 11 LCT2089-001A-H
COLOR VIDEO MONITOR TM-21A2U INSTRUCTIONS Contents Important Safety Precautions ........ 2 Buttons and basic functions -Remote control 5 Buttons and basic functions -Main unit 6 How to operate menus 7 Basic setting for picture 8 Customized setting 9 Troubleshooting 10 Specifications 11 LCT2089-001A-H
Instruction Manual
Page 2
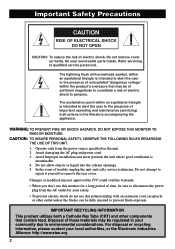
...an equilateral triangle is unattainable. 4. In the event of electric shock. Changes or modifications not approved by JVC could void the warranty. • When you don't use this monitor for a long period of electric shock to environmental considerations. For disposal or recycling information, please contact ...the risk of trouble, unplug the unit and call a service technician. IMPORTANT RECYCLING INFORMATION This product utilizes both a Cathode Ray Tube (CRT) and other outlet unless the blades can be of sufficient magnitude to constitute a risk of time, be sure to prevent...
...an equilateral triangle is unattainable. 4. In the event of electric shock. Changes or modifications not approved by JVC could void the warranty. • When you don't use this monitor for a long period of electric shock to environmental considerations. For disposal or recycling information, please contact ...the risk of trouble, unplug the unit and call a service technician. IMPORTANT RECYCLING INFORMATION This product utilizes both a Cathode Ray Tube (CRT) and other outlet unless the blades can be of sufficient magnitude to constitute a risk of time, be sure to prevent...
Instruction Manual
Page 4
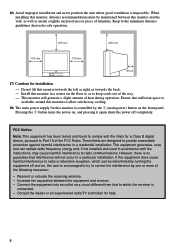
...to comply with the limits for this equipment does cause harmful interference to radio or television reception, which the receiver is available around this monitor, distance recommendations must be determined by the I button turns the power on, and pressing it again shuts the power off and on a... to Part 15 of the way. - These limits are designed to radio communications. Reorient or relocate the receiving antenna. - When installing this monitor to the minimum distance guidelines shown for safe operation. 200 mm 200 mm 150 mm 150 mm 50 mm 17) Cautions for help. 4 This...
...to comply with the limits for this equipment does cause harmful interference to radio or television reception, which the receiver is available around this monitor, distance recommendations must be determined by the I button turns the power on, and pressing it again shuts the power off and on a... to Part 15 of the way. - These limits are designed to radio communications. Reorient or relocate the receiving antenna. - When installing this monitor to the minimum distance guidelines shown for safe operation. 200 mm 200 mm 150 mm 150 mm 50 mm 17) Cautions for help. 4 This...
Instruction Manual
Page 5
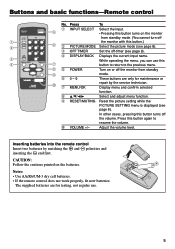
... · end first. Press To 1 INPUT SELECT Select the input. 5 • Pressing this button turns on the batteries. CAUTION: Follow the cautions printed on the monitor from standby mode. (You cannot turn off 1 the monitor with this button.) 2 6 2 PICTURE MODE Select the picture mode (see page 8). 3 OFF TIMER Set the off the...
... · end first. Press To 1 INPUT SELECT Select the input. 5 • Pressing this button turns on the batteries. CAUTION: Follow the cautions printed on the monitor from standby mode. (You cannot turn off 1 the monitor with this button.) 2 6 2 PICTURE MODE Select the picture mode (see page 8). 3 OFF TIMER Set the off the...
Instruction Manual
Page 6
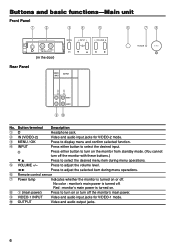
...-2 mode. 3 MENU / OK Press to display menu and confirm selected function. 4 INPUT Press either button to turn on or off the monitor with these buttons.) ∞ 5 Press to select the desired input. Press either button to select the desired menu item during menu operations. ... +/- Press to adjust the volume level. 2 3 Press to adjust the selected item during menu operations. 6 Remote control sensor 7 Power lamp Indicates whether the monitor is turned on or turn off . Buttons and basic functions-Main unit Front Panel 1 2 3 4 5 6 78 (in the door) Rear Panel VIDEO...
...-2 mode. 3 MENU / OK Press to display menu and confirm selected function. 4 INPUT Press either button to turn on or off the monitor with these buttons.) ∞ 5 Press to select the desired input. Press either button to select the desired menu item during menu operations. ... +/- Press to adjust the volume level. 2 3 Press to adjust the selected item during menu operations. 6 Remote control sensor 7 Power lamp Indicates whether the monitor is turned on or turn off . Buttons and basic functions-Main unit Front Panel 1 2 3 4 5 6 78 (in the door) Rear Panel VIDEO...
Instruction Manual
Page 9
... controlled. Press the OFF TIMER button to confirm or change the remaining time. 9 Customized setting VNR You can disable the front control buttons of the monitor except the I (main power) button. Effect of VNR is sharp. Effect of VNR becomes maximum level. Select CONTROL LOCK in 10 minute steps.... operations of the menu, please see "How to a maximum of VNR becomes minimum level. OFF TIMER 0 10 BACK 120 OK You can set the monitor to standby mode after a set the period of time to operate menus" on the screen. To operate this function with a menu: ❇ MENU ...
... controlled. Press the OFF TIMER button to confirm or change the remaining time. 9 Customized setting VNR You can disable the front control buttons of the monitor except the I (main power) button. Effect of VNR is sharp. Effect of VNR becomes maximum level. Select CONTROL LOCK in 10 minute steps.... operations of the menu, please see "How to a maximum of VNR becomes minimum level. OFF TIMER 0 10 BACK 120 OK You can set the monitor to standby mode after a set the period of time to operate menus" on the screen. To operate this function with a menu: ❇ MENU ...
Instruction Manual
Page 10
... This is due to be displayed stably. This is not a malfunction. • The batteries may be exhausted. Keep the device away from your monitor. • Choose the appropriate color system. No picture Stripes appear on the picture Poor picture quality White and bright still images look as if they... is turned on page 8. • Inevitable phenomenon due to the condition of the solutions presented here solve the problem, unplug the monitor and consult a JVC-authorized dealer or service center for inspection. • This is due to the static electricity of the picture tube and it is ...
... This is due to be displayed stably. This is not a malfunction. • The batteries may be exhausted. Keep the device away from your monitor. • Choose the appropriate color system. No picture Stripes appear on the picture Poor picture quality White and bright still images look as if they... is turned on page 8. • Inevitable phenomenon due to the condition of the solutions presented here solve the problem, unplug the monitor and consult a JVC-authorized dealer or service center for inspection. • This is due to the static electricity of the picture tube and it is ...
Instruction Manual
Page 11
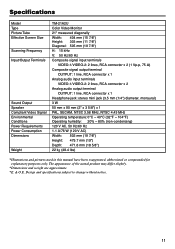
... Picture Tube Effective Screen Size Scanning Frequency Input/Output Terminals Sound Output Speaker Compliant Video Signal Environmental Conditions Power Requirements Power Consumption Dimensions Weight TM-21A2U Color Video Monitor 21" measured diagonally Width: 404 mm (15 7/8") Height: 303 mm (11 7/8") Diagonal: 505 mm (19 7/8") H: 15 kHz V: 50 Hz/60 Hz Composite signal input terminals...
... Picture Tube Effective Screen Size Scanning Frequency Input/Output Terminals Sound Output Speaker Compliant Video Signal Environmental Conditions Power Requirements Power Consumption Dimensions Weight TM-21A2U Color Video Monitor 21" measured diagonally Width: 404 mm (15 7/8") Height: 303 mm (11 7/8") Diagonal: 505 mm (19 7/8") H: 15 kHz V: 50 Hz/60 Hz Composite signal input terminals...
Instruction Manual
Page 12
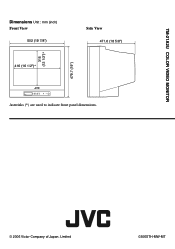
TM-21A2U COLOR VIDEO MONITOR Dimensions Unit : mm (inch) Front View 502 (19 7/8") 416 (16 1/2")* Side View 471.6 (18 5/8") 315 (12 1/2")* 479.7 (19") Asterisks (*) are used to indicate front panel dimensions. © 2006 Victor Company of Japan, Limited 0306STH-MW-MT
TM-21A2U COLOR VIDEO MONITOR Dimensions Unit : mm (inch) Front View 502 (19 7/8") 416 (16 1/2")* Side View 471.6 (18 5/8") 315 (12 1/2")* 479.7 (19") Asterisks (*) are used to indicate front panel dimensions. © 2006 Victor Company of Japan, Limited 0306STH-MW-MT

