Instruction Manual
Page 1
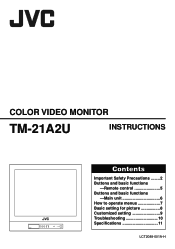
COLOR VIDEO MONITOR TM-21A2U INSTRUCTIONS Contents Important Safety Precautions ........ 2 Buttons and basic functions -Remote control 5 Buttons and basic functions -Main unit 6 How to operate menus 7 Basic setting for picture 8 Customized setting 9 Troubleshooting 10 Specifications 11 LCT2089-001A-H
COLOR VIDEO MONITOR TM-21A2U INSTRUCTIONS Contents Important Safety Precautions ........ 2 Buttons and basic functions -Remote control 5 Buttons and basic functions -Main unit 6 How to operate menus 7 Basic setting for picture 8 Customized setting 9 Troubleshooting 10 Specifications 11 LCT2089-001A-H
Instruction Manual
Page 2
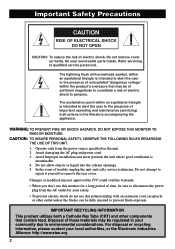
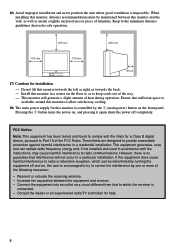
... of trouble, unplug the unit and call a service technician. No user serviceable parts inside. CAUTION: TO INSURE PERSONAL SAFETY, OBSERVE THE FOLLOWING RULES REGARDING THE USE OF THIS UNIT. 1. Avoid Improper installation and never position the unit where good ventilation is intended to alert the user to the presence of electric shock to constitute a risk of important operating and maintenance (servicing) instructions in...
... of trouble, unplug the unit and call a service technician. No user serviceable parts inside. CAUTION: TO INSURE PERSONAL SAFETY, OBSERVE THE FOLLOWING RULES REGARDING THE USE OF THIS UNIT. 1. Avoid Improper installation and never position the unit where good ventilation is intended to alert the user to the presence of electric shock to constitute a risk of important operating and maintenance (servicing) instructions in...
Instruction Manual
Page 3
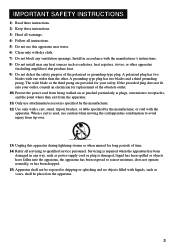
... all instructions. 5) Do not use this apparatus during lightning storms or when unused for replacement of the polarized or grounding-type plug. Servicing is required when the apparatus has been damaged in accordance with the manufacturer's instructions. 8) Do not install near ... SAFETY INSTRUCTIONS 1) Read these instructions. 2) Keep these instructions. 3) Heed all warnings. 4) Follow all servicing to dripping or splashing and no objects filled with the apparatus. When a cart is damaged, liquid has been spilled or objects have fallen into your safety. Install in any...
... all instructions. 5) Do not use this apparatus during lightning storms or when unused for replacement of the polarized or grounding-type plug. Servicing is required when the apparatus has been damaged in accordance with the manufacturer's instructions. 8) Do not install near ... SAFETY INSTRUCTIONS 1) Read these instructions. 2) Keep these instructions. 3) Heed all warnings. 4) Follow all servicing to dripping or splashing and no objects filled with the apparatus. When a cart is damaged, liquid has been spilled or objects have fallen into your safety. Install in any...
Instruction Manual
Page 4
...B digital device, pursuant to keep cords out of heat during operation. FCC Notice: Note: This equipment has been tested and found to radio or television reception, which the receiver is impossible. This equipment generates, uses and can be maintained between the equipment and receiver. - If this monitor to... to correct the interference by the I button turns the power on , the user is controlled by one or more of the FCC Rules. When installing this monitor and the wall, as well as to Part 15 of the following measures: - Keep to the minimum distance guidelines shown for ...
...B digital device, pursuant to keep cords out of heat during operation. FCC Notice: Note: This equipment has been tested and found to radio or television reception, which the receiver is impossible. This equipment generates, uses and can be maintained between the equipment and receiver. - If this monitor to... to correct the interference by the I button turns the power on , the user is controlled by one or more of the FCC Rules. When installing this monitor and the wall, as well as to Part 15 of the following measures: - Keep to the minimum distance guidelines shown for ...
Instruction Manual
Page 5
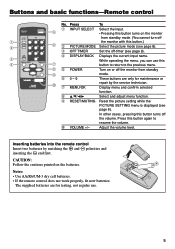
... turn off 1 the monitor with this button.) 2 6 2 PICTURE MODE Select the picture mode (see page 8). 3 OFF TIMER Set the off the monitor from standby 9 6 0-9 mode. The supplied batteries are only for testing, not regular use this 4 7 button to return to resume the volume. 0 VOLUME +/- Adjust the volume level. Notes: • Use AA/R6/UM-3 dry cell batteries. • If the remote control does not work properly, fit new batteries. Buttons and basic functions-Remote control No. Display menu...
... turn off 1 the monitor with this button.) 2 6 2 PICTURE MODE Select the picture mode (see page 8). 3 OFF TIMER Set the off the monitor from standby 9 6 0-9 mode. The supplied batteries are only for testing, not regular use this 4 7 button to return to resume the volume. 0 VOLUME +/- Adjust the volume level. Notes: • Use AA/R6/UM-3 dry cell batteries. • If the remote control does not work properly, fit new batteries. Buttons and basic functions-Remote control No. Display menu...
Instruction Manual
Page 6
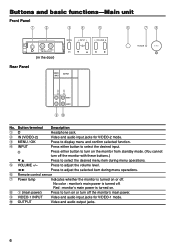
.... 6 Remote control sensor 7 Power lamp Indicates whether the monitor is turned on the monitor from standby mode. (You cannot turn off . Press to adjust the volume level. 2 3 Press to select the desired input. No color : monitor's main power is turned on. 8 I (main power) Press to select the desired menu item during menu operations. 5 VOLUME +/- Red : monitor's main power is turned off the monitor's main power. 9 VIDEO-1 INPUT Video and audio input jacks for VIDEO-2 mode. 3 MENU / OK Press to display menu...
.... 6 Remote control sensor 7 Power lamp Indicates whether the monitor is turned on the monitor from standby mode. (You cannot turn off . Press to adjust the volume level. 2 3 Press to select the desired input. No color : monitor's main power is turned on. 8 I (main power) Press to select the desired menu item during menu operations. 5 VOLUME +/- Red : monitor's main power is turned off the monitor's main power. 9 VIDEO-1 INPUT Video and audio input jacks for VIDEO-2 mode. 3 MENU / OK Press to display menu...
Instruction Manual
Page 7
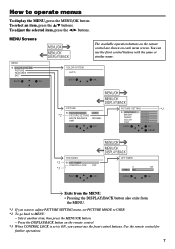
... adjust PICTURE SETTING menu, set to ON, you cannot use the front control buttons with the same or similar name. MENU Screens MENU COLOR SYSTEM PICTURE FEATURES EXIT BACK OK COLOR SYSTEM AUTO BACK The available operation buttons on the remote control are shown on the remote control. *3 When CONTROL LOCK is set PICTURE MODE to USER. *2 To go back to operate menus To display the MENU, press the MENU/OK button. Press the DISPLAY/BACK button on each menu screen. Use the remote control...
... adjust PICTURE SETTING menu, set to ON, you cannot use the front control buttons with the same or similar name. MENU Screens MENU COLOR SYSTEM PICTURE FEATURES EXIT BACK OK COLOR SYSTEM AUTO BACK The available operation buttons on the remote control are shown on the remote control. *3 When CONTROL LOCK is set PICTURE MODE to USER. *2 To go back to operate menus To display the MENU, press the MENU/OK button. Press the DISPLAY/BACK button on each menu screen. Use the remote control...
Instruction Manual
Page 8
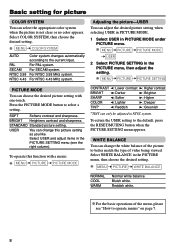
... the PICTURE MODE button to the default, press the RESET/MUTING button when the PICTURE SETTING menu appears. SOFT Softens contrast and sharpness. USER You can change the white balance of the picture to better match the type of the menu, please see the right column). Select WHITE BALANCE in the PICTURE menu, then adjust the setting. ❇ MENU PICTURE PICTURE SETTING PICTURE MODE You can choose the desired picture setting with a menu: ❇ MENU PICTURE PICTURE MODE CONTRAST...
... the PICTURE MODE button to the default, press the RESET/MUTING button when the PICTURE SETTING menu appears. SOFT Softens contrast and sharpness. USER You can change the white balance of the picture to better match the type of the menu, please see the right column). Select WHITE BALANCE in the PICTURE menu, then adjust the setting. ❇ MENU PICTURE PICTURE SETTING PICTURE MODE You can choose the desired picture setting with a menu: ❇ MENU PICTURE PICTURE MODE CONTRAST...
Instruction Manual
Page 9
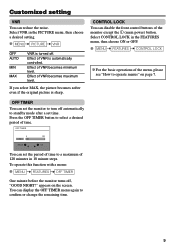
... TIMER You can reduce the noise. Customized setting VNR You can set the monitor to turn off automatically to standby mode after a set the period of time to a maximum of 120 minutes in 10 minute steps. Select VNR in the PICTURE menu, then choose a desired setting. ❇ MENU PICTURE VNR OFF AUTO MIN MAX VNR is automatically controlled. Effect of VNR becomes maximum level...
... TIMER You can reduce the noise. Customized setting VNR You can set the monitor to turn off automatically to standby mode after a set the period of time to a maximum of 120 minutes in 10 minute steps. Select VNR in the PICTURE menu, then choose a desired setting. ❇ MENU PICTURE VNR OFF AUTO MIN MAX VNR is automatically controlled. Effect of VNR becomes maximum level...
Instruction Manual
Page 10
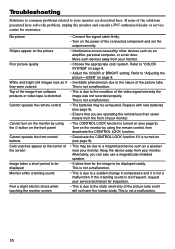
... here. Troubleshooting Solutions to common problems related to your monitor are operating the remote less than seven meters from the front of your monitor. • The CONTROL LOCK function is not a malfunction. • The batteries may be exhausted. Refer to "Adjusting the picture-USER" on page 8. • Inevitable phenomenon due to "COLOR SYSTEM" on the power of the connected component and set the...
... here. Troubleshooting Solutions to common problems related to your monitor are operating the remote less than seven meters from the front of your monitor. • The CONTROL LOCK function is not a malfunction. • The batteries may be exhausted. Refer to "Adjusting the picture-USER" on page 8. • Inevitable phenomenon due to "COLOR SYSTEM" on the power of the connected component and set the...
Instruction Manual
Page 11
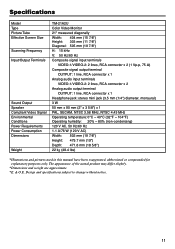
Specifications Model Type Picture Tube Effective Screen Size Scanning Frequency Input/Output Terminals Sound Output Speaker Compliant Video Signal Environmental Conditions Power Requirements Power Consumption Dimensions Weight TM-21A2U Color Video Monitor 21" measured diagonally Width: 404 mm (15 7/8") Height: 303 mm (11 7/8") Diagonal: 505 mm (19 7/8") H: 15 kHz V: 50 Hz/60 Hz Composite signal input terminals VIDEO-1/VIDEO-2: 2 lines, RCA connector x 2 (1 Vp-p, 75 Ω) Composite signal output terminal OUTPUT: 1 line...
Specifications Model Type Picture Tube Effective Screen Size Scanning Frequency Input/Output Terminals Sound Output Speaker Compliant Video Signal Environmental Conditions Power Requirements Power Consumption Dimensions Weight TM-21A2U Color Video Monitor 21" measured diagonally Width: 404 mm (15 7/8") Height: 303 mm (11 7/8") Diagonal: 505 mm (19 7/8") H: 15 kHz V: 50 Hz/60 Hz Composite signal input terminals VIDEO-1/VIDEO-2: 2 lines, RCA connector x 2 (1 Vp-p, 75 Ω) Composite signal output terminal OUTPUT: 1 line...
Instruction Manual
Page 12
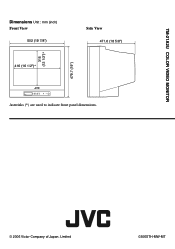
TM-21A2U COLOR VIDEO MONITOR Dimensions Unit : mm (inch) Front View 502 (19 7/8") 416 (16 1/2")* Side View 471.6 (18 5/8") 315 (12 1/2")* 479.7 (19") Asterisks (*) are used to indicate front panel dimensions. © 2006 Victor Company of Japan, Limited 0306STH-MW-MT
TM-21A2U COLOR VIDEO MONITOR Dimensions Unit : mm (inch) Front View 502 (19 7/8") 416 (16 1/2")* Side View 471.6 (18 5/8") 315 (12 1/2")* 479.7 (19") Asterisks (*) are used to indicate front panel dimensions. © 2006 Victor Company of Japan, Limited 0306STH-MW-MT


