Instructions
Page 1
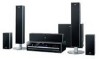
Retain this information for future reference. LVT1704-001B [J,C] which are located either on the rear, bottom or side of XV-THD4, SP-THD5W, SP-THD5F, SP-THD5C and SP-THD5S (TH-D60 only) INSTRUCTIONS For Customer Use: Enter below the Model No. Model No. and Serial No. DVD DIGITAL THEATER SYSTEM TH-D60 Consists of XV-THD60, SP-THD6W, SP-THD6F, SP-THD6C and SP-THD6S TH-D50 Consists of XV-THD50, SP-THD5W, SP-THD5F, SP-THD5C and SP-THD5S TH-D5 Consists of XV-THD5, SP-THD5W, SP-THD5F, SP-THD5C and SP-THD5S TH-D4 Consists of the cabinet. Serial No.
Retain this information for future reference. LVT1704-001B [J,C] which are located either on the rear, bottom or side of XV-THD4, SP-THD5W, SP-THD5F, SP-THD5C and SP-THD5S (TH-D60 only) INSTRUCTIONS For Customer Use: Enter below the Model No. Model No. and Serial No. DVD DIGITAL THEATER SYSTEM TH-D60 Consists of XV-THD60, SP-THD6W, SP-THD6F, SP-THD6C and SP-THD6S TH-D50 Consists of XV-THD50, SP-THD5W, SP-THD5F, SP-THD5C and SP-THD5S TH-D5 Consists of XV-THD5, SP-THD5W, SP-THD5F, SP-THD5C and SP-THD5S TH-D4 Consists of the cabinet. Serial No.

Instructions
Page 4
... mainly used to make the explanations simple and easy-to read this manual • Illustrations and button names of contents Before using this System 2 Playable discs/devices/files 3 Playable disc types 3 Playable digital devices 3 Playable file types 4 Getting started 5 Checking the supplied... Press the button briefly. Illustrations for DVD Audio 20 Operation from the on-screen bar ( 21). Press button A, then press button B. «Hold Press button B while holding button A. Table of the TH-D60 are used for System operations Operations from the center unit Operations...
... mainly used to make the explanations simple and easy-to read this manual • Illustrations and button names of contents Before using this System 2 Playable discs/devices/files 3 Playable disc types 3 Playable digital devices 3 Playable file types 4 Getting started 5 Checking the supplied... Press the button briefly. Illustrations for DVD Audio 20 Operation from the on-screen bar ( 21). Press button A, then press button B. «Hold Press button B while holding button A. Table of the TH-D60 are used for System operations Operations from the center unit Operations...

Instructions
Page 6
..., update your iPod, check on the Apple web site . It is possible to the latest version. Therefore, the use of Non-DVD side of a DualDisc on this System. Playable digital devices JVC bears no responsibility for any loss of media • Discs on the market •...; DVD-R/-R DL/-RW • +R/+RW • DualDisc* (DVD side only) • Discs on the market • DVD-R/-R DL/-RW • +R/+RW • Discs on the market • CD-R/-RW...
..., update your iPod, check on the Apple web site . It is possible to the latest version. Therefore, the use of Non-DVD side of a DualDisc on this System. Playable digital devices JVC bears no responsibility for any loss of media • Discs on the market •...; DVD-R/-R DL/-RW • +R/+RW • DualDisc* (DVD side only) • Discs on the market • DVD-R/-R DL/-RW • +R/+RW • Discs on the market • CD-R/-RW...
Instructions
Page 10
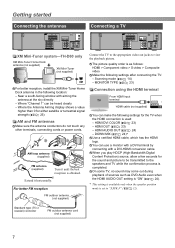
... ( 14) - HDMI AUDIO OUT ( 24) - DOWN MIX ( 24)* Use a certified HDMI cable, which has the HDMI logo. The picture quality order is as DVD Audio even when the HDMI AUDIO OUT setting is "ON" ( 24). * This setting is available only when the speaker position mode is obtained. HDMI DVI... cords or power cords. You can be transmitted to view the playback picture. Getting started Connecting the antennas Connecting a TV XM Mini-Tuner system-TH-D60 only XM Mini-Tuner Home Dock antenna (not supplied) XM Mini-Tuner (not supplied) For better reception, install the XM Mini-Tuner...
... ( 14) - HDMI AUDIO OUT ( 24) - DOWN MIX ( 24)* Use a certified HDMI cable, which has the HDMI logo. The picture quality order is as DVD Audio even when the HDMI AUDIO OUT setting is "ON" ( 24). * This setting is available only when the speaker position mode is obtained. HDMI DVI... cords or power cords. You can be transmitted to view the playback picture. Getting started Connecting the antennas Connecting a TV XM Mini-Tuner system-TH-D60 only XM Mini-Tuner Home Dock antenna (not supplied) XM Mini-Tuner (not supplied) For better reception, install the XM Mini-Tuner...
Instructions
Page 11
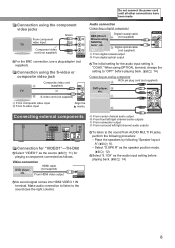
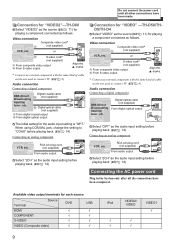
...8 Video connection DVD player, etc. A From center channel audio output B From front left/right channel audio outputs C From subwoofer output D From surround left/right channel audio outputs To listen to the sound (see the right column). Connecting external components , Connection for "VIDEO1"-TH-D60 Select "VIDEO1... as the audio input setting before playing back. ( 14) Connecting an analog component RCA pin plug cord (not supplied) DVD player, etc. Connection using the component video jacks From component video input TV Green Blue Component video cord (not supplied) ...
...8 Video connection DVD player, etc. A From center channel audio output B From front left/right channel audio outputs C From subwoofer output D From surround left/right channel audio outputs To listen to the sound (see the right column). Connecting external components , Connection for "VIDEO1"-TH-D60 Select "VIDEO1... as the audio input setting before playing back. ( 14) Connecting an analog component RCA pin plug cord (not supplied) DVD player, etc. Connection using the component video jacks From component video input TV Green Blue Component video cord (not supplied) ...
Instructions
Page 12
...VIDEO (Composite video) DVD USB 9 iPod √ √ VIDEO2/ VIDEO √ √ VIDEO1 √ When using COAXIAL jack, change the setting to connect TV. ( 8) Audio connection Connecting a digital component DBS (Direct Broadcasting Satellite) tuner, etc. Connection for "VIDEO2"-TH-D60 Select "VIDEO2" as... 14) Select "OPT" as the audio input setting before playing back. ( 14) Connecting the AC power cord Plug in the System only after all other connections have been completed. Video connection Composite video cord* (not supplied) VCR, etc. Digital optical cable (...
...VIDEO (Composite video) DVD USB 9 iPod √ √ VIDEO2/ VIDEO √ √ VIDEO1 √ When using COAXIAL jack, change the setting to connect TV. ( 8) Audio connection Connecting a digital component DBS (Direct Broadcasting Satellite) tuner, etc. Connection for "VIDEO2"-TH-D60 Select "VIDEO2" as... 14) Select "OPT" as the audio input setting before playing back. ( 14) Connecting the AC power cord Plug in the System only after all other connections have been completed. Video connection Composite video cord* (not supplied) VCR, etc. Digital optical cable (...
Instructions
Page 13
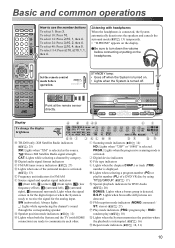
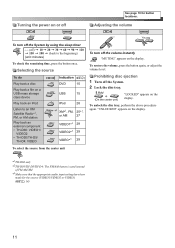
...select 14: Press h10, 1, then 4. Be sure to use the number buttons To select 3: Press 3. Display To change the display brightness A TH-D60 only: XM Satellite Radio indicators ( 25) XM: Lights when "XM" is displayed. B.S.P: Lights when browsable still pictures are ready to receive ... FM/AM tuner source indicators ( 27) D Lights when one of a DVD VR disc by category. PRGR.: Lights when the progressive scanning mode is turned off when the System is turned on. • Lights when the System is activated. To select 10: Press 10. Basic and common operations How to...
...select 14: Press h10, 1, then 4. Be sure to use the number buttons To select 3: Press 3. Display To change the display brightness A TH-D60 only: XM Satellite Radio indicators ( 25) XM: Lights when "XM" is displayed. B.S.P: Lights when browsable still pictures are ready to receive ... FM/AM tuner source indicators ( 27) D Lights when one of a DVD VR disc by category. PRGR.: Lights when the progressive scanning mode is turned off when the System is turned on. • Lights when the System is activated. To select 10: Press 10. Basic and common operations How to...
Instructions
Page 14
... device Play back an iPod Listen to an XM Satellite Radio*1, FM, or AM station Play back an external component • TH-D60: VIDEO1/ VIDEO2 • TH-D50/TH-D5/ TH-D4: VIDEO Indication DVD 15 USB 15 IPod 28 *2 XM*1, FM, 25*1, or AM 27 VIDEO1*3 29 VIDEO2*3 29 VIDEO*3 29 To select the source... from the center unit To turn off the System by using the sleep timer - - (off the System. 2 Lock the disc tray. «Hold (On the center unit) "LOCKED" appears on the display. *1TH-D60 only *2TH-D50/TH-D5/TH-D4: The FM/AM button is used instead of FM/AM...
... device Play back an iPod Listen to an XM Satellite Radio*1, FM, or AM station Play back an external component • TH-D60: VIDEO1/ VIDEO2 • TH-D50/TH-D5/ TH-D4: VIDEO Indication DVD 15 USB 15 IPod 28 *2 XM*1, FM, 25*1, or AM 27 VIDEO1*3 29 VIDEO2*3 29 VIDEO*3 29 To select the source... from the center unit To turn off the System by using the sleep timer - - (off the System. 2 Lock the disc tray. «Hold (On the center unit) "LOCKED" appears on the display. *1TH-D60 only *2TH-D50/TH-D5/TH-D4: The FM/AM button is used instead of FM/AM...
Instructions
Page 15
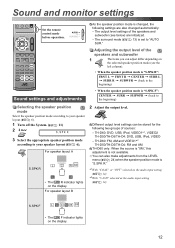
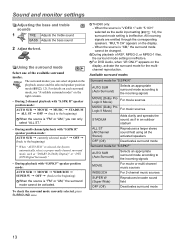
For speaker layout A S.SPK R • The R indicator lights on the display. 12 TH-D60: DVD, USB, IPod, VIDEO1*1, VIDEO2 TH-D50/TH-D5/TH-D4: DVD, USB, IPod, VIDEO - You can also make adjustments from the LEVEL menu ( 24) when the speaker position mode ... the System. ( 11) 2 «Hold 3 Select the appropriate speaker position mode according to the beginning) • When the speaker position mode is changed automatically: - Sound and monitor settings Set the remote control mode before operation. TH-D60: FM, AM and VIDEO1*2 TH-D50/TH-D5/TH-D4: FM and AM TH-D60 only:...
For speaker layout A S.SPK R • The R indicator lights on the display. 12 TH-D60: DVD, USB, IPod, VIDEO1*1, VIDEO2 TH-D50/TH-D5/TH-D4: DVD, USB, IPod, VIDEO - You can also make adjustments from the LEVEL menu ( 24) when the speaker position mode ... the System. ( 11) 2 «Hold 3 Select the appropriate speaker position mode according to the beginning) • When the speaker position mode is changed automatically: - Sound and monitor settings Set the remote control mode before operation. TH-D60: FM, AM and VIDEO1*2 TH-D50/TH-D5/TH-D4: FM and AM TH-D60 only:...
Instructions
Page 16
...F" speaker position mode: AUTO SUR = MOVIE = WIDE/2CH = SUPER W = OFF = (back to the beginning) * When "AUTO SUR" is selected, the System automatically selects a proper multi-channel surround mode, such as the audio input setting ( 14), the surround mode setting is "FM" or "AM," the surround mode... playback of the available surround modes. For DVD Audio, when "LR ONLY" appears on the display. - Using the surround mode Select one of ASF, MPEG-2, or MPEG-1 files, the surround mode setting is "XM," the surround mode cannot be activated. TH-D60 only: - When the source is ineffective...
...F" speaker position mode: AUTO SUR = MOVIE = WIDE/2CH = SUPER W = OFF = (back to the beginning) * When "AUTO SUR" is selected, the System automatically selects a proper multi-channel surround mode, such as the audio input setting ( 14), the surround mode setting is "FM" or "AM," the surround mode... playback of the available surround modes. For DVD Audio, when "LR ONLY" appears on the display. - Using the surround mode Select one of ASF, MPEG-2, or MPEG-1 files, the surround mode setting is "XM," the surround mode cannot be activated. TH-D60 only: - When the source is ineffective...
Instructions
Page 17
...for "VIDEO 1" and "VIDEO 2." To use the progressive mode, connect the TV to the HDMI MONITOR OUT terminal or COMPONENT jacks*1. ( 7) 1 Select "DVD" or "USB" as the source. ( 11) 2 «Hold 3 Select an appropriate scanning mode, then confirm the selection. 3 Select an appropriate audio ... Set the audio input of TV and connection method. The System automatically emits the AUTO*3 video signal to the type of the external component for "VIDEO1/ VIDEO2" (TH-D60) or "VIDEO" (TH-D50/TH-D5/THD4). 1 Item*1 Current setting 2 TH-D60 only: Select a source you want to set to select...
...for "VIDEO 1" and "VIDEO 2." To use the progressive mode, connect the TV to the HDMI MONITOR OUT terminal or COMPONENT jacks*1. ( 7) 1 Select "DVD" or "USB" as the source. ( 11) 2 «Hold 3 Select an appropriate scanning mode, then confirm the selection. 3 Select an appropriate audio ... Set the audio input of TV and connection method. The System automatically emits the AUTO*3 video signal to the type of the external component for "VIDEO1/ VIDEO2" (TH-D60) or "VIDEO" (TH-D50/TH-D5/THD4). 1 Item*1 Current setting 2 TH-D60 only: Select a source you want to set to select...

Instructions
Page 18
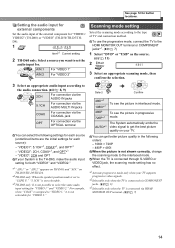
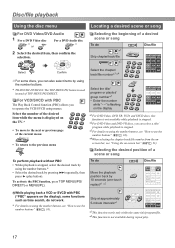
...8226; Scanning mode ( 14) • MONITOR TYPE ( 23) • ON SCREEN LANGUAGE ( 23) Basic playback Playing back a disc 1 Select "DVD" as the source. ( 11) Playback starts automatically. USB mass storage class device 2 Turn on the center unit simply by touching them. When you want ...tray. If a still picture is not played back automatically. • JPEG: Slide-show the available disc/file types for about 5 minutes, the System automatically dims the screen (screen saver function). Press 3 (play . ( 23) For messages and icons appearing on the display, see "Messages ...
...8226; Scanning mode ( 14) • MONITOR TYPE ( 23) • ON SCREEN LANGUAGE ( 23) Basic playback Playing back a disc 1 Select "DVD" as the source. ( 11) Playback starts automatically. USB mass storage class device 2 Turn on the center unit simply by touching them. When you want ...tray. If a still picture is not played back automatically. • JPEG: Slide-show the available disc/file types for about 5 minutes, the System automatically dims the screen (screen saver function). Press 3 (play . ( 23) For messages and icons appearing on the display, see "Messages ...
Instructions
Page 19
...2While playing a VCD or SVCD with time information*1 *2 Group (G) number and track (T) number File number Group (G) number and file (F) number *1For DVD Video, DVD Audio, DVD VR, VCD, SVCD, or CD, you press the button, the playback information alternates between "type A" and "type B" on the display. When ...iPod is turned on. Use a USB cable of the System. DO NOT connect the device through the USB MEMORY terminal. This System may ...
...2While playing a VCD or SVCD with time information*1 *2 Group (G) number and track (T) number File number Group (G) number and file (F) number *1For DVD Video, DVD Audio, DVD VR, VCD, SVCD, or CD, you press the button, the playback information alternates between "type A" and "type B" on the display. When ...iPod is turned on. Use a USB cable of the System. DO NOT connect the device through the USB MEMORY terminal. This System may ...
Instructions
Page 20
... is not available while playback is stopped. *2For DVD Video and DVD VR discs, you can select a title/ program while playback is stopped, select the desired track by using the number buttons.* • Select the desired track by using the number buttons. * TH-D50/TH-D5/TH-D4: The TOP MENU/PG button is not...
... is not available while playback is stopped. *2For DVD Video and DVD VR discs, you can select a title/ program while playback is stopped, select the desired track by using the number buttons.* • Select the desired track by using the number buttons. * TH-D50/TH-D5/TH-D4: The TOP MENU/PG button is not...
Instructions
Page 21
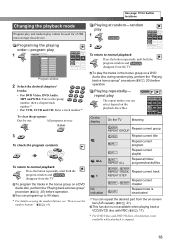
..., then a chapter/track number.* • For VCD, SVCD and CD: Enter a track number.* To play the tracks in the bonus group on a DVD Audio disc during random play 1 2 To return to normal playback Press the button repeatedly until both the program window and disappear from the TV. To... For details on -screen bar (A-B repeat). ( 21) This function is not available when playing back a VCD/SVCD disc with PBC ( 17). * For DVD Video and DVD VR discs, this function is not available while playback is deactivated You can select depend on the playback discs/files. Playing at once «...
..., then a chapter/track number.* • For VCD, SVCD and CD: Enter a track number.* To play the tracks in the bonus group on a DVD Audio disc during random play 1 2 To return to normal playback Press the button repeatedly until both the program window and disappear from the TV. To... For details on -screen bar (A-B repeat). ( 21) This function is not available when playing back a VCD/SVCD disc with PBC ( 17). * For DVD Video and DVD VR discs, this function is not available while playback is deactivated You can select depend on the playback discs/files. Playing at once «...

Instructions
Page 22
Select the audio language/audio channel*2 «Hold Select the view angle For DVD Audio, the functions take effect for the moving picture part only. *1For DVD Video and DVD Audio, reverse slow-motion is also available by performing the above procedure even if no subtitles are recorded. *...2Some subtitle or audio languages are abbreviated in area during playback. 19 For DVD Audio, the functions take effect for the moving picture part only. *1For DVD VR and SVCD discs, the subtitle indication appears and can be changed by pressing ( SLOW repeatedly. ...
Select the audio language/audio channel*2 «Hold Select the view angle For DVD Audio, the functions take effect for the moving picture part only. *1For DVD Video and DVD Audio, reverse slow-motion is also available by performing the above procedure even if no subtitles are recorded. *...2Some subtitle or audio languages are abbreviated in area during playback. 19 For DVD Audio, the functions take effect for the moving picture part only. *1For DVD VR and SVCD discs, the subtitle indication appears and can be changed by pressing ( SLOW repeatedly. ...
Instructions
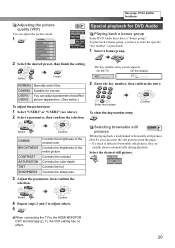
Page 23
... locations. The key number entry screen appears. CINEMA Suitable for movies USER1/ You can adjust the picture mode. 1 See page 15 for DVD Audio Playing back a bonus group Some DVD Audio discs have to the HDMI MONITOR OUT terminal ( 7), the VFP setting has no effect. 20 Select Confirm 4 Repeat steps 2 and 3 to...
... locations. The key number entry screen appears. CINEMA Suitable for movies USER1/ You can adjust the picture mode. 1 See page 15 for DVD Audio Playing back a bonus group Some DVD Audio discs have to the HDMI MONITOR OUT terminal ( 7), the VFP setting has no effect. 20 Select Confirm 4 Repeat steps 2 and 3 to...
Instructions
Page 24
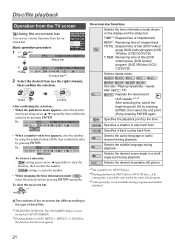
...*3: Elapsed time of chapter/track REM*3: Remaining time of chapter/track TOTAL: Elapsed time of title (DVD Video)/ group (DVD Audio)/program (DVD VR)/disc (VCD/CD/SVCD) T.REM: Remaining time of title (DVD Video)/group (DVD Audio)/ program (DVD VR)/disc (VCD/ CD/SVCD) Selects repeat mode. / / / / / / / / : ..., the function bar does not appear. 21 Selects the desired browsable still picture. *3Not available for DVD VR discs *4During playback of discs/files. *1TH-D50/TH-D5/TH-D4: The ON SCREEN button is not available during playback. Disc/file playback Operation from the TV...
...*3: Elapsed time of chapter/track REM*3: Remaining time of chapter/track TOTAL: Elapsed time of title (DVD Video)/ group (DVD Audio)/program (DVD VR)/disc (VCD/CD/SVCD) T.REM: Remaining time of title (DVD Video)/group (DVD Audio)/ program (DVD VR)/disc (VCD/ CD/SVCD) Selects repeat mode. / / / / / / / / : ..., the function bar does not appear. 21 Selects the desired browsable still picture. *3Not available for DVD VR discs *4During playback of discs/files. *1TH-D50/TH-D5/TH-D4: The ON SCREEN button is not available during playback. Disc/file playback Operation from the TV...
Instructions
Page 25
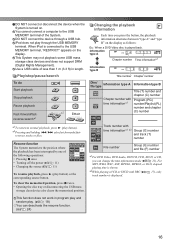
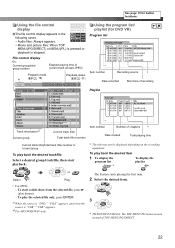
... press 3 (play button). - To play back the desired item 1 To display the program list * To display the playlist Select or The System starts playing the first item. Audio files: Always appears. - File control display Ex.: Current group/total group number Elapsed playing time of current ..., and when the source is "USB," "USB" appears. *2For MP3/WMA/WAV only. 3 * TH-D50/TH-D5/TH-D4: The TOP MENU/PG button is stopped. See page 15 for DVD VR) Program list Item number Recording source * Date recorded Start time of recording Playlist Track information*2 Current group...
... press 3 (play button). - To play back the desired item 1 To display the program list * To display the playlist Select or The System starts playing the first item. Audio files: Always appears. - File control display Ex.: Current group/total group number Elapsed playing time of current ..., and when the source is "USB," "USB" appears. *2For MP3/WMA/WAV only. 3 * TH-D50/TH-D5/TH-D4: The TOP MENU/PG button is stopped. See page 15 for DVD VR) Program list Item number Recording source * Date recorded Start time of recording Playlist Track information*2 Current group...
Instructions
Page 26
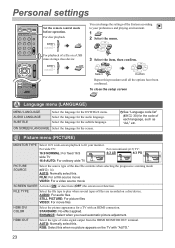
... close the setup screen Language menu (LANGUAGE) MENU LANGUAGE AUDIO LANGUAGE SUBTITLE Select the language for the code of the System according to your monitor. See "Language code list" ( 30) for the DVD/DivX menu. STANDARD: No effect applied. RGB: Select this . ON SCREEN LANGUAGE Select the language for the subtitle language...
... close the setup screen Language menu (LANGUAGE) MENU LANGUAGE AUDIO LANGUAGE SUBTITLE Select the language for the code of the System according to your monitor. See "Language code list" ( 30) for the DVD/DivX menu. STANDARD: No effect applied. RGB: Select this . ON SCREEN LANGUAGE Select the language for the subtitle language...


