Instructions
Page 1
DVD DIGITAL THEATER SYSTEM SYSTÈME DVD DIGITAL CINEMA TH-C30 Consists of XV-THC30, SP-PWC30, SP-THC40F, SP-THC40C and SP-THC40S Se compose de XV-THC30, SP-PWC30, SP-THC40F, SP-THC40C et SP-THC40S TH-C20 Consists of XV-THC20, SP-PWC20, SP-THC20F, SP-THC20C and SP-THC20S Se compose de XV-THC20, SP-PWC20, SP-THC20F, SP-THC20C et SP-THC20S INSTRUCTIONS MANUEL D'INSTRUCTIONS LVT1504-002A [C]
DVD DIGITAL THEATER SYSTEM SYSTÈME DVD DIGITAL CINEMA TH-C30 Consists of XV-THC30, SP-PWC30, SP-THC40F, SP-THC40C and SP-THC40S Se compose de XV-THC30, SP-PWC30, SP-THC40F, SP-THC40C et SP-THC40S TH-C20 Consists of XV-THC20, SP-PWC20, SP-THC20F, SP-THC20C and SP-THC20S Se compose de XV-THC20, SP-PWC20, SP-THC20F, SP-THC20C et SP-THC20S INSTRUCTIONS MANUEL D'INSTRUCTIONS LVT1504-002A [C]
Instructions
Page 2
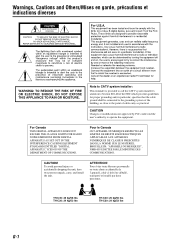
CAUTION Changes or modifications not approved by JVC could void the user's authority to the point of the building, as close to operate the equipment. For Canada THIS DIGITAL APPARATUS DOES NOT EXCEED .... To avoid personal injury or accidentally dropping the unit, have two persons unpack, carry, and install the unit. TH-C30: 25 kg/56 lbs TH-C20: 24 kg/53 lbs TH-C30: 25 kg/56 lbs TH-C20: 24 kg/53 lbs G-1 Pour le Canada CET APPAREIL NUMERIQUE RESPECTE LES LIMITES DE BRUITS RADIOELECTRIQUES APPLICABLES AUX...
CAUTION Changes or modifications not approved by JVC could void the user's authority to the point of the building, as close to operate the equipment. For Canada THIS DIGITAL APPARATUS DOES NOT EXCEED .... To avoid personal injury or accidentally dropping the unit, have two persons unpack, carry, and install the unit. TH-C30: 25 kg/56 lbs TH-C20: 24 kg/53 lbs TH-C30: 25 kg/56 lbs TH-C20: 24 kg/53 lbs G-1 Pour le Canada CET APPAREIL NUMERIQUE RESPECTE LES LIMITES DE BRUITS RADIOELECTRIQUES APPLICABLES AUX...
Instructions
Page 4
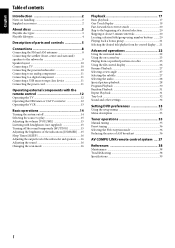
Table of contents Introduction 2 Notes on handling 2 Supplied accessories 2 About discs 3 Playable disc types 3 Playable file types 4 Description of parts and controls 5 Connections 8 Connecting the FM and AM antennas 8 Connecting the satellite (front, center and surround) speakers to the subwoofer 9 Speaker layout 10 Connecting a TV 10 Connecting the powered subwoofer 10 Connecting to an analog component 11 Connecting to a digital component 11 Connecting a USB mass storage class device 11 Connecting the power cord 11 Operating external components with the remote control 12 ...
Table of contents Introduction 2 Notes on handling 2 Supplied accessories 2 About discs 3 Playable disc types 3 Playable file types 4 Description of parts and controls 5 Connections 8 Connecting the FM and AM antennas 8 Connecting the satellite (front, center and surround) speakers to the subwoofer 9 Speaker layout 10 Connecting a TV 10 Connecting the powered subwoofer 10 Connecting to an analog component 11 Connecting to a digital component 11 Connecting a USB mass storage class device 11 Connecting the power cord 11 Operating external components with the remote control 12 ...
Instructions
Page 5
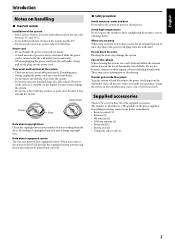
Recording of copyrighted material may damage the system. Do not block the vents Blocking the vents may infringe copyright laws. If water gets inside . If anything goes wrong, unplug the power cord and consult your VCR directly, the copyguard system activates and the picture may not be sure you have all of the supplied accessories. If anything is level, dry and neither too hot nor too cold; Note about copyright laws Check the copyright laws in this condition may cause deformation or discoloring. When you are away When away on travel or for an extended period of the pieces ...
Recording of copyrighted material may damage the system. Do not block the vents Blocking the vents may infringe copyright laws. If water gets inside . If anything goes wrong, unplug the power cord and consult your VCR directly, the copyguard system activates and the picture may not be sure you have all of the supplied accessories. If anything is level, dry and neither too hot nor too cold; Note about copyright laws Check the copyright laws in this condition may cause deformation or discoloring. When you are away When away on travel or for an extended period of the pieces ...
Instructions
Page 6
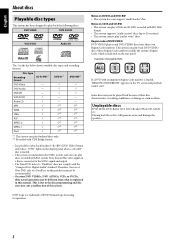
Region code of DVD VIDEO DVD VIDEO players and DVD VIDEO discs have their actual operation may not be different from what is explained in the list below shows available disc types and recording formats. appears on DVD-R and DVD-RW • This system does not support "multi-border" disc. "DVD" lights on a disc is possible to play "packet write" discs. Playing back these discs will generate noise and damage the speakers. 3 Note that an PAL video signal on the display panel when a +R/+RW disc is loaded. • This system accommodates the NTSC system, and also can play...
Region code of DVD VIDEO DVD VIDEO players and DVD VIDEO discs have their actual operation may not be different from what is explained in the list below shows available disc types and recording formats. appears on DVD-R and DVD-RW • This system does not support "multi-border" disc. "DVD" lights on a disc is possible to play "packet write" discs. Playing back these discs will generate noise and damage the speakers. 3 Note that an PAL video signal on the display panel when a +R/+RW disc is loaded. • This system accommodates the NTSC system, and also can play...
Instructions
Page 7
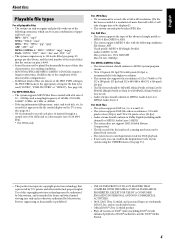
For ASF files • The system supports the types of the advanced simple profile as MPEG-4 files (MPEG-4 ASF). • The system supports MPEG-4 files with the following extensions, which can only play baseline JPEG files. bit rate: 384 kbps For MPEG-2/MPEG-1 files • The stream format should conform to MPEG system/program stream. • 720 x 576 pixels (25 fps)/720 x 480 pixels (30 fps) is recommended for the highest resolution. • This system also supports the resolutions of 352 x 576/480 x 576/ 352 x 288 pixels (25 fps) and 352 x 480/480 x 480/352 x 240 pixels (30 fps). &#...
For ASF files • The system supports the types of the advanced simple profile as MPEG-4 files (MPEG-4 ASF). • The system supports MPEG-4 files with the following extensions, which can only play baseline JPEG files. bit rate: 384 kbps For MPEG-2/MPEG-1 files • The stream format should conform to MPEG system/program stream. • 720 x 576 pixels (25 fps)/720 x 480 pixels (30 fps) is recommended for the highest resolution. • This system also supports the resolutions of 352 x 576/480 x 576/ 352 x 288 pixels (25 fps) and 352 x 480/480 x 480/352 x 240 pixels (30 fps). &#...

Instructions
Page 8
Display window 19 23 35 36 18 23 16 18 20 21 30 27 18 29 18 36 35 31 31 17 17 17 20, 35 15 Disc tray (inside): 17 Remote sensor: 7 15 14 14 17, 19 11 15 5 Description of parts and controls Front panel (center unit) The numbers in the figures indicate the pages where the details of the parts are described.
Display window 19 23 35 36 18 23 16 18 20 21 30 27 18 29 18 36 35 31 31 17 17 17 20, 35 15 Disc tray (inside): 17 Remote sensor: 7 15 14 14 17, 19 11 15 5 Description of parts and controls Front panel (center unit) The numbers in the figures indicate the pages where the details of the parts are described.

Instructions
Page 9
Power cord: 11 Rear 6 Description of parts and controls Rear panel (center unit) 10 11 8 11 10 37 10 11 11 Powered subwoofer SP-PWC30/SP-PWC20 Note that the illustration below is for SP-PWC30. 10 9 POWER ON lamp: 14 Front NOTE • For safety reasons, always ensure that there is sufficient space behind the powered subwoofer. * Do not block the ventilation openings to allow proper air circulation by the cooling fan.
Power cord: 11 Rear 6 Description of parts and controls Rear panel (center unit) 10 11 8 11 10 37 10 11 11 Powered subwoofer SP-PWC30/SP-PWC20 Note that the illustration below is for SP-PWC30. 10 9 POWER ON lamp: 14 Front NOTE • For safety reasons, always ensure that there is sufficient space behind the powered subwoofer. * Do not block the ventilation openings to allow proper air circulation by the cooling fan.
Instructions
Page 10
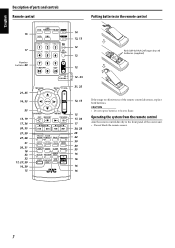
CAUTION • Do not expose batteries to the front panel of the remote control decreases, replace both batteries. Operating the system from the remote control Aim the remote control directly to heat or flame. Description of parts and controls Remote control 15 17 Number buttons: 20 21, 25 16, 33 23 13, 19 17, 36 20, 35 27, 29 27, 28 31 30, 31 18 33 32 17, 27, 29 16, 29 15 Putting batteries in the remote control 14 12, 13 12 12 12 12 - 35 21, 25 R03 (UM-4)/AAA (24F) type dry-cell batteries (supplied) 12, 15 15 17, 36 17 20, 28 29 22 30 20 25 16 16 16 16 If the range or effectiveness ...
CAUTION • Do not expose batteries to the front panel of the remote control decreases, replace both batteries. Operating the system from the remote control Aim the remote control directly to heat or flame. Description of parts and controls Remote control 15 17 Number buttons: 20 21, 25 16, 33 23 13, 19 17, 36 20, 35 27, 29 27, 28 31 30, 31 18 33 32 17, 27, 29 16, 29 15 Putting batteries in the remote control 14 12, 13 12 12 12 12 - 35 21, 25 R03 (UM-4)/AAA (24F) type dry-cell batteries (supplied) 12, 15 15 17, 36 17 20, 28 29 22 30 20 25 16 16 16 16 If the range or effectiveness ...

Instructions
Page 11
NOTE • Make sure the antenna conductors do not touch any other connections have the best reception during AM broadcast program reception. Connecting the FM and AM antennas 7 AM loop antenna Setting up supplied AM loop antenna If reception is poor AM loop antenna Center unit Outdoor single vinyl-covered wire antenna (not supplied) If the antenna cord is well-shielded against interference. • Turn the loop antenna until all other terminals, connecting cords or power cords. If reception is poor Center unit Outdoor FM antenna (not supplied) Standard type (75 Ω ...
NOTE • Make sure the antenna conductors do not touch any other connections have the best reception during AM broadcast program reception. Connecting the FM and AM antennas 7 AM loop antenna Setting up supplied AM loop antenna If reception is poor AM loop antenna Center unit Outdoor single vinyl-covered wire antenna (not supplied) If the antenna cord is well-shielded against interference. • Turn the loop antenna until all other terminals, connecting cords or power cords. If reception is poor Center unit Outdoor FM antenna (not supplied) Standard type (75 Ω ...
Instructions
Page 12
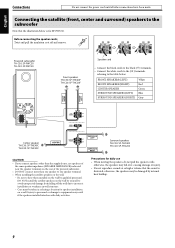
...(RIGHT) CENTER SPEAKER SURROUND SPEAKERS (LEFT) SURROUND SPEAKERS (RIGHT) White Red Green Blue Gray Center speaker TH-C30: SP-THC40C TH-C20: SP-THC20C Surround speakers TH-C30: SP-THC40S TH-C20: SP-THC20S CAUTION • If you connect speakers other connections have them installed on the wall by ...qualified personnel. Powered subwoofer TH-C30: SP-PWC30 TH-C20: SP-PWC20 Front speakers TH-C30: SP-THC40F TH-C20: SP-THC20F Speaker cord • Connect the black cords to the black (r) terminals. • ...
...(RIGHT) CENTER SPEAKER SURROUND SPEAKERS (LEFT) SURROUND SPEAKERS (RIGHT) White Red Green Blue Gray Center speaker TH-C30: SP-THC40C TH-C20: SP-THC20C Surround speakers TH-C30: SP-THC40S TH-C20: SP-THC20S CAUTION • If you connect speakers other connections have them installed on the wall by ...qualified personnel. Powered subwoofer TH-C30: SP-PWC30 TH-C20: SP-PWC20 Front speakers TH-C30: SP-THC40F TH-C20: SP-THC20F Speaker cord • Connect the black cords to the black (r) terminals. • ...
Instructions
Page 13
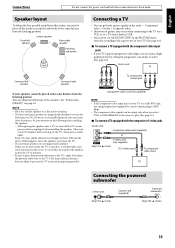
Speaker layout To obtain the best possible sound from this , do not place the speakers nearby the TV or monitor. • Be sure to place the powered subwoofer to place all other connections have followed the above. So, pay attention to avoid color distortions on the screen. To avoid this system, you need to active. (See page 16.) Center unit TV To component video input Component video cord (not supplied) NOTE • If the component video input jacks of picture may occur when connecting to the TV via a VCR, or to a TV with a built-in VCR. • You need to the TV's ...
Speaker layout To obtain the best possible sound from this , do not place the speakers nearby the TV or monitor. • Be sure to place the powered subwoofer to place all other connections have followed the above. So, pay attention to avoid color distortions on the screen. To avoid this system, you need to active. (See page 16.) Center unit TV To component video input Component video cord (not supplied) NOTE • If the component video input jacks of picture may occur when connecting to the TV via a VCR, or to a TV with a built-in VCR. • You need to the TV's ...
Instructions
Page 14
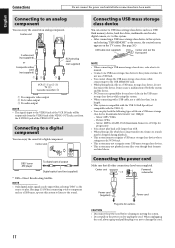
... frame rate of 30 fps for any loss of the VIDEO OUT jacks. It may cause a malfunction of both the system and the device. • JVC bears no responsibility for progressive) • You cannot play back a file larger than 1 m in length. • This system is compatible with the USB 2.0 Full-Speed...
... frame rate of 30 fps for any loss of the VIDEO OUT jacks. It may cause a malfunction of both the system and the device. • JVC bears no responsibility for progressive) • You cannot play back a file larger than 1 m in length. • This system is compatible with the USB 2.0 Full-Speed...
Instructions
Page 15
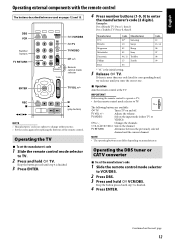
... buttons (1-9, 0) to change without notice. • Set the codes again after replacing the batteries of the remote control. Number buttons Remote control mode selector Manufacturer JVC Hitachi Magnavox Mitsubishi Panasonic Philips RCA Code Manufacturer 01* Samsung 10 Sanyo 02 Sharp 03 Sony 04, 11 Toshiba 15 Zenith 05 Code 12 13...
... buttons (1-9, 0) to change without notice. • Set the codes again after replacing the batteries of the remote control. Number buttons Remote control mode selector Manufacturer JVC Hitachi Magnavox Mitsubishi Panasonic Philips RCA Code Manufacturer 01* Samsung 10 Sanyo 02 Sharp 03 Sony 04, 11 Toshiba 15 Zenith 05 Code 12 13...
Instructions
Page 16
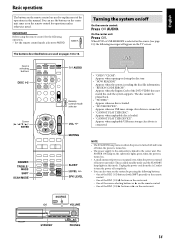
... DBS tuner or CATV converter on and off . 3 (play button) to start recording or together with 3 (play button): Starts playback. 7: Stops operation. 8: Pauses playback. Manufacturer JVC Emerson Fisher Funai Gold Star Hitachi Mitsubishi NEC Panasonic Code 01*, 02, 03 11, 26 29 10, 14, 15, 16 12 04 13 25 07...
... DBS tuner or CATV converter on and off . 3 (play button) to start recording or together with 3 (play button): Starts playback. 7: Stops operation. 8: Pauses playback. Manufacturer JVC Emerson Fisher Funai Gold Star Hitachi Mitsubishi NEC Panasonic Code 01*, 02, 03 11, 26 29 10, 14, 15, 16 12 04 13 25 07...
Instructions
Page 17
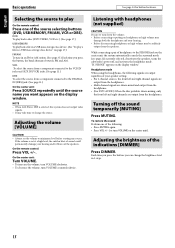
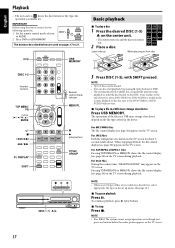
When DVD or USB MEMORY is called standby mode and the STANDBY lamp lights in this mode. The POWER ON lamp on the subwoofer lights green when the power is turned on. • A small amount of power is consumed even when the power is connected. The buttons described below are used on pages 14 to 16. One of the source selecting buttons or 3 on the remote control - Basic operations The buttons on the remote control are used to explain most of the operations in this manual. Turning the system on the system by pressing the following buttons; - On the center unit: Press ...
When DVD or USB MEMORY is called standby mode and the STANDBY lamp lights in this mode. The POWER ON lamp on the subwoofer lights green when the power is turned on. • A small amount of power is consumed even when the power is connected. The buttons described below are used on pages 14 to 16. One of the source selecting buttons or 3 on the remote control - Basic operations The buttons on the remote control are used to explain most of the operations in this manual. Turning the system on the system by pressing the following buttons; - On the center unit: Press ...
Instructions
Page 18
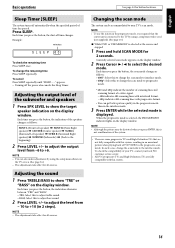
NOTE • When AM, FM or DBS is set the volume to the VCR IN jacks and AUX IN (VCR) jacks. (See page 11.) DBS: To select the source from the speakers. To restore the sound Perform one of the source selecting buttons (DVD, USB MEMORY, FM/AM, VCR or DBS). Each time you press the button, you can change the source. Adjusting the volume [VOLUME] CAUTION • Always set at a high level, the sudden blast of your speaker setting; • For 2 channel sources, the front left and right channels are output from the headphones. • (For DVD AUDIO) When the disc prohibits ...
NOTE • When AM, FM or DBS is set the volume to the VCR IN jacks and AUX IN (VCR) jacks. (See page 11.) DBS: To select the source from the speakers. To restore the sound Perform one of the source selecting buttons (DVD, USB MEMORY, FM/AM, VCR or DBS). Each time you press the button, you can change the source. Adjusting the volume [VOLUME] CAUTION • Always set at a high level, the sudden blast of your speaker setting; • For 2 channel sources, the front left and right channels are output from the headphones. • (For DVD AUDIO) When the disc prohibits ...
Instructions
Page 19
... adjustments by using the setup menu shown on the display window. NOTE • Although the picture may be accommodated to your local JVC customer service center. • All JVC progressive TVs and High-Definition TVs are some progressive TVs and High-Definition TVs that the center unit is required that are not...
... adjustments by using the setup menu shown on the display window. NOTE • Although the picture may be accommodated to your local JVC customer service center. • All JVC progressive TVs and High-Definition TVs are some progressive TVs and High-Definition TVs that the center unit is required that are not...
Instructions
Page 20
The buttons described below are recorded on a disc/device, select appropriate file type on the file types stored in the system, playback of the disc next to the DVD VIDEO or DVD AUDIO will not start playback by pressing 3 (play a file in a USB mass storage class device depend on the set up When placing an 8 cm disc Number buttons Cursor (3/2/Y/5)/ ENTER 17 Remote control mode selector (play button). 7 To stop playback or until the disc loaded on and the disc tray comes out. 2 Place a disc. For ASF/MPEG-2/MPEG-1 files Pressing TOP MENU/PG or MENU/PL shows the file control ...
The buttons described below are recorded on a disc/device, select appropriate file type on the file types stored in the system, playback of the disc next to the DVD VIDEO or DVD AUDIO will not start playback by pressing 3 (play a file in a USB mass storage class device depend on the set up When placing an 8 cm disc Number buttons Cursor (3/2/Y/5)/ ENTER 17 Remote control mode selector (play button). 7 To stop playback or until the disc loaded on and the disc tray comes out. 2 Place a disc. For ASF/MPEG-2/MPEG-1 files Pressing TOP MENU/PG or MENU/PL shows the file control ...
Instructions
Page 21
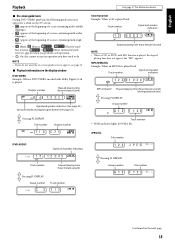
VCD/SVCD/CD Example: When a CD is played back Track number Signal and speaker indicators Elapsed playing time (hour:minute:second) NOTE • When a VCD or SVCD with Dolby Digital 5.1ch is played Chapter number Elapsed playing time (hour:minute:second) Signal and speaker indicators (See page 23.) Surround mode and digital signal format (See page 23.) Pressing FL DISPLAY Title number Chapter number DVD AUDIO Signal and speaker indicators Track number Elapsed playing time (hour:minute:second) Pressing FL DISPLAY Group number Track number See page 17 for button locations. ...
VCD/SVCD/CD Example: When a CD is played back Track number Signal and speaker indicators Elapsed playing time (hour:minute:second) NOTE • When a VCD or SVCD with Dolby Digital 5.1ch is played Chapter number Elapsed playing time (hour:minute:second) Signal and speaker indicators (See page 23.) Surround mode and digital signal format (See page 23.) Pressing FL DISPLAY Title number Chapter number DVD AUDIO Signal and speaker indicators Track number Elapsed playing time (hour:minute:second) Pressing FL DISPLAY Group number Track number See page 17 for button locations. ...