
Instructions
Page 3
... reception mode 16 XM Satellite Radio operations 17 Preparation 17 Listening to XM Satellite Radio 17 Using preset tuning 18 Changing the channel information 19 Basic settings 20 Setting the speaker information easily -Quick Speaker Setup 20 Basic setting items 21 Operating procedure 22 Setting...Surround modes 30 Introducing the DSP modes 32 Using the Surround/DSP modes 33 Activating the Surround/DSP modes 34 AV COMPU LINK remote control system .......... 35 Operating other JVC products 37 Operating other manufacturers' products ........ 39 Troubleshooting 42 Specifications 43 1
... reception mode 16 XM Satellite Radio operations 17 Preparation 17 Listening to XM Satellite Radio 17 Using preset tuning 18 Changing the channel information 19 Basic settings 20 Setting the speaker information easily -Quick Speaker Setup 20 Basic setting items 21 Operating procedure 22 Setting...Surround modes 30 Introducing the DSP modes 32 Using the Surround/DSP modes 33 Activating the Surround/DSP modes 34 AV COMPU LINK remote control system .......... 35 Operating other JVC products 37 Operating other manufacturers' products ........ 39 Troubleshooting 42 Specifications 43 1
Instructions
Page 4
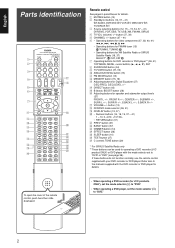
... then slide downward • When operating a DVD recorder (for operating a DVD recorder (JVC product ONLY) or DVD player with your DVD recorder or DVD player. R CENTER SUBWFR...the remote control supplied with the mode selector set the mode selector (i) to "DVD." 2 button (37, 39) 5 CHANNEL +/- button (13) i DVR/DVD mode selector (38, 41) o DISPLAY button (19, 37) ; • Numeric...button (15, 18) e Adjusting buttons for details. R L - English Parts identification A/V CONTROL RECEIVER REMOTE CONTROL RM-SRXD211J MUTING AUDIO 1 DBS/ DVR/DVD VCR CATV TV/SIRIUS 2 DVR/DVD ...
... then slide downward • When operating a DVD recorder (for operating a DVD recorder (JVC product ONLY) or DVD player with your DVD recorder or DVD player. R CENTER SUBWFR...the remote control supplied with the mode selector set the mode selector (i) to "DVD." 2 button (37, 39) 5 CHANNEL +/- button (13) i DVR/DVD mode selector (38, 41) o DISPLAY button (19, 37) ; • Numeric...button (15, 18) e Adjusting buttons for details. R L - English Parts identification A/V CONTROL RECEIVER REMOTE CONTROL RM-SRXD211J MUTING AUDIO 1 DBS/ DVR/DVD VCR CATV TV/SIRIUS 2 DVR/DVD ...
Instructions
Page 7
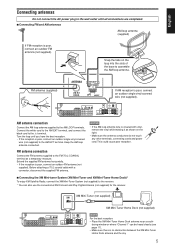
AM antenna connection Connect the AM loop antenna supplied to the receiver. * You can be heard clearly (see page 17). - Before attaching a 75 Ω coaxial cable with vinyl, remove the vinyl while twisting it as a temporary measure. ... the black cord to assemble the AM loop antenna. This could cause poor reception. facing window or where "Channel 1" can also use the conventional XM Connect and Play Digital Antenna (not supplied) for the receiver. XM Mini-Tuner (not supplied) XM Mini-Tuner Home Dock (not supplied) NOTE For the best reception...
AM antenna connection Connect the AM loop antenna supplied to the receiver. * You can be heard clearly (see page 17). - Before attaching a 75 Ω coaxial cable with vinyl, remove the vinyl while twisting it as a temporary measure. ... the black cord to assemble the AM loop antenna. This could cause poor reception. facing window or where "Channel 1" can also use the conventional XM Connect and Play Digital Antenna (not supplied) for the receiver. XM Mini-Tuner (not supplied) XM Mini-Tuner Home Dock (not supplied) NOTE For the best reception...
Instructions
Page 9
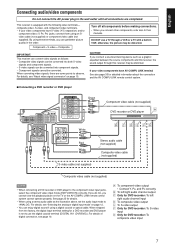
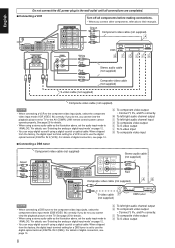
... the wall outlet until all components before making connections. • When you cannot view the playback picture on the TV or the AV COMPU LINK remote control system cannot operate properly. composite video, S-video, and component video terminals. • If your video components have...between the source components and this receiver may be converted. For details, see page 10. Å To component video output • Connect Y, PB, and PR correctly. ı To left/right audio channel output Ç Only for DVD recorder: To left/ right audio channel input Î To composite ...
... the wall outlet until all components before making connections. • When you cannot view the playback picture on the TV or the AV COMPU LINK remote control system cannot operate properly. composite video, S-video, and component video terminals. • If your video components have...between the source components and this receiver may be converted. For details, see page 10. Å To component video output • Connect Y, PB, and PR correctly. ı To left/right audio channel output Ç Only for DVD recorder: To left/ right audio channel input Î To composite ...
Instructions
Page 10
...page 25 for a VCR is set the audio input mode to "ANALOG." For details of digital connection, see page 10. Å To left /right audio channel input Î To composite video output ‰ To S-video output Ï To S-video input Ì To composite video input 7 Connecting a DBS tuner ... digital sound if using a digital coaxial or optical cable. If you do not, you cannot view the playback picture on the TV or the AV COMPU LINK remote control system cannot operate properly. When shipped from the factory, the digital input terminal setting for details. • When using a...
...page 25 for a VCR is set the audio input mode to "ANALOG." For details of digital connection, see page 10. Å To left /right audio channel input Î To composite video output ‰ To S-video output Ï To S-video input Ì To composite video input 7 Connecting a DBS tuner ... digital sound if using a digital coaxial or optical cable. If you do not, you cannot view the playback picture on the TV or the AV COMPU LINK remote control system cannot operate properly. When shipped from the factory, the digital input terminal setting for details. • When using a...
Instructions
Page 11
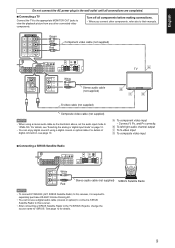
...video components. For details, see page 10. Å To component video input • Connect Y, PB, and PR correctly. ı To left/right audio channel output Ç To S-video input Î To composite video input 7 Connecting a SIRIUS Satellite Radio TV/SIRIUS DB L IN IN White 5 2 3 ...∞ Stereo audio cable (not supplied) SIRIUS Satellite Radio R Red NOTES • To connect KT-SR2000 (JVC SIRIUS Satellite Radio) to this receiver, it is required to separately purchase KS-K6013 Home Docking Kit. • You cannot use a digital audio cable (coaxial or optical)...
...video components. For details, see page 10. Å To component video input • Connect Y, PB, and PR correctly. ı To left/right audio channel output Ç To S-video input Î To composite video input 7 Connecting a SIRIUS Satellite Radio TV/SIRIUS DB L IN IN White 5 2 3 ...∞ Stereo audio cable (not supplied) SIRIUS Satellite Radio R Red NOTES • To connect KT-SR2000 (JVC SIRIUS Satellite Radio) to this receiver, it is required to separately purchase KS-K6013 Home Docking Kit. • You cannot use a digital audio cable (coaxial or optical)...

Instructions
Page 12
...; Pictures may cause fire, electric shock, or other components, refer also to "" (see pages 35 and 36), connect them also as preset channels and sound adjustment may be emitted only through the S-video output jacks of component can convert video signals. Digital coaxial cable (not supplied) Digital ... standby mode. CAUTIONS: • Do not touch the power cord with the receiver on page 12. • When you want to operate the connected component (except DBS tuner) using the AV COMPU LINK remote control system (see page 25). • If using composite video cable for connecting ...
...; Pictures may cause fire, electric shock, or other components, refer also to "" (see pages 35 and 36), connect them also as preset channels and sound adjustment may be emitted only through the S-video output jacks of component can convert video signals. Digital coaxial cable (not supplied) Digital ... standby mode. CAUTIONS: • Do not touch the power cord with the receiver on page 12. • When you want to operate the connected component (except DBS tuner) using the AV COMPU LINK remote control system (see page 25). • If using composite video cable for connecting ...

Instructions
Page 15
...can also enjoy the Surround/DSP mode through the headphones. (Sounds are down-mixed to the front channels while playing multi-channel software.) Connect a pair of signal comes into the receiver. NOTE When "DIGITAL AUTO" cannot recognize the incoming signal, no digital signal format indicator lights up... changes as high volume may output from the PHONES jack cancels the HEADPHONE (or 3D HEADPHONE) mode and activates the speakers. The receiver automatically detects the incoming signal format, then the digital signal format indicator (LINEAR PCM, , , or 96/24) for the detected...
...can also enjoy the Surround/DSP mode through the headphones. (Sounds are down-mixed to the front channels while playing multi-channel software.) Connect a pair of signal comes into the receiver. NOTE When "DIGITAL AUTO" cannot recognize the incoming signal, no digital signal format indicator lights up... changes as high volume may output from the PHONES jack cancels the HEADPHONE (or 3D HEADPHONE) mode and activates the speakers. The receiver automatically detects the incoming signal format, then the digital signal format indicator (LINEAR PCM, , , or 96/24) for the detected...

Instructions
Page 16
... off the sound through all connected speakers and headphones. Basic adjustment of auto memory This receiver memorizes sound settings for the current playback. 14 RS: Lights up when the surround back channel signal comes in . LFE: Lights up when monaural surround signal comes in . For ...SUBWFR ." R: • When digital input is selected: Lights up when the right channel signal comes in . English Turning off the sounds temporarily From the remote control ONLY: Press MUTING to turn off the receiver. Press DIMMER repeatedly. • Each time you change the shut-off . DIMMER ...
... off the sound through all connected speakers and headphones. Basic adjustment of auto memory This receiver memorizes sound settings for the current playback. 14 RS: Lights up when the surround back channel signal comes in . LFE: Lights up when monaural surround signal comes in . For ...SUBWFR ." R: • When digital input is selected: Lights up when the right channel signal comes in . English Turning off the sounds temporarily From the remote control ONLY: Press MUTING to turn off the receiver. Press DIMMER repeatedly. • Each time you change the shut-off . DIMMER ...
Instructions
Page 17
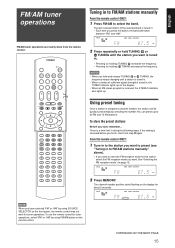
..." or "AM" by using FM/AM button on the front panel, the remote control may not work for tuner operations. If the setting is assigned a channel number, the station can preset up to select the band. ANALOG L R S.WFR TUNED STEREO AUTO MUTING MHz 2 Press MEMORY. NOTES • When you...lights up . You can be quickly tuned simply by using SOURCE SELECTOR on the remote control. The channel number position starts flashing on the display. • When an FM stereo program is received, the STEREO indicator also lights up on the display for this station, select the FM reception mode ...
..." or "AM" by using FM/AM button on the front panel, the remote control may not work for tuner operations. If the setting is assigned a channel number, the station can preset up to select the band. ANALOG L R S.WFR TUNED STEREO AUTO MUTING MHz 2 Press MEMORY. NOTES • When you...lights up . You can be quickly tuned simply by using SOURCE SELECTOR on the remote control. The channel number position starts flashing on the display. • When an FM stereo program is received, the STEREO indicator also lights up on the display for this station, select the FM reception mode ...

Instructions
Page 18
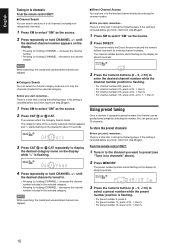
...WFR TUNED STEREO AUTO MUTING MHz • For channel number 5, press 5. • For channel number 10, press h10, 1, then 0. • For channel number 15, press h10, 1, then 5. The last received station of the selected band is also useful to select a preset channel number. The AUTO MUTING indicator lights up on the... display. Select this to the stations. In this . The station is hard to receive or noisy, you can change the FM reception mode while receiving an FM broadcast. • You...
...WFR TUNED STEREO AUTO MUTING MHz • For channel number 5, press 5. • For channel number 10, press h10, 1, then 0. • For channel number 15, press h10, 1, then 5. The last received station of the selected band is also useful to select a preset channel number. The AUTO MUTING indicator lights up on the... display. Select this to the stations. In this . The station is hard to receive or noisy, you can change the FM reception mode while receiving an FM broadcast. • You...
Instructions
Page 19
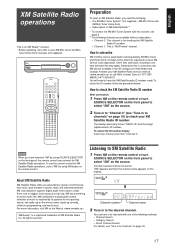
... Radio offers an extraordinary variety of the following methods: - XM ReadyR is tuned in sports, news, talk and entertainment. The last received channel is a registered trademark of music is "XM Preview" channel. You can tune in to XM Satellite Radio**. * To connect the XM Mini-Tuner System with one of commercialfree music, plus...
... Radio offers an extraordinary variety of the following methods: - XM ReadyR is tuned in sports, news, talk and entertainment. The last received channel is a registered trademark of music is "XM Preview" channel. You can tune in to XM Satellite Radio**. * To connect the XM Mini-Tuner System with one of commercialfree music, plus...
Instructions
Page 20
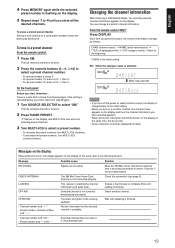
... display while ">" is canceled before you finish, start , remember... The receiver enters the Direct Access mode and the numeric buttons now work for about 5 seconds. until the desired channel is assigned a preset number, the channel can be quickly tuned simply by entering the channel number. Before you start from step 2 again. 1 Press XM to...
... display while ">" is canceled before you finish, start , remember... The receiver enters the Direct Access mode and the numeric buttons now work for about 5 seconds. until the desired channel is assigned a preset number, the channel can be quickly tuned simply by entering the channel number. Before you start from step 2 again. 1 Press XM to...
Instructions
Page 21
... 0. • For preset number 15, press h10, 1, then 5. It takes a few minutes to XM Satellite Radio, the currently selected channel information appears on the display. The last received channel is tuned in a preset channel From the remote control: 1 Press XM. EX.: When the category name is selected: DIGITAL AUTO L R LINEAR PCM S.WFR DIGITAL AUTO...
... 0. • For preset number 15, press h10, 1, then 5. It takes a few minutes to XM Satellite Radio, the currently selected channel information appears on the display. The last received channel is tuned in a preset channel From the remote control: 1 Press XM. EX.: When the category name is selected: DIGITAL AUTO L R LINEAR PCM S.WFR DIGITAL AUTO...

Instructions
Page 22
... information easily-Quick Speaker Setup Quick Speaker Setup helps you to easily and quickly register the speaker size, speaker distance, and output level of the receiver are explained. ANALOG L R S.WFR 2 Press SET. For details, see pages 23 and 27. 1,7 2,4,6 1,3,5 Before you start from Surround/DSP modes...on page 21. As you turn the jog, the room size changes as follows. • For the details of connected speakers (speaker channel number). From pages 20 to 25, how to all the connections are also set the speaker output levels separately for each speaker's information ...
... information easily-Quick Speaker Setup Quick Speaker Setup helps you to easily and quickly register the speaker size, speaker distance, and output level of the receiver are explained. ANALOG L R S.WFR 2 Press SET. For details, see pages 23 and 27. 1,7 2,4,6 1,3,5 Before you start from Surround/DSP modes...on page 21. As you turn the jog, the room size changes as follows. • For the details of connected speakers (speaker channel number). From pages 20 to 25, how to all the connections are also set the speaker output levels separately for each speaker's information ...

Instructions
Page 23
...select. • Subwoofer is not available with the current setting. L: Left front speaker - C: Center speaker - For example, when the speaker channel number is set as 0.1 channel. RS: Right surround speaker - LS: Left surround speaker - SBR: Right surround back speaker - R: Right front speaker - The size of connected... point. (23) EX/ES/PLIIx Select the EX/ES/PLIIx reproduction mode. (23) DUAL MONO Select the Dual Mono sound channel. (24) SUBWOOFER OUT Select sounds emitted from the subwoofer. (24) CROSSOVER Select the cutoff frequency to the subwoofer. (24)...
...select. • Subwoofer is not available with the current setting. L: Left front speaker - C: Center speaker - For example, when the speaker channel number is set as 0.1 channel. RS: Right surround speaker - LS: Left surround speaker - SBR: Right surround back speaker - R: Right front speaker - The size of connected... point. (23) EX/ES/PLIIx Select the EX/ES/PLIIx reproduction mode. (23) DUAL MONO Select the Dual Mono sound channel. (24) SUBWOOFER OUT Select sounds emitted from the subwoofer. (24) CROSSOVER Select the cutoff frequency to the subwoofer. (24)...

Instructions
Page 25
...receiver automatically sets the delay time of "S BACK L DIST" and "S BACK R DIST." 23 D UNIT Select to set the distance in meters. D UNIT Select to set to obtain the best possible sound effect from the Surround/DSP modes. EX/ES/PLIIx Depending on this case, select "" to both 5.1-channel and 6.1-channel... encoded software. According to both 5.1-channel and 6.1-channel encoded software. Initial setting: * For some Dolby Digital Surround EX software, Dolby Digital ...
...receiver automatically sets the delay time of "S BACK L DIST" and "S BACK R DIST." 23 D UNIT Select to set the distance in meters. D UNIT Select to set to obtain the best possible sound effect from the Surround/DSP modes. EX/ES/PLIIx Depending on this case, select "" to both 5.1-channel and 6.1-channel... encoded software. According to both 5.1-channel and 6.1-channel encoded software. Initial setting: * For some Dolby Digital Surround EX software, Dolby Digital ...

Instructions
Page 26
...If you have selected "LRG (large)" for the HEADPHONE and 3D HEADPHONE modes. When the receiver detects Dual mono signals, the DUAL MONO indicator lights up while playing back this channel. D MONO Select to apply the compression effect fully (useful at night using the Midnight mode... MIDNIGHT MIDNIGHT MIDNIGHT Select when you want to the size of the front speaker channels (MAIN) emitted through the subwoofer in "SW ." To use a small speaker in any position, this receiver automatically reallocates the bass sound elements assigned to the small speaker to "SML." ...
...If you have selected "LRG (large)" for the HEADPHONE and 3D HEADPHONE modes. When the receiver detects Dual mono signals, the DUAL MONO indicator lights up while playing back this channel. D MONO Select to apply the compression effect fully (useful at night using the Midnight mode... MIDNIGHT MIDNIGHT MIDNIGHT Select when you want to the size of the front speaker channels (MAIN) emitted through the subwoofer in "SW ." To use a small speaker in any position, this receiver automatically reallocates the bass sound elements assigned to the small speaker to "SML." ...

Instructions
Page 28
...parentheses for details. • You cannot select the items which are not available with sidewall image. (28) CENTER WIDTH Adjust the center channel localization between the center speaker and the left/ right speakers. (29) DIMENSION Adjust sound localization pattern. (29) CENTER GAIN Adjust the ...sound localization of the center channel. (29) CENTER TONE*1 Make the center tone soft or sharp. (29) CENTER ALIGN Align the vertical localization of analog source. (28...
...parentheses for details. • You cannot select the items which are not available with sidewall image. (28) CENTER WIDTH Adjust the center channel localization between the center speaker and the left/ right speakers. (29) DIMENSION Adjust sound localization pattern. (29) CENTER GAIN Adjust the ...sound localization of the center channel. (29) CENTER TONE*1 Make the center tone soft or sharp. (29) CENTER ALIGN Align the vertical localization of analog source. (28...

Instructions
Page 30
...) Initial setting: LIVENESS As the number increases, the attenuation level of the DSP modes (except ALL CH STEREO) is activated for the analog or digital 2-channel sound signal. LIVENESS This setting is available only when one of the analog source is too high, the sound will feel as if you have...
...) Initial setting: LIVENESS As the number increases, the attenuation level of the DSP modes (except ALL CH STEREO) is activated for the analog or digital 2-channel sound signal. LIVENESS This setting is available only when one of the analog source is too high, the sound will feel as if you have...

