Instruction Manual
Page 1
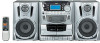
Model No. Serial No. 601-370000-010 LVT1094-001A [J] and Serial No. which are located either on the rear, bottom or side of the cabinet. Retain this information for future reference. English Español CD PORTABLE COMPONENT SYSTEM SISTEMA PORTÁTIL CON REPRODUCTOR DE DISCOS COMPACTOS PC-XC370 INSTRUCTIONS MANUAL DE INSTRUCCIONES For Customer Use: Enter below the Model No.
Model No. Serial No. 601-370000-010 LVT1094-001A [J] and Serial No. which are located either on the rear, bottom or side of the cabinet. Retain this information for future reference. English Español CD PORTABLE COMPONENT SYSTEM SISTEMA PORTÁTIL CON REPRODUCTOR DE DISCOS COMPACTOS PC-XC370 INSTRUCTIONS MANUAL DE INSTRUCCIONES For Customer Use: Enter below the Model No.
Instruction Manual
Page 2
.... POWER switch! Disconnect the mains plug to shut the power off and on a circuit different from that interference will not occur in exposure to the presence of uninsulated "dangerous voltage" within the product's enclosure that may result in a particular installation. Attention - CAUTION: Do not open and interlock failed or defeated. leave all servicing to beam. 3. CAUTION: The compact disc player uses invisible laser...
.... POWER switch! Disconnect the mains plug to shut the power off and on a circuit different from that interference will not occur in exposure to the presence of uninsulated "dangerous voltage" within the product's enclosure that may result in a particular installation. Attention - CAUTION: Do not open and interlock failed or defeated. leave all servicing to beam. 3. CAUTION: The compact disc player uses invisible laser...
Instruction Manual
Page 3
... a long period of the type as recommended by qualified service personnel when : (a) The power-supply cord or the plug has been damaged; or (c) The appliance has been exposed to operate normally or exhibits a marked change in a wet basement or near water - Instructions for safe use before this appliance is installed, wire-connected, and operated. 2) Retain Instructions - An outdoor antenna should be taken so that...
... a long period of the type as recommended by qualified service personnel when : (a) The power-supply cord or the plug has been damaged; or (c) The appliance has been exposed to operate normally or exhibits a marked change in a wet basement or near water - Instructions for safe use before this appliance is installed, wire-connected, and operated. 2) Retain Instructions - An outdoor antenna should be taken so that...
Instruction Manual
Page 4
...is brought directly from the unit. If operation using the remote control is different from the TV to avoid interference with wet hands. For instance, we do not repeat the information about turning on/off the unit, setting the volume, changing the sound effects, and...plug, not the AC power cord. • The manual mainly explains operations using the unit, it in again. In this manual for future reference. Others • Should any metallic object or liquid fall into the unit, unplug the unit and consult your dealer. DO NOT disassemble the unit since there are no user serviceable parts...
...is brought directly from the unit. If operation using the remote control is different from the TV to avoid interference with wet hands. For instance, we do not repeat the information about turning on/off the unit, setting the volume, changing the sound effects, and...plug, not the AC power cord. • The manual mainly explains operations using the unit, it in again. In this manual for future reference. Others • Should any metallic object or liquid fall into the unit, unplug the unit and consult your dealer. DO NOT disassemble the unit since there are no user serviceable parts...

Instruction Manual
Page 5
...19 Using Sleep Timer 20 Maintenance 21 Troubleshooting 22 Specifications 22 -2 - Program Play 14 Playing at Random - Continuous Play 14 Basic CD Operations 14 Programming the Playing Order of the Buttons and Controls 3 Front Panel 4 Remote Control 5 Getting Started 6 Unpacking 6 Putting the Batteries into the Remote Control .......... 6 Connecting Speakers 6 Connecting Other Equipment 7 Power Supply 7 Resetting the Unit 8 Common Operations 9 Turning On or Off the Power 9 Setting the Clock 9 Selecting the Sources 9 Adjusting the Volume 9 Reinforcing the Bass Sound 10...
...19 Using Sleep Timer 20 Maintenance 21 Troubleshooting 22 Specifications 22 -2 - Program Play 14 Playing at Random - Continuous Play 14 Basic CD Operations 14 Programming the Playing Order of the Buttons and Controls 3 Front Panel 4 Remote Control 5 Getting Started 6 Unpacking 6 Putting the Batteries into the Remote Control .......... 6 Connecting Speakers 6 Connecting Other Equipment 7 Power Supply 7 Resetting the Unit 8 Common Operations 9 Turning On or Off the Power 9 Setting the Clock 9 Selecting the Sources 9 Adjusting the Volume 9 Reinforcing the Bass Sound 10...

Instruction Manual
Page 7
...) z REW 1/FF ¡ buttons for deck B (16) x PLAY 3 button for details. Front Panel 1 TAPE button (9, 16, 18) Pressing this button also turns on the unit. 2 TUNER button (9, 11) Pressing this button also turns on the unit. 3 REMOTE SENSOR (5) 4 TIMER button (19) 5 POWER button (9) 6 CLOCK button (9) 7 BEAT CANCEL button (18) 8 TUNING PRESET button (11, 12) 9 PHONES jack (9) p HYPER-BASS SOUND button (10) q Disc trays w CD1 0/CD2 0/CD3 0 (CD tray open /close ) buttons (13, 14) Pressing one of these buttons also turns on the unit.
...) z REW 1/FF ¡ buttons for deck B (16) x PLAY 3 button for details. Front Panel 1 TAPE button (9, 16, 18) Pressing this button also turns on the unit. 2 TUNER button (9, 11) Pressing this button also turns on the unit. 3 REMOTE SENSOR (5) 4 TIMER button (19) 5 POWER button (9) 6 CLOCK button (9) 7 BEAT CANCEL button (18) 8 TUNING PRESET button (11, 12) 9 PHONES jack (9) p HYPER-BASS SOUND button (10) q Disc trays w CD1 0/CD2 0/CD3 0 (CD tray open /close ) buttons (13, 14) Pressing one of these buttons also turns on the unit.

Instruction Manual
Page 8
... Bass Sound) button (10) 8 EQ button (10) w 9 POWER button (9) e p SLEEP button (20) q FM MODE button (11) r w 4/¢ (down/up) buttons (14) t e ALL CD EJECT button (13) y r LONG PLAY button (14) u t 6 (play/pause) button (14) y 7 (stop) button (14) u RANDOM button (15) i i VOLUME + / - buttons (9) When using the remote control, point it at the remote sensor on the unit. English Remote Control 1 2 3 4 5 6 7 8 Remote Control 1 Number buttons (11, 12, 14) 2 0 (CD tray open/close) buttons (13) Pressing one of these buttons also turns on the unit. 3 CD playback buttons...
... Bass Sound) button (10) 8 EQ button (10) w 9 POWER button (9) e p SLEEP button (20) q FM MODE button (11) r w 4/¢ (down/up) buttons (14) t e ALL CD EJECT button (13) y r LONG PLAY button (14) u t 6 (play/pause) button (14) y 7 (stop) button (14) u RANDOM button (15) i i VOLUME + / - buttons (9) When using the remote control, point it at the remote sensor on the unit. English Remote Control 1 2 3 4 5 6 7 8 Remote Control 1 Number buttons (11, 12, 14) 2 0 (CD tray open/close) buttons (13) Pressing one of these buttons also turns on the unit. 3 CD playback buttons...

Instruction Manual
Page 9
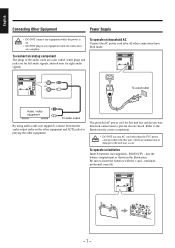
... when you are not going to use the remote control for an extended period of time. When the remote control can no longer operate the unit, replace both batteries at the same time. 2 R6P(SUM-3)/AA(15F) 1 (not supplied) Connecting Speakers Right speaker Left speaker Right speaker cord Left speaker cord Connect the left speaker cord to the L speaker terminal and the right speaker cord to the R speaker terminal. English Getting Started Continued Unpacking...
... when you are not going to use the remote control for an extended period of time. When the remote control can no longer operate the unit, replace both batteries at the same time. 2 R6P(SUM-3)/AA(15F) 1 (not supplied) Connecting Speakers Right speaker Left speaker Right speaker cord Left speaker cord Connect the left speaker cord to the L speaker terminal and the right speaker cord to the R speaker terminal. English Getting Started Continued Unpacking...
Instruction Manual
Page 10
... the audio cords are color coded: white plugs and jacks are complete. Refer to the illustration for this unit; The provided AC power cord for correct connection. • DO NOT use any equipment until all other than the JVC power cord provided with the + and - To operate on batteries Insert 8 batteries (not supplied) - Be sure to insert the batteries with this unit has certain one-way direction...
... the audio cords are color coded: white plugs and jacks are complete. Refer to the illustration for this unit; The provided AC power cord for correct connection. • DO NOT use any equipment until all other than the JVC power cord provided with the + and - To operate on batteries Insert 8 batteries (not supplied) - Be sure to insert the batteries with this unit has certain one-way direction...

Instruction Manual
Page 11
... power supply, the use new batteries (preferably alkaline batteries with the tip of a small screwdriver or similar object. When making an important recording, use of household AC is recommended, when continuous operation of the unit with a longer service life) to be turned off the power. 2 Press the RESET button on the rear of the unit is used, the power will be consumed quicker than noncontinuous operation. Resetting the...
... power supply, the use new batteries (preferably alkaline batteries with the tip of a small screwdriver or similar object. When making an important recording, use of household AC is recommended, when continuous operation of the unit with a longer service life) to be turned off the power. 2 Press the RESET button on the rear of the unit is used, the power will be consumed quicker than noncontinuous operation. Resetting the...
Instruction Manual
Page 12
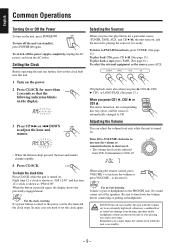
... disc tray ejects, and the source is automatically changed to CD. In such case you cannot adjust the volume level while the unit is ready. No sound comes out of headphones to the PHONES jack. Remember you need to set the clock again. to decrease it . • The volume level can be adjusted from the AC outlet. Setting the Clock Before operating the unit any source next time...
... disc tray ejects, and the source is automatically changed to CD. In such case you cannot adjust the volume level while the unit is ready. No sound comes out of headphones to the PHONES jack. Remember you need to set the clock again. to decrease it . • The volume level can be adjusted from the AC outlet. Setting the Clock Before operating the unit any source next time...
Instruction Manual
Page 13
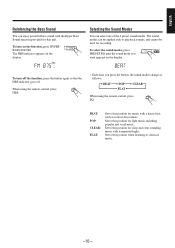
... on the display. • Each time you want appears on the display. The sound modes can enjoy powerful bass sound with the Hyper Bass Sound function provided for this unit. To select the sound modes, press PRESET EQ until the sound mode you press the button, the sound modes change as rock or disco music. BEAT: POP: CLEAR: FLAT: Set to this position for light music including popular and vocal music. When using the remote control, press EQ. Set to...
... on the display. • Each time you want appears on the display. The sound modes can enjoy powerful bass sound with the Hyper Bass Sound function provided for this unit. To select the sound modes, press PRESET EQ until the sound mode you press the button, the sound modes change as rock or disco music. BEAT: POP: CLEAR: FLAT: Set to this position for light music including popular and vocal music. When using the remote control, press EQ. Set to...
Instruction Manual
Page 14
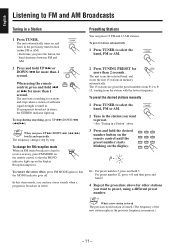
.... 2 Press TUNING PRESET for stations and stops when a station of the new station replaces the previous frequency in . When using a different preset number. To restore the stereo effect, press FM MODE again so that the MONO indicator lights up . English Listening to FM and AM Broadcasts Tuning in memory automatically. The unit starts searching for more than 2 seconds. Presetting Stations You can hear stereo sounds when a program is erased...
.... 2 Press TUNING PRESET for stations and stops when a station of the new station replaces the previous frequency in . When using a different preset number. To restore the stereo effect, press FM MODE again so that the MONO indicator lights up . English Listening to FM and AM Broadcasts Tuning in memory automatically. The unit starts searching for more than 2 seconds. Presetting Stations You can hear stereo sounds when a program is erased...

Instruction Manual
Page 15
... remote control: Press the number buttons. For preset number 12, press +10, then 2. If this happens, preset the stations again. For preset number 5, press 5. When you unplug the AC power cord or if a power failure occurs The preset stations will be erased in ferrite core antenna. -12 - Using the Antennas For FM reception, change the position of the telescopic antenna. On the unit: Press TUNING PRESET repeatedly until the desired preset number appears. English Tuning in a Preset Station...
... remote control: Press the number buttons. For preset number 12, press +10, then 2. If this happens, preset the stations again. For preset number 5, press 5. When you unplug the AC power cord or if a power failure occurs The preset stations will be erased in ferrite core antenna. -12 - Using the Antennas For FM reception, change the position of the telescopic antenna. On the unit: Press TUNING PRESET repeatedly until the desired preset number appears. English Tuning in a Preset Station...
Instruction Manual
Page 16
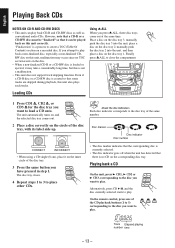
... the CD playback buttons (1 to 3) corresponding to the disc you attempt to load a CD onto. Finally press 0 ALL to play . If you want to play . - 13 - Alternatively, press CD 6, and the disc currently selected starts to close the compartment. The unit automatically turns on, and the selected disc tray comes out. 2 Place a disc correctly on the disc tray 1. Track Elapsed playing number time Even if a CD-R disc or a CD-RW disc...
... the CD playback buttons (1 to 3) corresponding to the disc you attempt to load a CD onto. Finally press 0 ALL to play . If you want to play . - 13 - Alternatively, press CD 6, and the disc currently selected starts to close the compartment. The unit automatically turns on, and the selected disc tray comes out. 2 Place a disc correctly on the disc tray 1. Track Elapsed playing number time Even if a CD-R disc or a CD-RW disc...

Instruction Manual
Page 17
... tracks play before you can play CDs continuously. 1 Load CDs. 2 Press LONG PLAY. For track number 15, press +10 then 5. When using the number buttons Pressing the number button(s) in one of the current or previous tracks. • UP ¢ : Skips to play. Playing Back the Entire Disc - The LONG PLAY indicator lights up . -14 - When using the remote control. The corresponding disc indicator lights up on the display, and playback of the following operations. Ex.: For track number...
... tracks play before you can play CDs continuously. 1 Load CDs. 2 Press LONG PLAY. For track number 15, press +10 then 5. When using the number buttons Pressing the number button(s) in one of the current or previous tracks. • UP ¢ : Skips to play. Playing Back the Entire Disc - The LONG PLAY indicator lights up . -14 - When using the remote control. The corresponding disc indicator lights up on the display, and playback of the following operations. Ex.: For track number...

Instruction Manual
Page 18
... LONG PLAY indicator is visible. Repeating Tracks or CDs - English 4 Press the number buttons to select a track from the CD selected in the above step. • For how to use the number buttons, see "To go back to another track directly using the remote control. To stop during play . Random Play The tracks of all the CDs, the program or the individual track currently playing repeat as many times as the CD label is displayed. The tracks on...
... LONG PLAY indicator is visible. Repeating Tracks or CDs - English 4 Press the number buttons to select a track from the CD selected in the above step. • For how to use the number buttons, see "To go back to another track directly using the remote control. To stop during play . Random Play The tracks of all the CDs, the program or the individual track currently playing repeat as many times as the CD label is displayed. The tracks on...
Instruction Manual
Page 20
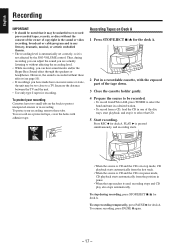
... or cable program and in any literary, dramatic, musical, or artistic embodied therein. • The recording level is automatically set correctly, so it may be unlawful to re-record pre-recorded tapes, records, or discs without affecting the recording level. • While recording, you can adjust the sound you have made have two small tabs on the back to select the band and tune in a desired station...
... or cable program and in any literary, dramatic, musical, or artistic embodied therein. • The recording level is automatically set correctly, so it may be unlawful to re-record pre-recorded tapes, records, or discs without affecting the recording level. • While recording, you can adjust the sound you have made have two small tabs on the back to select the band and tune in a desired station...
Instruction Manual
Page 22
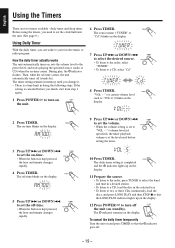
... the radio, press TUNER to select the band and tune in a desired station. • To listen to turn on standby). ON 3 Press UP ¢ or DOWN 4 to set to "VOL - -" (volume level not specified), the timer playback volume is completed and the indicator lights up on the display. 12 Press POWER to a CD, load the disc in doing the following steps. The timer setting remains in memory until...
... the radio, press TUNER to select the band and tune in a desired station. • To listen to turn on standby). ON 3 Press UP ¢ or DOWN 4 to set to "VOL - -" (volume level not specified), the timer playback volume is completed and the indicator lights up on the display. 12 Press POWER to a CD, load the disc in doing the following steps. The timer setting remains in memory until...
Instruction Manual
Page 25
... the cassette are connected. Timer operation does not start. Headphones are removed. The heads are having a problem with the label side up. Hard to listen to record on . The disc is heard. Specifications Amplifier section Output power 5 W per channel, min. x 113/4 in . Action Check all connections and make corrections. (See pages 6 and 7.) Connect the power cord. English Troubleshooting If you cannot solve the problem from the speakers...
... the cassette are connected. Timer operation does not start. Headphones are removed. The heads are having a problem with the label side up. Hard to listen to record on . The disc is heard. Specifications Amplifier section Output power 5 W per channel, min. x 113/4 in . Action Check all connections and make corrections. (See pages 6 and 7.) Connect the power cord. English Troubleshooting If you cannot solve the problem from the speakers...

