
Instructions
Page 11
...remove it requires a certain amount of this manual. Gently squeeze the left and right of the TV screen 5° up, 10° down and 20° to tilt the TV. If you need to begin using your ...or right While holding the bottom of the stand with a Table Top Stand already attached. Tilt the TV up or down While holding the bottom of the stand with one hand, use your new television right... which keeps your other hand to hold the edge of the panel and slowly adjust the direction of the TV stand. Step 1 - Cable Holder 11 After putting the cables in three easy steps, with the basic ...
...remove it requires a certain amount of this manual. Gently squeeze the left and right of the TV screen 5° up, 10° down and 20° to tilt the TV. If you need to begin using your ...or right While holding the bottom of the stand with a Table Top Stand already attached. Tilt the TV up or down While holding the bottom of the stand with one hand, use your new television right... which keeps your other hand to hold the edge of the panel and slowly adjust the direction of the TV stand. Step 1 - Cable Holder 11 After putting the cables in three easy steps, with the basic ...
Instructions
Page 13
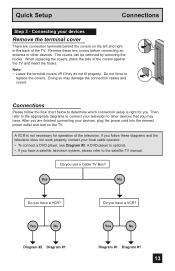
.... Connections Please follow these two covers before connecting an antenna or other devices that you are connection terminals behind the covers on the TV. If you use a Cable TV Box? The covers can be removed by removing the hooks. Doing so may have a VCR? A VCR is right for operation of ... insert the hooks. Do not force to other devices. Do you follow the flow chart below to the satellite TV manual. Yes No Do you have a VCR? A DVD player is optional. • If you have a satellite television system, please refer to determine which connection setup ...
.... Connections Please follow these two covers before connecting an antenna or other devices that you are connection terminals behind the covers on the TV. If you use a Cable TV Box? The covers can be removed by removing the hooks. Doing so may have a VCR? A VCR is right for operation of ... insert the hooks. Do not force to other devices. Do you follow the flow chart below to the satellite TV manual. Yes No Do you have a VCR? A DVD player is optional. • If you have a satellite television system, please refer to determine which connection setup ...
Instructions
Page 15
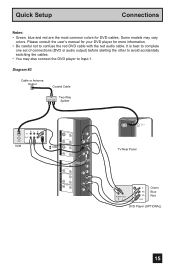
Please consult the user's manual for your DVD player for DVD cables. Diagram #3 Cable or Antenna Output Coaxial Cable IN Two-Way OUT OUT Splitter IN OUT VCR R L V IN OUT ..., blue and red are the most common colors for more information. • Be careful not to Input 1. AUDIO - AUDIO - L DIGITAL IN AUDIO R L (7U5HΩF/VHF) TV Rear Panel DIGITAL-IN AUDIO OUT R L Y Green PB Blue PR Red OUT DVD Player (OPTIONAL) UDIO OUT 15 AUDIO - L Y Pr Pb R - L S-VIDEO VIDEO R - It is...
Please consult the user's manual for your DVD player for DVD cables. Diagram #3 Cable or Antenna Output Coaxial Cable IN Two-Way OUT OUT Splitter IN OUT VCR R L V IN OUT ..., blue and red are the most common colors for more information. • Be careful not to Input 1. AUDIO - AUDIO - L DIGITAL IN AUDIO R L (7U5HΩF/VHF) TV Rear Panel DIGITAL-IN AUDIO OUT R L Y Green PB Blue PR Red OUT DVD Player (OPTIONAL) UDIO OUT 15 AUDIO - L Y Pr Pb R - L S-VIDEO VIDEO R - It is...
Instructions
Page 17
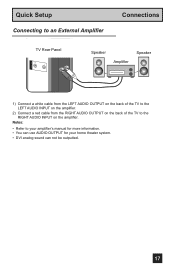
Notes: • Refer to the RIGHT AUDIO INPUT on the amplifier. Quick Setup Connecting to an External Amplifier Connections TV Rear Panel R L Speaker Amplifier Speaker AUDIO OUT 1) Connect a white cable from the LEFT AUDIO OUTPUT on the back of the TV to the LEFT AUDIO INPUT on the amplifier. 2) Connect a red cable from the RIGHT AUDIO OUTPUT on the back of the TV to your amplifier's manual for more information. • You can use AUDIO OUTPUT for your home theater system. • DVI analog sound can not be outputted. 17
Notes: • Refer to the RIGHT AUDIO INPUT on the amplifier. Quick Setup Connecting to an External Amplifier Connections TV Rear Panel R L Speaker Amplifier Speaker AUDIO OUT 1) Connect a white cable from the LEFT AUDIO OUTPUT on the back of the TV to the LEFT AUDIO INPUT on the amplifier. 2) Connect a red cable from the RIGHT AUDIO OUTPUT on the back of the TV to your amplifier's manual for more information. • You can use AUDIO OUTPUT for your home theater system. • DVI analog sound can not be outputted. 17

Instructions
Page 18
L S-VIDEO VIDEO R - Notes: • Please refer to your AV Receiver instruction manual for more devices to your AV Receiver, you should not connect them using both S-Video and Composite connection at the same time when you are ...using V1 Input as the V1 Smart Input. AUDIO - AUDIO - AUDIO - This allows you to free up the other input connections on your TV. L VIDEO R - TV Rear Panel INPUT 1 INPUT 2 S-VIDEO VIDEO R - L MONITOR OUT AV Receiver Y PB PR MONITOR OUT INPUT 3 INPUT 1 COMPONENT DIGITAL IN AUDIO R L AUDIO OUT 1) Connect an...
L S-VIDEO VIDEO R - Notes: • Please refer to your AV Receiver instruction manual for more devices to your AV Receiver, you should not connect them using both S-Video and Composite connection at the same time when you are ...using V1 Input as the V1 Smart Input. AUDIO - AUDIO - AUDIO - This allows you to free up the other input connections on your TV. L VIDEO R - TV Rear Panel INPUT 1 INPUT 2 S-VIDEO VIDEO R - L MONITOR OUT AV Receiver Y PB PR MONITOR OUT INPUT 3 INPUT 1 COMPONENT DIGITAL IN AUDIO R L AUDIO OUT 1) Connect an...

Instructions
Page 21
... been turned on for the first time the interactive plug-in menu, it . Language After the "JVC INTERACTIVE PLUG IN MENU" has been displayed, the TV automatically switches to view your timer functions will skip over it will work properly. In this case use by letting you set clock) NEXT ...Plug-In Menu Step 4 - The plug-in three languages: English, French (Français) or Spanish (Español). You can choose "AUTO" or "MANUAL" for : • The language in which channels you press the Menu button while setting up the interactive plug-in menu will appear. You can choose...
... been turned on for the first time the interactive plug-in menu, it . Language After the "JVC INTERACTIVE PLUG IN MENU" has been displayed, the TV automatically switches to view your timer functions will skip over it will work properly. In this case use by letting you set clock) NEXT ...Plug-In Menu Step 4 - The plug-in three languages: English, French (Français) or Spanish (Español). You can choose "AUTO" or "MANUAL" for : • The language in which channels you press the Menu button while setting up the interactive plug-in menu will appear. You can choose...
Instructions
Page 22
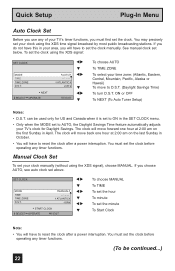
...set to AUTO, the Daylight Savings Time feature automatically adjusts your TV's clock for US and Canada when it is set to ON in April. SET CLOCK MODE TIME TIME ZONE D.S.T. MANUAL -- : -- -- You must first set the clock. See manual clock set above. To set the clock using the XDS time...broadcast by most public broadcasting stations. Quick Setup Plug-In Menu Auto Clock Set Before you use any of your TV's timer functions, you will have to set the clock manually. You may precisely set your clock using the XDS signal: SET CLOCK MODE TIME TIME ZONE D.S.T. If you choose...
...set to AUTO, the Daylight Savings Time feature automatically adjusts your TV's clock for US and Canada when it is set to ON in April. SET CLOCK MODE TIME TIME ZONE D.S.T. MANUAL -- : -- -- You must first set the clock. See manual clock set above. To set the clock using the XDS time...broadcast by most public broadcasting stations. Quick Setup Plug-In Menu Auto Clock Set Before you use any of your TV's timer functions, you will have to set the clock manually. You may precisely set your clock using the XDS signal: SET CLOCK MODE TIME TIME ZONE D.S.T. If you choose...
Instructions
Page 45
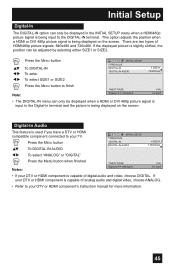
... AUDIO SIZE1 DIGITAL Press the Menu button when finished Notes: NEXT PAGE SELECT OPERATE (1/4) MENU EXIT • If your DTV or HDMI component's instruction manual for more information. 45 Digital-In Audio This feature is capable of analog audio and digital video, choose ANALOG. • Refer to your DTV or... displayed on the screen. If the displayed picture is slightly shifted, the position can only be adjusted by selecting either SIZE1 or SIZE2. If your TV.
... AUDIO SIZE1 DIGITAL Press the Menu button when finished Notes: NEXT PAGE SELECT OPERATE (1/4) MENU EXIT • If your DTV or HDMI component's instruction manual for more information. 45 Digital-In Audio This feature is capable of analog audio and digital video, choose ANALOG. • Refer to your DTV or... displayed on the screen. If the displayed picture is slightly shifted, the position can only be adjusted by selecting either SIZE1 or SIZE2. If your TV.
Instructions
Page 50
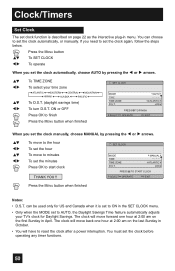
... function is set to finish Press the MENU button when finished SET CLOCK MODE TIME TIME ZONE D.S.T. SET CLOCK MODE TIME TIME ZONE D.S.T. AUTO -- : -- -- MANUAL -- : -- -- can choose to set the minutes Press OK to start clock THANK YOU !! ATLANTIC ON PRESS OK TO START CLOCK SELECT OPERATE MENU EXIT Press... MANUAL by pressing the √ or ® arrows. π† √® π† √® To TIME ZONE To select your TV's clock for US and Canada when it is described on page 22 as the interactive plug-in the SET CLOCK menu. • Only when ...
... function is set to finish Press the MENU button when finished SET CLOCK MODE TIME TIME ZONE D.S.T. SET CLOCK MODE TIME TIME ZONE D.S.T. AUTO -- : -- -- MANUAL -- : -- -- can choose to set the minutes Press OK to start clock THANK YOU !! ATLANTIC ON PRESS OK TO START CLOCK SELECT OPERATE MENU EXIT Press... MANUAL by pressing the √ or ® arrows. π† √® π† √® To TIME ZONE To select your TV's clock for US and Canada when it is described on page 22 as the interactive plug-in the SET CLOCK menu. • Only when ...


