Instructions
Page 2
... relocate the receiving antenna. - If you for help. These limits are no guarantee that interference will not occur in a particular installation. If this equipment does cause harmful interference to radio or television reception, which the receiver is connected. - WARNINGS: To prevent ...installation. it may obstruct the operation of the following measures: - Do not view directly with the limits for USA, the Electronic Industries Alliance: http://www.eiae.org. [European Union only] 2 Consult the dealer or an experienced radio/TV technician for purchasing a JVC ...
... relocate the receiving antenna. - If you for help. These limits are no guarantee that interference will not occur in a particular installation. If this equipment does cause harmful interference to radio or television reception, which the receiver is connected. - WARNINGS: To prevent ...installation. it may obstruct the operation of the following measures: - Do not view directly with the limits for USA, the Electronic Industries Alliance: http://www.eiae.org. [European Union only] 2 Consult the dealer or an experienced radio/TV technician for purchasing a JVC ...
Instructions
Page 6
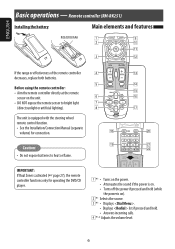
Remote controller (RM-RK251) Installing the battery Main elements and features R03/LR03/AAA If the range or effectiveness of the remote controller decreases, replace both batteries. Before using the ... the power if pressed and held (while the power is equipped with the steering wheel remote control function. • See the Installation/Connection Manual (separate volume) for operating the DVD/CD player. 1*1 • Turns on the power. • Attenuates the sound if the power is on ). 2*1 Selects the source. 3*1 • Displays . • Displays...
Remote controller (RM-RK251) Installing the battery Main elements and features R03/LR03/AAA If the range or effectiveness of the remote controller decreases, replace both batteries. Before using the ... the power if pressed and held (while the power is equipped with the steering wheel remote control function. • See the Installation/Connection Manual (separate volume) for operating the DVD/CD player. 1*1 • Turns on the power. • Attenuates the sound if the power is on ). 2*1 Selects the source. 3*1 • Displays . • Displays...
Instructions
Page 54
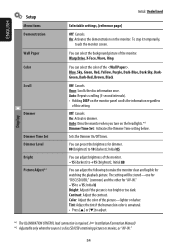
... Set : Activates the Dimmer Time setting below. Initial 00 You can select the color of the monitor. Display *1 The ILLUMINATION CONTROL lead connection is required. ( Installation/Connection Manual) *2 Adjustable only when the source is unnatural. • Press [5] or [∞] to make the monitor clear and legible for "AV-IN." -15 to...
... Set : Activates the Dimmer Time setting below. Initial 00 You can select the color of the monitor. Display *1 The ILLUMINATION CONTROL lead connection is required. ( Installation/Connection Manual) *2 Adjustable only when the source is unnatural. • Press [5] or [∞] to make the monitor clear and legible for "AV-IN." -15 to...
Instructions
Page 59
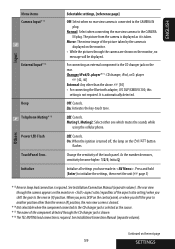
... using the cellular phone. As the number decreases, sensitivity become higher. 1/2/3; player [42, 46] External: Any other than the above. [50] • For connecting the Bluetooth adapter, JVC DLP/XMDJVC100, this setting is required. Off: Cancels. Continued on the rear.... Initialize Selectable settings, [reference page] Off: Select when no message will be displayed. The rear view through the camera appears on the flashes. See Installation/Connection Manual (separate volume). player...
... using the cellular phone. As the number decreases, sensitivity become higher. 1/2/3; player [42, 46] External: Any other than the above. [50] • For connecting the Bluetooth adapter, JVC DLP/XMDJVC100, this setting is required. Off: Cancels. Continued on the rear.... Initialize Selectable settings, [reference page] Off: Select when no message will be displayed. The rear view through the camera appears on the flashes. See Installation/Connection Manual (separate volume). player...
Instructions
Page 73
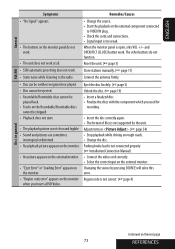
...on the monitor when you used for recording. • Insert the disc correctly again. • The format of files is not connected properly. ( Installation/Connection Manual) • Connect the video cord correctly. • Select the correct input on the next page 73 REFERENCES Connect the antenna firmly. .... ( page 3) Unlock the disc. ( page 19) • Insert a finalized disc. • Finalize the discs with the component which you insert a DVD Video. The other buttons do not work. • The unit does not work at all. • Change the source. • Start the playback on ...
...on the monitor when you used for recording. • Insert the disc correctly again. • The format of files is not connected properly. ( Installation/Connection Manual) • Connect the video cord correctly. • Select the correct input on the next page 73 REFERENCES Connect the antenna firmly. .... ( page 3) Unlock the disc. ( page 19) • Insert a finalized disc. • Finalize the discs with the component which you insert a DVD Video. The other buttons do not work. • The unit does not work at all. • Change the source. • Start the playback on ...

Instructions
Page 79
... is necessary for your car, consult your telephone directory for the monitor to 104°F) Dimensions (W × H × D): • With trim plate and sleeve attached Installation Size (approx.): Panel Size (approx.): 182 mm × 111 mm × 160 mm (7-3/16" × 4-3/8" × 6-5/16") 188 mm × 117 mm × 10 mm...
... is necessary for your car, consult your telephone directory for the monitor to 104°F) Dimensions (W × H × D): • With trim plate and sleeve attached Installation Size (approx.): Panel Size (approx.): 182 mm × 111 mm × 160 mm (7-3/16" × 4-3/8" × 6-5/16") 188 mm × 117 mm × 10 mm...


