Instruction Manual
Page 3
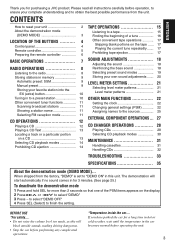
...radio 8 Storing stations in memory 9 Automatic preset: SSM 9 Manual preset 9 Storing your favorite station into the EX (extra) button 10 Tuning in to a preset station 10 Other convenient tuner functions 11 Scanning broadcast stations 11 Showing a station name 11 Selecting FM reception mode 11 CD OPERATIONS 12 Playing a CD 12 Playing a CD...page 25.) To deactivate the demonstration mode 1 Press and hold SEL for purchasing a JVC product. to select "DEMO OFF." 4 Press SEL (Select) to obtain the ...clock 22 Changing general settings (PSM 22 Assigning names to select "DEMO." 3 Press -...
...radio 8 Storing stations in memory 9 Automatic preset: SSM 9 Manual preset 9 Storing your favorite station into the EX (extra) button 10 Tuning in to a preset station 10 Other convenient tuner functions 11 Scanning broadcast stations 11 Showing a station name 11 Selecting FM reception mode 11 CD OPERATIONS 12 Playing a CD 12 Playing a CD...page 25.) To deactivate the demonstration mode 1 Press and hold SEL for purchasing a JVC product. to select "DEMO OFF." 4 Press SEL (Select) to obtain the ...clock 22 Changing general settings (PSM 22 Assigning names to select "DEMO." 3 Press -...
Instruction Manual
Page 4
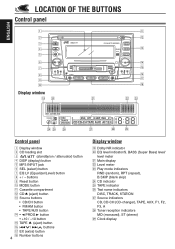
...7 EQ LV (Equalizer/Level) button 8 + / - EQ level indicator/S. buttons 9 Reset button p MODE button q Cassette compartment w CD 0 (eject) button e Source buttons • CD/CH button • FM/AM button • TAPE/AUX button r • 2 PROG 3 button • +10 / -10 button...), RPT (repeat), B.SKIP (blank skip) f CD indicator g TAPE indicator h Text name indicators DISC, TRACK, STATION j Source indicators CD, CD-CH (CD-changer), TAPE, AUX, F1, F2, F3, A k Tuner reception indicators MO (monaural), ST (stereo) l Clock display ENGLISH LOCATION OF THE BUTTONS Control panel 1 ...
...7 EQ LV (Equalizer/Level) button 8 + / - EQ level indicator/S. buttons 9 Reset button p MODE button q Cassette compartment w CD 0 (eject) button e Source buttons • CD/CH button • FM/AM button • TAPE/AUX button r • 2 PROG 3 button • +10 / -10 button...), RPT (repeat), B.SKIP (blank skip) f CD indicator g TAPE indicator h Text name indicators DISC, TRACK, STATION j Source indicators CD, CD-CH (CD-changer), TAPE, AUX, F1, F2, F3, A k Tuner reception indicators MO (monaural), ST (stereo) l Clock display ENGLISH LOCATION OF THE BUTTONS Control panel 1 ...
Instruction Manual
Page 7
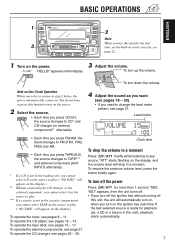
... on the display.) ** Without connecting the CD changer or the external component, you cannot select it as the source to play . ("NO TAPE" will automatically turn on when you turn off the ignition key without turning off the power Press /ATT for more than 1 second. Clock time To drop the volume in...
... on the display.) ** Without connecting the CD changer or the external component, you cannot select it as the source to play . ("NO TAPE" will automatically turn on when you turn off the ignition key without turning off the power Press /ATT for more than 1 second. Clock time To drop the volume in...
Instruction Manual
Page 22
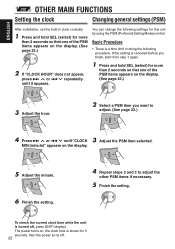
...that one of the PSM items appears on the display. (See page 23.) 2 If "CLOCK HOUR" does not appear, press ¢ or 4 repeatedly until "CLOCK Adjust the PSM item selected. If the setting is a time limit in clock correctly. 1 Press and hold SEL (select) for more than 2 seconds so that one ... hold SEL (select) for this unit by using the PSM (Preferred Setting Mode) control. MIN (minute)" appears on , the clock time is turned off . 22 To check the current clock time while the unit is shown for 5 seconds, then the power turns off , press DISP (display). The power turns on...
...that one of the PSM items appears on the display. (See page 23.) 2 If "CLOCK HOUR" does not appear, press ¢ or 4 repeatedly until "CLOCK Adjust the PSM item selected. If the setting is a time limit in clock correctly. 1 Press and hold SEL (select) for more than 2 seconds so that one ... hold SEL (select) for this unit by using the PSM (Preferred Setting Mode) control. MIN (minute)" appears on , the clock time is turned off . 22 To check the current clock time while the unit is shown for 5 seconds, then the power turns off , press DISP (display). The power turns on...
Instruction Manual
Page 23
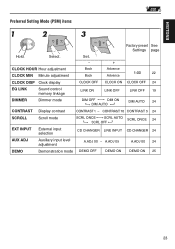
... CD CHANGER 24 AUX ADJ Auxiliary input level adjustment A.ADJ 00 - Select. A.ADJ 05 A.ADJ 00 24 DEMO Demonstration mode DEMO OFF DEMO ON DEMO ON 25 23 ENGLISH Preferred Setting Mode (PSM) items 1 2 3 Factory-preset See Settings page Hold. CLOCK HOUR Hour adjustment CLOCK MIN... Minute adjustment Set. − Back Back + Advance Advance 1:00 22 CLOCK DISP Clock display CLOCK OFF CLOCK ON CLOCK OFF 24 EQ LINK Sound control memory linkage LINK ON LINK OFF LINK OFF...
... CD CHANGER 24 AUX ADJ Auxiliary input level adjustment A.ADJ 00 - Select. A.ADJ 05 A.ADJ 00 24 DEMO Demonstration mode DEMO OFF DEMO ON DEMO ON 25 23 ENGLISH Preferred Setting Mode (PSM) items 1 2 3 Factory-preset See Settings page Hold. CLOCK HOUR Hour adjustment CLOCK MIN... Minute adjustment Set. − Back Back + Advance Advance 1:00 22 CLOCK DISP Clock display CLOCK OFF CLOCK ON CLOCK OFF 24 EQ LINK Sound control memory linkage LINK ON LINK OFF LINK OFF...
Instruction Manual
Page 24
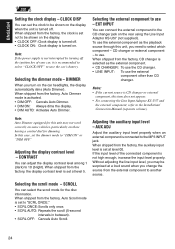
... Note: If the power supply is not interrupted by turning off the ignition key of the connected component is turned off . • CLOCK ON: Clock display is CD changer or external component, this unit may be shown on the car headlights, the display automatically dims (Auto Dimmer). When shipped from the... or external component - If the input level of your car, it is set the clock to "DIM ON" or "DIM OFF." CLOCK DISP You can connect the external component to the CD changer jack on those having a control dial for dimming. In this unit, you may not work correctly on...
... Note: If the power supply is not interrupted by turning off the ignition key of the connected component is turned off . • CLOCK ON: Clock display is CD changer or external component, this unit may be shown on the car headlights, the display automatically dims (Auto Dimmer). When shipped from the... or external component - If the input level of your car, it is set the clock to "DIM ON" or "DIM OFF." CLOCK DISP You can connect the external component to the CD changer jack on those having a control dial for dimming. In this unit, you may not work correctly on...


