
Instructions
Page 1
FRANÇAIS ESPAÑOL ENGLISH GPS NAVIGATION SYSTEM SISTEMA DE NAVEGACIÓN GPS SYSTÈME DE NAVIGATION GPS KW-NT1 KW-NT1 KW-NT1 For installation and connections, refer to the separate manual. which are located on the top or bottom of the cabinet. Retain this information for future reference. Pour l'installation et les raccordements, se référer...
FRANÇAIS ESPAÑOL ENGLISH GPS NAVIGATION SYSTEM SISTEMA DE NAVEGACIÓN GPS SYSTÈME DE NAVIGATION GPS KW-NT1 KW-NT1 KW-NT1 For installation and connections, refer to the separate manual. which are located on the top or bottom of the cabinet. Retain this information for future reference. Pour l'installation et les raccordements, se référer...
Instructions
Page 2
...top cover. These limits are no guarantee that to which can radiate radio frequency energy and, if not installed and used in accordance with the limits for a Class B digital device, pursuant to provide reasonable protection against harmful interference in a... obtain the best possible performance from that interference will not occur in a residential installation. IMPORTANT FOR LASER PRODUCTS 1. Consult the dealer or an experienced radio/TV technician for purchasing a JVC product. leave all instructions carefully before operation, to ensure your complete understanding and ...
...top cover. These limits are no guarantee that to which can radiate radio frequency energy and, if not installed and used in accordance with the limits for a Class B digital device, pursuant to provide reasonable protection against harmful interference in a... obtain the best possible performance from that interference will not occur in a residential installation. IMPORTANT FOR LASER PRODUCTS 1. Consult the dealer or an experienced radio/TV technician for purchasing a JVC product. leave all instructions carefully before operation, to ensure your complete understanding and ...

Instructions
Page 3
...the monitor while driving. • If the parking brake is connected to the parking brake system built in the car (refer to direct sunlight. • Do not operate the touch panel...car becomes normal before performing any cable in a location where; - Touch the buttons on the navigation menus are wearing a glove, take it may not be shown. - Chemical changes occur inside the...When the temperature is not malfunction. • Do not expose the monitor to the Installation/Connection Manual). 3 Pictures may obstruct the steering wheel and gearshift lever operations. - This is inevitable and...
...the monitor while driving. • If the parking brake is connected to the parking brake system built in the car (refer to direct sunlight. • Do not operate the touch panel...car becomes normal before performing any cable in a location where; - Touch the buttons on the navigation menus are wearing a glove, take it may not be shown. - Chemical changes occur inside the...When the temperature is not malfunction. • Do not expose the monitor to the Installation/Connection Manual). 3 Pictures may obstruct the steering wheel and gearshift lever operations. - This is inevitable and...

Instructions
Page 7
... panel 6 How to forcibly eject a disc 6 Introduction 8 Installation settings 9 Parts identification 10 Basic operations 11 About operating screens 12 Switching screens 14 Navigation System 16 Safety instructions for the Navigation System..........17 Basic operations 18 Registering your home/favorite points 21 Searching ... 33 Arranging your route 35 How you are guided 37 Checking the information of the navigation system 41 Initializing memories/navigation settings 42 Navigation menu items 43 Additional information 45 AV Operations 47 Common operations on AV screens 48 ...
... panel 6 How to forcibly eject a disc 6 Introduction 8 Installation settings 9 Parts identification 10 Basic operations 11 About operating screens 12 Switching screens 14 Navigation System 16 Safety instructions for the Navigation System..........17 Basic operations 18 Registering your home/favorite points 21 Searching ... 33 Arranging your route 35 How you are guided 37 Checking the information of the navigation system 41 Initializing memories/navigation settings 42 Navigation menu items 43 Additional information 45 AV Operations 47 Common operations on AV screens 48 ...

Instructions
Page 8
ENGLISH Introduction 9 Installation settings 10 Parts identification 11 Basic operations Turning on the power 11 Adjusting the audio volume 11 Displaying monitor setting bars 11 12 About operating screens Map screens 12 AV screens 12 14 Switching screens 8
ENGLISH Introduction 9 Installation settings 10 Parts identification 11 Basic operations Turning on the power 11 Adjusting the audio volume 11 Displaying monitor setting bars 11 12 About operating screens Map screens 12 AV screens 12 14 Switching screens 8

Instructions
Page 9
... 69) @ ¤ Finish the procedure. 9 DST *1 Select if your car. State/ Select the State or Province Province where you select [Skip Installation Settings (for Store Display)], the System starts in the navigation demonstration mode for the display and the voice guidance. • You can also change these settings through . (☞ page 70) ! Camera...
... 69) @ ¤ Finish the procedure. 9 DST *1 Select if your car. State/ Select the State or Province Province where you select [Skip Installation Settings (for Store Display)], the System starts in the navigation demonstration mode for the display and the voice guidance. • You can also change these settings through . (☞ page 70) ! Camera...

Instructions
Page 11
.... • To adjust the guidance volume, ☞ page 40. *1 Appears only when the map screen is displayed. *2 The ILLUMINATION CONTROL lead connection is required. (☞ Installation/Connection Manual) 11 To use the map screen, press [OK]. [Hold] *1 • The power is turned off when the ignition switch is not pressed on...
.... • To adjust the guidance volume, ☞ page 40. *1 Appears only when the map screen is displayed. *2 The ILLUMINATION CONTROL lead connection is required. (☞ Installation/Connection Manual) 11 To use the map screen, press [OK]. [Hold] *1 • The power is turned off when the ignition switch is not pressed on...

Instructions
Page 45
...when driving on a road constructed recently • The route calculated by closely standing trees • The position of GPS is poor, navigation guidance may not be shown in the route guidance on the display nor counted in the route guidance voice message. • The following...give incorrect distance information. It may not ask you can neither be correct. • The System may occur even if the System is working correctly... - a highway and ordinary road running in a building - after installing the unit - in a tunnel or parking lot in parallel) - in a place surrounded by...
...when driving on a road constructed recently • The route calculated by closely standing trees • The position of GPS is poor, navigation guidance may not be shown in the route guidance on the display nor counted in the route guidance voice message. • The following...give incorrect distance information. It may not ask you can neither be correct. • The System may occur even if the System is working correctly... - a highway and ordinary road running in a building - after installing the unit - in a tunnel or parking lot in parallel) - in a place surrounded by...

Instructions
Page 60
KS-U29 (not supplied). ☞ Installation/Connection Manual (separate volume) - Normal Faster Slower Plays at normal speed. Though selecting "Front AV-IN" may also show pictures from the iPod/ iPhone. • ...
KS-U29 (not supplied). ☞ Installation/Connection Manual (separate volume) - Normal Faster Slower Plays at normal speed. Though selecting "Front AV-IN" may also show pictures from the iPod/ iPhone. • ...

Instructions
Page 66
... the connected component and start playing the source. 66 AV-IN You can connect an external component to the LINE IN/VIDEO IN jacks. (☞ Installation/Connection Manual) ~ Select "AV-IN" as the source. Ÿ Turn on the connected component and start playing the source.
... the connected component and start playing the source. 66 AV-IN You can connect an external component to the LINE IN/VIDEO IN jacks. (☞ Installation/Connection Manual) ~ Select "AV-IN" as the source. Ÿ Turn on the connected component and start playing the source.
Instructions
Page 68
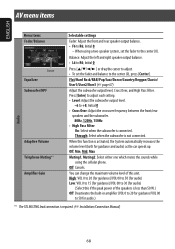
...Low: VOL 0 to 15 (for guidance)/VOL 00 to 30 (for audio) (Select this function is activated, the System automatically increases the volume level (both for audio.) *1 The TEL MUTING lead connection is less than 50 W.) Off: Deactivates... not connected. Off, Min, Mid, Max Muting1, Muting2: Select either one which mutes the sounds while using a two-speaker system, set the fader and balance to the center (0). Press [Enter] to adjust each setting. • Level: Adjust the subwoofer... change the maximum volume level of the speakers is required. (☞ Installation/Connection Manual) 68
...Low: VOL 0 to 15 (for guidance)/VOL 00 to 30 (for audio) (Select this function is activated, the System automatically increases the volume level (both for audio.) *1 The TEL MUTING lead connection is less than 50 W.) Off: Deactivates... not connected. Off, Min, Mid, Max Muting1, Muting2: Select either one which mutes the sounds while using a two-speaker system, set the fader and balance to the center (0). Press [Enter] to adjust each setting. • Level: Adjust the subwoofer... change the maximum volume level of the speakers is required. (☞ Installation/Connection Manual) 68

Instructions
Page 69
... use of the LINE IN and VIDEO IN jacks. (☞ page 66) AV: Select when connecting an AV component such as a portable audio player. On: Activates dimmer. Audio: Select when connecting an audio component such as a camcorder. Off: Cancels. You can determine the use of the... AV-IN jack on the installation settings (☞page 9). For menu, ☞ page 79. 69 On, Off (☞ page 86) On: Activates the demonstration on the headlights.*4 Time...
... use of the LINE IN and VIDEO IN jacks. (☞ page 66) AV: Select when connecting an AV component such as a portable audio player. On: Activates dimmer. Audio: Select when connecting an audio component such as a camcorder. Off: Cancels. You can determine the use of the... AV-IN jack on the installation settings (☞page 9). For menu, ☞ page 79. 69 On, Off (☞ page 86) On: Activates the demonstration on the headlights.*4 Time...

Instructions
Page 70
... search)/9 kHz. EU : When using in North/Central/South America. AM interval is 100 kHz. ENGLISH AV menu items Initial: Underlined System Menu items Language *1 Time Format DST *1 (Daylight Saving Time) Time Zone*1 Tuner Area Beep Startup Message Shutdown Message Reverse Signal Polarity...interval is set to DST. FM/AM intervals are set to initialize the settings. • When restoring the settings, adjust the settings on installation setting screen (☞ page 9). *1 The setting varies depending on -screen information and voice guidance. Press [Restore] to 200 kHz/10 kHz...
... search)/9 kHz. EU : When using in North/Central/South America. AM interval is 100 kHz. ENGLISH AV menu items Initial: Underlined System Menu items Language *1 Time Format DST *1 (Daylight Saving Time) Time Zone*1 Tuner Area Beep Startup Message Shutdown Message Reverse Signal Polarity...interval is set to DST. FM/AM intervals are set to initialize the settings. • When restoring the settings, adjust the settings on installation setting screen (☞ page 9). *1 The setting varies depending on -screen information and voice guidance. Press [Restore] to 200 kHz/10 kHz...

Instructions
Page 86
... you shift the gear to the reverse (R) position. • When you cannot go back to the rear view screen. - For connecting a rear view camera, ☞ Installation/Connection Manual. Press AV MAP. - Off Select when no rear view camera is required. Press [ ] or [ ]. - Shifting the gear to the CAMERA IN jack. Activating...
... you shift the gear to the reverse (R) position. • When you cannot go back to the rear view screen. - For connecting a rear view camera, ☞ Installation/Connection Manual. Press AV MAP. - Off Select when no rear view camera is required. Press [ ] or [ ]. - Shifting the gear to the CAMERA IN jack. Activating...

Instructions
Page 90
...coordinates you have entered are out of map area. Connect them correctly (☞Installation/Connection Manual-separate volume). The destination/via point where is not connected. Check .... Please input again." • Acquiring GPS signals. Failed to the place where the System receives the GPS signals. Reversing signal lead is nearer to a road. "Acquiring GPS ...voice guidance does not come out from the current position. ENGLISH Troubleshooting Navigation Symptoms Remedies/Causes Navigation voice cannot be received. Guidance volume level is not found in the ...
...coordinates you have entered are out of map area. Connect them correctly (☞Installation/Connection Manual-separate volume). The destination/via point where is not connected. Check .... Please input again." • Acquiring GPS signals. Failed to the place where the System receives the GPS signals. Reversing signal lead is nearer to a road. "Acquiring GPS ...voice guidance does not come out from the current position. ENGLISH Troubleshooting Navigation Symptoms Remedies/Causes Navigation voice cannot be received. Guidance volume level is not found in the ...
Instructions
Page 91
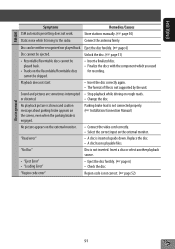
...; Recordable/Rewritable discs cannot be played back. • Tracks on rough roads. No playback picture is engaged. Parking brake lead is not connected properly. (☞ Installation/Connection Manual) No picture appears on the external monitor. • Connect the video cord correctly. • Select the correct input on the screen, even when...
...; Recordable/Rewritable discs cannot be played back. • Tracks on rough roads. No playback picture is engaged. Parking brake lead is not connected properly. (☞ Installation/Connection Manual) No picture appears on the external monitor. • Connect the video cord correctly. • Select the correct input on the screen, even when...

Instructions
Page 97
... unless otherwise authorized by U.S. Dolby and the double-D symbol are owned by Victor Company of Japan, Limited (JVC) is a trademark of DVD Format/Logo Licensing Corporation registered in the U.S. Other trademarks and trade names are registered trademarks of SIRIUS Satellite Radio...11 V to 16 V allowance) Grounding System: Negative ground Allowable Storage Temperature: -10°C to +60°C (14°F to 140°F) Allowable Operating Temperature: 0°C to +40°C (32°F to 104°F) Dimensions (W × H × D): Installation Size (approx.): • With trim ...
... unless otherwise authorized by U.S. Dolby and the double-D symbol are owned by Victor Company of Japan, Limited (JVC) is a trademark of DVD Format/Logo Licensing Corporation registered in the U.S. Other trademarks and trade names are registered trademarks of SIRIUS Satellite Radio...11 V to 16 V allowance) Grounding System: Negative ground Allowable Storage Temperature: -10°C to +60°C (14°F to 140°F) Allowable Operating Temperature: 0°C to +40°C (32°F to 104°F) Dimensions (W × H × D): Installation Size (approx.): • With trim ...

Instructions
Page 98
... or distribute it , provided that the Data or server will be uninterrupted or error-free. or (b) with any products, systems, or applications installed or otherwise connected to or in any purpose, except to the terms of this "End-User License Agreement") and conditions which..., and (ii) save it in communication with permission from Canadian authorities, including: © Her Majesty the Queen in Right of vehicle navigation, positioning, dispatch, real time route guidance, fleet management or similar applications; NT holds a non-exclusive license from this EndUser License Agreement....
... or distribute it , provided that the Data or server will be uninterrupted or error-free. or (b) with any products, systems, or applications installed or otherwise connected to or in any purpose, except to the terms of this "End-User License Agreement") and conditions which..., and (ii) save it in communication with permission from Canadian authorities, including: © Her Majesty the Queen in Right of vehicle navigation, positioning, dispatch, real time route guidance, fleet management or similar applications; NT holds a non-exclusive license from this EndUser License Agreement....


