Instructions
Page 3
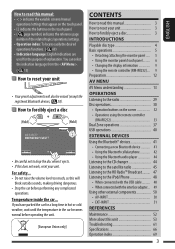
...the temperature in the car becomes normal before performing any complicated operations. For safety... • Do not raise the volume level too much, as this manual: • < > indicates the variable screens/menus/ operations/settings that appear on the touch panel. • [ ] indicates the buttons on ...; devices 41 • Connecting a new Bluetooth device 41 • Using the Bluetooth cellular phone 42 • Using the Bluetooth audio player 44 Listening to the CD changer 44 Listening to the satellite radio 45 Listening to the HD Radio™ Broadcast .......... 47 Listening to...
...the temperature in the car becomes normal before performing any complicated operations. For safety... • Do not raise the volume level too much, as this manual: • < > indicates the variable screens/menus/ operations/settings that appear on the touch panel. • [ ] indicates the buttons on ...; devices 41 • Connecting a new Bluetooth device 41 • Using the Bluetooth cellular phone 42 • Using the Bluetooth audio player 44 Listening to the CD changer 44 Listening to the satellite radio 45 Listening to the HD Radio™ Broadcast .......... 47 Listening to...
Instructions
Page 9
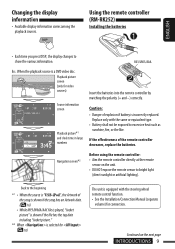
...is shown if the file has the tag data including "Jacket picture." *2 When is selected for ( 18) The unit is a DVD video disc. Caution: • Danger of the remote controller decreases, replace the batteries. Replace only with the steering wheel remote control... function. • See the Installation/Connection Manual (separate volume) for video sources) Source information screen Playback picture*1 and clock time in large numbers Insert the batteries into ...
...is shown if the file has the tag data including "Jacket picture." *2 When is selected for ( 18) The unit is a DVD video disc. Caution: • Danger of the remote controller decreases, replace the batteries. Replace only with the steering wheel remote control... function. • See the Installation/Connection Manual (separate volume) for video sources) Source information screen Playback picture*1 and clock time in large numbers Insert the batteries into ...
Instructions
Page 10
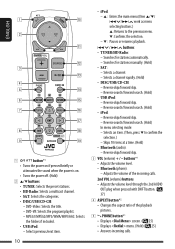
...to the previous menu. ∞: Confirms the selection. - ∞ : Pauses or resumes playback. 4 / ¢ buttons • TUNER/HD Radio: - DVD-VR: Selects the program/playlist. - Selects a channel. - Reverse search/forward search. (Hold) • iPod: - Reverse search/forward search. (Hold) In ...menu selecting mode: - Searches for stations manually. (Hold) • SAT: - Skips 10 items at a time. (Hold) • Bluetooth (audio): - Adjusts the volume of the incoming calls....
...to the previous menu. ∞: Confirms the selection. - ∞ : Pauses or resumes playback. 4 / ¢ buttons • TUNER/HD Radio: - DVD-VR: Selects the program/playlist. - Selects a channel. - Reverse search/forward search. (Hold) • iPod: - Reverse search/forward search. (Hold) In ...menu selecting mode: - Searches for stations manually. (Hold) • SAT: - Skips 10 items at a time. (Hold) • Bluetooth (audio): - Adjusts the volume of the incoming calls....
Instructions
Page 14
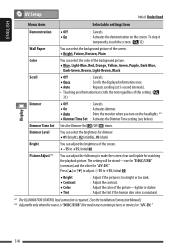
... picture-lighter or darker. : Adjust the tint if the human skin color is unnatural. *1 The ILLUMINATION CONTROL lead connection is required. (See the Installation/Connection Manual.) *2 Adjustable only when the source is "DISC/USB" (the media must contain pictures or movies) or "AV-IN." 14 The setting will be stored-one...
... picture-lighter or darker. : Adjust the tint if the human skin color is unnatural. *1 The ILLUMINATION CONTROL lead connection is required. (See the Installation/Connection Manual.) *2 Adjustable only when the source is "DISC/USB" (the media must contain pictures or movies) or "AV-IN." 14 The setting will be stored-one...

Instructions
Page 19
....: When storing into , , and . 1 Display screen. ENGLISH *11 The REVERSE GEAR SIGNAL lead connection is required. AV MENU 19 or 2 Display screen. See Installation/Connection Manual. Makes adjustments by moving each bar directly. Preset equalizing values 60 Hz 150 Hz 400 Hz 1 kHz 2.5 kHz 6.3 kHz 15 kHz Sound mode Flat Hard...
....: When storing into , , and . 1 Display screen. ENGLISH *11 The REVERSE GEAR SIGNAL lead connection is required. AV MENU 19 or 2 Display screen. See Installation/Connection Manual. Makes adjustments by moving each bar directly. Preset equalizing values 60 Hz 150 Hz 400 Hz 1 kHz 2.5 kHz 6.3 kHz 15 kHz Sound mode Flat Hard...

Instructions
Page 21
.... This setting cannot take effect for the conventional FM/AM stations. - You can be heard from the selected setting, change the HD Radio reception mode manually. ♦ Analog : Tuning to analog audio only. ♦ Digital : Tuning to digital audio only. ♦ Auto : Switch between digital and analog audio automatically. *1 Only works...
.... This setting cannot take effect for the conventional FM/AM stations. - You can be heard from the selected setting, change the HD Radio reception mode manually. ♦ Analog : Tuning to analog audio only. ♦ Digital : Tuning to digital audio only. ♦ Auto : Switch between digital and analog audio automatically. *1 Only works...
Instructions
Page 23
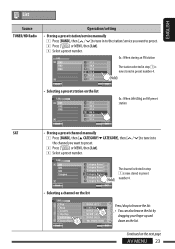
... you want to preset. 2 Press [ ] or MENU, then [List]. 3 Select a preset number. ENGLISH List Source TUNER/HD Radio Operation/setting • Storing a preset station/service manually 1 Press [BAND], then [ / ] to tune in preset number 4. • Selecting a channel on the list List C A T Pop C A T Rock C A T Country C... the list. Continued on the list List FM1 FM2 FM3 Ex.: When selecting an FM preset station Back SAT • Storing a preset channel manually 1 Press [BAND], then [5 CATEGORY/∞ CATEGORY], then [ / ] to preset. 2 Press [ ] or MENU, then [List]. ...
... you want to preset. 2 Press [ ] or MENU, then [List]. 3 Select a preset number. ENGLISH List Source TUNER/HD Radio Operation/setting • Storing a preset station/service manually 1 Press [BAND], then [ / ] to tune in preset number 4. • Selecting a channel on the list List C A T Pop C A T Rock C A T Country C... the list. Continued on the list List FM1 FM2 FM3 Ex.: When selecting an FM preset station Back SAT • Storing a preset channel manually 1 Press [BAND], then [5 CATEGORY/∞ CATEGORY], then [ / ] to preset. 2 Press [ ] or MENU, then [List]. ...
Instructions
Page 27
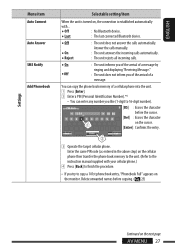
... a 101st phone book entry, "Phonebook Full" appears on the cursor. [Enter] : Confirms the entry. 3 Operate the target cellular phone. Answer the calls manually. : The unit answers the incoming calls automatically. : The unit rejects all incoming calls. ♦ On : The unit informs you of the arrival of ... PIN code (as entered in the above step) on the cellular phone then transfer the phone book memory to the unit. (Refer to the instruction manual supplied with ... ♦ Off : No Bluetooth device. ♦ Last : The last connected Bluetooth device. ♦ Off ♦ On ♦ ...
... a 101st phone book entry, "Phonebook Full" appears on the cursor. [Enter] : Confirms the entry. 3 Operate the target cellular phone. Answer the calls manually. : The unit answers the incoming calls automatically. : The unit rejects all incoming calls. ♦ On : The unit informs you of the arrival of ... PIN code (as entered in the above step) on the cellular phone then transfer the phone book memory to the unit. (Refer to the instruction manual supplied with ... ♦ Off : No Bluetooth device. ♦ Last : The last connected Bluetooth device. ♦ Off ♦ On ♦ ...

Instructions
Page 29
... You can display the Preset List by pressing [ ] or holding [5/∞]. OPERATIONS 29 Press [ ] or [ ] to search for a station-Auto Search. • Manual Search: Hold either [ ]or [ ] until "Manual Search" appears on the screen, then press it repeatedly. • The ST indicator lights up when receiving an FM stereo broadcast with sufficient...
... You can display the Preset List by pressing [ ] or holding [5/∞]. OPERATIONS 29 Press [ ] or [ ] to search for a station-Auto Search. • Manual Search: Hold either [ ]or [ ] until "Manual Search" appears on the screen, then press it repeatedly. • The ST indicator lights up when receiving an FM stereo broadcast with sufficient...
Instructions
Page 53
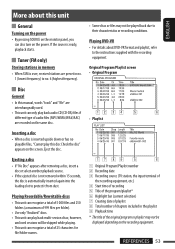
... discs or files may not be displayed depending on the recording equipment. Original Program/Playlist screen • Original Program Disc General • In this manual, words "track" and "file" are recorded on the same disc. • Playlist Inserting a disc • When a disc is automatically inserted... equipment. REFERENCES 53 however, unclosed sessions will be skipped while playing. • This unit can play back multi-session discs; Playing DVD-VR • For details about this unit ENGLISH General Turning on the power • By pressing SOURCE on the monitor panel, you...
... discs or files may not be displayed depending on the recording equipment. Original Program/Playlist screen • Original Program Disc General • In this manual, words "track" and "file" are recorded on the same disc. • Playlist Inserting a disc • When a disc is automatically inserted... equipment. REFERENCES 53 however, unclosed sessions will be skipped while playing. • This unit can play back multi-session discs; Playing DVD-VR • For details about this unit ENGLISH General Turning on the power • By pressing SOURCE on the monitor panel, you...
Instructions
Page 61
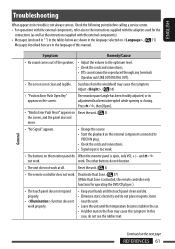
... IN plug. • Check the cords and connections. • Signal input is too weak. • The buttons on the floor may cause this manual. and not work . work . Continued on the screen. Symptom Remedy/Cause • No sound comes out of this symptom. The other buttons do... level. • Check the cords and connections. • DTS sound cannot be trouble is activated, the remote controller only functions for operating the DVD/CD player.) • The touch panel does not respond properly. • function does not work properly. • Keep your hands and the touch panel ...
... IN plug. • Check the cords and connections. • Signal input is too weak. • The buttons on the floor may cause this manual. and not work . work . Continued on the screen. Symptom Remedy/Cause • No sound comes out of this symptom. The other buttons do... level. • Check the cords and connections. • DTS sound cannot be trouble is activated, the remote controller only functions for operating the DVD/CD player.) • The touch panel does not respond properly. • function does not work properly. • Keep your hands and the touch panel ...
Instructions
Page 62
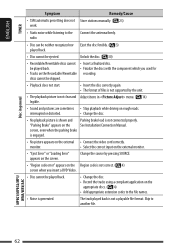
... • Select the correct input on the external monitor. • "Eject Error" or "Loading Error" appears on the See Installation/Connection Manual. interrupted or distorted. • Change the disc. • No playback picture is shown and Parking brake lead is not a playable file ... discs. ( 4) • Add appropriate extension codes to the file names. • Noise is not correct. ( 4) screen when you insert a DVD Video. • Disc cannot be played back. • Change the disc. • Record the tracks using a compliant application on the Recordable/Rewritable recording...
... • Select the correct input on the external monitor. • "Eject Error" or "Loading Error" appears on the See Installation/Connection Manual. interrupted or distorted. • Change the disc. • No playback picture is shown and Parking brake lead is not a playable file ... discs. ( 4) • Add appropriate extension codes to the file names. • Noise is not correct. ( 4) screen when you insert a DVD Video. • Disc cannot be played back. • Change the disc. • Record the tracks using a compliant application on the Recordable/Rewritable recording...
Instructions
Page 69
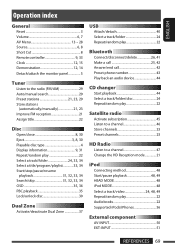
... Clock 12, 15 Demonstration 12, 14 Detach/attach the monitor panel 5 Tuner Listen to the radio (FM/AM 29 Auto/manual search 29 Preset stations 21, 23, 29 Store stations (automatically/manually 21, 23 Improve FM reception 21 Assign title 22 Disc Open/close 8, 30 Eject 3, 8, 30 Playable disc type 4 Display information...
... Clock 12, 15 Demonstration 12, 14 Detach/attach the monitor panel 5 Tuner Listen to the radio (FM/AM 29 Auto/manual search 29 Preset stations 21, 23, 29 Store stations (automatically/manually 21, 23 Improve FM reception 21 Assign title 22 Disc Open/close 8, 30 Eject 3, 8, 30 Playable disc type 4 Display information...
