
Update Guide
Page 1
...is completed. [Important] • 2 GB free space is the instructions for checking the free space. • The maximum space of KV-PX9 13 LVT1900-001A See page 3 for updating the firmware and software on the built-in POI (Point Of Interest) will be removed and...update 7 Confirming the software version of the AV Player area will be updated by this update: • KV-PX9 firmware • Map data -The U.S., U.S. KV-PX9S/KV-PX9B/KV-PX9SN/KV-PX9BN Update Instructions English Française Español This is required on the AV Player area on KV-PX9, HDD Portable Navigation.
...is completed. [Important] • 2 GB free space is the instructions for checking the free space. • The maximum space of KV-PX9 13 LVT1900-001A See page 3 for updating the firmware and software on the built-in POI (Point Of Interest) will be removed and...update 7 Confirming the software version of the AV Player area will be updated by this update: • KV-PX9 firmware • Map data -The U.S., U.S. KV-PX9S/KV-PX9B/KV-PX9SN/KV-PX9BN Update Instructions English Française Español This is required on the AV Player area on KV-PX9, HDD Portable Navigation.
Update Guide
Page 2
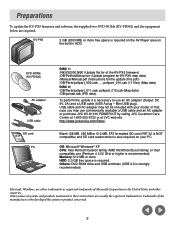
...update it is necessary to use commercially available a USB cable and an AC adapter or purchase JVC KV-K1016 POWER KIT by calling JVC Customer Care Center at 1-800-252-5722 or at JVC web site http://www.jvcservice.com/Store/. Blank 128 MB, 256 MB or 512 MB, ...Microsoft Corporation in these instructions are required. Preparations To update the KV-PX9 firmware and software, the supplied two DVD-ROMs (KV-PD902) and the equipment below are usually the registered trademark or trademarks of the manufacturers who developed the system or product concerned. 2 Others: DVD-ROM drive and USB terminals...
...update it is necessary to use commercially available a USB cable and an AC adapter or purchase JVC KV-K1016 POWER KIT by calling JVC Customer Care Center at 1-800-252-5722 or at JVC web site http://www.jvcservice.com/Store/. Blank 128 MB, 256 MB or 512 MB, ...Microsoft Corporation in these instructions are required. Preparations To update the KV-PX9 firmware and software, the supplied two DVD-ROMs (KV-PD902) and the equipment below are usually the registered trademark or trademarks of the manufacturers who developed the system or product concerned. 2 Others: DVD-ROM drive and USB terminals...
Update Guide
Page 3
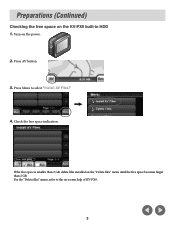
Press Menu to the on the KV-PX9 built-in HDD 1. Turn on the "Delete files" menu until the free space becomes larger than 2 GB. Press AV button. 3. If the free space is smaller than 2 GB, delete files installed on the power. 2. Check the free space indication. Preparations (Continued) Checking the free space on -screen help of KV-PX9. 3 For the "Delete files" menu, refer to select "Install AV Files." 4.
Press Menu to the on the KV-PX9 built-in HDD 1. Turn on the "Delete files" menu until the free space becomes larger than 2 GB. Press AV button. 3. If the free space is smaller than 2 GB, delete files installed on the power. 2. Check the free space indication. Preparations (Continued) Checking the free space on -screen help of KV-PX9. 3 For the "Delete files" menu, refer to select "Install AV Files." 4.
Update Guide
Page 4
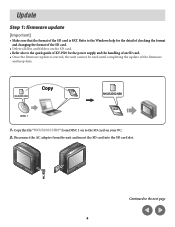
NKUS2000.NB0 Copy NKUS2000.NB0 DISC 1 1. Continued to the quick guide of KV-PX9 for the detail of checking the format and changing the format of the SD card. • Delete all files and folders on your PC. 2. Refer ...
NKUS2000.NB0 Copy NKUS2000.NB0 DISC 1 1. Continued to the quick guide of KV-PX9 for the detail of checking the format and changing the format of the SD card. • Delete all files and folders on your PC. 2. Refer ...
Update Guide
Page 7
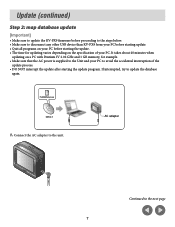
... the database again. Update (continued) Step 2: map database update [Important] • Make sure to update the KV-PX9 firmware before proceeding to the steps below. • Make sure to disconnect any other USB device than KV-PX9 from your PC before starting update. • Quit all programs on the specification of your PC to...
... the database again. Update (continued) Step 2: map database update [Important] • Make sure to update the KV-PX9 firmware before proceeding to the steps below. • Make sure to disconnect any other USB device than KV-PX9 from your PC before starting update. • Quit all programs on the specification of your PC to...
Update Guide
Page 12
Update (continued) 10. Disconnect the USB cable. KV-PX9 will automatically restart after finishing the update. 11. After restarting, confirm the software version of the unit (see "Confirming the software version of KV-PX9" on -screen instructions. Click "END" after disconnection. Otherwise the unit may be damaged. 12. Left-click the icon in the task bar, and follow the on the next page). 12 Make sure to unmount the unit from the PC.
Update (continued) 10. Disconnect the USB cable. KV-PX9 will automatically restart after finishing the update. 11. After restarting, confirm the software version of the unit (see "Confirming the software version of KV-PX9" on -screen instructions. Click "END" after disconnection. Otherwise the unit may be damaged. 12. Left-click the icon in the task bar, and follow the on the next page). 12 Make sure to unmount the unit from the PC.

Update Guide
Page 13
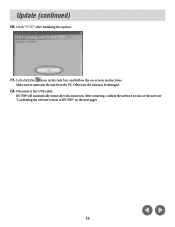
Press "INFO." 3. The version information of KV-PX9 1. Press Menu button. 2. Confirming the software version of the unit appears. Press "Version." The information appears as below after the update was finished successfully. 13
Press "INFO." 3. The version information of KV-PX9 1. Press Menu button. 2. Confirming the software version of the unit appears. Press "Version." The information appears as below after the update was finished successfully. 13