
Instructions
Page 6
Index Package Contents 7 Optional Accessories (Sold Separately 9 Installation for Car Use 12 "Professional" Installation 12 "Do it Yourself" Installation 15 Installation for Home Use 18 Connecting the Cigarette Lighter Adapter 19 Controls ...20 Getting to Know Your HD Radio Receiver 20 Getting to Know Your Remote Control 23 On-Screen Information 26 During HD Radio Mode 26 During FM/AM Mode 27 Menu Options 28 5
Index Package Contents 7 Optional Accessories (Sold Separately 9 Installation for Car Use 12 "Professional" Installation 12 "Do it Yourself" Installation 15 Installation for Home Use 18 Connecting the Cigarette Lighter Adapter 19 Controls ...20 Getting to Know Your HD Radio Receiver 20 Getting to Know Your Remote Control 23 On-Screen Information 26 During HD Radio Mode 26 During FM/AM Mode 27 Menu Options 28 5
Instructions
Page 8
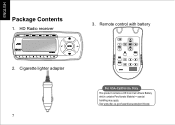
HD Radio receiver 3. Remote control with battery 2. Package Contents 1. Cigarette lighter adapter 7 For USA-California Only This product contains a CR Coin Cell Lithium Battery which contains Perchlorate Material special handling may apply. See www.dtsc.ca.gov/hazardouswaste/perchlorate
HD Radio receiver 3. Remote control with battery 2. Package Contents 1. Cigarette lighter adapter 7 For USA-California Only This product contains a CR Coin Cell Lithium Battery which contains Perchlorate Material special handling may apply. See www.dtsc.ca.gov/hazardouswaste/perchlorate
Instructions
Page 19
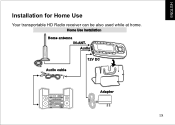
Installation for Home Use Your transportable HD Radio receiver can be also used while at home. 18
Installation for Home Use Your transportable HD Radio receiver can be also used while at home. 18
Instructions
Page 22
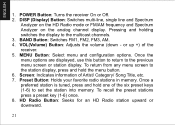
.... To recall the preset stations press a preset key (1-6) once. 8. POWER Button: Turns the receiver On or Off. 2. VOL(Volume) Button: Adjusts the volume (down - Screen: Indicates information of the receiver. 5. Pressing and holding switches the display to the previous menu screen or station display. or up...is tuned, press and hold the menu button. 6. DISP (Display) Button: Switches multi-line, single line and Spectrum Analyzer on the HD Radio mode or FM/AM frequency and Spectrum Analyzer on the analog channel display. Once the menu options are displayed, use this button to return ...
.... To recall the preset stations press a preset key (1-6) once. 8. POWER Button: Turns the receiver On or Off. 2. VOL(Volume) Button: Adjusts the volume (down - Screen: Indicates information of the receiver. 5. Pressing and holding switches the display to the previous menu screen or station display. or up...is tuned, press and hold the menu button. 6. DISP (Display) Button: Switches multi-line, single line and Spectrum Analyzer on the HD Radio mode or FM/AM frequency and Spectrum Analyzer on the analog channel display. Once the menu options are displayed, use this button to return ...

Instructions
Page 27
On-Screen Information During HD Radio Mode When your HD Radio receiver receives a digital (HD Radio) signal, the following information is indicated: Source indicator Frequency Station name HD indicator Digital signal indicator Artist Program Type Song title Equalizer Preset radio station 26
On-Screen Information During HD Radio Mode When your HD Radio receiver receives a digital (HD Radio) signal, the following information is indicated: Source indicator Frequency Station name HD indicator Digital signal indicator Artist Program Type Song title Equalizer Preset radio station 26
Instructions
Page 28
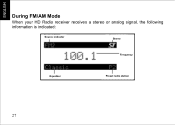
During FM/AM Mode When your HD Radio receiver receives a stereo or analog signal, the following information is indicated: Source indicator Stereo Frequency Equalizer Preset radio station 27
During FM/AM Mode When your HD Radio receiver receives a stereo or analog signal, the following information is indicated: Source indicator Stereo Frequency Equalizer Preset radio station 27
Instructions
Page 29
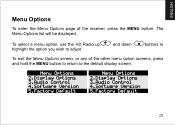
and down buttons to To exit the Menu Options screen, or any of the receiver, press the MENU button. The Menu Options list will be displayed. To select a menu option, use the HD Radio up highlight the option you wish to the default display screen. 28 Menu Options To enter the Menu Options page of the other menu option screens, press and hold the MENU button to return to adjust.
and down buttons to To exit the Menu Options screen, or any of the receiver, press the MENU button. The Menu Options list will be displayed. To select a menu option, use the HD Radio up highlight the option you wish to the default display screen. 28 Menu Options To enter the Menu Options page of the other menu option screens, press and hold the MENU button to return to adjust.
Instructions
Page 30
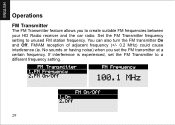
If interference is experienced, set the FM transmitter at a certain frequency. You can also turn the FM transmitter On and Off. FM/AM reception of adjacent frequency (+/- 0.2 MHz) could cause interference (ie. Set the FM Transmitter frequency setting to create suitable FM frequencies between your HD Radio receiver and the car radio. Operations FM Transmitter The FM Transmitter feature allows you set the FM Transmitter to a different frequency setting. 29 No sounds or having noise) when you to unused FM station frequency.
If interference is experienced, set the FM transmitter at a certain frequency. You can also turn the FM transmitter On and Off. FM/AM reception of adjacent frequency (+/- 0.2 MHz) could cause interference (ie. Set the FM Transmitter frequency setting to create suitable FM frequencies between your HD Radio receiver and the car radio. Operations FM Transmitter The FM Transmitter feature allows you set the FM Transmitter to a different frequency setting. 29 No sounds or having noise) when you to unused FM station frequency.
Instructions
Page 31
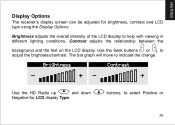
Brightness adjusts the overall intensity of the LCD display to adjust the brightness/contrast. Contrast adjusts the relationship between the background and the text on the LCD display. Use the HD Radio up and down Negative for brightness, contrast and LCD type using the Display Options. Use the Seek buttons ( or ), to help with viewing in different lighting conditions. The bar graph will move to select Positive or 30 Display Options The receiver's display screen can be adjusted for LCD display Type. buttons, to indicate the change.
Brightness adjusts the overall intensity of the LCD display to adjust the brightness/contrast. Contrast adjusts the relationship between the background and the text on the LCD display. Use the HD Radio up and down Negative for brightness, contrast and LCD type using the Display Options. Use the Seek buttons ( or ), to help with viewing in different lighting conditions. The bar graph will move to select Positive or 30 Display Options The receiver's display screen can be adjusted for LCD display Type. buttons, to indicate the change.
Instructions
Page 35
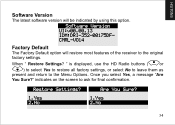
Once you select Yes, a message "Are You Sure?" Software Version The latest software version will restore most features of the receiver to the original factory settings. When " Restore Settings? Factory Default The Factory Default option will be indicated by using this option. indicates on the screen to the Menu Options. " is displayed, use the HD Radio buttons ( or ) to select Yes to restore all factory settings, or select No to leave them as present and return to ask for final confirmation. 34
Once you select Yes, a message "Are You Sure?" Software Version The latest software version will restore most features of the receiver to the original factory settings. When " Restore Settings? Factory Default The Factory Default option will be indicated by using this option. indicates on the screen to the Menu Options. " is displayed, use the HD Radio buttons ( or ) to select Yes to restore all factory settings, or select No to leave them as present and return to ask for final confirmation. 34


